
16. Layers
Layer basics
As we stated in Chapter 10, though it may appear as if all the items on a page occupy the same front-to-back position, in actuality, each item occupies a different position in the overall stacking order. Each new item is automatically positioned in front of all the existing items on the current layer.
Every layout has a Default layer, and all new items are placed onto that layer unless you create and choose a different one. Using the Layers palette ![]() , you can add up to 255 more layers, up to a maximum of 256 per layout. Layers don’t change how a layout looks or prints, but they make it much easier to edit items selectively
, you can add up to 255 more layers, up to a maximum of 256 per layout. Layers don’t change how a layout looks or prints, but they make it much easier to edit items selectively ![]() . In QuarkXPress, a layer spreads across all the pages of a layout.
. In QuarkXPress, a layer spreads across all the pages of a layout.

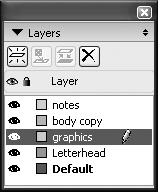
![]() The QuarkXPress Layers palette
The QuarkXPress Layers palette

![]() In this mock newsletter, the header, page number, and lines are from a master page, so they’re on the Default layer. The body text is on another layer, and the pictures are on yet another layer.
In this mock newsletter, the header, page number, and lines are from a master page, so they’re on the Default layer. The body text is on another layer, and the pictures are on yet another layer.
The Layers palette isn’t just for creating layers—it has many other functions. For example, you can also use the palette to hide distracting layers that you’re not working on, suppress the output of individual layers, or lock layers you’re not working on so you don’t edit items on them inadvertently. Other palette functions that you’ll learn about in this chapter include moving an item to a different layer, merging two or more layers, restacking layers, duplicating layers, and deleting layers.
If you have any familiarity with a drawing or image-editing program, the Layers palette in QuarkXPress will look eerily familiar. Aside from a few unique button icons and hidden context menu commands, it’s the same basic concept (a layers palette is a layers palette is a layers palette).
Every layout has a Default layer automatically, and all items are placed on that layer unless you create items on, or move items to, a different layer. You can add up to 255 layers to a layout; each layout has its own layers. Each newly created layer is automatically placed in front of the currently active layer in the layout, and in front of any and all existing items on that layer. On the Layers palette, a new layer will be listed directly above the previously active layer. A layer’s stacking position can be changed at any time.
To create a layer
- Open the Layers palette (Window > Show Layers).
- Click the New Layer button
 at the top of the Layers palette.
or
Control-click/Right-click anywhere on the layer list on the Layers palette and choose New Layer from the context menu.
The new layer will be the active layer, and it will be stacked directly above the previously active layer. The Edit icon
 appears next to the name of the currently active layer
  .
.
To create an item on a layer
- Click a layer name on the Layers palette (the Edit icon will appear).
- Create the item. The item will appear on that layer. That’s all there is to it. Note the color coding system: The visual indicator in the upper-right corner of the item matches the color square of the item’s layer (see the next page).
Tip
Before dragging an item from a library to a layout, choose the layer you want the item to appear on.
• Master pages can have only one layer: the Default layer. To drive this point home, display a master page in the project window. The Layers palette becomes dimmed.
• On layout pages, items from master pages are automatically placed on the Default layer behind any non-master items, regardless of whether the master items or non-master items were created or appeared first. You can restack any master or non-master item manually within its layer.
• And finally, if you move a master item on a layout page from the Default layer to another layer, it will cease to be associated with the master page or function as a master item. You’ll get a prompt ![]() , though, so you’ll have a chance to change your mind.
, though, so you’ll have a chance to change your mind.

![]() This prompt will appear if you move a master item on a layout page from the Default layer to a different layer.
This prompt will appear if you move a master item on a layout page from the Default layer to a different layer.
Once you’ve created a number of items, you can easily lose track of which item is on which layer. Thankfully, there are several ways to find out which layer an item is on.
To find out which layer an item is on
In QuarkXPress 7, the bounding box of every item is displayed in the color of the layer it belongs to ![]() . (This replaces the old system of “Visual Indicators” in previous versions of the program.) If the bounding boxes aren’t visible, make sure that View > Guides is checked.
. (This replaces the old system of “Visual Indicators” in previous versions of the program.) If the bounding boxes aren’t visible, make sure that View > Guides is checked.

![]() The color of an item’s bounding box matches the color square for that item’s layer on the Layers palette.
The color of an item’s bounding box matches the color square for that item’s layer on the Layers palette.
or
Choose the Item or Content tool, then click an item in a layout. Now look for the Item icon ![]() on the Layers palette. That’s the item’s layer
on the Layers palette. That’s the item’s layer ![]() . If items are selected from more than one layer, you’ll see more than one Item icon.
. If items are selected from more than one layer, you’ll see more than one Item icon.
To select all the items on a layer
Control-click/Right-click a layer name on the Layers palette and choose Select Items on Layer. This command isn’t available for locked or hidden layers.
Follow these instructions if you want to move an existing item from one layer to another.
To move an item to a different layer
- Choose the Item tool or Content tool.
- In the project window, select the item you want to move . You can also select multiple items for moving, as long as they’re all on the same layer.
- Drag the Item icon
 upward or downward to the desired layer name.
or
Click the Move Item to Layer button
 on the Layers palette, choose the layer you want to move the item(s) to from the Choose Destination Layer menu, then click OK
  –
– . From the Choose Destination Layer menu, choose the layer you want to move the item to.


Tip
You can also cut and paste an item or items from one layer to another.
To copy an item to another layer
- Using the Item or Content tool, select the item you want to copy in the project window. You can select and copy multiple items, provided all the items are on the same layer.
- Control-drag/Ctrl-drag the Item icon on the Layers palette to the desired layer. The duplicate item will appear in the same x/y position as the original, the item on the lower layer hidden behind the item on the higher layer.
When you duplicate a layer, all the items on that layer are copied to the duplicate, and appear in the same x/y position.
To duplicate a layer in the same layout
Control-click/Right-click a layer on the Layers palette and choose Duplicate [layer name] from the context menu ![]() –
–![]() . The duplicate layer will appear above the original layer and will have a different color. In Mac, the word “copy” will be added to the name; in Windows, it will have a “Copy of” prefix.
. The duplicate layer will appear above the original layer and will have a different color. In Mac, the word “copy” will be added to the name; in Windows, it will have a “Copy of” prefix.

![]() Choose Duplicate Layer from the context menu.
Choose Duplicate Layer from the context menu.

![]() The duplicate layer appears above the layer that was copied.
The duplicate layer appears above the layer that was copied.
The following is one of those quick-and-dirty, sort of works, sort of doesn’t methods. It’s a repeat of what we showed you on page 193, but this time with more information about layers. If you drag-copy an item from one project to another (or between layouts in the same project), that item’s layer will copy to the target project too—unless a layer of the same name already exists in the target layout. In the latter case, the item will be copied but not the layer. Unselected items on the source layer won’t copy.
To copy an item and its layer from one project to another
- Open two projects.
- Choose the Item tool (or hold down Cmd/Ctrl if the Content tool is chosen).
- Drag an item, multiple-item selection, or group from a layout in the source project window into the target project window. This can be undone.
If the target layout doesn’t have a layer of the same name, the item’s layer will be copied to the target project. If the target layout does have a layer of the same name, the item will be copied but it will be placed on the layer of the same name in the target layout; no new layers will be added. The duplicate item(s) will appear in front of all the existing items on the existing or newly copied layer in the target project.
When you move a layer frontward or backward (upward or downward on the palette, actually), all the items on the layer move to a new stacking position in the layout.
Note: To change the stacking position of an item within a layer, use the Item > Send to Back, Send Backward, Bring to Front, or Bring Forward command. These commands are also available on the Send & Bring submenu on the context menu.
To restack a layer
On the Layers palette, drag a layer upward or downward (no modifier keys are required) ![]() –
–![]() . You can restack the dragged layer above or below the Default layer. The layout will redraw to reflect the new stacking position. The layer will keep its original name or number.
. You can restack the dragged layer above or below the Default layer. The layout will redraw to reflect the new stacking position. The layer will keep its original name or number.

![]() Drag a layer up or down to change its position in the stack.
Drag a layer up or down to change its position in the stack.
![]() The “graphics” layer was moved lower in the stack.
The “graphics” layer was moved lower in the stack.
Every layer except the Default layer is automatically assigned its own color, but you can assign a color of your own choosing. Why? Perhaps a layer’s color is similar to the color of the items on the layer, and it’s visually confusing. You can also use the Attributes dialog box to change a layer’s name to help you remember or identify what it contains.
To change a layer’s name or color
- Double-click a layer name on the Layers palette.
or
Control-click/Right-click a layer name and choose Edit [layer name] from the context menu.
- Change the layer Name (the field will be automatically selected) .
You can use the Attributes dialog box to change a layer’s name or color.
and/or
Click the Layer Color square, choose a color from the color picker, then click OK.
- Click OK. (The other options in the Attributes dialog box are discussed elsewhere in this chapter.)

You can choose whether the current Runaround settings will be preserved for text on visible layers, even if the items the text is wrapping around are hidden ![]() . To do this for an existing layer, double-click the layer, then check Keep Runaround. To turn this option on or off for future layers, check Keep Runaround in QuarkXPress (Edit, in Windows) > Preferences > Print Layout > Layers.
. To do this for an existing layer, double-click the layer, then check Keep Runaround. To turn this option on or off for future layers, check Keep Runaround in QuarkXPress (Edit, in Windows) > Preferences > Print Layout > Layers.

![]() Keep Runaround is in effect on the picture layer, even though that layer is currently hidden.
Keep Runaround is in effect on the picture layer, even though that layer is currently hidden.
Hiding layers
Although it may not occur to you at first, the ability to lock and hide layers can really come in handy, particularly if your layout contains a lot of layers. Hiding the layers you’re not working on can boost your ability to focus on the layers that you are working on. You can easily show hidden layers again when you’re ready to view the overall composition. (To lock layers, see the following page.)
Note: Hidden layers don’t print by default, but you can enable printing for them in the Print dialog box (see page 388).
To hide/show layers individually
On the Layers palette, click the Visible (eye) icon ![]() for each layer you want to hide
for each layer you want to hide ![]() . Items on the layer will disappear from view, and the layer names will become italicized. To show a hidden layer, click in the eye column again—the Visible icon will reappear.
. Items on the layer will disappear from view, and the layer names will become italicized. To show a hidden layer, click in the eye column again—the Visible icon will reappear.

or
Double-click a layer name, uncheck Visible, then click OK. Retrace your steps to make the layer visible again.
To hide/show all the layers in a layout
Control-click/Right-click anywhere on the layer list on the Layers palette and choose Hide All Layers or Show All Layers from the context menu.
To hide all the layers except one
On the Layers palette, click the layer you want to keep visible, then Control-click/Ctrl-click the layer’s Visible icon.![]() (Repeating this step won’t make the layers redisplay; see the next set of instructions.)
(Repeating this step won’t make the layers redisplay; see the next set of instructions.)
or
Control-click/Right-click the layer you want to keep visible and choose Hide Other Layers from the context menu.
To redisplay all layers
Control-click/Right-click the Layers palette and choose Show All Layers from the context menu.
Locking layers
Objects on a locked layer can’t be selected, moved, or unlocked individually. You can’t create new items on a locked layer, or select items on a locked layer by any method (clicking, Cmd-Option-Shift/Ctrl-Alt-Shift clicking, marqueeing, or Edit > Select All). Locking a layer also seals it off, meaning items can’t be moved into it or out of it.
Note: The Check Spelling, Find/Change, Picture Usage, Style Sheets, H&Js, indexing, and list features do affect items or text on locked layers. Also, text on a locked layer may reflow if it happens to be linked to text that’s edited on an unlocked layer.
To lock/unlock one layer
On the Layers palette, click in the second column for the layer you want to lock ![]() . A Lock icon
. A Lock icon ![]() will appear and, if that layer is selected, a red slash will appear on the pencil icon. All the items on that layer will now be locked. To unlock a layer, click in the lock column again.
will appear and, if that layer is selected, a red slash will appear on the pencil icon. All the items on that layer will now be locked. To unlock a layer, click in the lock column again.

or
Double-click the layer you want to lock, check Locked, then click OK.
Tip
If you unlock a layer, any items that were locked individually via Item > Lock prior to the layer being locked will remain so.
To lock all the layers except one
Control-click/Ctrl-click in the second column for the layer that you want to keep unlocked ![]() . (Repeating this step won’t unlock all the layers; see the next set of instructions.)
. (Repeating this step won’t unlock all the layers; see the next set of instructions.)

To lock/unlock all layers
Control-click/Right-click the Layers palette, then choose Lock All Layers or Unlock All Layers from the context menu.
Deleting layers
If you delete a layer that contains items, you can tell the program to either delete the items entirely or preserve them on one of the remaining layers. Every layout must be left with one layer, but it doesn’t necessarily have to be the Default layer.
To delete a layer or layers
- Click the layer you want to delete. Or to delete multiple, consecutive layers, click a layer, then Shift-click the last layer in the series; or Cmd-click/Ctrl-click nonconsecutive layers. Next, click the Delete Layer button at the top of the Layers palette.
or
To delete one layer, Control-click/Right-click the layer you want to delete and choose Delete [layer name] from the context menu.
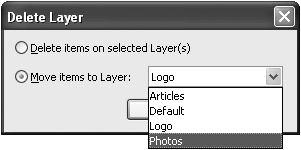
- If any of the layer(s) you’re deleting contain items, the Delete Layer dialog box will open :
Click Delete items on selected Layer(s) to have all the items on the selected layer(s) be deleted from the layout.
If you want to save the items from a layer you’re deleting, choose the layer you want to move the items to from the Move items to Layer menu.or
Click Move items to Layer and then, from the pop-up menu, choose which layer you want the items from the deleted layer or layers to be moved to (not a locked layer).
- Click OK. You can undo this.
Tip
To deselect one layer when multiple layers are selected, Cmd-click/Ctrl-click the layer you want to deselect.
To delete all layers that don’t contain any items
Control-click/Right-click the Layers palette and choose Delete Unused Layers from the context menu.
You can merge layers together periodically as you work on a layout, or you can do it all at once when your layout is done. Good news! The Merge command can be undone.
To merge layers
- Click, then Shift-click the consecutive layers you want to merge or Cmd-click/Ctrl-click nonconsecutive layers. Make sure none of the layers you want to merge are locked.
Shift-click the layers you want to merge, then click the Merge Layers button.
- Click the Merge Layers button
 at the top of the palette. The Merge Layer dialog box opens.
 - From the Choose Destination Layer menu , choose the layer you want the selected layers to merge into, then click OK . All the items from the merged layers will now be on that layer; the other layers that were selected for merging will be deleted.
From the Choose Destination Layer menu, choose which layer you want the selected layers to be merged into. The “Articles” and “Photos” layers were merged into the “Photos” layer.


Let’s say you want to print a text layer but not a layer that contains pictures, or you’ve created a layer that contains “sticky” notes that’s not supposed to print. You can prevent a layer from printing via the Layers palette (discussed below) or, more easily, via the Print dialog box (see page 392). The Suppress Output command also affects the export of layers in Web layouts.
To prevent a layer from being output
- Double-click the layer you want to prevent from being output.
- Check Suppress Output.
- Click OK. The layer name will now appear in italics.
Tip
To prevent just an individual item from outputting—not a whole layer—select the item, choose Item > Modify, then check Suppress Output. (Or to output a picture box frame, if any, but not the picture itself, check Suppress Picture Output in the Picture pane instead.) The Suppress Output setting in Item > Modify overrides the Suppress Output setting on the Layers palette.