
17. Search and Replace
Word processing in QuarkXPress
This chapter covers QuarkXPress’s global search and replace features—features that you may be familiar with from word processing applications: Check Spelling, Find/Change, and Font Usage. We’ll begin with spelling.
A series of selected words, a story, or a whole layout can be checked for spelling errors. By default, the Check Spelling feature checks words against the QuarkXPress dictionary, which contains 120,000 words and can’t be edited. In addition, you can create your own auxiliary dictionary or open an existing one for use in conjunction with the QuarkXPress dictionary. Unlike the QuarkXPress dictionary, auxiliary dictionaries can be edited.
Only one auxiliary dictionary can be open at a time, but a layout can be checked for spelling more than once, each time with a different auxiliary dictionary open. And the same auxiliary dictionary can be used with any layout. You can check a layout without using an auxiliary dictionary, but you’ll save time in the long run if you get in the habit of using one.
The last auxiliary dictionary that you create or open for a layout will remain associated with that layout until you close the dictionary or open another one while that layout is open. An auxiliary dictionary will also become disassociated from a layout if you move it from its original location. A different auxiliary can be associated with each layout within a project.
Checking spelling
Note: If you create an auxiliary dictionary when no projects are open, it will become the default auxiliary dictionary for future projects and any new layouts that you add to existing projects.
To create an auxiliary dictionary
- Choose Utilities > Auxiliary Dictionary.
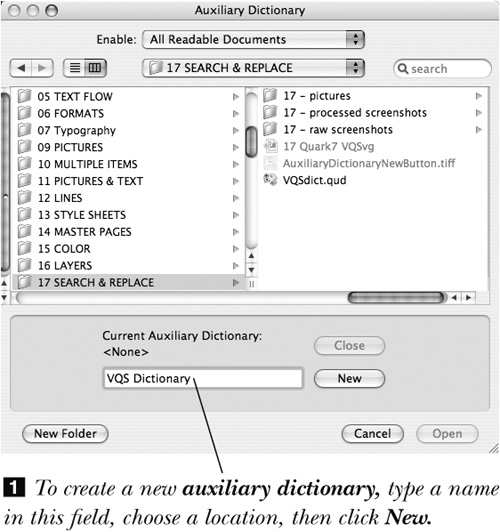
- Type a name for the new auxiliary dictionary in the first field in the Auxiliary Dictionary dialog box
 .
.
- Choose a location for the dictionary.
- Click New. Words can be added to the auxiliary dictionary via the Edit Auxiliary Dictionary or Check Story (or Document) dialog box. We’re going to show you how to do both.
To open an existing auxiliary dictionary
- Choose Utilities > Auxiliary Dictionary.
- Locate and click the dictionary that you want to open
 .
.
- Click Open (Return/Enter).

Tip
Click Close in the Auxiliary Dictionary dialog box to disassociate the currently open auxiliary dictionary from the active project.
To check the spelling of a word, selection, story, or layout
- Optional: Choose a large display size for your layout so you’ll be able to decipher words easily, and make the window smaller so it scrolls quickly. Only the currently displayed layout will be checked—not the whole project.
- Open an existing auxiliary dictionary or create a new one.
- Choose the Content tool.
- Do one of the following:
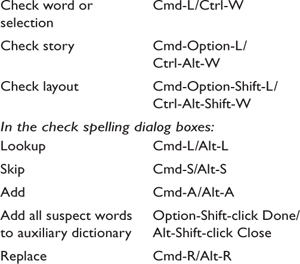
To check the spelling of a word or selection, click in a word or select some text, then choose Utilities > Check Spelling > Word or Selection (Cmd-L/Ctrl-W). Single-letter words (e.g., “a” and “I”) can’t be checked.
To check a story for spelling errors, click in the story, then choose Utilities > Check Spelling > Story (Cmd-Option-L/Ctrl-Alt-W).
To check a whole layout, choose Utilities > Check Spelling > Layout (Cmd-Option-Shift-L/Ctrl-Alt-Shift-W). The contents of text boxes, tables, and paths will be checked in the order in which those items were created—not according to their location in the layout.
To check the master pages, display that master page, then choose Utilities > Check Spelling > Masters (Cmd-Option-Shift-L/Ctrl-Alt-Shift-W).
- Click OK in the Word Count dialog box .
Click OK in the Word Count dialog box to start spell-checking.
- The first Suspect Word will appear at the top of the Check [Word, Selection, Story, Document, or Masters] dialog box. Do any of the following:
If a word (or words) similar to the current Suspect Word is found in the QuarkXPress dictionary or in an open auxiliary dictionary, it will appear on the scroll list, and the program’s best guess as an appropriate or likely substitute word will appear in the Replace With field. If you’re satisfied with the Replace With word, just click Replace.
or
Double-click a word on the scroll list
, if any are listed; or click a word on the scroll list, then click Replace. To expand the list of potential substitute words, click Look Up (Cmd-L/Alt-L). This button will be dimmed if no similar words are found in the QuarkXPress dictionary or in the currently open auxiliary dictionary.Click Look up to see a list of similarly spelled words; or click Add to add a Suspect Word to the currently open auxiliary dictionary; or click Skip to pass over a Suspect Word entirely.
No close approximation of the word “frumious” was found in the QuarkXPress dictionary or in an open auxiliary dictionary, so the Look Up button is dimmed.or
In the Replace With field, correct the spelling of the recommended replacement word or type a different word, then click Replace (Alt-R in Windows).
or
Click Skip (Cmd-S/Alt-S) to skip over all instances of the current word entirely (no change).
or
Click Add to add the Suspect Word to the currently open auxiliary dictionary (no change).
- Optional: Check Search Locked Content to include locked text items in the search. You can’t correct misspellings in locked content. (When you’re done spell-checking, you can choose Item > Lock > Story to unlock the content.)
- To end the check spelling process at any time, click Done/Close (Esc).


Tip
After the spelling of a word is checked once, any other instances of that word are treated in the same manner.
Tip
Option-Shift-click/Alt-Shift-click the Done/Close button to add all the Suspect Words to the currently open auxiliary dictionary (this also closes the dialog box and ends the check spelling session). After doing this, be sure to open the auxiliary dictionary and inspect it (Utilities > Edit Auxiliary).
Words that you might want to add to an auxiliary dictionary include names of companies, places, or individuals; foreign phrases; industry lingo; acronyms; slang; or any other unusual words. If, while spell-checking, the program encounters a word that’s contained in an open auxiliary dictionary, it will ignore it rather than call it suspect, thus speeding up the process and providing a more accurate spell-check. You can’t edit words in the Edit Auxiliary Dictionary dialog box—only delete or add them. It’s a primitive little system.
To edit an auxiliary dictionary
- Make sure the auxiliary dictionary you want to edit is open (use Utilities > Auxiliary Dictionary, if necessary).
- Choose Utilities > Edit Auxiliary.
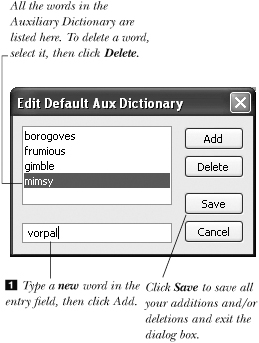
- Type a new word in the entry field , then click Add (Return/Enter). Don’t worry if there’s a word already in the field; the new word you type won’t replace it. A few rules:
Spaces (e.g., “ad lib”) aren’t permitted.
Compound words (e.g., “e-mail”) aren’t permitted.
Punctuation isn’t permitted, except for apostrophes (e.g., you could enter “won’t” but not “.com”).
Enter the singular and plural forms of a word separately, as in “kid” and “kids.”
Foreign language characters (e.g., é, ü, and ô) are permitted.
Don’t bother typing any uppercase characters, as only one version of each word can be entered.
- To remove any word, click it, then click Delete.
- Click Save.
Tip
You can also add a Suspect Word to an open auxiliary dictionary by clicking Add in the Check [Word, Selection, Story, Document, or Masters] dialog box.
Find/Change
The Find/Change command searches for and replaces text, text attributes, or style sheets in the currently active layout. Choices made on the left side of the Find/Change palette define the text or attributes to be searched for; choices made on the right side define what the text or attributes will be changed to.
To find and change spaces, characters, style sheets, or attributes
- To limit the search to a story, choose the Content tool and click in a story.
If you’re going to search for type attributes, (e.g., point size, style) click in a word that contains those attributes. They will automatically register in the Find What area of the Find/Change palette if you uncheck Ignore Attributes.
- Choose Edit > Find/Change (Cmd-F/Ctrl-F).
- To search the entire layout, regardless of which page is currently displayed, check Layout. Uncheck Layout to search from the current cursor position forward. Regardless of whether this option is checked or not, only the currently displayed layout will be searched.
- Note: To find/change only text characters, follow this step and skip step 5. To find/change attributes only—not text characters—skip this step. To find/change text characters and attributes, follow both this step and step 5.
To change text characters, type up to 80 characters or spaces in the Find What field (the text to be searched for)
. If Ignore Attributes is unchecked, check Text, then enter text in the Find What field.Optional: Uncheck Whole Word to also search for any Find What text that may be embedded in a larger word.
Optional: Uncheck Ignore Case to search for only an exact match of the upper and lowercase configuration that was entered in the Find What field.
Optional: Check Search Locked Content to include locked stories in your search (Item > Lock > Story). Naturally, you won’t be able to change any of the text you find unless you unlock the story.
- To find/change attributes in addition to or instead of text characters, uncheck Ignore Attributes. Then, on the left side of the palette, do any of the following:
To search for instances of a character or paragraph style sheet, check Style Sheet, then choose from the menu.
To search for a font, check Font, then start typing a font name or choose from the menu.
To search for a specific point size, check Size, then enter a size or choose from the menu.
To search for a color, check Color, then choose a color from the menu.

To search for type styles, check Type Style, then click any style button to search for that style (make the button black; you may need to click it twice). Leave a style button white to exclude it from the search. A dimmed style, if found, won’t be changed.
To search for characters that have been assigned a language, check Language and choose from the menu.
To search for characters in text that has ligatures enabled, check Ligatures.
To search for characters by their OpenType features, check OpenType and click the triangle, then check the individual features to search for. The OpenType check boxes have three states: checked (find), unchecked (don’t find), and a hyphen (ignore).
Be sure to uncheck any category that you want the search to ignore.
- On the Change To side of the palette, do any of the following :
Check Text, if necessary, then enter up to 80 characters or spaces of replacement text in the Text field. Or leave this field blank to have all instances of the Find What text be deleted (yes, deleted!).
If Ignore Attributes is unchecked, you can choose a replacement style sheet, font, point size, color, or type style. An activated (black) Type Style will be applied to the text; an inactive style will be removed from the text; a dimmed style will be ignored (no change). Click the P, for Plain, to remove all the styles. Again, be sure to uncheck the box for any category that you want the replace to ignore.
- Now, to begin the search:
Hold down Option/Alt and click Find First to search for the first instance of the Find What text in the current layout.
or
Click Find Next to search for the next instance of the Find What text, starting from the current cursor location.
If no instances (or no more instances) are found of the Find What text and/or attributes, a beep will sound.
- Click the Change, then Find button to change the current instance and search for the next instance in one step.
or
Click Change to change the current instance, then click Find Next to resume the search.
or
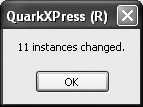
Click Change All to change all the instances in one fell swoop. A prompt displaying the number of found instances will appear
. Click OK. A summary will appear after you click Change All.Optional: If a prompt appears saying, “Search will start at the beginning...,” you can click Yes or No.
- You can edit your layout and zoom in or out while the Find/Change palette is open. To close it, press Cmd-Option-F/Ctrl-Alt-F or click the Close button.


Tip
To use Find/Change on a master page, display that master page, then check Masters on the Find/Change palette.
Use Find/Change to apply a style sheet
The instructions on this page elaborate on the instructions for Find/Change, which are found on the previous three pages.
You can use Find/Change to apply a character style sheet to type that has already been locally formatted. On the left side of the Find/Change palette, choose the font and other type attributes that you want the program to search for ![]() . On the right side, choose the character style sheet to be applied to that locally formatted text, and, for Type Style, click P (plain)
. On the right side, choose the character style sheet to be applied to that locally formatted text, and, for Type Style, click P (plain) ![]() .
.
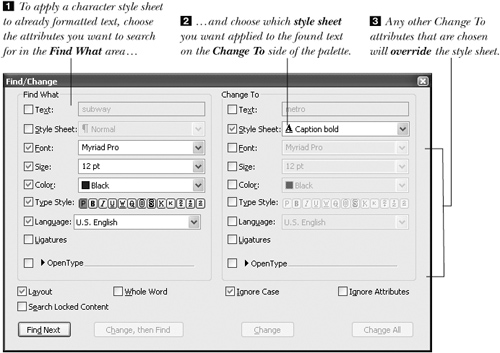
If, in addition to choosing a style sheet, you also choose other text attributes on the Change To side of the palette, those attributes will override the style sheet specs ![]() . For example, let’s say you want to apply a subhead character style sheet but you don’t like the style sheet’s font size. Just check the Size box on the Change To side of the palette and enter the desired size. In essence, you’ll be applying a style sheet and local formatting in one lightning-quick step.
. For example, let’s say you want to apply a subhead character style sheet but you don’t like the style sheet’s font size. Just check the Size box on the Change To side of the palette and enter the desired size. In essence, you’ll be applying a style sheet and local formatting in one lightning-quick step.
If you want to search for locally formatted text in addition to a style sheet, choose those text attributes in the Find What area of the Find/Change palette, too.
Note: Usage > Fonts replaces all instances of a font within the currently displayed layout. If you want to replace font instances on a case-by-case basis, use the Find/Change feature instead.
To find and change fonts only
- Choose Utilities > Usage (F13/F2), then click Fonts in the list at left. The names of all the fonts used in the layout will be listed in the Fonts pane at the right (that is, except for fonts used in any imported EPS files).
- Click the name of the font you want to replace (or click the first in a series of consecutively listed fonts, then Shift-click the last font in the series, or Cmd-click/Ctrl-click some individually), then click Replace .
or
Double-click the name of the font that you want to replace.
- Start typing the name of a replacement font or choose a replacement font from the menu, then click OK. When the alert dialog box appears, click OK.
- Repeat steps 2–3 for any other fonts you want to replace.
- Optional: Click Show First to display the first instance of the currently selected font in the layout, then click Show Next to see the next instance, or hold down Option/Alt to turn the Show Next button into a Show First button. Remember, all instances of a given font will be replaced, regardless of which instance is currently displayed on your screen.
Check More Information to display the PostScript Name, File Name (and location), Type, and Version number of the currently selected font.
- Click Done/Close to exit the dialog box.
