
18. Béziers
Bézier basics
All Bézier items are composed of the same building blocks: straight and/or curved line segments, connected by points. Each point on a curved segment has two rabbit-ear curve handles attached to it that control the shape and direction of the curve. Béziers are defined by mathematical formulas, but the math is done for you.
QuarkXPress offers a whole slew of tools for creating custom-shaped Bézier boxes, lines, and text paths: three Bézier Picture Box tools, two Bézier Text Box tools, two Bézier Line tools, and two Bézier Text-Path tools. Each Bézier tool creates an item with a distinctive function—e.g., a closed shape to contain text or a picture, an open line on which to place text, or a decorative, freely drawn line. Once you learn how to use them, you’ll be able to draw any shape under the sun.
All Bézier items are reshaped using the same techniques: by manipulating their segments, points, and curve handles ![]() –
–![]() . Furthermore, as you’ll see by the end of this chapter, you can convert any type of shape into any other type of shape—a line into a box, a picture box into a text box, etc.
. Furthermore, as you’ll see by the end of this chapter, you can convert any type of shape into any other type of shape—a line into a box, a picture box into a text box, etc.

![]() With Item > Edit > Shape off, you can resize or change an item’s overall shape by dragging any of the eight handles on its bounding box.
With Item > Edit > Shape off, you can resize or change an item’s overall shape by dragging any of the eight handles on its bounding box.

![]() With Item > Edit > Shape on, all of an item’s individual points and curve handles are accessible for reshaping.
With Item > Edit > Shape on, all of an item’s individual points and curve handles are accessible for reshaping.
In the first part of this chapter you’ll learn many techniques for creating Bézier items. Once you master these, you’ll most likely use an assortment of them, along with some keyboard shortcuts, as you draw different kinds of items. Later in the chapter you’ll learn how to reshape and combine Bézier items and how to manipulate text on a Bézier path.
The Bézier tool chest

The Bézier Picture Box tools

The Bézier Line tools
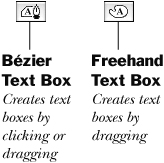
The Bézier Text Box tools

The Bézier Text-Path tools

![]() Handles on a smooth point can be of different lengths.
Handles on a smooth point can be of different lengths.
![]() Handles on a symmetrical point are always of equal length.
Handles on a symmetrical point are always of equal length.

![]() Handles on a corner point can be moved in different directions and can be of different lengths.
Handles on a corner point can be moved in different directions and can be of different lengths.
Bézier settings on the Measurements palette

These palette features are available when a point is selected on a Bézier text box and Item > Edit > Shape is on.
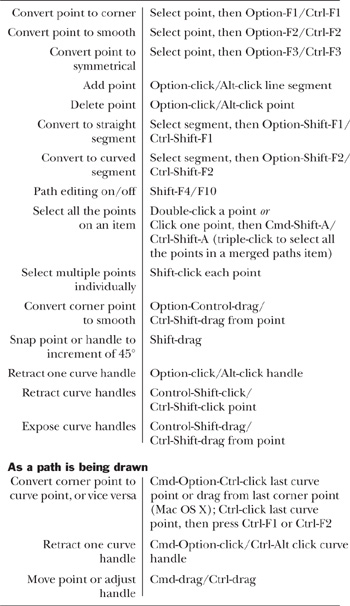
The Bézier shortcuts
If you’re new to Béziers, skip this page for now. Once you’ve learned the Bézier fundamentals and you’re ready to speed things up, come back and add some of these shortcuts to your repertoire.
Drawing Bézier items
When you click with a Bézier tool, corner points are created.
To draw a straight-sided Bézier line or text path
- Choose the Bézier Line
 or Bézier Text-Path tool.
- Click to create an anchor point.
- Click to create additional points
 . Shift-click to constrain a segment to an increment of 45°. Straight line segments will connect the points.
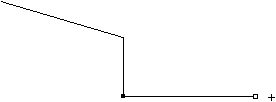
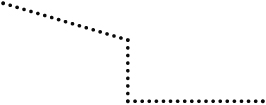
Click—don’t drag—to create points connected by straight segments.
. Shift-click to constrain a segment to an increment of 45°. Straight line segments will connect the points.
Click—don’t drag—to create points connected by straight segments. - To end the path, select another tool or double-click when you create the last point
 –
– . (More about text paths later in this chapter.)
Change the width, style, or color of a Bézier line as you would any other line (see Chapter 12). On a text path, enter and style your text as you would text in a box.
. (More about text paths later in this chapter.)
Change the width, style, or color of a Bézier line as you would any other line (see Chapter 12). On a text path, enter and style your text as you would text in a box.

Tip
To delete a path as you’re creating it, press Cmd-K/Ctrl-K.
Tip
Normally, a Bézier tool will switch to the Item or Content tool as soon as one path is completed. If you Option-click/Alt-click a Bézier tool, it will stay selected so you can draw multiple paths (end each path by double-clicking).
To draw a straight-sided Bézier picture box or text box
- Choose the Bézier Picture Box
 or Bézier Text Box tool.
- Click to create an anchor point.
- Click to create additional points. Straight line segments will connect the points.
- To close the box, choose another tool.
or
Create the last point by double-clicking (not necessarily over the first point). A segment connecting this last point and the first point will be created.
or
Click the starting point
 –
– . One way to close a Bézier box is by clicking back on the starting point. You can use guides to help you place points. A Bézier text box

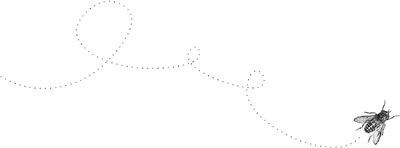
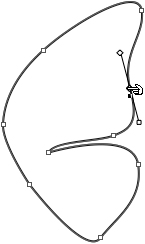
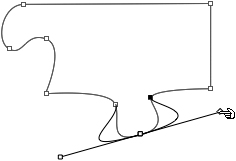
If you like to draw in a freeform manner, try using one of the freehand Bézier tools. They lend themselves to natural subjects—flora and fauna—more than to geometric subjects. Keep your mouse button down for as long as you want the line to go.
To draw a freehand box, line, or text path
- Choose the Freehand Picture Box
 , Freehand Line
  , Freehand Text Box
  , or Freehand Text-Path tool.
Tip
Option-choose/Alt-choose a tool if you want to draw multiple, separate items without having to choose the tool again.
- Drag to draw a path. To close a freehand box, just release the mouse—the path will close automatically, and a line segment will join the first and last points –. Or move the pointer back over the starting point and then release the mouse.
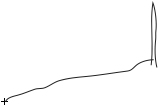
To draw with any Freehand tool, drag with the mouse button down for as long as you want the line to extend. If you’re using the Freehand Picture Box or Freehand Text Box tool, when you’re ready to close a box, release the mouse or drag back over the starting point. With the Freehand Line or Freehand Text-Path tool, you can make little separate marks, or draw one long, wiggly string as in this illustration. Release the mouse to end an open path.
To end a line, just release the mouse.

Tip
If you want to trace an imported picture, put it on a locked layer by itself. To lighten the picture to make it easier to trace, use Style > Opacity.
To delete a Bézier item
- Choose the Item tool.
- Click the path you want to delete, making sure no individual points or segments are selected.
- Choose Item > Delete (Cmd-K/Ctrl-K).
or
Press Delete/Backspace.
Note: You can also delete an item with the Content tool selected, using Item > Delete (Cmd-K/Ctrl-K).
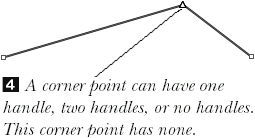
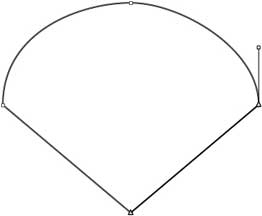
In these instructions, you’ll learn how to draw curves with symmetrical points. Symmetrical points always have handles of equal length, and they produce the least bumpy curves. (Smooth points, by comparison, have handles that move in tandem but can be of different lengths; and corner points can have one, two, or zero handles.)
To draw curved segments connected by symmetrical points
- Choose the Bézier Picture Box , Bézier Line , Bézier Text Box , or Bézier Text-Path tool.
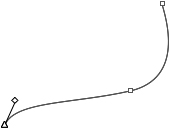
- Drag to create a point. The shape of the curved segment and the angle of the curve handles that control the segment will be defined by the length and direction you drag the mouse.
- Release the mouse and reposition it away from the first point. Drag in the direction you want the curve to follow to create a second point . The points will now be connected by a curved segment. Remember, you can always reshape the curves later on.
To draw curves, drag in the direction you want the curve to follow.
- Drag to create additional points and handles (or click at any time to add corner points).
- To close a picture box or text box :
Choose another tool (the final segment will be drawn automatically).
or
Double-click at the location where you want the last point to appear.
or
Click once on the starting point (you’ll see a close box pointer
 ). The completed picture box


To end (not close) a line or text path:
Choose another tool.
or
Double-click to create the last point.
(To join the endpoints of a line or text path and thus convert it to a closed shape, see page 321.)
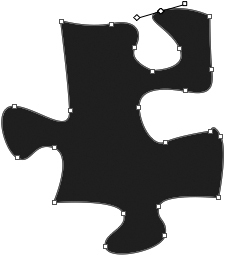
On these pages we’ve broken down the creation of straight and curved segments into separate instructions to make it as clear as possible. When you’re actually drawing items, you’ll usually use a combination of techniques—draw a straight segment, then a curve, then maybe retract a handle, adjust a handle, and so on. Once you’re comfortable creating the basic elements, get some practice under your belt by drawing the puzzle piece illustrated on page 303 or some other shape that will require you to create symmetrical, smooth, and corner points.
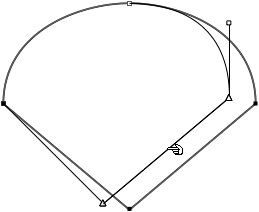
To draw curved segments connected by corner points
- Choose the Bézier Picture Box , Bézier Line , Bézier Text Box , or Bézier Text-Path tool.
- Drag to create the first point.
- Drag to create a second point.
- Cmd-Option-click/Ctrl-Alt-click either of the last created curve handles (the handle you click will disappear) –.
If at any point while drawing a shape you want to convert a symmetrical or smooth point into a corner point, Cmd-Option-click/Ctrl-Alt-click one curve handle of the last pair that was created. The handle disappears. Now you can resume drawing the rest of the path.
- Repeat steps 3 and 4 until the shape is completed .
When a corner point connects two curved segments, the curved segments come together at an angle.


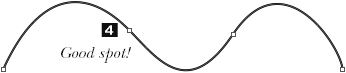
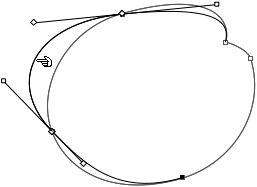
If you want your curves to be nice and smooth, place your points where a curved segment changes direction to meet another curved segment ![]() , not at the peak of a curve
, not at the peak of a curve ![]() .
.
Tip
Drag to draw curves in the same item (omit the Cmd-Option-click/Ctrl-Alt-click step). Or to draw straight segments, click without dragging.
Corner points have handles that can be moved independently of each other.
To convert a smooth or symmetrical point to a corner point
- Choose the Item or Content tool.
- Click a point on a Bézier item.
- Option-Control-drag/Ctrl-Shift-drag a curve handle. Now the handles can be adjusted separately (no need to hold any keys down).
No, it’s not your imagination—the Item > Shape submenu was discussed earlier in this book. Here it’s used to convert a standard box or line into a Bézier box or line.
To convert a standard box or line into a Bézier box or line
- Choose the Item or Content tool.
- Click the standard item you want to convert into a Bézier.
- To convert the item into a closed Bézier box, go to Item > Shape and choose the Freehand Box icon
 –. Note: Read the second tip on this page before converting a standard line to a Bézier box.
A standard text box... ...is converted into a Bézier text box. Now the Bézier box can be reshaped by any of the usual means (drag a point or segment, convert a corner point to a smooth point, etc.).
–. Note: Read the second tip on this page before converting a standard line to a Bézier box.
A standard text box... ...is converted into a Bézier text box. Now the Bézier box can be reshaped by any of the usual means (drag a point or segment, convert a corner point to a smooth point, etc.).or
To convert the item into a Bézier line, go to Item > Shape and choose the Freehand Line icon.
 If you convert a text box into a line, the result will be a text path . If you convert a picture box that contains a picture into a line, you’ll get a warning prompt; if you click OK, the picture will be deleted. In either case, the result will be an open shape, and the two endpoints of the line will be positioned one directly on top of the other (look for them at the bottom or in the lower-left corner). Select and move either point, if you like. If a standard text box is converted into a freehand line, the result is an open text path.


Tip
The box that results from a conversion of a standard oval box to a Bézier box may have an excessive number of points; you can remove any extraneous points after the conversion ![]() . Sometimes it’s simpler to create a shape from scratch using a Bézier tool!
. Sometimes it’s simpler to create a shape from scratch using a Bézier tool!
![]() The original standard oval text box
The original standard oval text box
After it’s converted into a Bézier box
After removing four extraneous points
Tip
To convert a narrow line (less than 2 points wide) into a Bézier box, hold down Option/Alt while choosing the Freehand Box icon (![]() –
–![]() , next page).
, next page).

![]() A line with a .5-pt. width is selected.
A line with a .5-pt. width is selected.

![]() After choosing the freehand box shape from the Item > Shape submenu with Option/Alt held down, the line is converted into a closed box. Its frame has the same width as the original line, (in this case, .5 pt).
After choosing the freehand box shape from the Item > Shape submenu with Option/Alt held down, the line is converted into a closed box. Its frame has the same width as the original line, (in this case, .5 pt).
Note: If you choose the Freehand Box icon from the Item > Shape submenu without holding down Option/Alt, a warning prompt will appear. If you click OK, you’ll get a very thin hollow line or lines. Not what you had in mind? Undo it.
If the endpoints of a line are very close together or one is on top of the other and you choose the Freehand Box icon with Option/Alt held down, the endpoints will be joined into a single point. If there is space between the endpoints, they’ll be connected by a new line segment. In either case, a closed shape will be produced.
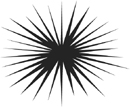
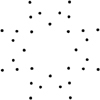
To create a star-shaped picture box
- Choose the Starburst tool
 .
. - Drag on the page, or Shift-drag to draw a perfect star.
or
Click on the page to open the Starburst dialog box. Then, enter values for the Star Width and Star Height
, as well for the Number of Spikes (3–100) and the Spike Depth (10–90%), which controls the length of the spikes. To create spikes that are irregular in length and depth, enter a Random Spikes value above zero (0–100) . Click OK – . Enter values in the Starburst dialog box. Number of Spikes 30, Spike Depth 50%, Random Spikes 67 Number of Spikes 8, Spike Depth 50%, Random Spikes 0; All Dots frame style applied; no background color Number of Spikes 20, Spike Depth 30%, Random Spikes 70; imported picture


Reshaping Bézier items
On the following pages, you’ll learn these methods for reshaping a Bézier path:
• Add or delete a point
• Move a point or a segment
• Rotate, lengthen, or shorten a curve handle to reshape a curve
• Convert a point to a different type (symmetrical, smooth, or corner)
• Convert a curved segment into a straight segment, or vice versa
• Move a handle on the bounding box
• Cut a segment in two
• Convert a Bézier to an entirely different shape via the Item > Shape submenu
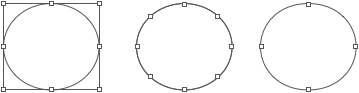
If you want to reshape part of a Bézier item, you must first turn on Item > Edit > Shape (Shift-F4/F10—memorize this shortcut!) ![]() . This command makes an item’s individual points, curve handles, and segments visible and accessible. Remember to turn this command off when you’ve finished reshaping the item so you don’t inadvertently move any points or segments!
. This command makes an item’s individual points, curve handles, and segments visible and accessible. Remember to turn this command off when you’ve finished reshaping the item so you don’t inadvertently move any points or segments!
![]() With Item > Edit > Shape on, a Bézier item’s individual points and curve handles are accessible for reshaping.
With Item > Edit > Shape on, a Bézier item’s individual points and curve handles are accessible for reshaping.
To reshape or resize a whole Bézier item, turn off Item > Edit > Shape (re-choose the command), then drag any of the eight handles of its bounding box ![]() .
.

![]() With Item > Edit > Shape off, only a Bézier item’s outer bounding box and eight handles are visible.
With Item > Edit > Shape off, only a Bézier item’s outer bounding box and eight handles are visible.
To add or delete a point
Method 1
- Choose the Item or Content tool, then click the item to make its points visible.
- Option-click/Alt-click a point to delete it –.

 Option-click/Alt-click a point to delete it. The point is deleted.
or
Option-click/Alt-click a segment where you want a new point to appear
.  Option-click/Alt-click a segment to add a point.

Method 2 (deleting only)
- Choose the Item tool.
- Click a point, then press Delete/Backspace. To delete multiple points, Shift-click them (or click a segment to delete both of its connecting points), then press Delete/Backspace.

To move a point
- Choose the Item or Content tool.
- Click a Bézier path to select it.
- Position the pointer over a point (the cursor will change into a pointing finger with a little black square), then drag the point to reposition it .
Dragging a point
or
Click a point to select it, then press an arrow key on the keyboard. The point will move along the horizontal or vertical axis.
or
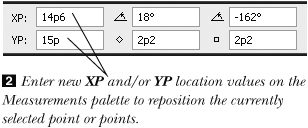
Click a point to select it and then, on the right side of the Measurements palette (Classic tab), enter the desired horizontal location in the XP field and/or the desired vertical location in the YP field
.
Tip
To move multiple points, select them using one of the shortcuts listed in the sidebar, then use a method in step 3, above. If you enter a number in the XP or YP field, all the currently selected points will be stacked on top of one another at that XP or YP location.
To move a whole Bézier item
- Choose the Item tool. Or hold down Cmd/Ctrl to move an item with the Content tool.
- To move a box, drag inside it. If you pause before dragging (wait for the cluster-of-arrows pointer to appear), the item’s contents will display as it’s dragged. Drag without pausing to see just the wireframe outline of the box.
or
To move a line or a text path, click the line first to select it, move the pointer slightly away from the line (just slightly!), then drag when you see the four-way arrow pointer.
To move control handles to reshape a curve
- Choose the Item or Content tool.
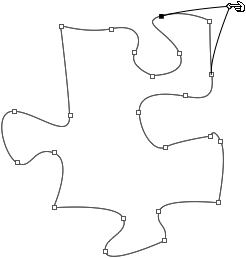
- Click any point that has a handle or handles .
First select a point that has curve handles.
- Drag a handle toward or away from the point to change the height of the curve . The angle of a handle affects the slope of the curve into the point. The handles on a smooth point move in tandem and can be different in length; the pair of handles on a symmetrical point move in tandem and are always of equal length; handle(s) on a corner point, if any, move independently of each another.
Then lengthen or shorten either curve handle...
or
Rotate the handle around the point
. ...and/or rotate the handle around the point.or
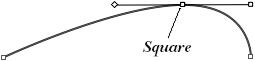
On the Measurements palette (Classic tab), enter a number in the angle field for the diamond-shaped curve handle or in the angle field for the square-shaped curve handle (not the most intuitive thing you’ve ever done in your life)
. You can do this (and the next option) for multiple selected points.or
On the right side of the Measurements palette, enter a length for the diamond-shaped curve handle or a length for the square-shaped curve handle
. To make the handles of equal length, enter the same number in both fields (or click the Symmetrical Point button  on the Measurements palette). Enter the same value in both length fields on the Measurements palette to make a pair of curve handles equal in length.


When you retract a curve handle, it converts the point to a corner point and changes the shape of the curve.
To retract one curve handle
- Choose the Item or Content tool.
- Select a point that has handles.
- Option-click/Alt-click a handle to retract it –.
Click a point, then Option-click/Alt-click one of its handles. The handle disappears.
or
On the right side of the Measurements palette (Classic tab), enter 0 in the length field for the diamond-shaped or square-shaped handle
.


Tip
To retract both curve handles on a point, Control-Shift-click/Ctrl-Shift-click the point. To make them reappear, Control-Shift-drag/Ctrl-Shift-drag from a point.
To restore retracted curve handles
- Choose the Item or Content tool.
- Select a point that doesn’t have handles.
- On the Measurements palette (Classic tab):
Click the Symmetrical Point button
or Smooth Point  button.
or
Enter a value above 0 in either or both of the length fields (diamond and/or square).
To reshape a segment by dragging
- Choose the Item or Content tool.
- Click a Bézier box, line, or text path.
- Drag a straight segment. The anchor points that touch it will move with it . Shift-drag to constrain the movement to an increment of 45°.
If you drag a straight segment, the segment and its connecting points will move.
or
Drag a curved segment. Only the segment will move, not its connecting points
. If you drag a curved segment, only the curve will move—not its connecting points.Note: If you pause before dragging a segment, the item’s fill will preview as the segment is moved. Otherwise, just the outer wireframe representation will display as you drag.
Use the Scissors tool to cut boxes, lines, and text paths. The tool can’t be used on a table, an anchored item, or an item in a group.
Note: To access this tool, the Scissors.xnt XTension must be installed and enabled (see page 377).
To cut an item with the Scissors tool
- Choose the Scissors tool.

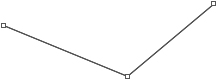
- Click the edge of an item . Two new endpoints will be created. The Scissors tool converts a picture box into a line, a text box into a text path, and a text path into two linked paths.
Click a line with the Scissors tool.
- The Item or Content tool will become selected automatically. Move either or both of the new endpoints –.
Then move one of the new endpoints. What was a single line is now two separate lines.
Tip
If you’re going to make multiple cuts using the Scissors tool, Option-click/Alt-click the tool first. Then you won’t have to reselect it each time. Choose another tool when you’re done.
Tip
To cut a merged item, you may have to split it first using Item > Split, depending on which Merge command was used (see pages 320–321).

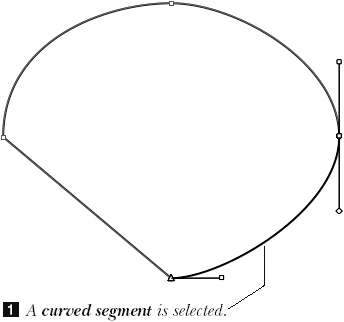
To convert a curved segment into a straight segment, or vice versa, in a Bézier box, line, or text path, all you gotta do is click a button on the Measurements palette (Classic tab). Easy.
To convert a curved segment into a straight segment, or vice versa
- Choose the Item or Content tool.
- Click a Bézier box or line to select it, then click the segment that you want to convert (make sure its points are selected) .
- Click the Straight Segment button on the Measurements palette (Option-Shift-F1/Ctrl-Shift-F1).
 One of the curve handles on each of the two points that are adjacent to the segment will disappear .
After clicking the Straight Segment button on the Measurements palette (Classic tab), the curved segment is converted into a straight segment.
One of the curve handles on each of the two points that are adjacent to the segment will disappear .
After clicking the Straight Segment button on the Measurements palette (Classic tab), the curved segment is converted into a straight segment.or
Click the Curved Segment button on the Classic tab of the Measurements palette (Option-Shift-F2/Ctrl-Shift-F2).
 One curve handle will appear on each of the two points that are adjacent to the segment.
Tip
You can also convert a selected segment by choosing Item > Point/Segment Type > Straight Segment or Curved Segment, but why go all the way to the menu bar when you can just click a button instead?
Tip
To convert all the points and segments on a path into all curves or all straights, double-click any point to select all the points and segments on the path, then click the Straight Segment or Curved Segment button on the Measurements palette.
To change a point’s style
- Choose the Item or Content tool.
- Select one or more points on a Bézier item.
- On the Classic tab of the Measurements palette:
Click the Symmetrical Point (first) button.
Handles on a symmetrical point always stay on the same axis and are of equal length . On a symmetrical point, the handles always stay on the same axis, and are always of equal length.or
Click the Smooth Point (second) button.
Handles on a smooth point always stay on the same axis but can be different lengths, allowing for greater control over reshaping . On a smooth point, the handles always stay on the same axis, but they can be of different lengths.or
Click the Corner Point (third) button.
 Now the handles can be rotated, lengthened, or shortened independently of each other, and the segments that the point connects will come together at a sharper angle . On a corner point, the handles move independently of each other. (Not all corner points have handles.)


Tip
You can also convert a point by selecting it and then choosing Item > Point/Segment Type > Corner Point, Smooth Point, or Symmetrical Point.

To scale a whole Bézier box, line, or text path
- Choose the Item or Content tool.
- Make sure Item > Edit > Shape is turned off (Shift-F4/F10).
- Click a Bézier box, line, or text path .
With Item > Edit > Shape off, the eight handles on an item’s bounding box are available.
- To scale the item proportionally, but not its contents (picture or text), Option-Shift-drag/Alt-Shift-drag one of the handles of its bounding box –.
Drag a handle to scale the whole item. Option-Shift-drag/Alt-Shift-drag a handle on the bounding box to resize just the item—not its contents.
or
To scale the item and contents (if any) proportionally, Cmd-Option-Shift-drag/Ctrl-Alt-Shift-drag a handle
. Cmd-Option-Shift-drag/Ctrl-Alt-Shift-drag a handle on the bounding box to resize the item and its contents, if any.or
To scale the item nonproportionally, but not its contents, change the W and/or H values on the Classic tab of the Measurements palette
(or press Cmd-M/Ctrl-M to open the Modify dialog box, click the Box tab, then change the Width and/or Height values).


Tip
Regardless of which method you use to scale a box, the frame width stays the same.
Tip
You can rotate a Bézier item using the same techniques that you’d use to rotate a non-Bézier item.
No matter what kind of items you start with, all the Merge commands produce a single Bézier item from two or more individual items. And in all cases, the color attributes and contents of the item farthest back in the stacking order—including any text, picture, or background color—are applied to the final item.
The items can be lines, boxes, text paths, Bézier items, or any combination thereof (not a table), and they can be grouped. If you’re going to apply any Merge command except Union, arrange them so they overlap—at least partially.
The items can be on different layers.
To merge two or more items
- Choose the Item or Content tool.
- Select two or more items.
- Choose Item > Merge.
- Choose one of the following:
INTERSECTION
Parts of any item that overlap the backmost item are preserved; parts of items that don’t overlap the backmost item are cut away
–. The two original objects IntersectionUNION
All items are combined into one overall new item (the original items don’t have to overlap!). You can use this option to create a complex item from a combination of simple items
. UnionDIFFERENCE
Only the backmost item remains, minus any parts of any items that are in front of it and overlap it
. DifferenceREVERSE DIFFERENCE
The original backmost item is deleted, items in front of it are united, and parts of the original items that overlap the backmost item are cut away
. A new shape is produced from items that extend beyond the edge of the backmost item. Reverse DifferenceAreas of items that overlap the backmost item are cut away, and the remaining items are united
–. The color of the original backmost item is applied to the non-cutout areas. The corners of the cutout areas will have two sets of points—one that can be used to reshape the cutout areas and one that can be used to reshape the non-cutout areas. The original objects Exclusive OrCOMBINE
Works like Exclusive Or, except that extra points aren’t added to the corners of the cutout areas, so you can’t adjust the corners of the resulting cutout shapes unless you add corner points yourself.
Note: Exclusive Or and Combine will produce the same results if the original overlapping items don’t extend beyond the edge of the backmost item.
JOIN ENDPOINTS
The Join Endpoints command will join a pair of endpoints from two separate text paths or lines into one point—provided the endpoints are close together
–. The attributes (style, weight, color, etc.) of the backmost line are applied to the resulting line. Boxes don’t have endpoints, so the Join Endpoints command has no effect on them. Two freehand lines are selected. After choosing the Join Endpoints commandNote: For two endpoints to be affected by the Join Endpoints command, the distance between them can’t exceed the current Snap Distance (1–216) specified in Preferences > Print Layout > General. The default Snap Distance value is 6 pixels.


The Text to Box command converts a copy of one or more standard text characters into a single Bézier picture box. And if you like, you can make this conversion and anchor the new Bézier box into its text block all in one fell swoop.
The resulting Bézier box can be filled with a color, a blend, or a picture; it can be converted into a text box and filled with text; or it can be reshaped using any of the techniques that are discussed in this chapter.
To convert text characters into a Bézier picture box
- Choose the Content tool.
- Select the characters you want to convert (no more than one line). The larger and chunkier, the better.
The first character in a box is selected.
- Choose Style > Text to Box. A duplicate of all the selected text will be converted into a single picture box.
or
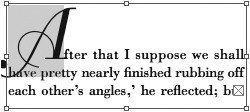
To convert the text into a picture box and anchor it in its current location in the text simultaneously, hold down Option/Alt and choose Style > Text to Box
–. Style > Text to Box is chosen with Option/Alt held down: In one step, a copy of the character is converted into a Bézier picture box and is anchored into the text. We reshaped and enlarged the box (it’s now a Bézier box), filled it with a background shade and a picture, and chose a lighter shade for its frame.


Tip
To change the contents of the newly created picture box, click on it, then choose Item > Content > Text (so you can enter text inside the letter shapes) or None (so you can fill the letter shapes with color only). To access the Content submenu quickly via the context menu, select the box, then Control-click/Right-click in the project window.
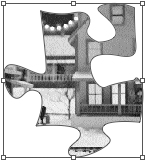
The Split command is really an un-merge command. It divides a text-to-box item or items merged via the Combine or Exclusive Or command into individual, separate items. It can also be used to split up a complex box that contains paths within paths or a box whose border criss-crosses itself. Once an item is split, each component can then be manipulated or recolored individually.
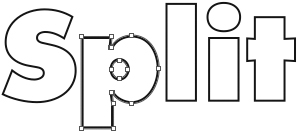
If you split a box that was created using the Text to Box command into separate paths, you’ll then be able to select and recolor each letter individually, fill each letter with a different picture, or reshape any letter to create a custom character (you can have some fun with this). Start with a box that was created from more than one letter.
To split a merged or Text to Box item
- Choose the Item or Content tool.
- Select a complex (merged) item.
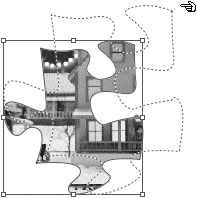
- Choose Item > Split > Outside Paths to split only outside paths, not any paths contained within them –.
The original Text to Box item After choosing Split > Outside Paths, each letter item can now be selected and edited individually.
or
Choose Item > Split > All Paths to split all an item’s paths, including any interior paths
. If you apply this to a Text to Box letter shape, any counter (hole) within the letter will become a separate shape (as in an “O” or a “P”), and it can then be treated as a separate item. After selecting the “P” shape and choosing Item > Split > All Paths, the center (counter) of the “P” can now be edited separately from the outer portion.

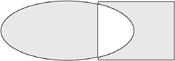
To type inside type, select one or more large, chunky text characters, choose Style > Text to Box, choose Item > Content > Text, then enter text ![]() . (To force the text to wrap on all sides of the interior oval instead of on just one side, go to Item > Modify > Text, then check Run Text Around All Sides.)
. (To force the text to wrap on all sides of the interior oval instead of on just one side, go to Item > Modify > Text, then check Run Text Around All Sides.)
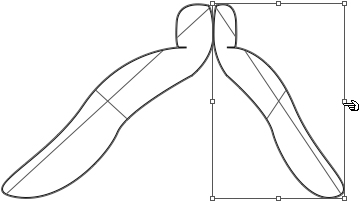
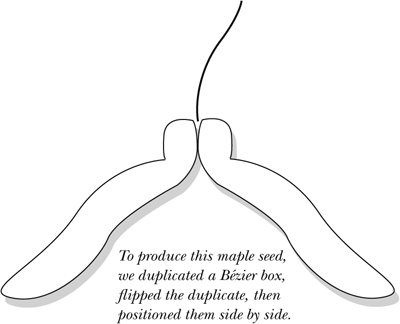
You can flip any type of Bézier item. Try flipping a Bézier text path vertically.
To flip an item
- Optional: To create a mirror image, duplicate the item (Cmd-D/Ctrl-D) before you flip it.
- Choose the Item or Content tool.
- Click the item, and turn off Item > Edit > Shape.
- So you’ll be able to restore the original dimensions to the item after it’s flipped, display the Classic tab of the Measurements palette and copy (Cmd-C/Ctrl-C) the W or H value, depending on which way you want to flip the box—horizontally (W) or vertically (H).
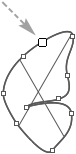
- If you copied the W value, drag a side midpoint handle all the way across the item to the other side –. Or if you copied the H value, drag the top or bottom midpoint handle.
After copying an item’s width or height from the Measurements palette, drag a midpoint handle all the way across the shape. Continue dragging to the opposite side.
- Re-select the field that you chose for step 3 above, paste (Cmd-V/Ctrl-V), then press Return/Enter .
Click the Width or Height field on the Measurements palette (whichever value you copied), paste (Cmd-V/Ctrl-V), then press Return/Enter.


Tip
To flip the contents of a selected box, choose the Content tool, then choose Style > Flip Horizontal or Flip Vertical or click the Flip Horizontal button ![]() or Flip Vertical button
or Flip Vertical button ![]() on the Classic tab of the Measurements palette.
on the Classic tab of the Measurements palette.
Creating Bézier text paths
In addition to creating a text path using any of the Text-Path tools, you can also produce a text path by converting an existing line.
To convert a line into a text path
- Choose the Item or Content tool.
- Click a line that was created using the Orthogonal Line, Line, Bézier Line, or Freehand Line tool .
Select a line, then choose Item > Content > Text.
- Choose Item > Content > Text (or choose it from the context menu).
- With the Content tool chosen, type, paste, or import text onto the path .
The line becomes a text path.


We converted a round text box into a freehand line via Item > Shape, made the path 20% black and wider in Item > Modify > Line, added type, and in Item > Modify > Text Path, chose Align Text: Descent and Align with Line: Bottom. To fine-tune the position of the text on the path, we used Style > Baseline Shift. (The picture is in a picture box.)
After checking Flip Text on the Text Path tab of the Measurements palette
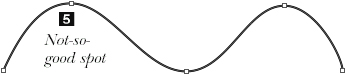
Try not to create acute concave angles when you draw a text path—the letters will bunch together and be unreadable.
Other ways to play with text paths
To change the width and other attributes of a text path, select it using the Item tool, then choose attributes from the Style menu, from the Measurements palette, or from Item > Modify > Line. Any dash or stripe style can be applied to a text path ![]() .
.

![]() To create this text path, we converted a standard round text box into a Bézier line.
To create this text path, we converted a standard round text box into a Bézier line.
To recolor a text path, select it with the Item tool and choose from the Style > Color and Shade submenus. Or select it with the Item or Content tool, click the Line Color button ![]() on the Colors palette, then click a color and choose a shade. (To make the path invisible, click the Line Color button, then click None.)
on the Colors palette, then click a color and choose a shade. (To make the path invisible, click the Line Color button, then click None.)
Change the attributes of text on a path as you would text in a box: Select it using the Content tool, then choose attributes from the Style menu or from any of several tabs on the Measurements palette; or apply a style sheet or sheets to it.
To flip text to the opposite side of a path, click the path with the Content tool and choose Style > Flip Text ![]() –
–![]() . Or click the path with the Item or Content tool, then check or uncheck Flip Text on the Text Path tab of the Measurements palette or in Item > Modify > Text Path.
. Or click the path with the Item or Content tool, then check or uncheck Flip Text on the Text Path tab of the Measurements palette or in Item > Modify > Text Path.

![]() Text on a path
Text on a path

![]() After clicking the Flip Text button
After clicking the Flip Text button
To turn a text box into a text path, select the box, then from the Item > Shape submenu, choose the Line icon ![]()
![]() or Orthogonal Line icon
or Orthogonal Line icon ![]() . An open text path will be created. Or if you choose the Bézier Line icon
. An open text path will be created. Or if you choose the Bézier Line icon ![]() instead, a path will be created in the shape of the original box
instead, a path will be created in the shape of the original box ![]() .
.

![]() A text box is converted into a text path by choosing the Line icon
A text box is converted into a text path by choosing the Line icon ![]() from the Item > Shape submenu.
from the Item > Shape submenu.

![]() A text box is converted into a text path by choosing the Bézier Line icon
A text box is converted into a text path by choosing the Bézier Line icon ![]() from the Item > Shape submenu.
from the Item > Shape submenu.
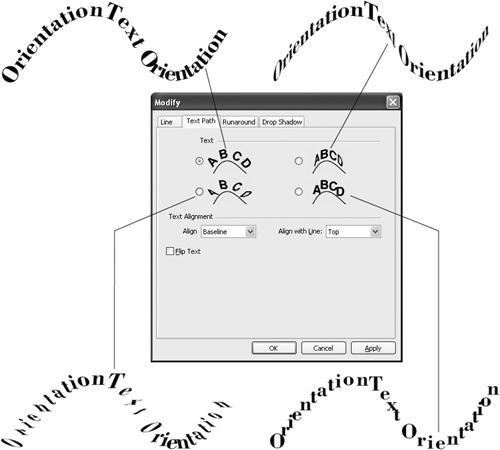
To change the orientation of text on a curvy path
- Choose the Item or Content tool.
- Click on a text path.
- Choose Item > Modify (Cmd-M/Ctrl-M), then click the Text Path tab.
or
Display the Text Path tab of the Measurements palette (see the next page).
- Click any of the four Text Orientation buttons .
The four Text Orientation buttons in Item > Modify > Text Path
- Click Apply to preview.
- Click OK.
To raise or lower text on its path
- Choose the Item or Content tool.
- Click on a text path.
- Display the Text Path tab of the Measurements palette.
or
Choose Item > Modify (Cmd-M/Ctrl-M), then click the Text Path tab.
- Choose Align Text: Ascent, Center, Baseline, or Descent – (to specify the part of the text that touches the path).
Choose from the Align Text and/or Align with Line menus on the Text Path tab of the Measurements palette.
- Choose Align with Line: Top, Center, or Bottom (to specify the part of the path the text connects to) . The wider the path, the more dramatic the shift.
- Click Apply to preview.
- Click OK.
Tip
You can use Baseline Shift to further raise or lower text on a path (Character Attributes tab of the Measurements palette or Style > Baseline Shift).