
19. Libraries
Using libraries
A library is a special kind of file that’s used to organize and store items of any type: text boxes or picture boxes, empty or filled; contentless boxes; lines; text paths; tables; and even groups of items. Each library is displayed as a floating palette ![]() –
–![]() and can contain up to 2,000 items. When you drag an item from a library palette into any QuarkXPress project window, a copy of the item appears in the active layout. An unlimited number of libraries can be created.
and can contain up to 2,000 items. When you drag an item from a library palette into any QuarkXPress project window, a copy of the item appears in the active layout. An unlimited number of libraries can be created.


![]() Library items can be labeled and shown by category (this is a library palette in Windows).
Library items can be labeled and shown by category (this is a library palette in Windows).
Note: The version of a picture that is stored in a library is just its low-resolution preview; this keeps library file sizes relatively small. However, if you send a file containing library elements for imagesetting—as with any picture used in a QuarkXPress layout—you’ll need to supply the original picture files. A library can also serve a supporting role as an onscreen picture catalog.
To create a library
- Choose File > New > Library (Cmd-Option-N/Ctrl-Alt-N).
- Type a name for the library in the Save As/Save as Type field.
- Select a drive or folder in which to save the library.
- Click Create. A new library palette will appear on your screen. To put items into the library, see the instructions on the following page.
To put an item in a library
- Create a new library or open an existing library.
- Choose the Item tool, or hold down Cmd/Ctrl if the Content tool is chosen.
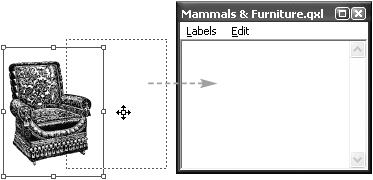
- Drag any item, group, or multiple-item selection into the library
 . When the pointer is over the library, you’ll see an eyeglasses icon
  . When you release the mouse, a thumbnail of the item will appear in the library
  ; the original item will stay on your page. A multiple-item selection will be stored as one entry.
Drag an item into a library with the Item tool. The pointer turns into an eyeglasses icon as the item is dragged into the library. The arrowheads show where the item will appear in the palette. The item is automatically duplicated, and the original is left intact in the layout. To move an item to a different spot in a library, just drag it.
; the original item will stay on your page. A multiple-item selection will be stored as one entry.
Drag an item into a library with the Item tool. The pointer turns into an eyeglasses icon as the item is dragged into the library. The arrowheads show where the item will appear in the palette. The item is automatically duplicated, and the original is left intact in the layout. To move an item to a different spot in a library, just drag it.You can’t undo an addition to a library, but you can remove any item from a library (see page 332).

Tip
Items can be dragged from one library to another.
Any libraries that are open when you quit/exit QuarkXPress will reopen automatically when you relaunch the application.
To open an existing library
- Choose File > Open (Cmd-O/Ctrl-O).
- Locate and click the library that you want to open , then click Open (or double-click the icon). Library files are represented by a bookshelf icon.


Tip
To open a library from the Desktop, double-click the library file icon. The extension for libraries is “.qxl”. A library created in Mac OS X can’t be opened in Windows, and vice versa.
Tip
To close a library palette, click its close button. Don’t use File > Close.
Picture paths
When a picture is added to a library, information about the path to the original picture file is stored with the library item. Similarly, when a picture is retrieved from a library, the picture’s path information is stored with the project. For an image to print properly, the original picture file must be kept in the same location, with the same file name. If you move or rename the original picture file, you should update it in the library.
One way to update a library item is to relink the picture in the layout, select it with the Item tool, copy it (Cmd-C/Ctrl-C), click the library item to be replaced, paste (Cmd-V/choose Paste from the Edit menu on the library palette in Windows), then click OK in the alert dialog box.
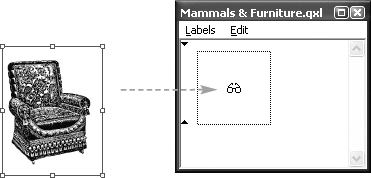
To retrieve an item from a library
- Choose the Item or Content tool.
- If the layout has multiple layers, choose a layer for the library item.
- Drag an item from a library into a layout page (you can enlarge the palette or use the scroll arrows to display items that are out of view) . Simple as that.
Drag an item from a library into your layout.

If a library contains a lot of items, it can become difficult to find the items you need. By labeling related library items, you can limit the number of items that are displayed at a given time. You can assign a different label to each item or assign the same label to multiple items.
To label a library item
- Double-click a library item.
- Enter a name in the Label field .
or
Choose an existing label, if there are any, from the Label menu
. You can retype the same label for various items, but it’s easier to choose an existing label, and you’ll be less likely to make a typing error. - Click OK. If you created a new label, it will appear on the menu at the top of the library palette.

To display items by label
Choose a label category from the pop-up menu (Mac OS X) ![]() /Labels menu (Windows)
/Labels menu (Windows) ![]() . More than one label category can be displayed at a time.
. More than one label category can be displayed at a time.

![]() In Mac OS X, when more than one label is chosen and the pop-up menu isn’t open, it says Mixed Labels.
In Mac OS X, when more than one label is chosen and the pop-up menu isn’t open, it says Mixed Labels.
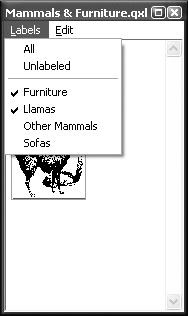
![]() The Labels menu (Windows) on a library palette shows a check mark next to each category that is currently displayed.
The Labels menu (Windows) on a library palette shows a check mark next to each category that is currently displayed.
Choose All to display all the items in the library, both labeled and unlabeled.
Choose Unlabeled to display only those items that don’t have a label.
To hide items bearing the same label
A check mark on the menu on a library palette means that that label category is displayed. Reselect a selected label to uncheck it.
To delete an item from a library
- Choose the Item or Content tool.
- Click a library item.
- In Mac OS X, choose Edit > Clear or press Delete. In Windows, choose Delete from the Edit menu on the library palette or press Ctrl-X (Cut).
- Click OK. You can’t undo the deletion!