
6. Formats
Formatting fundamentals
Well, you’ve managed to get some text onto your page, but it’s just sitting there in a big clump, and it’s hard to read. By adding space between lines and paragraphs, indents, and other paragraph formats, not only will your type look more elegant and professional, it will also be easier to read.
All the formatting commands described in this chapter affect entire paragraphs rather than individual characters. These commands, which are accessed via the Style menu and the Measurements palette when text is selected, include horizontal alignment, hyphenation and justification, indents, leading, space before and after, keeping lines together, rules, and tabs ![]() and
and ![]() . In the next chapter, you’ll learn the ins and outs of typography (styling characters in different fonts, point sizes, and so on).
. In the next chapter, you’ll learn the ins and outs of typography (styling characters in different fonts, point sizes, and so on).
![]() Most of the commands that affect whole paragraphs are found in the Formats, Tabs, and Rules panes of the Paragraph Attributes dialog box.
Most of the commands that affect whole paragraphs are found in the Formats, Tabs, and Rules panes of the Paragraph Attributes dialog box.
![]() The Paragraph Attributes tab of the Measurements palette provides quick access to the most commonly used paragraph formatting options.
The Paragraph Attributes tab of the Measurements palette provides quick access to the most commonly used paragraph formatting options.
A paragraph consists of one or more characters or words, followed by an invisible Return character. A Return looks like this when View > Invisibles is checked: ¶. Paragraph formats can be applied manually—or even more efficiently, using paragraph style sheets (see Chapter 13).
Note that not all paragraph attributes are available when working in Web layouts.
To indent a whole paragraph
- Choose the Content tool.
- Click in a paragraph or drag through a series of paragraphs
 .
The paragraph containing the insertion point has an indent value of 0.
.
The paragraph containing the insertion point has an indent value of 0. - Display the Paragraph Attributes tab of the Measurements palette.
- Enter indent values in the Left Indent, and/or Right Indent fields using any measurement system allowed in QuarkXPress
 .
.
- Press Return/Enter or tab to another field to see the results of your changes
 –
– .
This paragraph has a Left Indent value of 2p (called a “block” indent). This paragraph has a Right Indent value of 2p.
.
This paragraph has a Left Indent value of 2p (called a “block” indent). This paragraph has a Right Indent value of 2p.


Tip
You can also use the old-fashioned dialog box method:
Choose Style > Formats (Cmd-Shift-F/Ctrl-Shift-F) to open the Formats pane of the Paragraph Attributes dialog box. Enter Left Indent and/or Right Indent values and click Apply to preview (Cmd-A in Mac OS X). Or Option-click/Alt-click Apply to turn on continuous apply (Alt-A in Windows). Click in, or Tab to, another field to activate it.
Don’t try to indent type by pressing the Spacebar. The indents won’t line up properly in multiple paragraphs because typeset characters aren’t equal in width, as they are on a typewriter. You could use a tab to indent a paragraph, but you can’t automatically insert a tab character with a paragraph style sheet. The proper way to indent type is by entering a value greater than zero in one or more of the three Indent fields or dragging icons on the Formats ruler.
To indent the first line of a paragraph
- Choose the Content tool.
- Click in a paragraph or drag through a series of paragraphs.
- Display the Paragraph Attributes tab of the Measurements palette.
- Enter a First Line value . If you’re not sure what value to use, start with the point size of the text you’re indenting (e.g., for 9 pt. type, enter p9).
- Press Return .
A First Line indent enhances readability.


Tip
When the Paragraph Attributes dialog box is open or the Paragraph Attributes tab of the Measurements palette is showing, a Formats ruler displays over the currently selected text box. Indents can be adjusted by dragging the indent markers in the ruler ![]() . Ditto for tab stops. To insert a new tab stop, click in the ruler. (Read more about tabs in Chapter 8.)
. Ditto for tab stops. To insert a new tab stop, click in the ruler. (Read more about tabs in Chapter 8.)

![]() The width of the Formats ruler matches the width of the currently selected text box.
The width of the Formats ruler matches the width of the currently selected text box.
Tip
For each text box, the current paragraph indent value is added together with the current Text Inset value set for the text box (see page 71).
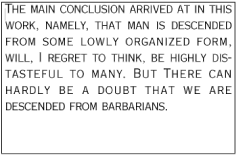
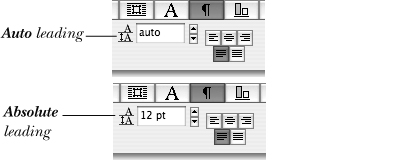
Leading (line spacing) is the distance from baseline to baseline between lines of type, and it’s measured in points. Three types of leading are used in QuarkXPress:
Absolute leading is an amount that remains fixed regardless of the point size of the type to which it’s applied ![]() .
.

![]() A paragraph with 11 pt. absolute leading: The leading is consistent throughout, despite the fact that two different point sizes are applied to the type in the first line of the paragraph.
A paragraph with 11 pt. absolute leading: The leading is consistent throughout, despite the fact that two different point sizes are applied to the type in the first line of the paragraph.
We use absolute leading because we like the control it gives us, but there’s an alternative, called auto leading, that you may as well know about. Auto leading is calculated separately for each line of text based on the point size of the largest character per line ![]() . The percentage used for that calculation is specified in the Auto Leading field in QuarkXPress (Edit, in Windows) > Preferences > Print Layout > Paragraph, and it applies to the entire layout. For example, if 20% is the current percentage and the largest character in a line of text is 10 pt., the leading for that line would be 12 pt. You won’t see a percentage in the Leading field; you’ll just see the word “auto.” Alternatively, you can enter an incremental value, such as +2 or −2, in the Auto Leading field. In this case the leading will be calculated based on the point size of the largest character in each line, plus or minus that increment.
. The percentage used for that calculation is specified in the Auto Leading field in QuarkXPress (Edit, in Windows) > Preferences > Print Layout > Paragraph, and it applies to the entire layout. For example, if 20% is the current percentage and the largest character in a line of text is 10 pt., the leading for that line would be 12 pt. You won’t see a percentage in the Leading field; you’ll just see the word “auto.” Alternatively, you can enter an incremental value, such as +2 or −2, in the Auto Leading field. In this case the leading will be calculated based on the point size of the largest character in each line, plus or minus that increment.

![]() The same paragraph with auto leading: The large initial cap is throwing the whole thing off, and it ain’t pretty.
The same paragraph with auto leading: The large initial cap is throwing the whole thing off, and it ain’t pretty.
To change leading using the Measurements palette
- Choose the Content tool.
- Click in a paragraph or drag through a series of paragraphs.
- Change the Leading value in the Classic (default) tab or Paragraph Attributes tab of the Measurements palette .
The Leading area in the Paragraph Attributes tab of the Measurements palette
or
Next to the Leading field, click the up arrow to increase the leading in 1-point increments, or the down arrow to reduce the leading. Option-click/Alt-click an arrow to increase or reduce the leading in 0.1-point increments.

Use roomy leading to enhance readability if your text is set in a wide column, in a sans serif or bold font, or in a font that has a large x-height, tall ascenders, or tall descenders. This is 8 pt. Gill Sans Regular, with roomy 11 pt. leading.

You can use tighter leading for serif body text or multiple-line headlines or subheads. This is 8 pt. Bauer Bodoni with 10 pt. leading.
To change leading using the keyboard
- Choose the Content tool.
- Click in a paragraph or drag through a series of paragraphs.
- Press Cmd-Shift-“/Ctrl-Shift-” to increase leading or Cmd-Shift-:/Ctrl-Shift-: to decrease leading in 1-point increments. If the leading was on auto, it will switch to the nearest absolute value when you use this shortcut.
Tip
Press Cmd-Option-Shift-“/Ctrl-Alt-Shift-” to increase leading in 0.1-point increments; press Cmd-Option-Shift-:/Ctrl-Alt-Shift-: to decrease leading in 0.1-point increments.
Tip
The traditional way to notate point size and leading is to divide the two values by a slash. For example, “8/11” represents 8-point type with 11-point leading.
To change leading using a dialog box
- Choose the Content tool.
- Click in a paragraph or drag through a series of paragraphs.
- Choose Style > Leading (Cmd-Shift-E/Ctrl-Shift-E). The Paragraph Attributes > Formats dialog box opens.
- Type a value in the selected Leading field in an increment as small as .001 . You don’t need to enter the “pt”.
- Click OK.
Tip
Leading has no affect on the positioning of the first line of text in a box. To lower text from the top of its box, increase the Top Text Inset value in the Text tab of the Measurements palette.

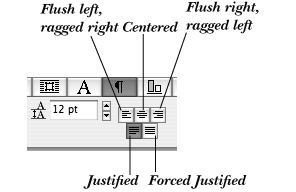
To change horizontal alignment
- Choose the Content tool.
- Click in a paragraph or drag through a series of paragraphs.
- Click one of the five horizontal alignment buttons on the Paragraph Attributes tab of the Measurements palette .
The five horizontal alignment buttons on the Paragraph Attributes tab of the Measurements palette
Note: Forced Justified alignment justifies all the lines in a paragraph—including the last line. For this option, make sure the paragraph has a Return character (¶) at the end.
Tip
Horizontal alignment can also be changed by using the shortcuts listed at right; the Style > Alignment submenu; the Alignment menu in the Style > Formats dialog box; or the buttons on the Classic tab of the Measurements palette.
Tip
Turn on Hyphenation for justified text to help reduce the gaps between words (see pages 117–119).
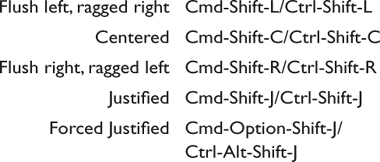

Flush left, ragged right

Centered (for occasional use only; it’s tiring to read)

Try to vary the line lengths in centered text (it usually looks better).

Flush right, ragged left (also a bit tiring to read, but sometimes useful)

Justified

Forced Justified
Use this method to adjust a headline or fix an awkward break in ragged left or ragged right copy. Depending on the length of words in the text, the font, the column width, the hyphenation and justification settings in use, and other variables, QuarkXPress may not wrap text well and you may end up fiddling with line breaks. QuarkXPress 7 provides a variety of new default hyphenation and justification settings to help with this, but you inevitably end up breaking a few lines manually.
To break a line without creating a new paragraph
- Choose the Content tool.
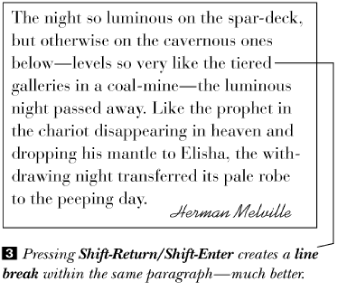
- Click just to the left of a whole word that you want to bring down to the next line, then press Shift-Return/Shift-Enter –.
A paragraph Return creates a whole new paragraph—no good.
or
To insert a discretionary hyphen which will disappear if the text reflows (unlike a regular hyphen), click in a word where you want a hyphen to be inserted, then choose Utilities > Insert Character > Special > Discretionary Hyphen.


Tip
You can also enter a discretionary hyphen by pressing Cmd/Ctrl with the hyphen key. When View > Invisibles is checked, the discretionary hyphen looks like a small gray hyphen slightly overlapping the text. To remove a discretionary hyphen character, click to the right of it, then press Delete/Backspace.
Tip
To find out where a word should be hyphenated, click in the word, then choose Utilities > Suggested Hyphenation (Cmd-Option-Shift-H/Ctrl-Alt-Shift-H). If no hyphens display in the dialog box, it means that word isn’t supposed to be hyphenated.
Note: The values entered in the Space Before and Space After fields are added together, so try to be consistent and use one most of the time and the other for special circumstances. For example, we use Space After for body text and use Space Before for subheads to add extra space above them.
To change the spacing between paragraphs
- Choose the Content tool.
- Click in a paragraph or drag through a series of paragraphs.
- Display the Paragraph Attributes tab of the Measurements palette.
- Enter a Space Before or Space After value .
The Space Before and Space After fields in the Paragraph Attributes tab of the Measurements palette
- Press Return/Enter .
If you want to fine tune the spacing between paragraphs, use the Space Before or Space After field. Don’t insert extra Returns—it’s so-o--o unprofessional.


Tip
The Space Before command has no effect on the first line of text in a box. To move text downward on a page, the simplest thing is to move the box itself—an obvious solution that’s easy to forget! If you don’t want to move the box, you can use First Baseline (see page 74) or Text Inset (see page 71).
Tip
To accomplish the same task by means of a dialog box, choose Style > Formats (Cmd-Shift-F/Ctrl-Shift-F) and enter values into the Space Before and/or the Space After fields in the Formats pane of the Paragraph Attributes dialog box ![]() . Click Apply to preview the result, then click OK.
. Click Apply to preview the result, then click OK.

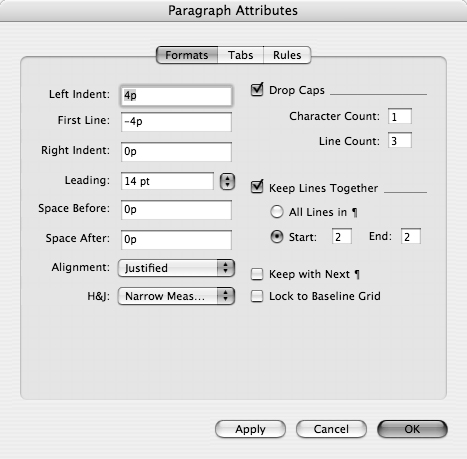
Apply the Keep with Next ¶ command to a subhead to ensure that if it falls at the end of a column or page, it won’t become separated from the paragraph that follows it. Like all paragraph formats, Keep with Next ¶ can be applied manually or via a style sheet. Don’t apply it to body text.
To keep two paragraphs together
- Choose the Content tool.
- Click in a paragraph.
- Choose Style > Formats (Cmd-Shift-F/Ctrl-Shift-F) to open the Formats pane of the Paragraph Attributes dialog box.
- Check Keep with Next ¶ .
- Click OK.

As QuarkXPress defines it, a widow is the last line of a paragraph that’s stranded at the top of a column ![]() . An orphan is the first line of paragraph that’s stranded at the bottom of a column
. An orphan is the first line of paragraph that’s stranded at the bottom of a column ![]() . Both are typesetting no-no’s. The Keep Lines Together command can be used to prevent orphan and widow lines. It can also be used to keep all the lines in a paragraph together.
. Both are typesetting no-no’s. The Keep Lines Together command can be used to prevent orphan and widow lines. It can also be used to keep all the lines in a paragraph together.


To prevent orphan and widow lines
- Choose the Content tool.
- Click in a paragraph.
- Choose Style > Formats (Cmd-Shift-F/Ctrl-Shift-F).
- Check Keep Lines Together .
- Click All Lines in ¶ to keep all the lines of a paragraph together, even if the paragraph falls at the end of a column or page (we use this for subheads and the like).
or
Click Start to turn on orphan and widow control, then enter “2” (or even “3”) in the Start and End fields to ensure that no fewer than two lines of a paragraph are stranded at the bottom or top of a column, respectively.
- Click OK.
Formatting tips and tricks
A format in which the first line of a paragraph is aligned flush left and the remaining lines are indented is called a hanging indent. Hanging indents can be used to make subheads, bullets, or other special text more prominent or to hang punctuation (see page 132). A hanging indent that’s created by following the steps below can be applied via a paragraph style sheet.
To create a hanging indent using a dialog box
- Choose the Content tool.
- Click in a paragraph or drag through a series of paragraphs.
- Choose Style > Formats (Cmd-Shift-F/Ctrl-Shift-F).
- Enter a Left Indent value. Need a suggestion? Try 1p or 2p .
The Paragraph Attributes > Formats pane
- Enter a First Line value that’s equal to or less than the number you entered in the previous step, preceded by a minus (-) sign.
- Click Apply to preview (Cmd-A/Alt-A), make any adjustments, and then click OK –.
In this example, a positive Left Indent and a negative First Line Indent create a hanging indent formation in each paragraph. In this example, after the hanging indents were created via a positive Left Indent and a negative First Line, the Tab key was pressed after the bold text in each paragraph to align the text to the tab stop that QuarkXPress inserted automatically.


On the positive side, the Indent Here character instantly creates a hanging indent wherever your cursor happens to be positioned. On the minus side, the Indent Here character has to be inserted manually into each paragraph, it can’t be incorporated into a style sheet, and it can’t be added or removed using Find/Change. It’s very handy for quickly formatting a unique paragraph here or there. To create a hanging indent in multiple paragraphs, though, follow the instructions on the previous page instead.
To create a hanging indent using the Indent Here character
- Choose the Content tool.
- Click in a paragraph where the indent is to be inserted .
To insert the Indent Here character, click in the text, then press Cmd-/Ctrl-.
- Choose Utilities > Insert Character > Special > Indent Here or press Cmd/Ctrl with the backslash ( ) key .
A hanging indent is created.


To remove an Indent Here character
- Choose the Content tool.
- Choose View > Invisibles (Cmd-I/Ctrl-I), if invisibles aren’t currently showing.
- Click just to the right of the Indent Here character . If you’re having trouble locating the correct spot, you can press the left or right arrow key on your keyboard to move the text cursor one character at a time.
- Press Delete/Backspace. Choose View > Invisibles again, if you prefer to work with this feature off.

An interesting drop cap (or caps) can add pizzazz to a page and spark your reader’s interest. Caution: Because they’re so easy to create, it’s tempting to use drop caps here, there, and everywhere. Don’t succumb—like hot chilis, they’re best used sparingly.
To insert an automatic drop cap
- Choose the Content tool.
- Click in a paragraph.
- Display the Paragraph Attributes tab of the Measurements palette.
- Check Drop Caps .
- Optional: To “drop cap” more than one character, enter that number in the Character Count field (1–127) .
A drop cap with a character count of 3 and a line count of 2
- Optional: To adjust the height of the drop cap, change the Line Count (2–16). The drop cap will adjust automatically to fit the line count .
A drop cap with a character count of 1 and a line count of 5
- Optional: Select the drop cap and change its color, shade, or font (see the next chapter). Be bold and imaginative!


Tip
To anchor any item (e.g., a picture box, text box, contentless box, or line) as a drop cap or a large initial cap, see page 199.
Tip
You can create drop caps using the same controls in the Format pane of the Paragraph Attributes dialog box (Style > Formats). Drop caps can be saved with paragraph style sheets as well, making it quick and easy to format opening paragraphs.
To resize an automatic drop cap
- Choose the Content tool.
- Select the drop cap character or characters .
A drop cap is selected.
- In the point size field on the right side of the Character Attributes tab or Classic tab of the Measurements palette, change the size percentage . The range you can enter varies depending on the font size.
The drop cap is enlarged to 125%.
or
Choose Style > Character (Cmd-Shift-D/Ctrl-Shift-D), then change the Size percentage.


To kern next to a drop cap
- Choose the Content tool.
- Click in the first line of the paragraph between the drop cap and the character to the right of it. You’ll see a tall blinking bar when the cursor has been inserted correctly .
The cursor is correctly positioned for kerning next to a drop cap.
- In the Tracking/Kerning section of the Character Attributes tab or Classic tab of the Measurements palette, click the left arrow to delete space or the right arrow to add space . Option-click/Alt-click the left or right arrow to kern in finer increments.
or
To kern using the keyboard, press Cmd-Shift-[/Ctrl-Shift-[ or Cmd-Shift-]/Ctrl-Shift-]. Add Option/Alt to the shortcut to kern in a finer increment.
Note: If you need an introduction to kerning, see pages 124–126.


To remove an automatic drop cap
- Choose the Content tool.
- Click in the paragraph that contains the drop cap.
- Display the Paragraph Attributes tab of the Measurements palette.
- Uncheck Drop Caps.
- Click OK.
There are many reasons to use the Paragraph Rules feature for creating rules (horizontal lines above or below text). For one, a paragraph rule stays anchored to its paragraph even if the paragraph is moved or reflows (a line created with a line tool would stay put). Second, a paragraph rule can be applied using a style sheet. And finally, unlike the Underline type style, a paragraph rule can be modified in its appearance and position.
To insert a paragraph rule
- Choose the Content tool.
- Click in a paragraph or drag through a series of paragraphs.
- Choose Style > Rules (Cmd-Shift-N/Ctrl-Shift-N) to open the Rules pane of the Paragraph Attributes dialog box.
- Check Rule Above and/or Rule Below .
- Choose or enter a Width. Click Apply to preview (Cmd-A/Alt-A).
- Choose Indents, Text, or Column from the Length menu. If you choose Text, the rule will be the length of the first line of text in the paragraph for a Rule Above or the length of the last line of text in the paragraph for a Rule Below. If you choose Indents, the rule will span the width of the paragraph, unless you enter a number greater than 0 in the From Left and/or From Right field (see step 8). Note: The rule will be shortened by any Indent values in Style > Formats and any Text Inset values in Item > Modify > Text .
In this example, the first line of the paragraph is indented, which causes the rule to indent as well.
- In the Offset field, enter the fixed distance, in any measurement unit, by which you want to offset the bottom of the Rule Above upward from the baseline of the first line of the paragraph or offset the top of the Rule Below downward from the baseline of the last line of the paragraph. For a Rule Above, enter an Offset that is equal to or greater than the point size of the type.
or
Enter a percentage Offset (0–100%). A Rule Below with a 20% Offset, for example, would position the rule closer to the bottom of the currently selected paragraph than would an 80% offset. If this method is used and the spacing between the paragraphs is altered, the rule position will adjust automatically.
- Optional: Raise the From Left and/or From Right values to indent, and thus shorten, the rule.
- Optional: Choose a dash or stripe style from the Style menu. To create a custom style, see pages 227.
- Optional: Choose a color from the Color menu.
- Optional: Adjust the Shade and Opacity of the color using the sliders or fields.
- Click Apply to preview, make any adjustments, then click OK –
 .
To align the rule with the left edge of the rest of the paragraph, as in this example, in the From Left field we entered the same value as the paragraph’s left indent with a minus sign in front of it (-1p). A 2-pt Rule Above, Length: Indents, Offset p10 A 2-pt Rule Above, Length: Text, Offset p10 A 2-pt Rule Above, Length: Text, From Left 1p10, Offset p10
.
To align the rule with the left edge of the rest of the paragraph, as in this example, in the From Left field we entered the same value as the paragraph’s left indent with a minus sign in front of it (-1p). A 2-pt Rule Above, Length: Indents, Offset p10 A 2-pt Rule Above, Length: Text, Offset p10 A 2-pt Rule Above, Length: Text, From Left 1p10, Offset p10


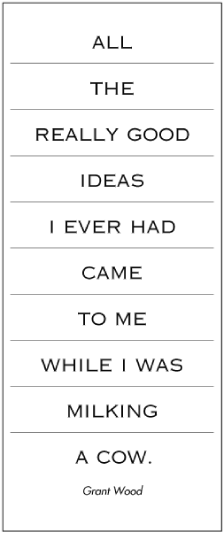
Rules of varying lengths and weights

To add alternating tints behind text, use a wide Rule Above with a negative Offset. Apply it via a style sheet!
Need to quickly fill a page with horizontal lines? Apply a paragraph rule, then keep pressing Return/Enter.
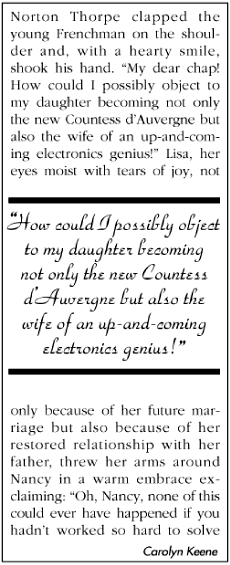
Here paragraph rules are used to separate a pull quote from the main body text.
Rules can be used as decorative elements or for emphasis. In this example, a Return was inserted after every line, making every line a separate paragraph.
The Lock to Baseline Grid command is used to precisely align text across columns in text boxes and table cells. For an alternate method of aligning text across columns, see the sidebar.
To align text to a grid
- Take note of what leading value is currently applied to your body text. Also, select your text box, go to Item > Modify > Text, then on a scrap of paper, jot down the current First Baseline: Offset value (paperless office? Ha!).
- Optional: To display the nonprinting gridlines, choose View > Baseline Grid (Option-F7/Ctrl-F7).
- Choose QuarkXPress (Edit, in Windows) > Preferences > Print Layout > Paragraph.
- Enter as the Baseline Grid: Start value the First Baseline: Offset value that you got from Item > Modify.
- Enter as the Baseline Grid: Increment the current leading value or a multiple of the leading value.
- Click OK.
- To snap the text to the grid lines, select the paragraphs you want to lock.
- Display the Paragraph Attributes tab of the Measurements palette or choose Style > Formats.
- Check Lock to Baseline Grid .
Text aligned across columns using Lock to Baseline Grid

Note: If Justified is chosen as the Vertical Alignment: Type in Item > Modify > Text, only the first and last lines in the column will lock to the grid.
Note: Also see the information about Maintain Leading on page 374.
Tip
You may not want to lock subheads to the grid. Many designers prefer to have subheads “float.”
Tip
For consistency, implement Lock to Baseline Grid through paragraph style sheets.
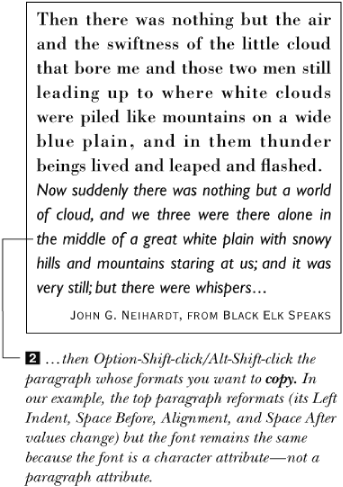
You can use this trick to copy paragraph formats within the same text box or between linked text boxes, but not between unlinked boxes or table cells. Paragraph style sheet and local formatting specifications will copy; character attributes (font, size, color, etc.) won’t. To use this trick, you will select the paragraphs you want to change, then click the paragraph that contains the desired formatting. Memorize this technique—you will use it often when formatting and fine tuning text.
To copy formats in the same story
- Click in a paragraph or drag through a series of paragraphs that you want to reformat.
- Option-Shift-click/Alt-Shift-click the paragraph whose formats you want copied to the paragraph(s) you selected in the previous step .

Applying hyphenation
Auto Hyphenation lessens gaps between words in justified type and smooths ragged edges in nonjustified type. A set of hyphenation and justification settings is called an “H&J,” and each project can contain up to 1,000 of them. To apply an H&J, follow the instructions on page 119. (Manual hyphenation, which is discussed in the sidebar on page 120, should be used only to correct an occasional awkward break here or there.)
To create or edit an H&J
- Choose Edit > H&Js (Cmd-Option-J/Ctrl-Alt-J). An H&J that is created when no files are open will be available in all subsequently created project files.
- To create a new H&J, click New , then enter a descriptive name in the Edit Hyphenation & Justification dialog box.
or
Click an existing H&J, then click Edit. The Standard H&J can be modified.
- In the Hyphenation & Justification dialog box, check Auto Hyphenation .
- Change any of the hyphenation settings:
Smallest Word is the minimum number of characters a word must contain to be hyphenated. We use 5 or 6.
Minimum Before is the minimum number (1–6) of a word’s characters that must precede a hyphen.
Minimum After is the minimum number (2–8) of characters that can follow a hyphen. For the sake of readability, we use 3 rather than the default 2.
Check Break Capitalized Words if you want to permit words that begin with an uppercase character to be hyphenated.
Hyphens in a Row is the number of consecutive lines that can end with a hyphen. More than two hyphens in a row can impair readability.
Enter a Hyphenation Zone value greater than zero to create a more ragged edge (less hyphenation).
- To tighten word spacing in justified paragraphs, enter lower Space: Min. and Space: Max. values . The subheads and thumb tabs in this book have slightly tightened word spacing. Headlines also tend to look better with tighter-than-normal word (and character) spacing. To loosen word spacing, enter higher values.
To tighten character spacing in justified paragraphs, enter lower Char: Min. and Char: Max. values. To loosen character spacing, enter higher values. Experiment and make your final judgment from a printout. The effect may vary depending on the font.
To change the word or character spacing in both justified and nonjustified paragraphs, change either or both of the Opt./Optimum values.
- Optional: The Flush Zone, which is the span within which the last word in a justified paragraph must fall in order to be justified, can be widened.
Check Single Word Justify to force any single word that falls on a line by itself to be justified to the full width of the text box, minus any indents. Usually this occurs at the end of a paragraph.
Note: The Forced Justify horizontal alignment option justifies single words automatically. In fact, Forced Justify overrides both the Flush Zone and Single Word Justify settings.
- Click OK.
- Click Save. To apply an H&J, follow the instructions on the next page.


Tip
To delete an H&J, click its name, then click Delete. If the H&J is in use, you’ll be prompted to choose a replacement ![]() . The Standard H&J can’t be deleted.
. The Standard H&J can’t be deleted.
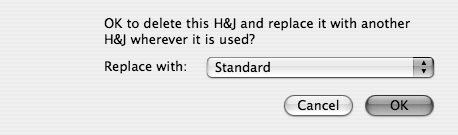
![]() This alert dialog box will open if you delete an H&J that is currently applied to text in a project. When you replace an H&J, text is likely to reflow throughout the layouts.
This alert dialog box will open if you delete an H&J that is currently applied to text in a project. When you replace an H&J, text is likely to reflow throughout the layouts.
In this illustration, hyphenation is on for the subheads (a no-no!) and off for the justified body text (another no-no because it leaves ugly “rivers” of white space).

Here hyphenation is turned off for the subheads and turned on for the justified body text. An improvement, don’t you think?
H&Js are applied to individual paragraphs via the H&J menu in Style > Formats. If you’re using more than one H&J setting in a project, the most efficient way to apply them to your text is via style sheets (click Formats in the Edit Paragraph Style Sheet dialog box; see Chapter 13). The Normal style sheet will have the Standard H&J associated with it unless a different H&J is chosen for it.
To apply an H&J
- Choose the Content tool.
- Click in a paragraph or drag through a series of paragraphs.
- Choose Style > Formats (Cmd-Shift-F/Ctrl-Shift-F).
- Choose an option from the H&J menu .
- Click Apply, if desired (Cmd-A/Alt-A), then click OK.

Tip
Use a nonbreaking (permanent) hyphen if you want a word to always hyphenate but never break at the end of a line (a compound word, such as “e-mail” or “two-thirds”). To insert one, choose Utilities > Insert Character > Special (nonbreaking) > Hyphen or press Cmd-=/Ctrl-=.
The Hyphenation Exceptions dialog box is used not only to enter words you don’t want hyphenated, but also to specify how specific words are to be hyphenated.
To enter hyphenation exceptions
- Choose Utilities > Hyphenation Exceptions.
- Type a word that you don’t want hyphenated . You can’t type spaces or punctuation marks.
Using the Hyphenation Exceptions dialog box, you can specify how a word is to be hyphenated and also specify which words you don’t want hyphenated.
or
Specify how a word will be hyphenated by typing it with a hyphen.
- Click Add (Return/Enter).
- Optional: To edit an entry, click it (the Add button will change to Replace), edit it in the field, then click Replace.
- Repeat steps 2–3 or 4 for any other words. Be sure to add any variations of a word, such as its plural form.
- Click Save. Hyphenation exceptions are saved in the XPress Preferences file, and are specify to layouts (not projects).

Tip
To prevent a compound word such as “absent-minded” from hyphenating, add each part of the word separately as a hyphenation exception.
Tip
You can use the Line Check feature to search for manually and/or automatically hyphenated words (see page 93).