
22. Preferences
Getting to the preferences
The Preferences dialog box
Preferences are the default values that automatically apply when a feature or a tool is used. For example, when the Line tool is used, a line is automatically drawn in a particular width; that width is one of its default settings. Other default settings for the Line tool include its color and style.

If you select project-level preferences when a project is open, the preferences affect only that project. Likewise, if you select layout-level preferences when a specific layout is active, the preferences affect only that layout. If no projects are open, however, project-level and layout-level preferences become defaults for all new projects and their layouts.
Other preferences, such as whether the XTensions Manager displays at startup, apply to the whole application, regardless of whether any projects are open when you choose them.
To open the main Preferences dialog box ![]() , use any of these three methods:
, use any of these three methods:
• Choose QuarkXPress (Edit, in Windows) > Preferences.
• Press one of the keyboard shortcuts listed in the sidebar at left.
• Control-click/Right-click a blank area in a layout and choose Preferences.

Once you’re in the Preferences dialog box, click an option in the scroll list at left to display a pane (a category) of preferences.
Other kinds of preferences and defaults
In addition to the preferences you can set via the Preferences dialog box, you can also specify other kinds of very useful defaults for the application. For example, any paragraph or character style sheet that’s created or appended when no projects are open will appear on the Style Sheets palette of subsequently created projects. The same holds true for colors, H&Js, lists, dashes and stripes, and the default auxiliary dictionary. Normal, the default paragraph and character style sheets that automatically appear in every new project and in any text box to which type specifications have not yet been applied, can be edited for all future layouts when no projects are open. Don’t overlook setting these kinds of defaults—they’re enormous time-savers!
Tracking and kerning table settings, and hyphenation exceptions, are stored in individual projects and in the XPress Preferences file. (On Mac OS: [hard drive]/Users/[user name]/Library/Preferences/Quark/QuarkXPress 7.0. On Windows: C: > Documents and Settings[current user]Application DataQuarkQuarkXPress 7.0). If, upon opening a file, the project settings don’t match the XPress Preferences settings, an alert dialog box will appear. Click Use XPress Preferences (Cmd-./Esc) to apply the preferences resident on that computer, or click Keep Document Settings (Return/Enter) to leave the project as is (see the sidebar).
If you trash your XPress Preferences.prf file, the application will create a new one automatically, but in the process all your custom settings will be lost. For this reason, you should trash the Preferences file only if the application becomes corrupt or if you intentionally want to restore the program defaults for some reason. You can copy your Preferences file and stash the copy for safekeeping.
Choosing application preferences
Remember that changes to Application Preferences affect all projects—as soon as you make the changes.
Display pane 

![]() The Display pane of QuarkXPress (Edit, in Windows) > Preferences > Application
The Display pane of QuarkXPress (Edit, in Windows) > Preferences > Application
To choose the color for Margin or Ruler guides, or the Grid, click the appropriate square, then choose a color from the Color Picker. The Margin color is also used to represent the item boundary in the Runaround and Clipping dialog boxes; the Ruler color also represents the clipping path; and the Grid color also represents the runaround path.
With Opaque Text Box Editing on, if you click a text box with the Content tool, it will look opaque, making it easier to edit the text, whether or not the box actually has a background color. With this option off (the default), a text box will keep its current background color, whether it’s a solid color, a blend, or None (transparent).
Choose a color depth for the screen preview that QuarkXPress creates for imported Color TIFFs. A picture’s screen preview affects its redraw speed and the storage size of the QuarkXPress file. The 8-bit (256 possible colors) option produces a faster redraw speed and smaller file size, but with an inferior screen preview. Style > Contrast isn’t available for a picture that has a 16-bit preview (thousands of possible colors) or 32-bit (Mac OS)/24-bit (Windows) preview (millions of possible colors).
Choose a color depth for the screen preview for imported Gray [grayscale] TIFFs.
The Pasteboard Width is the percentage of the total width of the layout that’s allocated to the pasteboard. 100% is the default. (48 is the maximum total width.)
If you clicked “Do not show this warning again” in any alert dialog box, you can click Show All Alerts here to allow alert dialog boxes to redisplay.
The Monitor Profile menu lets you tell QuarkXPress what type of computer monitor you are using so it knows how to display color. The default setting, Automatic, matches the monitor profile selected on your system. If for some reason it is incorrect, or on the rare occasion that you want to simulate a different monitor, you can choose a different profile. If you acquire a new monitor and it provides a profile, drag that profile into the Profiles folder inside the QuarkXPress application folder (if the folder doesn’t exist, create it). Then, choose that profile from this menu.
Windows only: The Display DPI Value is the monitor resolution. Read about this setting in the QuarkXPress documentation.
Input Settings pane

![]() The Input Settings pane of QuarkXPress (Edit, in Windows) > Preferences > Application
The Input Settings pane of QuarkXPress (Edit, in Windows) > Preferences > Application
Move the Scrolling slider to choose a rate of speed for the scroll arrows and boxes on the project window.
With Speed Scroll on, on a slow machine, large pictures and blends will be greeked (display as solid gray) as you scroll and then redraw when you stop scrolling.
With Live Scroll on, the layout will redraw as you drag a scroll box on the project window. Turn this option off if you have a slow machine. Option-drag/Alt-drag a scroll box to temporarily turn Live Scroll on or off. The Page Grabber always produces a live scroll.
With Smart Quotes on, smart quotation marks are inserted automatically when the ‘ or ” key is pressed (see page 130). Choose a Format (style) for the quotes. Professional typesetters always use Smart Quotes. Un-smart quotes look, well, un-smart.
Choose Page Range Separators for the symbols to be used in the Print dialog box to separate the page numbers you want to print. This is something you only need to worry about if your section page numbers include the default characters. For example, if you have pages such as “A-1,” then you couldn’t use a hyphen to separate a range of page numbers you want to print.
Mac OS X only: Choose which function you want the Control Key to have: Zoom in/out or access Contextual Menus (the default).
Adjust the Delay Before Live Refresh value to control how long you need to pause before you can see an item as you drag it with the mouse. Enter the number of seconds (or fraction of a second) in the field that you want to pause before dragging (0.75–5 seconds).
With Drag and Drop Text on, you can select text and drag it to a new location within the same story (one or more linked text boxes or table cells). See page 70.

If Show Tool Tips is checked and you rest the pointer on an interface element—such as a tool, icon, or palette button—its name will display. Knowing the names is also helpful for looking up information.
When Maintain Picture Box Attributes is checked, Maintain Picture Attributes is automatically checked in File > Import Picture when you import a picture into a box that already contains a picture. This setting also controls whether attributes (such as offset and scale) are maintained when you paste pictures into boxes that already contain pictures.
If Font Fallback is checked and you import or paste text containing special characters that are not available in the current font, QuarkXPress attempts to find the character in another active font and displays that character. When this is unchecked, QuarkXPress displays a box for missing characters. Uncheck this if you prefer to handle all font issues yourself.
Undo pane

![]() The Undo pane of QuarkXPress (Edit, in Windows) > Preferences > Application
The Undo pane of QuarkXPress (Edit, in Windows) > Preferences > Application
In Mac OS X, Cmd-Shift-Z is the default keyboard shortcut for Redo. To change this shortcut, choose Cmd-Z or Cmd-Y from the Redo Key menu. Note: If you choose Cmd-Z for Redo, you’ll need to press Cmd-Option-Z when you want to reverse your steps back through the Undo history.
In Windows, Ctrl-Y is the default keyboard shortcut for Redo. To change this shortcut, choose Ctrl-Shift-Z or Ctrl-Z from the Redo Key menu. Note: If you choose Ctrl-Z for Redo, you’ll need to press Ctrl-Alt-Z to reverse your steps back through the Undo history.
If you choose Cmd-Z/Ctrl-Z as your shortcut for Redo, you can then toggle back and forth between undoing and redoing the last edit.
In the Maximum History Actions field, you can specify the maximum number (1–30) of edits (actions) that can be stored in your Undo history. The default setting is 20. If the number of actions in a work session exceeds this maximum, the oldest action will be removed from the Undo menu.

The Undo/Redo menus in the lower-left corner of the project window
Save pane (, next page)
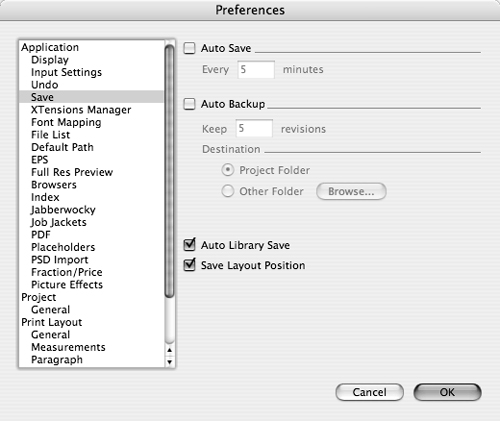
![]() The Save pane of QuarkXPress (Edit, in Windows) > Preferences > Application
The Save pane of QuarkXPress (Edit, in Windows) > Preferences > Application
Auto Save and Auto Backup are like system or power failure insurance. With Auto Save enabled, modifications are saved in a temporary file at the interval specified in the “Every [ ] minutes” field. Five minutes is the default. There may be a short (but potentially annoying) interruption in processing while an Auto Save occurs. If a system or power failure occurs while you’re modifying a layout and you restart and then reopen the project, a prompt will appear. Click OK to reopen the last auto-saved version. Beware! Auto Save can’t retrieve a project that’s never been saved!
To restore the last manually saved version of an open project, choose File > Revert to Saved. To restore the last auto-saved version of a project, hold down Option/Alt while choosing File > Revert to Saved.
Unlike Auto Save, which saves only modifications made to a project in a temporary file, Auto Backup creates a backup version of the entire project when the Save command is executed. Progressively higher numbers are appended to the backup names. To specify how many backup versions will be created before the oldest backup version is deleted, enter a number between 1 and 100 in the “Keep [ ] revisions” field.
Auto backups are saved in the current document (project) folder, unless you specify a different destination. Designating a different location for the backups can help prevent confusion. If you want to designate a different destination, click Other Folder and use the Browse button to specify a new location. To reset the destination as the current project folder at any time, click Project Folder.
With Auto Library Save on, a library will be saved whenever an item is added to it. With Auto Library Save off, a library will be saved only when it’s closed or when you quit/exit the application.
With Save Layout Position on, when a project is reopened, it will open to the same layout with the same zoom level, window size, and position onscreen that it had when it was last closed.
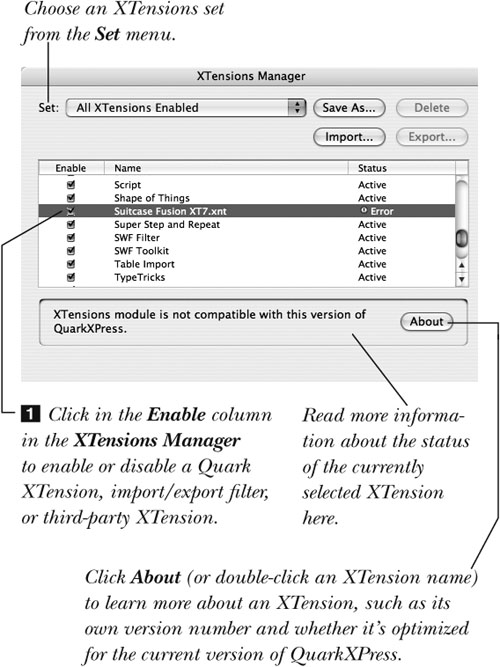
XTensions Manager pane 
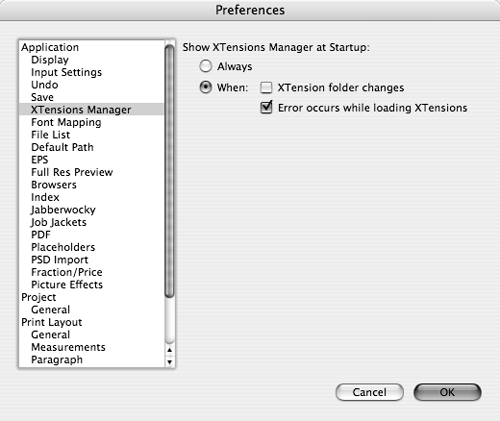
![]() The XTensions Manager pane of QuarkXPress (Edit, in Windows) > Preferences > Application
The XTensions Manager pane of QuarkXPress (Edit, in Windows) > Preferences > Application
With Show XTensions Manager at Startup: Always on, the XTensions Manager will open automatically whenever the application is launched.
With When: XTension Folder Changes on instead, the XTensions Manager will open during launch only if you’ve added or removed an XTension or XTensions from your XTension folder since the application was last open.
With When: Error Occurs While Loading XTensions on, the XTensions Manager will open during a launch only if QuarkXPress encounters a problem while loading XTensions.
Font Mapping pane 

![]() The Font Mapping pane of QuarkXPress (Edit, in Windows) > Preferences > Application
The Font Mapping pane of QuarkXPress (Edit, in Windows) > Preferences > Application
The Font Mapping preferences control what happens when you open a project that uses a font that is not active in your system. Usually, the answer is to locate and activate the font. You can, however, save font replacement “rules” for all projects by choosing replacement fonts and clicking Save as Rule in the Missing Fonts dialog box.
For handling missing fonts without rules, check Specify Default Replacement Font and select a font from the menu. If you have rules in place to handle most missing fonts, check Do Not Display Missing Fonts Dialog, and then specify how to handle fonts without rules: Display Missing Fonts Dialog or Replace Missing Fonts with Replacement Font (specified in the menu above).
File List pane

![]() The File List pane of QuarkXPress (Edit, in Windows) > Preferences > Application
The File List pane of QuarkXPress (Edit, in Windows) > Preferences > Application
Enter the maximum Number of Recent Files to Display (recently opened and saved files), from 3–9, that can be listed on the File menu.
Click Append Files to File Menu to have file names be listed on the first level of the File menu, or click Append Files to Open Menu Item to have file names be listed on the File > Open submenu.
Check Alphabetize Names to have file names be listed in alphabetical order. With this option unchecked, names will appear in the order in which they were opened or saved.
Check Show Full Path to have a file’s location (drive and folder) be listed next to its name on the File menu.
Default Path pane

![]() The Default Path pane of QuarkXPress (Edit, in Windows) > Preferences > Application
The Default Path pane of QuarkXPress (Edit, in Windows) > Preferences > Application
If you tend to navigate to the same folder each time you use the Open, Save/Save As, Import Text, or Import Picture command, it’s worth your while to use Default Path preferences to designate a default path for those dialog boxes.
Click any or all of the four Use Default Path for... check boxes, and for each one you check, use the Browse button to specify a path.
Tip
To disable a default path, uncheck that box in the Default Path preferences dialog box. The default path will still be listed, but it won’t be active.
EPS pane
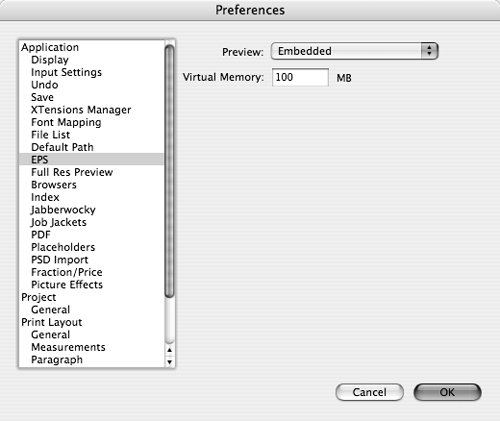
![]() The EPS pane of QuarkXPress (Edit, in Windows) > Preferences > Application
The EPS pane of QuarkXPress (Edit, in Windows) > Preferences > Application
The Preview menu lets you specify what displays when you import a picture in EPS format. Choose Embedded to display the built-in preview (saved with a picture in Illustrator, for example) or Generate to have QuarkXPress create a new preview.
In Mac OS, you can increase the memory available for creating EPS files from QuarkXPress (File > Save Page as EPS) by increasing the Virtual Memory value.
Full Res Preview pane
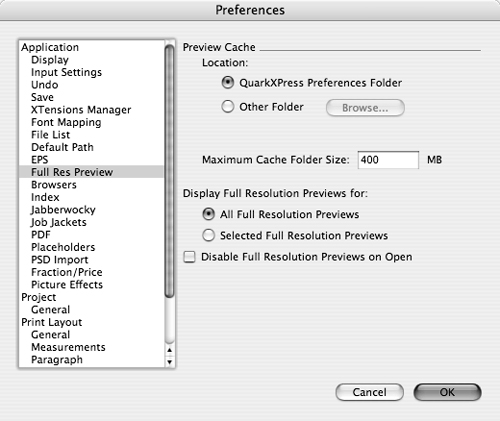
![]() The Full Res Preview pane of QuarkXPress (Edit, in Windows) > Preferences > Application
The Full Res Preview pane of QuarkXPress (Edit, in Windows) > Preferences > Application
High-resolution previews aren’t stored in project files. Rather, they’re stored in a folder called Preview Cache, located in the QuarkXPress Preferences Folder. To change it to a location with more space such as an external hard drive, click Other Folder and use the Browse button to specify a new location.
Enter the Maximum Cache Folder Size (200–4000 MB) for storage in the designated preview cache location.
With Display Full Resolution Preview for: All Full Resolution Previews chosen, if you apply View > Full Resolution Preview to pictures in a QuarkXPress project and then open the project on another computer, the application will have to generate new previews, which can take a while. If you click Selected Full Resolution Previews instead, QuarkXPress won’t display (or generate) any high-resolution previews until or unless a picture is selected.
To turn off the display of high-resolution previews, check Disable Full Resolution Previews on Open. Then, if and when you’re ready to see the high-resolution previews, you can turn them back on again by choosing View > Show Full Res Previews.
Job Jackets pane

![]() The Job Jackets pane of QuarkXPress (Edit, in Windows) > Preferences > Application
The Job Jackets pane of QuarkXPress (Edit, in Windows) > Preferences > Application
When using the Job Jackets feature, you can test layouts to see if they comply with rules and output specifications—such as whether a layout should use spot colors. Under Evaluate Layout, check when you want the tests to be performed. For the average user, On Open or On Close would be adequate whereas a service bureau might want On Output.
To store Job Jackets in your system’s Documents/My Documents folder, click Use Default Folder for Shared Job Jackets under Job Jacket Location. Otherwise, click Other Folder and use the Browse button to specify a new location.
PDF pane
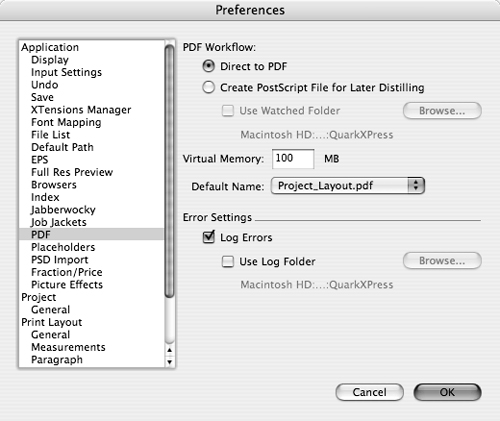
![]() The PDF pane of QuarkXPress (Edit, in Windows) > Preferences > Application
The PDF pane of QuarkXPress (Edit, in Windows) > Preferences > Application
If you choose File > Export > Layout as PDF to export a layout to PDF format and PDF Workflow: Direct to PDF is chosen as the Preferences setting, QuarkXPress will export the layout directly into the PDF format. If the setting is Create PostScript File for Later Distilling instead, when you choose the Layout as PDF command, QuarkXPress will create a PostScript export file that you can later convert to PDF using Adobe Acrobat Distiller.
If you check Use Watched Folder and then use the Browse button to designate a folder for exported PostScript files, Distiller will periodically check this folder and automatically distill any files saved to it.
In Mac OS, you can increase the memory available for creating PDFs by increasing the value in the Virtual Memory field.
To specify a default naming convention for exported PDF files, choose an option from the Default Name menu. If your projects don’t include multiple layouts, we suggest choosing Project.PDF rather than the default shown (Project_Layout.pdf).
To create a log file describing any errors when exporting a PDF, check Log Errors. To store all the log files in one location, check Use Log Folder and use the Browse button to specify a location. Otherwise, log files are stored in the same place as the exported PDF.
PSD Import pane
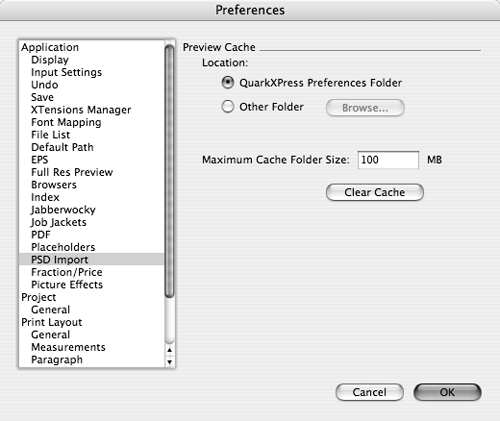
![]() The PSD Import pane of QuarkXPress (Edit, in Windows) > Preferences > Application
The PSD Import pane of QuarkXPress (Edit, in Windows) > Preferences > Application
Previews for import PSD (native Photoshop) files are stored in a folder called PSD Import Cache, located in the QuarkXPress Preferences Folder. To change to a location with more space such as an external hard drive, click Other Folder and use the Browse button to specify a new location.
Enter the Maximum Cache Folder Size (1–32,767 MB) for storage in the designated preview cache location.
Fraction/Price pane
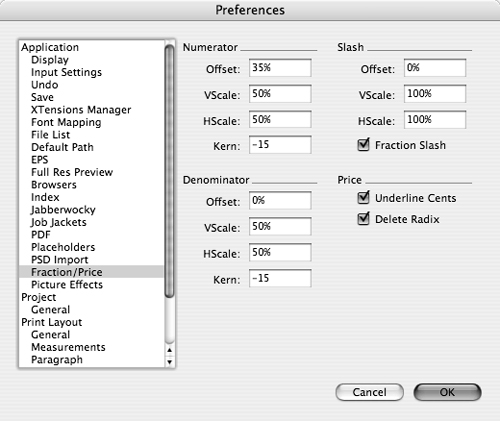
![]() The Fraction/Price pane of QuarkXPress (Edit, in Windows) > Preferences > Application
The Fraction/Price pane of QuarkXPress (Edit, in Windows) > Preferences > Application
Fraction/Price preferences control the proportions of fractions (e.g., ½, ¼) and prices (e.g., $2499, $99.99). To produce a fraction in QuarkXPress, type the normal characters (e.g., ¼), then select them and choose Style > Type Style > Make Fraction. Or for a price, type and select the characters, then choose Style > Type Style > Make Price. When the preferences are changed, only subsequently created fractions and prices are affected.
For fractions, you can change the VScale (vertical scale) and HScale (horizontal scale) for the Numerator, Slash, or Denominator to make them chunkier or thinner, and you can enter a Kern value for the space between the numerals and the slash. With Fraction Slash unchecked, the program will insert a normal slash; with this option checked (we recommend checking it), a special slash that fits better around the numerals will be used instead.
For the Make Price command, check Underline Cents if you want the cents digits be underlined, as in $2499. Whether or not you opt to have underlining, the cents will appear in the Superior style. Check Delete Radix to have a radix (decimal point or comma) appear in prices (as in $10.99); or uncheck this option to produce prices without a radix (as in $1099).
Picture Effects pane

![]() The Picture Effects pane of QuarkXPress (Edit, in Windows) > Preferences > Application
The Picture Effects pane of QuarkXPress (Edit, in Windows) > Preferences > Application
When you click the Save Preset or Load Preset button on the Picture Effects palette (Window menu), the location specified under Picture Effects Presets Location opens by default. The default location is the QuarkXPress Preferences Folder but you can change this to a more convenient location. Click Other Folder and use the Browse button to specify a location.
Choosing project preferences
Changes to Project Preferences affect all the layouts in the active project. If no projects are open, the changes become the new default settings for all new projects.
General pane

![]() The General pane of QuarkXPress (Edit, in Windows) > Preferences > Project
The General pane of QuarkXPress (Edit, in Windows) > Preferences > Project
When you open a project, the Auto Picture Import options control whether pictures used in the project are updated if they were modified after the project was last closed. For example, if you edit a picture in Photoshop after importing it, QuarkXPress considers it to be “modified” and needs to update the picture’s preview. Choose On to have pictures reimport automatically without a dialog box opening; choose Verify to have an alert dialog box appear if pictures were modified (see page 183); or choose Off to turn this feature off.
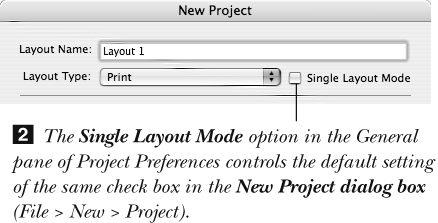
If you do not store multiple layouts in a project file, you can use the Single Layout Mode. This simplifies file naming because you need only one file name—not a project name and a layout name. If a project contains only one layout but is in multiple-layout mode, you can check Single Layout Mode to streamline its file name. Or, check Single Layout Mode when no projects are open, and Single Layout Mode will be checked automatically in the New Project dialog box for all future projects ![]() .
.
OpenType fonts include default kerning values that you can automatically apply to all layouts by checking Use OpenType Kerning. The OpenType kerning values will override anything you specified for the font in Kerning Table Edit (Utilities menu), but you can apply additional kerning manually (Style > Kern).
Choosing print layout preferences
Changes to Print Layout Preferences affect the active layout. If no projects are open, the changes become the new default settings for layouts in all new projects.
General pane

![]() The General pane of QuarkXPress (Edit, in Windows) > Preferences > Print Layout
The General pane of QuarkXPress (Edit, in Windows) > Preferences > Print Layout
Greek Text Below is the point size below which text will display as solid gray bars to help speed up screen redraw. Greeking is also affected by the current zoom level.
With Greek Pictures on, pictures display as gray boxes until you select them. This speeds screen redraw but is unnecessary if your computer is reasonably fast.
Set ruler Guides to display In Front of or Behind items on a page (see page 203).
The Snap Distance is the range in pixels within which an item (or table gridline) will snap to a guide if View > Snap to Guides is checked.
The Master Page Items options, Keep Changes and Delete Changes, affect whether modified master page items on layout pages are retained or deleted when master pages are applied or reapplied (see page 252).
Framing is added either to the Inside (the default) or Outside edges of a box. With Outside chosen, framing increases the dimensions of a box and changes its x/y location; with Inside chosen, those settings are unaffected. The Framing setting affects only subsequently created boxes.
In print layouts, with Auto Page Insertion on, pages will be added to a chain of automatic text boxes, when necessary, at the location of your choosing: End of Story, End of Section, or End of Document (see page 81). Choose Off to turn this feature off.
With Auto Constrain on, each newly created item (child) is constrained by the dimensions of an existing (parent) item.

Measurements pane

![]() The Measurements pane of QuarkXPress (Edit, in Windows) > Preferences > Print Layout
The Measurements pane of QuarkXPress (Edit, in Windows) > Preferences > Print Layout
For Measurements, choose the default Horizontal and Vertical units separately: Inches, Inches Decimal, Picas, Points, Millimeters, Centimeters, Ciceros, or Agates (see page 29). These units are used for the Measurements palette, rulers, and dialog boxes—except for font size, leading, frame width, and line width, which always display in points, regardless of the current default unit.
72 points/inch is the current standard Points/Inch ratio in desktop publishing, so there’s no need to change it. Ditto for Ciceros/cm, the ciceros-to-centimeter conversion ratio (2.197 is the default).
With Item Coordinates: Page chosen (the default setting), horizontal ruler increments start anew at zero on each page. With Spread chosen, horizontal ruler increments advance uninterrupted across any multipage spreads.
Tip
You can also Control-click/Right-click the horizontal or vertical ruler in the project window, then choose a unit from the Measure submenu.
Paragraph pane

![]() The Paragraph pane of QuarkXPress (Edit, in Windows) > Preferences > Print Layout
The Paragraph pane of QuarkXPress (Edit, in Windows) > Preferences > Print Layout
With Mode: Typesetting chosen, leading is measured from baseline to baseline, as in traditional typesetting. In Word Processing mode, leading is measured from ascent to ascent. Most publishers stick with Typesetting mode.
Auto Leading is enabled when “auto” or “0” is entered in the Leading field on the Measurements palette or in the Formats dialog box. When Auto Leading is used, you may see variable spacing between lines within the same paragraph, because it calculates the leading separately for each line based on the point size of the largest character per line. An increment can be entered instead of “auto” or “0.” If you enter “+2,” for example, 2 points will be added to the point size of the text to arrive at the leading amount (thus, 10-point text would have 12-point leading). The Auto Leading setting affects both newly created and existing text.
If Maintain Leading is on and an item is positioned within a column of text, the first line of text that’s forced below the obstructing item will snap to the nearest leading increment (allowing for the current Item Runaround value), thereby enabling text baselines to align across columns. With Maintain Leading off, text will be offset from the bottom of an obstructing item only by any existing Item Runaround value, making it difficult, but not impossible, to align text across columns.
By aligning text or items in a layout across columns using the nonprinting Baseline Grid ![]() , you can make pages look more symmetrical and uniform. To use this feature, specify an Increment that’s equal to or a multiple of the current text leading. The Start value should match the vertical (y) position of the first baseline of the text.
, you can make pages look more symmetrical and uniform. To use this feature, specify an Increment that’s equal to or a multiple of the current text leading. The Start value should match the vertical (y) position of the first baseline of the text.

![]() The Baseline Grid area in the Paragraph pane of QuarkXPress (Edit, in Windows) > Preferences > Print Layout
The Baseline Grid area in the Paragraph pane of QuarkXPress (Edit, in Windows) > Preferences > Print Layout
The choices for Hyphenation: Method are, in order of appearance and quality from earlier versions of QuarkXPress to this version: Standard, Enhanced, and Expanded. Click a Language to access this menu.
Character pane

![]() The Character pane of QuarkXPress (Edit, in Windows) > Preferences > Print Layout
The Character pane of QuarkXPress (Edit, in Windows) > Preferences > Print Layout
The Superscript Offset is the distance a superscript character is raised above the baseline, and it’s measured as a percentage of the current point size. The Subscript Offset is the distance a character is lowered below the baseline. The Superscript, Subscript, Small Caps, and Superior VScale (height) and HScale (width) are calculated as a percentage of a normal uppercase letter.
Tip
Increase the HScale for Small Caps (it looks better), or better yet, use an expert font with built-in small caps.
• Select the paragraphs and click the Lock to Baseline Grid icon on the Paragraph tab of the Measurements palette or choose Style > Formats, then check Lock to Baseline Grid.
• To display the grid, check View > Baseline Grid.
A ligature is a pair of serif characters (such as an “f” followed by an “l”) that are joined into one character to prevent them from ungracefully knocking into each other (![]() ). The hyphenation and check spelling features treat ligatures that are produced this way as normal characters. The Break Above value
). The hyphenation and check spelling features treat ligatures that are produced this way as normal characters. The Break Above value ![]() is the amount of tracking or kerning in a line of type above which characters with Ligatures applied won’t be joined as ligatures (for justified type, try 3 or 4). If Not “ffi” or “ffl” is checked, you will not get “fi” and “fl” ligatures for those letter combinations—unless the font includes actual ligatures for “ffi” and “ffl.”
is the amount of tracking or kerning in a line of type above which characters with Ligatures applied won’t be joined as ligatures (for justified type, try 3 or 4). If Not “ffi” or “ffl” is checked, you will not get “fi” and “fl” ligatures for those letter combinations—unless the font includes actual ligatures for “ffi” and “ffl.”

![]() The “fl” and “fi” ligatures (boldface added for emphasis)
The “fl” and “fi” ligatures (boldface added for emphasis)

![]() The Ligatures area in the Character pane of QuarkXPress (Edit, in Windows) > Preferences > Print Layout
The Ligatures area in the Character pane of QuarkXPress (Edit, in Windows) > Preferences > Print Layout
The Auto Kern Above value is the point size above which characters will be kerned automatically, based on each particular font’s built-in kerning values as well as any user-defined QuarkXPress Tracking Edit or Kerning Table Edit values. Kerning is essential for professional-looking type. For OpenType fonts, use the Use OpenType Kerning setting in the General pane of Project Preferences.
The increment used for tracking in QuarkXPress is ![]() of an em space. With Standard Em Space off (the default setting), an em space equals the width of two zeros in the current font. With this option on, an em space equals the point size of the text.
of an em space. With Standard Em Space off (the default setting), an em space equals the width of two zeros in the current font. With this option on, an em space equals the point size of the text.
The Flex Space Width (0–400%) is a percentage of an en space in the current font. To enter a flexible space or a nonbreaking flexible space in text, use the Utilities > Insert Character submenus. To make the flex space the same width as an em space, enter 200%.
Check Accents for All Caps to permit foreign-language accent marks on small caps or all caps text ![]() . Note that they’re acceptable in some languages and not others. To learn the keystrokes for producing foreign-language accent marks (such as é, ö, ã, à), see Appendix A.
. Note that they’re acceptable in some languages and not others. To learn the keystrokes for producing foreign-language accent marks (such as é, ö, ã, à), see Appendix A.
![]() With Accents for All Caps on, accent marks can be inserted above uppercase characters.
With Accents for All Caps on, accent marks can be inserted above uppercase characters.
Tools pane

![]() The Tools pane of QuarkXPress (Edit, in Windows) > Preferences > Print Layout
The Tools pane of QuarkXPress (Edit, in Windows) > Preferences > Print Layout
To choose default settings for a tool, click its icon in the Tools pane or double-click the tool on the Tools palette. Click Modify to change the default settings for the currently selected tool icon(s). Among the many item creation tool settings you can change are the background color, Frame Width, and Runaround Type for any Picture Box tool or Text Box tool, the Text Inset for the Text Box tools, and the Width for the Line tool ![]() . For the Zoom tool, you can specify Minimum and Maximum values 10–800%) and an Increment value (1–400%). For the Tables tool, you can specify defaults for table creation and formatting.
. For the Zoom tool, you can specify Minimum and Maximum values 10–800%) and an Increment value (1–400%). For the Tables tool, you can specify defaults for table creation and formatting.

![]() A sample of defaults available for the Line tool
A sample of defaults available for the Line tool
To set preferences for more than one tool at a time, first Cmd-click/Ctrl-click their icons individually. Or click one tool icon, then click Similar Types or Similar Shapes to change the default settings for related tools. Fewer Modify dialog box settings may be available when more than one tool icon is selected.
To restore the default settings for the currently selected tools, click Use Default Prefs. To restore the default arrangement of tools on the Tools palette and pop-out menus, click Default Tool Palette.
Layers pane

![]() The Layers pane of QuarkXPress (Edit, in Windows) > Preferences > Print Layout
The Layers pane of QuarkXPress (Edit, in Windows) > Preferences > Print Layout
Choose whether newly created layers will be Visible. Invisible layers don’t print. Choose whether to Suppress Output of all items on subsequently created layers.
Tip
To control the printing of individual items on a layer instead of all the items on a layer, use the Suppress Output or Suppress Picture Output option in Item > Modify.
Choose whether you want new layers to be Locked. Check Keep Runaround to preserve the current Runaround settings for text on visible layers, even if the items the text is wrapping around are hidden.
Managing XTensions
XTensions are add-ons to QuarkXPress that extend the program’s capabilities. Some XTensions are included with the application, such as the filters for importing word processing files, whereas others are produced by third-party developers and must be purchased separately (see page 28).
Using the XTensions Manager, you can enable or disable program and/or third-party XTensions from within the application, as long as they’re located either in the XTension folder or the XTension Disabled folder. To conserve memory, you should disable any XTensions that you’re not using. You can also use this utility to save, export, import, or delete XTension sets, which are user-defined groups of XTensions that you want to use together.
To enable/disable XTensions or import/export filters
- Choose Utilities > XTensions Manager.
- Click a check mark to disable an XTension, or click an empty check box/empty space in the Enable column to enable it . Repeat for any other XTensions you want to turn on or off.
or
Choose an XTensions set from the Set menu (see the next page).
- Optional: Click About or double-click an XTension name to display information about the currently selected XTension. Click in the info dialog box to return to the Manager.
- Click OK. The XTensions Manager changes won’t take effect until you quit/exit and relaunch QuarkXPress.
To help you organize XTensions and make it easier to turn them on and off (this XTension on, that XTension off, etc.), you can save your custom XTensions Manager settings as a set. You can also choose which set will be in effect when the application is launched. XTensions sets are saved in the XPress Preferences file. Whichever set is chosen from the Set menu when you quit/exit QuarkXPress will be in effect when the program is relaunched.
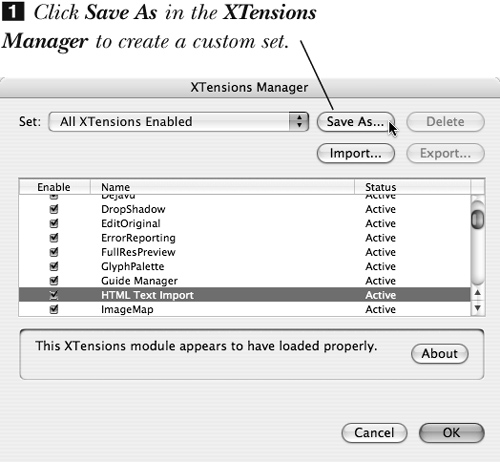
To create an XTensions set
- Choose Utilities > XTensions Manager.
- Disable any XTensions that you don’t want included in your set, and enable any XTensions that you do want included by clicking the box in the far left column.
- Click Save As .
- Enter a name for the current set .
Enter a name for the XTensions set.
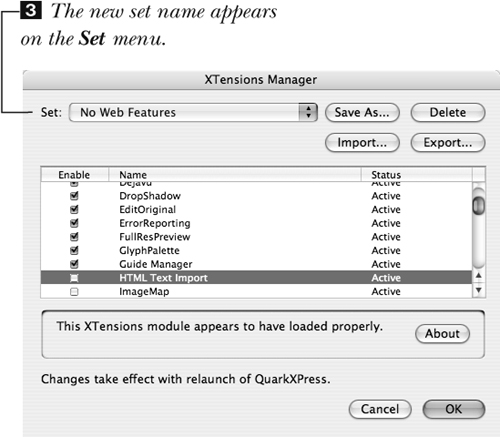
- Click Save. Your custom set will appear on the Set menu in the XTensions Manager , and it will be enabled when the application is relaunched.
- Click OK.

Tip
To enable all the XTensions, choose Set: All XTensions Enabled. To disable them all, choose All XTensions Disabled from the same menu.
Tip
To delete a user-defined set, choose it from the Set menu, then click Delete. This can’t be undone!
To backup and share XTensions sets
If you’re a member of a workgroup, you can share XTensions sets by exporting and importing them. Click Export to export the currently active XTensions set. Other users can then use the Import button to access your set—provided they also own those XTensions. You can also use this method to backup your XTensions sets.