
3. Navigate/Undo
Changing zoom levels
By learning how to switch zoom levels, you’ll work more efficiently and minimize eye and neck strain. You can go back and forth between editing small details at a magnified zoom level to checking out the overall composition in Fit in Window view or a lower zoom level. Changing the zoom level doesn’t alter a layout’s output dimensions; it only changes its onscreen appearance.

For the zoom in and zoom out shortcuts, see the following page.
To zoom in or out using the View menu or the view percent field
Choose View > Fit in Window (Cmd-0/Ctrl-0), 50%, 75%, Actual Size (Cmd-1/Ctrl-1), 200%, or Thumbnails (Shift-F6).
or
Double-click the view percent field in the lower-left corner of the project window ![]() (Control-V/Ctrl-Alt-V), type a number between 10 and 800 (but Windows users, see the sidebar at left), then press Return/Enter. You don’t have to enter the % symbol. For Thumbnails view, enter “t”, then press Return/Enter.
(Control-V/Ctrl-Alt-V), type a number between 10 and 800 (but Windows users, see the sidebar at left), then press Return/Enter. You don’t have to enter the % symbol. For Thumbnails view, enter “t”, then press Return/Enter.

Tip
Page elements can’t be modified in Thumbnails view. Pages in a layout can be rearranged in Thumbnails view, however (see page 88), and whole pages can be drag-copied between projects and between layouts within one project, provided both source and target are in Thumbnails view (see page 95).
Tip
For an almost-thumbnails view in which page elements are editable, choose a very small view size, such as 25%.
Accessing the Zoom tool from the keyboard is much speedier than selecting and then deselecting the tool from the Tools palette. You can choose a different zoom level for each layout in a project.
Note: In Mac OS X, you need to be aware of a preferences setting when accessing the Zoom tool using the keyboard. If Contextual Menu is chosen as the Control Key Activates setting in QuarkXPress > Preferences > Application > Input Settings, you can use the shortcuts as listed below. If Control Key Activates: Zoom is chosen, on the other hand, omit the Shift key from the shortcuts.
To zoom in or out using a shortcut
Control-Shift-click/Ctrl-Spacebar-click the page to zoom in ![]() .
.

![]() Control-Shift-click/Ctrl-Spacebar-click a page to zoom in.
Control-Shift-click/Ctrl-Spacebar-click a page to zoom in.
or
Control-Option-click/Ctrl-Alt-Spacebar-click the page to zoom out.
or
Control-Shift-drag/Ctrl-Spacebar-drag a marquee across an area on the page that you want to magnify ![]() .
.

![]() Control-Shift-drag/Ctrl-Spacebar-drag over a section of a page to magnify that chosen area.
Control-Shift-drag/Ctrl-Spacebar-drag over a section of a page to magnify that chosen area.
or
Press Cmd-+ (plus) to zoom in or Cmd- – (minus) to zoom out. If the Content tool is chosen, deselect first.
or
Control-click/Right-click in a layout and choose Fit in Window or Actual Size.
Tip
To set the Minimum, Maximum, and Increment percentages for the Zoom tool, double-click the tool, then click Modify.
Tip
Click the project window zoom/maximize button to enlarge the window to full screen size (Mac OS X)/application window size (Windows). Click it again to restore the window’s former size.

Moving around
To switch between layouts
Click a layout tab at the bottom of the project window ![]() .
.

![]() Click a layout tab at the bottom of the project window.
Click a layout tab at the bottom of the project window.
or
Press Cmd-′/Alt-′ (apostrophe) to cycle through the layouts in a project.
or
From the Layout menu, choose Previous, Next, First, or Last.
or
Choose from the Layout > Go To submenu.
To move a layout in the project window using the page grabber hand
Option-drag/Alt-drag to move a layout in the project window. The cursor will temporarily turn into a hand icon ![]() , and the layout will redraw as you scroll. If Speed Scroll is on in QuarkXPress (Edit, in Windows) > Preferences > Application > Interactive, pictures and blends may be greeked (grayed out) as you scroll.
, and the layout will redraw as you scroll. If Speed Scroll is on in QuarkXPress (Edit, in Windows) > Preferences > Application > Interactive, pictures and blends may be greeked (grayed out) as you scroll.

![]() Option-drag/Alt-drag to move a page in the project window.
Option-drag/Alt-drag to move a page in the project window.
Note: The page grabber isn’t accessible while the Zoom tool is chosen.
To move a layout in the project window using the scroll arrows, bars, or boxes
Click a scroll arrow to scroll a short distance through a layout ![]() .
.

![]() The standard window navigation features: scroll boxes, bars, and arrows
The standard window navigation features: scroll boxes, bars, and arrows
or
Move a scroll box to move through a layout more quickly. The page number in the lower-left corner of the project window will update if you move to a different page.
or
Click a gray scroll bar area to scoot quickly through a layout.
Tip
The scroll speed and other scroll preferences are set in QuarkXPress (Edit, in Windows) > Preferences > Application > Input Settings (see page 364).
To move through a layout using the extended keyboard
Press Page Up or Page Down to move up or down one full screen ![]() .
.

or
Press Shift-End/Ctrl-Page Down to go to the top of the last page in the layout.
or
Press Shift-Home/Ctrl-Page Up to go to the top of the first page in the layout.
or
Press Shift-Page Up to go to the top of the previous page.
or
Press Shift-Page Down to go to the top of the next page.
or
In Mac OS X, press Home to go to the top of the first page in the layout (or to the blank space to the left of the first page), or press End to go to the bottom of the last page (or the blank space to the right of the last page).
In Windows, press Ctrl-Home to go to the start of the current story, or press Ctrl-End to go to the end of the story.
For more shortcuts like these, see page 424.
To go to a page using a command
Choose Page > Previous, Next, First, or Last.
or
Choose Page > Go to (Cmd-J/Ctrl-J), enter the desired page number in the Go to Page field, then click OK ![]() .
.

![]() Press Cmd-J/Ctrl-J to get to the Go to Page dialog box quickly.
Press Cmd-J/Ctrl-J to get to the Go to Page dialog box quickly.
Tip
If the desired page has a prefix that was applied using the Section command, be sure to enter that prefix along with the number in the Go to Page dialog box. Also make sure the number is entered in the correct format (e.g. lowercase Roman, numeric). To display a page based on its position in the layout rather than its applied Section number, enter “+” before the number. (For example, the first page in the layout is always +1.) You can also type “end” to get to the last page in a layout.
To go to a page using the Page Layout palette
- Choose Window > Page Layout (F10/F4).
- Click the desired page number under the layout page icon
 .
.
The Page Layout palette
or
Double-click a layout page icon. (Single-clicking will select the icon but not display the page.)

Tip
When a page icon is selected, its number displays in the lower-left corner of the Page Layout palette. If a page begins a section, an asterisk will follow the number. If no page icon is selected, the total number of pages the layout contains will display instead (e.g., “10 Pages”) ![]() .
.
Tip
In Mac OS X, the F10 key is assigned by default to the Application Windows features of Exposé. If you want the key to work properly in QuarkXPress, open System Preferences > Dashboard & Exposé and assign a new keystroke to Application Windows.
To go to a page using the Go-to-page menu or field
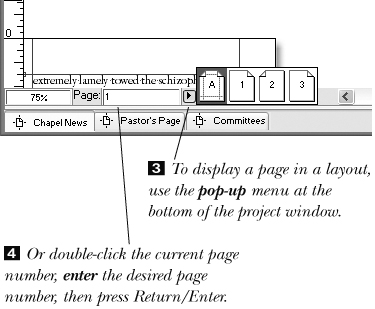
Choose a page number from the Go-to-page pop-up menu at the bottom of the project window ![]() .
.
or
Double-click the current page number at the bottom of the project window ![]() , enter the desired page number, then press Return/Enter.
, enter the desired page number, then press Return/Enter.
To arrange multiple project windows
In Mac OS X, choose any of the following commands from the Window menu (or Shift-click the project window title bar and choose any of the commands from there):
Bring All to Front to bring all the currently open QuarkXPress project windows to the front of any other open application windows without changing their size, location, or stacking position.
or
Tile to stack all the currently open project windows in neat horizontal strips.
or
Stack to stack project windows at full size with their title bars showing.
In Windows, choose any of the following commands from the Window menu:
Cascade to stack project windows at full size in a stair-stepped arrangement.
or
Tile Horizontally to arrange project windows in horizontal strips ![]() .
.

![]() This is how the layout appears after choosing Window > Tile Horizontally in Windows. In Mac OS X, choosing Tile does the same thing.
This is how the layout appears after choosing Window > Tile Horizontally in Windows. In Mac OS X, choosing Tile does the same thing.
or
Tile Vertically to arrange project windows in columns.
To activate an open project
Choose the name of any open project from the bottom of the Window menu.
In Mac OS X, you can also Shift-click a project title bar and choose from a list of open files.
In Mac OS X, a bullet will appear next to the name of any open but not active project that contains unsaved changes.
Creating multiple views of one layout or project
It’s sometimes useful to be able to look at two or more parts of your layout at the same time, or view one page from your layout at two different zoom levels. Or, you might need to look at pages from two different layouts in the same project simultaneously. QuarkXPress 7 now lets you accomplish all of these things by opening a layout in more than one window, or by splitting a window into several views.
To view a layout in multiple windows
Choose Window > New Window.
A new window opens, duplicating the current view of your layout ![]() . You can close the new window any time without losing changes.
. You can close the new window any time without losing changes.

![]() A single layout, visible in two windows.
A single layout, visible in two windows.
Tip
If your project contains multiple layouts, you can choose to display a different layout in the new window ![]() . This is helpful for dragging items and pages between layouts in the same project.
. This is helpful for dragging items and pages between layouts in the same project.

![]() Two layouts from the same project, displayed in separate windows.
Two layouts from the same project, displayed in separate windows.
To split a window into multiple views
Click the split bar at the top of the righthand scroll bar (to split horizontally) or to the right of the bottom scroll bar (to split vertically) ![]() .
.

![]() The split bar
The split bar
or
Choose Window > Split Window > Horizontal (or Vertical) ![]() .
.

![]() After choosing Split Window > Vertical
After choosing Split Window > Vertical
The window is divided into equal portions, each showing the same view of the layout. You can scroll each view independently of the other, and the views can have different zoom levels.
Tip
Drag the bar dividing the window to adjust the relative sizes of the splits.
To remove splits from a window
Drag a split bar all the way to the edge of the window.
or
Choose Window > Split Window > Remove All.
Undoing edits
If you’re nervous about making mistakes, relax. You will never (okay, rarely) have to retrace your steps if you take advantage of all the safety mechanisms QuarkXPress has to offer. Your computer has a memory, and you can rely on it.
In most cases, the last maneuver you performed can be undone using the Edit > Undo command. If you change your mind again, choose Edit > Redo.
Get in the habit of saving after every couple of moves (see page 36). For some reason, beginning “Quarkers” are often reluctant to use this command (or are too absorbed with other tasks) and end up learning the hard way. Having learned a few hard lessons ourselves, we now save constantly, and we make a special point of saving before we perform any complicated maneuvers. Then, if we make the inevitable multiple-step blunder, we choose File > Revert to Saved to get back to the last-saved version of the file. (Also read about multiple undos/redos on the following three pages.)
The undo shortcut (Cmd-Z/Ctrl-Z) can also be used to restore the last-used settings in an open dialog box. To dismiss a dialog box without applying any values, click Cancel (Esc or Cmd-./Esc).
QuarkXPress has two features for backing up a whole project: Auto Save and Auto Backup. Read about these features on page 365.
And finally, if you’re working on a complicated object, you can duplicate it (Item > Duplicate or Cmd-D/Ctrl-D) and set the copy aside for safekeeping (put it on the pasteboard). Then later you can compliment yourself on your great foresight.
You can undo up to 30 edits, in reverse order, or redo up to the same number of actions that you’ve undone. QuarkXPress stores those edits in memory (it’s called the Undo History), replacing the oldest one on the list as each new edit is performed.
You may want to scan these pages and then reread them after you’ve learned how to perform some edits.
To undo via a shortcut or button
As we said on the previous page, to reverse your last edit, one option is to choose Edit > Undo (Cmd-Z/Ctrl-Z). You can choose the same command again to undo the next most recent action, and so on, until no actions remain in the Undo History. Note: This is the default shortcut for Undo. If it doesn’t work, see the preferences information on page 365.
or
Click the Undo button ![]() at the bottom of the project window
at the bottom of the project window ![]() –
–![]() . Keep clicking the button, if desired, to continue undoing. This button won’t be available if the last edit can’t be undone (see the sidebar on the following page) or if the Undo History is empty.
. Keep clicking the button, if desired, to continue undoing. This button won’t be available if the last edit can’t be undone (see the sidebar on the following page) or if the Undo History is empty.


Tip
If you perform an edit that affects the whole project, that edit is added to the Undo History for all the layout spaces in that project. See our chart on page 33, which lists the edits that affect whole projects and the edits that affect individual layouts.
To undo via a menu command
Each reversible edit you perform is added to the Undo History pop-up menu, which opens when you press and hold the Undo button in Mac OS X ![]() /the disclosure triangle next to the Undo button in Windows
/the disclosure triangle next to the Undo button in Windows ![]() . The most recently performed edit is listed at the top of the Undo History pop-up menu; the oldest edit is at the bottom.
. The most recently performed edit is listed at the top of the Undo History pop-up menu; the oldest edit is at the bottom.

![]() Four undos are selected on the Undo pop-up menu in Mac OS X.
Four undos are selected on the Undo pop-up menu in Mac OS X.

![]() The Undo pop-up menu in Windows
The Undo pop-up menu in Windows
When you make a selection on the Undo History pop-up menu, all subsequent edits (all the edits listed above the one you select on the menu) are selected and undone automatically. Unfortunately, you can’t single out an edit from the middle of the list and undo just that one.
Beware! This doesn’t make any sense to us, but the Undo History pop-up menu is emptied automatically whenever you perform any edit that’s nonreversible or you choose File > Revert to Saved.
Regardless of what appears on the Undo History pop-up menu, the current maximum number of undos will still be available via the Undo command or button.
The Undo History isn’t cleared when you perform nonreversible edits, such as those listed below, and thus they’re exceptions to the above-mentioned rule:
• Choose File > Save
• Create a new master page
• Duplicate a master page
• Apply a master page to a layout page
• Create or move a ruler guide on a layout page
• Delete a ruler guide from a layout page
• Edit Layer Attributes
• Changes made in the Edit Colors dialog box
• Master pages changes (e.g., duplicating a master page or choosing commands from the context menu over the Page Layout palette while a master page is displayed)—once a layout page is redisplayed.
• Adding, deleting, or re-ordering pages in the Page Layout palette.
The Redo command redoes the last edit that you’ve undone. You can choose the command again and again to reverse multiple undos, going backward in history.
To redo edits that were undone
Method 1
Choose Edit > Redo (Cmd-Shift-Z/Ctrl-Shift-Z). You can keep choosing the same command to reverse more undos, until the Redo History empties out. Note: If this command doesn’t work, read about Undo preferences on page 365.
Method 2
Click the Redo button ![]() at the bottom of the project window. Click again to reverse more undos. This button won’t be available if the Redo History is empty.
at the bottom of the project window. Click again to reverse more undos. This button won’t be available if the Redo History is empty.
Method 3
Each edit you perform is added to the Redo History pop-up menu, which opens when you press and hold the Redo button in Mac OS X ![]() /the disclosure triangle next to the Redo button in Windows
/the disclosure triangle next to the Redo button in Windows ![]() . The most recently performed undo will be listed at the top of the Redo History pop-up menu, and so on down in order. When you select an edit on the menu, that undo and all edits that are listed above it are selected and reversed.
. The most recently performed undo will be listed at the top of the Redo History pop-up menu, and so on down in order. When you select an edit on the menu, that undo and all edits that are listed above it are selected and reversed.

![]() The Redo pop-up menu in Mac OS X
The Redo pop-up menu in Mac OS X

![]() The Redo pop-up menu in Windows
The Redo pop-up menu in Windows
Note: The Redo History is usually empty because QuarkXPress clears it automatically whenever you perform an edit other than Undo or Redo. When the Redo History is empty, the Redo button is unavailable.