
4. Text
Text basics
To input or import text in QuarkXPress, you first have to create a box to put it. You can also flow text along a path or enter it in table cells. QuarkXPress has five tools that are expressly used for creating different-shaped text boxes, as well as two Bézier Text Box tools, four Text-Path tools, and a Tables tool. In addition, you can convert any item into a text box or text path.

In QuarkXPress 7.0, new text boxes are transparent by default—that is, they are created with a background color of None. To learn about adding color to a text box or path, see pages 267–271.
Note: If you check Automatic Text Box in the New Project dialog box when you create a project, every page in the default layout will contain a text box within the margin guides. This box is used to flow text from page to page, and you’ll learn about it in the next chapter. For now, you can delete the automatic text box if it gets in the way: click it, then press Cmd-K/Ctrl-K (or, if you’re in a lousy mood, Cmd-Option-Shift-K/Ctrl-Alt-Shift-K might cheer you up—no, it’s not a virus, it’s a feature).
To create a text box
- Choose any Text Box tool except a Bézier text tool (see Chapter 18). The cursor will turn into a crosshair.
- Drag in any direction
 . When you release the mouse, the finished box will be selected and ready to hold text
  . When the Content tool is chosen and a text box is selected, a blinking text insertion marker appears in the box and the pointer turns into an I-beam.
Drag with a Text Box tool. A new text box is created.
. When the Content tool is chosen and a text box is selected, a blinking text insertion marker appears in the box and the pointer turns into an I-beam.
Drag with a Text Box tool. A new text box is created.

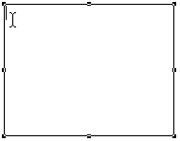
Every box in QuarkXPress, no matter its shape, is contained within a rectangular, non-printing bounding box which has handles at each corner and in the middle of each side ![]() . When you resize a text box, you are manipulating its bounding box.
. When you resize a text box, you are manipulating its bounding box.

![]() An oval text box enclosed in its bounding box
An oval text box enclosed in its bounding box
To resize a text box manually
- Choose the Item or Content tool (Shift-F8).
- Click a box. Its bounding box appears.
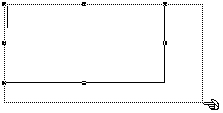
- Drag any handle –
 .
Resize a box by dragging any of its four corner handles (note the hand pointer)......or drag any of its four midpoint handles.
.
Resize a box by dragging any of its four corner handles (note the hand pointer)......or drag any of its four midpoint handles.or
To resize the box proportionally, hold down Option-Shift/Alt-Shift while dragging. (Hold down Shift without Option/Alt to turn the bounding box into a square.) Release the modifier keys after you release the mouse.
Tip
Make sure the point of the cursor arrow is directly over one of the box handles before pressing the mouse. The cursor will change into a pointing-hand icon.
Tip
To see your changes in real time, pause after clicking a handle of a text box but before dragging. The text wrap will update continuously as you drag (the pointer will turn into a cluster of arrows)
 . The length of the pause required before dragging can be adjusted in Preferences (see page 364). Pause-dragging with Live Refresh
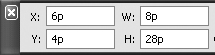
To resize a text box using the Measurements palette
- Choose the Item or Content tool.
- Click a box.
- Change the W (and/or H) value on the Measurements palette (Classic or Space/Align tab) for the width (and/or height) of the box, then press Return/Enter
 . You need to include an abbreviation for the unit (e.g., “p” or “mm”) only if the value you’re entering is not in the current default unit. See page 29.
The box location and size fields on the Classic tab of the Measurements palette
. You need to include an abbreviation for the unit (e.g., “p” or “mm”) only if the value you’re entering is not in the current default unit. See page 29.
The box location and size fields on the Classic tab of the Measurements palette

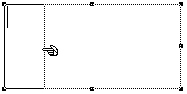
To move a text box manually
- Choose the Item tool. Or if you’re using the Content tool, hold down Cmd/Ctrl to turn it into a temporary Item tool.
- Press inside a text box, pause briefly for the text to redraw, then drag the item to a new location on the same page or on a different page – (the pointer will be a cluster of arrowheads). The X and Y position values on the Measurements palette will update as you drag. To force scrolling, knock your pointer into the edge of the project window while dragging.
Pause before dragging to see the contents of the item as you move it... ...or drag without pausing to see only the outline of the box as it’s moved. Use this method on a slow machine.
Tip
Hold down Shift as you drag to constrain the movement to a horizontal or vertical axis. Release the mouse before releasing Shift. To use ruler guides to position an item, see page 203.

Use the Measurements palette to move the upper-left corner of an item to a precise X/Y location, relative to the ruler origin.
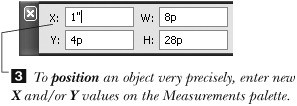
To reposition a text box or any other item using the Measurements palette
- Choose the Item or Content tool.
- Click the item you want to reposition.
- Enter a new number in the X (or Y) field on the Classic or Space/Align tab of the Measurements palette to change the horizontal (or vertical) position of the item’s bounding box relative to the ruler origin , which, unless you change it, is located at the uppermost left corner of the project window.
- Press Return/Enter .
After pressing Return/Enter, the 1″ value entered in the X field is converted to its equivalent in the default measurement unit (in this case, picas).
Tip
To use arithmetic in the X, Y, W, or H field—for example, to make a box 4p taller—enter “+” after the current number, then the amount you want to add. To subtract, enter “-”; to multiply, enter “*”; or to divide, enter “/”.
Working with text
To input text
- Choose the Content tool.
- Click in a text box (or click a text path) to create an insertion point.
- Start typing . Press Return/Enter whenever you want to begin a new paragraph .
Text is typed into a text box with the Content tool.
Tip
Make sure View > Invisibles is checked (Cmd-I/Ctrl-I) to reveal paragraph returns, spaces, and other non-printing characters.
Tip
To move text inward from the sides of its box, select the box, use the Text tab of the Measurements palette or the Item < Modify dialog box to adjust Text Inset (see page 71). And remember, you can always move the text box downward on the page!


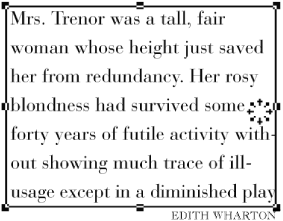
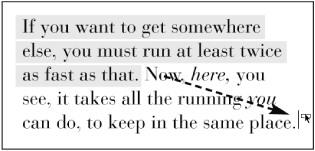
What is the text overflow symbol?
If a text box is too small to display all the text that it contains, a text overflow symbol appears in the lower-right corner of the box ![]() . The text overflow symbol will disappear if the text box is enlarged enough to display all the type that it contains or if the box is linked to another box for the text to spill into.
. The text overflow symbol will disappear if the text box is enlarged enough to display all the type that it contains or if the box is linked to another box for the text to spill into.
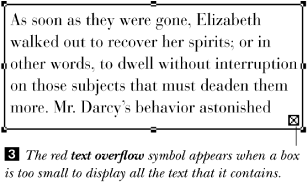
The text overflow symbol doesn’t print; it’s merely an indicator that there’s hidden text in the buffer. Only text that’s visible in a box will print.
Tip
If pages are mysteriously added to your layout when a text box becomes full, it means Auto Page Insertion is on in QuarkXPress (Edit, in Windows) > Preferences > Print Layout > General.
To select text
- Choose the Content tool.
- Drag across the text you want to select.
or
Use one of these fast-clicking methods
–: Triple-click to select a line. Click four times to select a paragraph.
or
To select a whole story, click in a text box, then choose Edit > Select All (Cmd-A/Ctrl-A). Hidden overflow text, if any, will be included in the selection. A story is all the text in a box, plus any boxes that it’s linked to.
Note: If the Item tool is active when you choose Select All, all items on the currently displayed page or spread and surrounding pasteboard will become selected instead!
or
Click in a text box at the beginning of a text string, then Shift-click at the end of the text string.
or
To select from the current cursor position to the end of a story: Cmd-Option-Shift-down arrow/Ctrl-Alt-Shift-down arrow. (See page 424 for more shortcuts.)
or
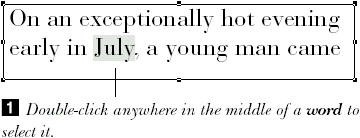
To select a series of words, double-click the first word, keep the mouse button down on the second click, then drag. Or triple-click, then drag downward to select a series of lines.

To delete text
- Choose the Content tool.
- Click to the right of the character you wish to delete , then press Delete/Backspace. (Press the left or right arrow on the keyboard to move the insertion point one character at a time.)
Pressing Delete with the cursor at this insertion point would remove the “S.”
or
First select the text you want to delete (see the previous page)
. Then in Mac OS X, press Delete or choose Edit > Clear. In Windows, press Backspace or Delete or choose Edit > Delete. Pressing Delete with this selection selected would delete the “HES.”
Tip
To delete the character to the right of the cursor, press the del/Delete key on an extended keyboard or press Shift-Delete on a nonextended keyboard.


The Line Text-Path tool and Orthogonal Text-Path tool are discussed below. The Bézier Text-Path and Freehand Text-Path tools are discussed in Chapter 18.
To create a straight text path
- To draw a straight path oriented at any multiple of 45°, choose the Orthogonal Text-Path tool

 Drag vertically or horizontally with the Orthogonal Text-Path tool.
or
To draw a straight-line path at any angle, choose the Line Text-Path tool
 . Drag at any angle with the Line Text-Path tool.
 - Drag to draw the path, and leave it selected. The Content tool becomes active.
- Start typing. The text will march along the path.
Tip
If you want to draw several text paths in quick succession, hold down Option/Alt when choosing the text-path tool. The tool will remain active after you draw the path.

To delete any item
Choose the Item or Content tool, click the item you want to delete, then choose Item > Delete (Cmd-K/Ctrl-K).
or
Choose the Item tool, and click the item you want to delete. Then in Mac OS X, press Delete or choose Edit > Clear. In Windows, press Delete or Backspace or choose Edit > Delete.
The Clipboard is a holding area that stores one cut or copied selection at a time. The current contents of the Clipboard can be retrieved an unlimited number of times via the Paste command. The current Clipboard contents will be replaced if you invoke the Copy or Cut command in any application, and will be deleted if you turn off your computer.
To rearrange text using the Clipboard
- Choose the Content tool.
- Select the text you want to move .
To move text, select it, then choose Edit > Cut.
- Choose Edit > Cut (Cmd-X/Ctrl-X) to place the selected text on the Clipboard and remove it from its current location.
or
Choose Edit > Copy (Cmd-C/Ctrl-C) to place a copy of the selected text on the Clipboard and leave the selected text in its current location.
- Click in a text box to create a new insertion point .
Click to create a new insertion point.
- Choose Edit > Paste (Cmd-V/Ctrl-V) . QuarkXPress (using a feature called Smart Space) takes care of adding spaces where needed (see page 194).
Choose Edit > Paste.
Tip
The Clipboard can also be used to cut or copy any type of box, line, or group when the Item tool is selected, or a picture if the Content tool is chosen. Paste using the same tool that was used to Cut or Copy—unless you want the item to be anchored (see page 199)!
You can use the Drag and Drop Text feature to move or copy text quickly without having to use the Cut, Copy, or Paste command. You can drag and drop text within the same box or between linked boxes or table cells (a story), but not between unlinked boxes or cells. This is a very handy feature for making quick copyedits.
Note: To enable the drag-and-drop feature, go to QuarkXPress (Edit, in Windows) > Preferences > Application > Input Settings, then check Drag and Drop Text ![]() .
.

In Mac OS X only, if the Drag and Drop Text option is off, you can still perform the command: Cmd-Control-drag the text to move it or Cmd-Control-Shift-drag to move a copy of it.
To drag and drop text
- Choose the Content tool.
- Select the text you want to move or copy (see page 67).
- Release the mouse.
- To move the selected text, drag the blinking insertion point to a new location in the same text box or table cell or in a box or cell that it’s linked to. A hollow box will display under the pointer as you drag –.
To drag and drop (move) text, select it, release the mouse, then drag the selected text to a new position. A blinking cursor will indicate the insertion point. The sentences have been swapped.
or
To move a copy of the text, hold down Shift while dragging the blinking insertion point to a new location (a hollow box and a plus sign will also display as you drag).
Tip
Text that is dragged and dropped is also placed on the Clipboard, but you won’t be aware of it unless you use the Paste command or choose Edit > Show Clipboard.

Working with text boxes
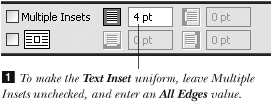
The text inset is the blank space between text and the four edges of the box that contains it. A Text Inset value greater than zero should be applied to any box that has a frame in order to create breathing space between the text and the frame. You used to have to open the Modify dialog box to change the values, but in QuarkXPress 7 you can use the Text tab of the Measurements palette.
To change the Text Inset using the Measurements palette
- Choose the Item or Content tool.
- Click a text box.
- Display the Text tab on the Measurements palette.
- To apply a uniform Text Inset value to all four edges of the text box, leave Multiple Insets unchecked, then enter a value in the All Edges field –. If you’re entering a value in points, you don’t have to reenter the “pt.”
A text box with a Text Inset of 0 pt The same text box with a Text Inset of 7 pt
or
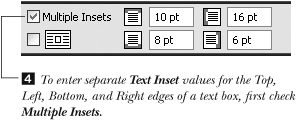
To enter a different Text Inset value for each edge of a rectangular text box, check Multiple Insets
–, then enter Top, Left, Bottom, and Right values. The text box with a different Text Inset value on each of its four sides - Press Return/Enter.
Tip
Even though we’re showing you how to adjust text using (for the most part) the new and improved Measurements palette in QuarkXPress 7.0, our old friend, the Modify dialog box, is still available for the same adjustments. We just think the Measurements palette is more convenient.


These instructions apply to text boxes, picture boxes, and contentless boxes.
To apply a frame to any type of box
- Choose the Item or Content tool.
- Click a box (Bézier or standard).
- Choose Item > Frame (Cmd-B/Ctrl-B).
- Choose a preset Width from the menu or enter a custom Width . You can enter fractions of a point.
The Frame tab of the Item > Modify dialog box
- Choose from the Style menu. (To create a custom dashed or multi-line frame, see pages 227–230.)
- Choose from the Frame: Color menu.
- Choose from the Frame: Shade and Opacity menus or enter a Shade or Opacity percentage.
- Optional: To color the white areas in a multiline or broken style, choose from the Gap: Color, Shade, and Opacity menus.
- Click Apply to preview, make any adjustments, then click OK (illustrations on the next page).

Tip
To remove a frame, select the box, choose Item > Frame again, then enter 0 in the Width field.
Tip
You can also use the Frame tab of the Measurements palette to design a frame. Make sure to choose a width first, so the results of your other changes will appear instantly.
Frames illustrated


To move text down in its box
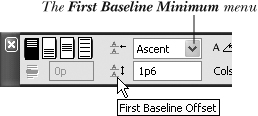
To move the first line of text down from the top of its box, select the box, click the Text tab on the Measurements palette, then enter a First Baseline Offset value greater than 0 and press Return/Enter ![]() . This value will be added to the current Text Inset value. From the First Baseline Minimum menu, choose whether, at minimum, the first line of text will be offset from the top of the box as measured from the line’s largest Cap Height, Cap + Accent [mark], or Ascent (top of the tallest character, as in an “l”or a “T”)
. This value will be added to the current Text Inset value. From the First Baseline Minimum menu, choose whether, at minimum, the first line of text will be offset from the top of the box as measured from the line’s largest Cap Height, Cap + Accent [mark], or Ascent (top of the tallest character, as in an “l”or a “T”) ![]() –
–![]() .
.
![]() Using the Text tab of the Measurements palette to adjust the vertical offset of the first line of text
Using the Text tab of the Measurements palette to adjust the vertical offset of the first line of text

![]() First Baseline 0
First Baseline 0
![]() First Baseline 1p6
First Baseline 1p6
or
Display the Text tab of the Measurements palette, check Multiple Insets, then enter a higher Top Text Inset value and press Return/Enter.
or
This may feel like cheating, but sometimes simplest is best: Just yank the whole box downward on the page with the Item tool. This works as long as the box isn’t framed.
The flip commands flip all the text in a box, but not the box itself. Text can be modified in its flipped position.
To flip text
- Choose the Content tool.
- Click a text box.
- Choose Style > Flip Horizontal or Flip Vertical.
or
Click the Flip Horizontal
 and/or Flip Vertical
  button on the Classic tab or Text tab of the Measurements palette –. The word “backwards” is in a separate text box, and it’s flipped horizontally. The text box containing the gray “Narcissus” was flipped vertically.


To rotate all the text in a box—without rotating its box—follow these instructions. To rotate text and its box, see the following page.
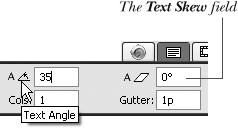
To change the text angle using the Measurements palette
- Choose the Item or Content tool.
- Click a text box of any shape or Shift-click multiple boxes.
- Display the Text tab of the Measurements palette and enter a value between –360° and 360° in the Text Angle field .
Use the Text tab of the Measurements palette to change the angle of the text.
- Press Return/Enter . The text can still be edited. You can restore the Text Angle to 0° at any time.
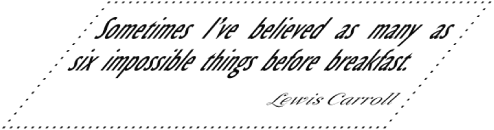
A Text Angle of 35°: The text is rotated; the box isn’t.
To change the text angle using the Modify dialog box
- Choose the Item or Content tool.
- Click a text box of any shape or Shift-click multiple boxes.
- Choose Item > Modify (Cmd-M/Ctrl-M), then click the Text tab.
- Enter a Text Angle value between –360° and 360°, then click Apply to preview.
- Click OK.
Tip
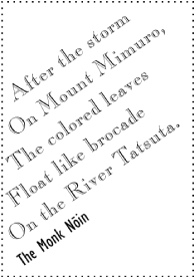
Skewing a text box slants the text as well
. The effect is sometimes referred to as “false italic.” To skew text, follow either set of instructions above, except on the Text tab of the Measurements palette enter a value between –75 and 75 in the Text Skew field, then press Return/Enter. Or in the Modify dialog box, click the Box tab and enter a Text Skew value between –75 and 75. A rectangular text box skewed at a 40° angle: Both the text and the box are skewed.
You can rotate a text box a specific angle by entering a number into the Measurements palette (or in the Item > Modify dialog box). If you use this method, the center of the box will always be the axis of rotation. Using the Rotation tool to rotate a box, on the other hand, allows you to choose the axis.
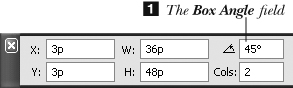
To rotate a text box using the Measurements palette
- Choose the Item or Content tool.
- Click a text box.
- In the Box Angle field on the Classic or Space/Align tab of the Measurements palette, enter a positive value between 0° and 360° to rotate the box counterclockwise or a negative value to rotate it clockwise, then press Return/Enter. You can edit the text in its rotated position.
To rotate a text box using the Rotation tool
- Choose the Rotation tool.

- Click a text box.
- Press to create an axis point for rotation, then drag the mouse away from the axis to create a “lever” . The further you drag away from the axis before rotating, the easier the rotation will be to control.
Drag away from the axis point to create a lever before rotating.
- Drag clockwise or counterclockwise . Hold down Shift while dragging to rotate at an increment of 45° (release the mouse first).
The box rotated -90°


The Vertical Alignment options affect all the text contained in a rectangular box. Leading (line spacing) and interparagraph spacing, which affect one or more paragraphs, are discussed in Chapter 6.
To change vertical alignment
- Choose the Item or Content tool, then click a rectangular text box or select multiple boxes (see page 185).
- Display the Text tab of the Measurements palette.
- Choose one of the Vertical Alignment options by clicking its icon: Top, Centered, Bottom, or Justified .
The Vertical Alignment options, as displayed on the Text tab of the Measurements palette
- Optional: If you chose Justified, enter a value for Inter Paragraph Maximum spacing. If the value is 0, space is added evenly between lines and paragraphs. A value greater than 0 is the maximum space that can be added between paragraphs before leading is affected. Try raising this value and see what happens.
- Press Return/Enter . Note: Make sure there isn’t a return at the end of the last line in a box to which Bottom, Centered, or Justified Vertical Alignment has been applied, or the alignment will be thrown off. The Vertical Alignment options are also affected by the First Baseline Offset and Top Text Inset values.
Tip
Vertical justification won’t work if the justified text box is behind another box that has a Runaround setting other than None. To make justification work, click the Runaround tab and change the Type to None for the top box.
Tip
If you’ve chosen Centered alignment and your text happens not to have any descenders (characters that extend below the baseline), you may need to Baseline Shift the type down slightly to make it look more centered (see page 129).


Follow either set of instructions on this page to change the number of columns and/or the gutter width in an individual box. To change the non-printing margin and column guides or to change the number of columns in a box originating from a master page, follow the instructions on page 247.
To change the number of columns using the Measurements palette
- Choose the Item or Content tool.
- Select a text box.
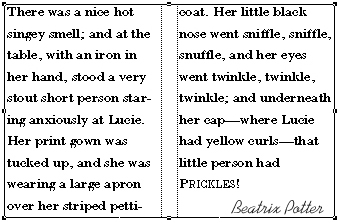
- Display the Classic or Text tab of the Measurements palette and enter a number in the “Cols” field (1–30, depending on the width of the box) .
and/or
Change the Gutter value for the blank space between the columns (Text tab only).
- Press Return/Enter –.
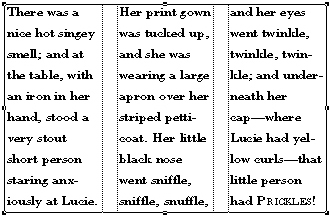
A two-column text box... ...is converted into a three-column text box.

To change columns and/or gutter width using a dialog box
- Choose the Item or Content tool.
- Select a text box.
- Choose Item > Modify (Cmd-M/Ctrl-M), then click the Text tab.
- Change the number in the Columns field .
and/or
Change the Gutter Width value for the blank space between the columns.
- Click OK.

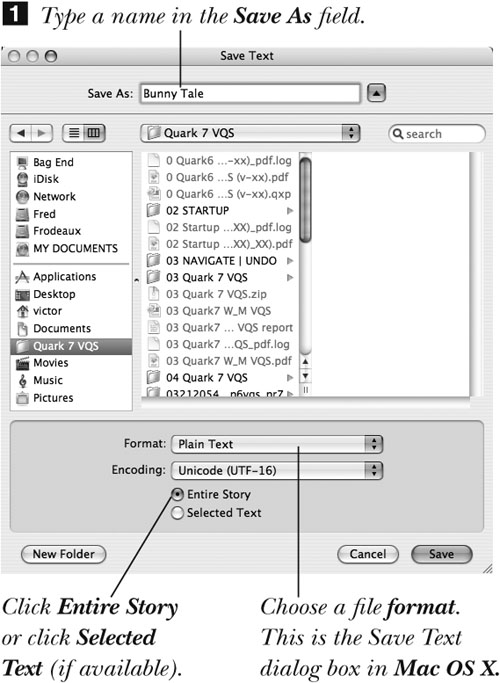
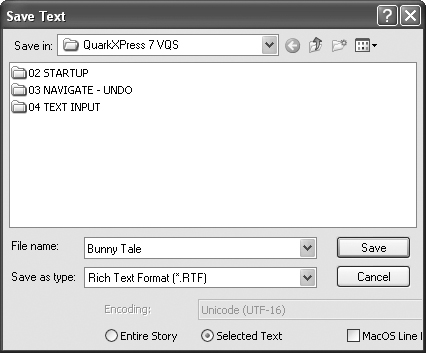
You can save text from a QuarkXPress file as a separate file into any of these formats: Plain Text, XPress Tags, Rich Text, WordPerfect, Microsoft Word, or HTML. You can save all the text in a story, or just a selected portion.
To save text as a word processing file
- Choose the Content tool.
- Select the text to be saved.
or
Click in a story.
- Choose File > Save Text (Cmd-Option-E/Ctrl-Alt-E).
or
Control-click/Right-click and choose Save Text from the context menu.
- Type a name for the text file in the Save As/File Name field –.
The Save Text dialog box in Windows
- If text is selected in the layout, you can click Entire Story or Selected Text. If you clicked in a story but didn’t select any text, the Entire Story option will be chosen for you.
- Choose a file format from the Format/Save as Type menu. A format’s import/export filter must be enabled in order for it to appear on the list. Use the XTensions Manager to turn a filter on or off (see page 377).
- Optional in Windows: If you’ve chosen Plain Text as the format and you check Mac OS Line Endings, the standard Windows line break that’s represented by a return and line feed character will be replaced by just a return character, which is standard in Mac OS X.
- Choose a location in which to save the text file.
- Click Save (Return/Enter).
Tip
To learn more about XPress Tags, see the QuarkXPress documentation or Real World QuarkXPress 7 by David Blatner (Peachpit Press).
Managing fonts
Keep in mind that fonts are not managed by QuarkXPress and they are activated (installed) or de-activated by your operating system or by third-party font management software. QuarkXPress does not come with fonts and it does not control which ones are available on your computer. That’s all up to you. Some fonts do come with your system software and with other applications, and you can buy more from sources such as www.adobe.com, www.linotype.com, and www.myfonts.com.
Use a font manager
When you’re working on any type of professional publishing, you absolutely need a font management utility. A font manager shows you which fonts are active on your computer, which fonts you have available, and what they look like. In addition, many font managers let you create sets of fonts to activate manually for specific projects, and sets of fonts that are activated when you launch specific applications. Font managers may also provide automatic font activation as you open documents (thereby preventing the dreaded “missing fonts” alert) and means for exporting fonts.
Mac OS X comes with a basic font manager, FontBook. For more power, we recommend Suitcase Fusion ![]() (www.extensis.com) or FontAgent Pro (www.insidersoftware.com). For Windows, try Suitcase (www.extensis.com) or FontExpert 2006 (www.proximasoftware.com). Or, to save money, you can consult your system’s Help file to learn about managing fonts.
(www.extensis.com) or FontAgent Pro (www.insidersoftware.com). For Windows, try Suitcase (www.extensis.com) or FontExpert 2006 (www.proximasoftware.com). Or, to save money, you can consult your system’s Help file to learn about managing fonts.

![]() Suitcase Fusion allows you to create sets of fonts on a project-by-project basis (top left); lists detailed information about each font’s kind, foundry, version, and more (bottom left); and displays previews of fonts at any size (right).
Suitcase Fusion allows you to create sets of fonts on a project-by-project basis (top left); lists detailed information about each font’s kind, foundry, version, and more (bottom left); and displays previews of fonts at any size (right).
Use the same fonts
In professional publishing it’s importantto use the exact same fonts throughout an entire workflow—from design to output. And when we say “exact same fonts,” we don’t mean any old font named “Helvetica” or “Times” or “Garamond.” Fonts come in many flavors, from OpenType to TrueType to PostScript, and from different vendors in bewilderingly different versions. It’s not at all uncommon to have the same font in three slightly different versions: Adobe Garamond 1.000, 1.001, 1.002. But should you care? Yes! Using different versions of the same font, particularly in different formats or from different foundries and possibly in different versions, can cause your text to reflow and ruin a layout. If you are working crossplatform, passing files back and forth between Mac OS and Windows, we suggest you use OpenType fonts, which flow the same on both platforms.