
2. Startup
Getting started
To launch QuarkXPress in Mac OS X
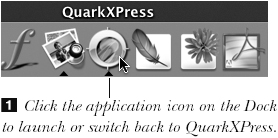
Click the QuarkXPress application icon on the Dock ![]() . If you haven’t yet placed the application icon there, drag the application file icon
. If you haven’t yet placed the application icon there, drag the application file icon ![]() from the QuarkXPress folder to the Dock.
from the QuarkXPress folder to the Dock.
or
Open the QuarkXPress folder in the Finder, then double-click the QuarkXPress application icon.
or
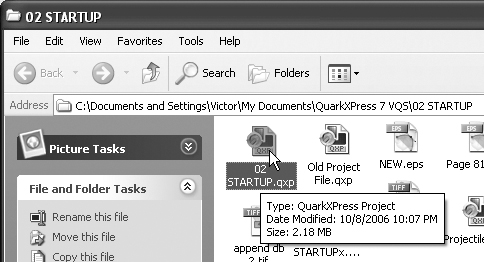
Double-click any existing QuarkXPress file icon in the Finder (the program will launch automatically)![]() .
.

![]() Or double-click any QuarkXPress file icon to launch the application and open that file simultaneously.
Or double-click any QuarkXPress file icon to launch the application and open that file simultaneously.
Tip
If you switch to another application—whether intentionally or not—and want to return to QuarkXPress, click any QuarkXPress project window or click the application icon in the Dock.
To launch QuarkXPress in Windows
In Windows 2000 or Windows XP, click the Start button on the Taskbar, choose All Programs, choose QuarkXPress, then click QuarkXPress 7.0 ![]() .
.

![]() Click QuarkXPress 7.0 on the Start menu.
Click QuarkXPress 7.0 on the Start menu.
or
In Windows Explorer, double-click a QuarkXPress file icon. The application will launch and that file will be maximized onscreen ![]() .
.
![]() Or double-click any QuarkXPress file icon to launch the application and open that file simultaneously.
Or double-click any QuarkXPress file icon to launch the application and open that file simultaneously.
Tip
Once QuarkXPress is running, you can choose it (or any other open application) from the Taskbar at the bottom of the screen ![]() .
.
![]() You can choose any open application from the Taskbar.
You can choose any open application from the Taskbar.
Projects and layouts
When you save a file in QuarkXPress 7, the entity that is saved, and that is identified by an icon on the Desktop, is called a project. Each project, in turn, holds one or more layouts. Layouts hold the “actual” pages and page elements, such as text, lines, tables, and pictures. Each layout has its own Layout Properties settings, which include the page width, height, margin guides, column guides, and layout type (print or Web).
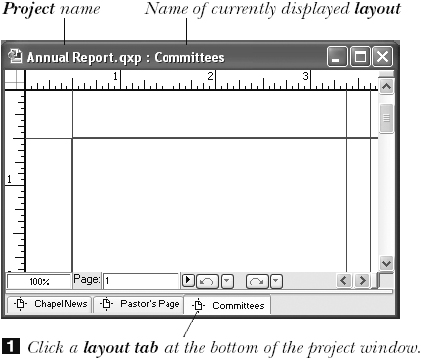
Physically, what you’ll see onscreen is a project window and, inside the window, the currently displayed layout. To switch between multiple layouts in a project, click one of the layout tabs at the bottom of the project window ![]() .
.

When a new project is created, it automatically contains a default layout. You can create additional layouts either by choosing Layout > New ![]() or by choosing Layout > Duplicate (more about this later). When you duplicate a layout, its style sheets, colors, master pages, and layout properties also appear in the duplicate. Each project can hold many layouts (limited only by your computer’s RAM), and each layout can contain up to 2,000 pages. You can also delete any layout from a project; a minimum of one layout must remain.
or by choosing Layout > Duplicate (more about this later). When you duplicate a layout, its style sheets, colors, master pages, and layout properties also appear in the duplicate. Each project can hold many layouts (limited only by your computer’s RAM), and each layout can contain up to 2,000 pages. You can also delete any layout from a project; a minimum of one layout must remain.
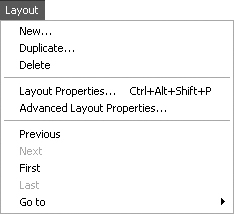
![]() Use commands on the Layout menu to create, delete, reconfigure, or navigate among layouts in a project.
Use commands on the Layout menu to create, delete, reconfigure, or navigate among layouts in a project.
Not only can print and Web layouts be contained within the same project, you can even switch the layout type for any existing layout from print to Web, or vice versa, using Layout > Layout Properties. Each layout type has its own features. In Chapter 20, we’ll show you how to synchronize content across multiple layouts.
New in version 7 is the ability to create a project containing only a single layout (see page 34). This feature allows you to simplify your workflow while you pretend that you’re working in QuarkXPress 5!
To make it easier to remember which features apply to whole projects and which features apply just to individual layouts, we’ve created the handy chart below. Refer to it as often as you need to until you get your bearings.
Tip
If you undo a project-level command, such as a change to an H&J, the undo will affect the whole project. If you undo a layout-specific command, such as a text edit, the undo will affect only that layout.
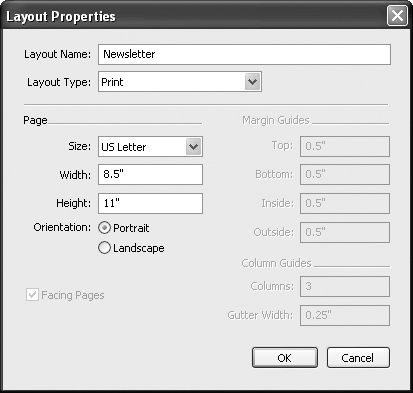
Every new project automatically contains one layout. The parameters for that layout are specified in the New Project dialog box.
To create a project
- Launch QuarkXPress (instructions on page 31), then choose File > New > Project (Cmd-N/Ctrl-N).
Change any of the following settings (press Tab to move from one field to the next):
- Leave the default name for the layout as is, or enter a new Layout Name.
or
Check Single Layout Mode to create a project that initially contains one, and only one, layout.
- From the Layout Type menu (
 , next page), choose Print. The dialog box will display options for print layouts. (Web layouts are not discussed in this book.) You can change the layout type at any time by choosing Layout > Layout Properties.
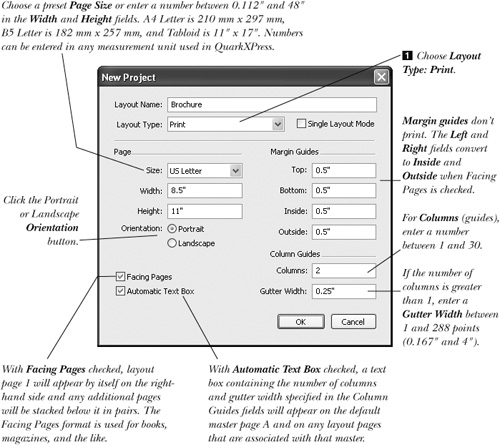
- Choose a preset size from the Size menu.
or
Enter numbers in the Width and Height fields to create a custom-size layout. You can enter values in any measurement unit used in QuarkXPress (see page 29).
- Optional: Click the unselected Orientation button to swap the layout’s width and height values.
- Change any of the Margin Guides. If you check Facing Pages, the Left and Right Margin Guides fields will convert to Inside and Outside and layout pages will be arranged in pairs.
- Change the number of Columns. If the number of columns is greater than 1, change the Gutter Width. Try 1p or 1p6 (0.167″ or 0.25″).
- Optional: Check Automatic Text Box to have a text box appear automatically within the margin guides on master page A and on every layout page with which master page A is associated (see Chapter 14). This is used for multipage layouts.
- Double-check that you’re satisfied with the current settings. Your choices aren’t irrevocable, but it’s easier to change them now than it is to fix them later. Click OK. A new project window will appear on your screen.
Tip
The last settings used in the New Project dialog box will reappear the next time it’s opened.
Tip
If Single Layout Mode is checked, the Layout Name field disappears from the New Project dialog box. Otherwise, the dialog box is the same as for projects with multiple layouts.

Saving files
If your file has never been saved, ever, these are the instructions for you. To resave an already saved file, see page 38.
To save an unsaved file
- Choose File > Save (Cmd-S/Ctrl-S). The Save As dialog box will open.
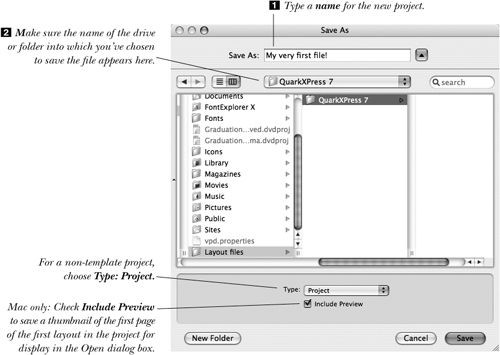
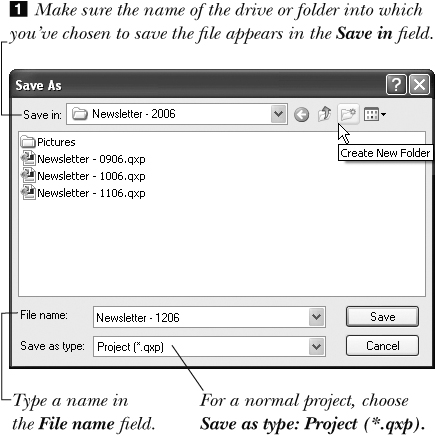
- Type a name for the file in the Save As/File Name field .
- In Mac OS X, choose Type: Project. In Windows, choose Save as type: Project (*.qxp). To create a project template, see page 39.
- Choose a location for the file:
In Mac OS X: Navigate to the desired folder or drive, making sure that location appears on the pop-up menu at the top of the dialog box
 .
.Optional: To create a new folder for the file in the location you’ve chosen, click New Folder, enter a name, then click Create.
In Windows: Use the Up One Level button and the Folder List arrow to navigate to the desired location. Make sure the drive or folder into which you have chosen to save the file appears in the Save in field
. Optional: To create a new folder for the file in the location you’ve chosen, click the Create New Folder button, and type a name for the new folder; double-click the new folder to open it. - Optional in Mac OS X: Check Include Preview to have a thumbnail of the first page of the first layout in the project display when you reopen the file using File > Open . If you forget to check Include Preview here, you can add the preview later using Save As (see the following page).
In Mac OS X: In order to see a preview in the Open dialog box, a file has to be saved with Include Preview checked.
- Click Save.

Save frequently! We save almost every time we complete a major change—it’s like an automatic reflex. Note: In addition to manual saving, you may also want to use the Auto Save feature (see the sidebar).
To resave a file
Choose File > Save (Cmd-S/Ctrl-S) or Control-click/Right-click a blank area in any layout and choose Save. The Save command will be dimmed if no modifications were made to the file since it was last saved.
The Save As command creates a copy of a whole project under a different name. Now that you can create multiple variations of a layout within the same project, we use Save As less. Occasionally, if we have a corrupted file (e.g., it won’t let us save), we’ll try the Save As command on it—sometimes that does the trick.
To save a new version of a file
- Open the file to be duplicated.
- Choose File > Save As (Cmd-Shift-S/Ctrl-Shift-S).
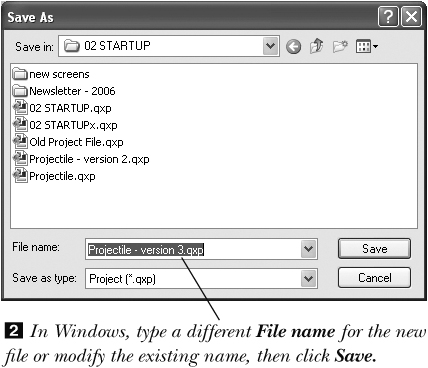
- Change the name in the Save As field (Mac OS X)/File name field (Win) .
- Optional in Mac OS X: Check Include Preview to have a thumbnail of the first page of the first layout display in the Open dialog box.
- Choose a location in which to save the duplicate file.
- Click Save. The new version of the file will remain open; the original version of the file will close.

Tip
If you don’t change the file name in the Save As dialog box, a warning prompt will appear when you click Save. Click Replace to save over the original file, or click Cancel.
A template is a version of a project that you use as a boilerplate from which to spawn new versions. It can contain master pages, style sheets, custom colors, H&J settings, etc.—any items or layout specifications.
To create a template
- Choose File > Save As (Cmd-Shift-S/Ctrl-Shift-S).
- In Mac OS X, choose Type: Project Template. In Windows, choose Save as type: Project Template (*.qpt).
- Enter a name for the template (include the word “template” in the name, if you like), choose a location for the template, then click Save.
To create a normal project using the template, open the template file, choose File > Save (the Save As dialog box will open), enter a name for the non-template version, then click Save.
Tip
To edit the template itself, open it, edit it, choose File > Save, reenter the template’s exact same name, choose its current location, click Save, then click Replace/Yes when the prompt appears.
The Revert to Saved command, which restores the last-saved version of a file, isn’t going to be of much help unless you invoke the Save command frequently as you work. We save our files constantly, especially before performing any undoable maneuvers, like rearranging pages.
To revert to the last saved version
- Choose File > Revert to Saved.
- When the alert prompt appears, click OK .
If you choose File > Revert to Saved, this prompt will appear. Click Yes to restore the most recently saved version of the file.

Tip
Choose Revert to Saved with Option/Alt held down to revert the file to its last Auto-Saved version (see page 365).
Working with layouts
Every new project automatically contains a default layout. You can add more layouts to any project, limited only by the amount of RAM installed in your system. To do this, you can add an empty layout using the New Layout dialog box; or duplicate an existing layout, complete with all its contents (follow the instructions on the next page); or append a layout from another project.
To add a layout to a project
- With a project open , choose Layout > New.
The original project, which contains one layout
or
Control-click/Right-click a layout tab and choose New.
The New Layout dialog box opens
. (It looks just like the New Project dialog box.) Choose parameters in the New Layout dialog box. - Optional: Change the Layout Name.
- From the Layout Type menu, you can choose Print or Web as the output medium for the layout. Options in the dialog box will change depending on what type of layout you choose. For now, choose Print.
- Choose Page, Margin Guides, Facing Pages, Automatic Text Box, and Column Guides values and options, per our instructions on page 34.
- Click OK. A tab for the new layout will appear after the last tab at the bottom of the project window
 (regardless of which layout was showing when you created the new one), and the new layout will be displayed in the project window.
Layout 2 is added to the project.
(regardless of which layout was showing when you created the new one), and the new layout will be displayed in the project window.
Layout 2 is added to the project.


Tip
Even if you created your project in single layout mode, you can still use this technique to add layouts to it.
To switch among layouts
Click a layout tab at the bottom of the project window ![]() . Print layout tabs have a
. Print layout tabs have a ![]() icon; Web layout tabs have a
icon; Web layout tabs have a ![]() icon. The name of the currently displayed layout appears next to the project name in the title bar at the top of the project window.
icon. The name of the currently displayed layout appears next to the project name in the title bar at the top of the project window.
Each project must contain a minimum of one layout; a project can’t be layout-free.
To delete a layout
- Display the layout you want to delete, then choose Layout > Delete.
or
Control-click/Right-click a layout tab and choose Delete.
- When the alert dialog box appears, click Yes. You can’t undo the deletion.
If you duplicate a layout, all the master pages and layout pages, style sheets, colors, and other layout elements from the original layout will also show up in the duplicate—the whole kit and caboodle.
To duplicate a layout
- Display the layout you want to duplicate (click its tab), and display a layout page—not a master page.
- Choose Layout > Duplicate.
or
Control-click/Right-click a layout tab and choose Duplicate.
- Change any Page settings, if desired, in the Duplicate Layout dialog box, then click OK.
Tip
Any shared content in the original layout will be synchronized in the duplicate layout (see Chapter 20).
Tip
To change the layout properties (layout name, page dimensions, margin guides, column guides, layout type, etc.) of an existing layout, see page 34.
You can export one or more layouts into a new project. In QuarkXPress 7, this is the only way to downsave a project to version 6.
To export layouts from a project
- With a project open, choose File > Export > Layouts as Project.
The Export Layouts as Project dialog box opens
. Export layouts from one project into a new project file. - Optional: Give the new project a unique name.
- In Mac OS X, choose Type: Project. In Windows, choose Save as type: Project (*.qxp). To create a template, see page 39.
- To save the project in QuarkXPress 6 format, choose 6.0 from the Version menu.
- In the Layouts area, check the individual layouts that you want to export. Check Select All to include all of the current project’s layouts in the new project.
- Choose a location for the file.
- Optional in Mac OS X: Check Include Preview to add a thumbnail of the first page of the first layout in the project to the file. This will display in the Open dialog box the next time you open the project.
- Click Export. A new project is created containing the layouts you selected.

Changing layout properties
Use the Layout Properties dialog box, which is (almost) identical to the New Project and New Layout dialog boxes, to change the parameters of your layout at any time.
To change a layout’s dimensions or type
- Display the layout whose properties you want to change, then choose Layout > Layout Properties (Cmd-Option-Shift-P/Ctrl-Alt-Shift-P).
or
Control-click/Right-click a layout tab and choose Layout Properties.
- Do any of the following :
Change the Layout Name.
Change a layout name, output type, dimensions, and other parameters in the Layout Properties dialog box.Choose Layout Type: Print or Web.
Note: If you change the Layout Type, items that are found only in the current type (such as form controls in a Web layout or tabs, kerning, tracking, or H&Js in a print layout) may be altered.
Choose a preset Page Size.
Change the Width and/or Height values.
Click the unselected page Orientation icon/button.
To convert a single-sided layout to a facing-pages layout, check Facing Pages (to learn more about facing pages, see page 247). Converting a facing-pages layout into a single-sided layout is more complicated, because it involves deleting master pages, which we cover in Chapter 14.
- Click OK. If you changed the layout’s type, an alert dialog box will appear . Click OK to continue.
This prompt will appear if you change a layout’s type (Layout Type menu) and click OK.
Any text box that fits exactly within the margin guides (such as the automatic text box) will resize automatically to fit within the new margins.

Opening files
To open a QuarkXPress project from within the application
- Choose File > Open (Cmd-O/Ctrl-O).
- In Mac OS X: Choose All Readable Documents from the Enable menu.
In Windows: Choose All QuarkXPress Files from the Files of Type menu.
- Locate and click a file name, then click Open –.
The Open dialog box in Mac OS X The Open dialog box in Windows
or
Double-click a file name.
The number of QuarkXPress projects that can be open at a time is limited only by available memory.
Note: Be sure to read “Things that may happen when a file is opened,” starting on the following page.


To reopen a recently opened and saved file
Choose from a list of recently opened files on the File > Open submenu ![]() or at the bottom of the Open menu. The location of the list and the number of files listed will depend on the current File List Location setting in File List preferences (see page 367).
or at the bottom of the Open menu. The location of the list and the number of files listed will depend on the current File List Location setting in File List preferences (see page 367).

![]() The File > Open submenu
The File > Open submenu
To open a QuarkXPress file from the Finder/Windows Explorer
In Mac OS X: Double-click a QuarkXPress file icon ![]() or drag a QuarkXPress file icon over the application icon on the Dock.
or drag a QuarkXPress file icon over the application icon on the Dock.
![]() Mac OS X: You can open a file in the Finder by double-clicking its icon.
Mac OS X: You can open a file in the Finder by double-clicking its icon.
In Windows Explorer: Double-click a QuarkXPress file icon ![]() or drag a QuarkXPress file over the program shortcut on the Desktop.
or drag a QuarkXPress file over the program shortcut on the Desktop.

![]() Windows Explorer: Double-click the file you want to open.
Windows Explorer: Double-click the file you want to open.
If QuarkXPress hasn’t yet been launched, it will launch now.
To convert a file from a previous version of QuarkXPress to 7.0
- Open the file using File > Open—not by double-clicking its icon in the Finder or in Windows Explorer.
- Immediately after the file opens and you’ve responded to any alerts (see the next section), choose File > Save.
- Click Save, then click Replace.
Things that may happen when a file is opened
Non-matching preferences prompt
Kerning and tracking table settings and hyphenation exceptions are stored in individual projects and in the QuarkXPress folder in a file called XPress Preferences. If, upon opening a file, the project settings don’t match the XPress Preferences settings, a prompt will appear ![]() . Click Use XPress Preferences (or press Cmd-./Alt-U) to apply the preferences currently resident on that machine to all the layouts in the project (the text may reflow!), or click Keep Project Settings (Return/Enter) to preserve all the current preferences for each layout in the project.
. Click Use XPress Preferences (or press Cmd-./Alt-U) to apply the preferences currently resident on that machine to all the layouts in the project (the text may reflow!), or click Keep Project Settings (Return/Enter) to preserve all the current preferences for each layout in the project.

![]() The XPress Preferences prompt
The XPress Preferences prompt
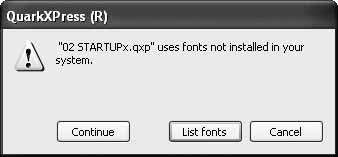
Fonts are missing
If you open a file that uses fonts that aren’t installed or aren’t currently available in your system (perhaps the font is temporarily deactivated), a prompt will appear:
- Click List Fonts to see a list of missing fonts . Note: If you click Continue and the missing fonts subsequently become available, they will display properly.
If the missing fonts prompt appears, click List Fonts to open the Missing Fonts dialog box, or click Continue to open the file without replacing the missing fonts.
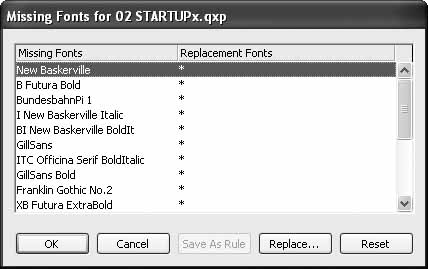
- To replace a missing font, click a font name . An asterisk in the Replacement Fonts column indicates that that font has not been replaced.
In the Missing Fonts dialog box, click a font name, click Replace...
- Click Replace.
- In the Find Replacement Font dialog box, choose a font from the Replacement Font menu .
...then choose a replacement font from the menu.
- Click OK. Beware! Do not replace fonts lightly. All the text in the layouts may reflow.
- Repeat steps 2–5 for any other missing fonts you want to replace. If you change your mind after choosing a replacement font, click the replacement font, then click Reset.
- Click OK.

Profiles are missing
This is a giant leap ahead, but we’ll be brief. “Profiles” is short for Quark Color Management System profiles, which the program uses to achieve color matching among various devices. If a profile that’s been assigned to your file is missing when you try to open it (or print it), the missing profiles prompt will appear ![]() . You can either click Continue to open the file without replacing the missing profile (the simplest solution for now) or click List Profiles to proceed ahead to the Missing Profiles dialog box (
. You can either click Continue to open the file without replacing the missing profile (the simplest solution for now) or click List Profiles to proceed ahead to the Missing Profiles dialog box (![]() , next page). Profiles are assigned to input and output devices as well as to individual pictures.
, next page). Profiles are assigned to input and output devices as well as to individual pictures.
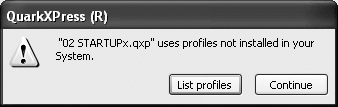
![]() If the missing profiles prompt appears, click List Profiles to substitute profiles, or click Continue to open the file without replacing the missing profiles.
If the missing profiles prompt appears, click List Profiles to substitute profiles, or click Continue to open the file without replacing the missing profiles.

![]() In the Missing profiles dialog box, select a profile name, click Replace, choose a replacement profile, click OK, then click OK again.
In the Missing profiles dialog box, select a profile name, click Replace, choose a replacement profile, click OK, then click OK again.
Pictures are missing
If your file contains pictures that were moved or renamed since it was last opened and Auto Picture Import: Verify is chosen in QuarkXPress (Edit, in Windows) > Preferences > Print Layout or Web Layout > General, yet another alert dialog box will open ![]() . Click Yes to proceed, and then to update the picture/file link(s), choose Utilities > Usage, click Pictures in the list on the left, double-click the name of a missing picture
. Click Yes to proceed, and then to update the picture/file link(s), choose Utilities > Usage, click Pictures in the list on the left, double-click the name of a missing picture ![]() , locate and click the picture file name in the Find dialog box, then click Open (or click OK). Repeat for any other missing pictures. Click Done when you’re done. See pages 183–184.
, locate and click the picture file name in the Find dialog box, then click Open (or click OK). Repeat for any other missing pictures. Click Done when you’re done. See pages 183–184.

![]() This prompt will appear if, when you open a file, any original picture files for the project are missing or were modified.
This prompt will appear if, when you open a file, any original picture files for the project are missing or were modified.

![]() In Utilities > Usage > Pictures, double-click a missing picture file name. Then, in the Find dialog box, locate and click the picture file name, then click Open.
In Utilities > Usage > Pictures, double-click a missing picture file name. Then, in the Find dialog box, locate and click the picture file name, then click Open.
If a prompt appears indicating that an XTension is missing, the project contains a picture in a file format for which an import XTension filter is needed (see below).
Note: If additional missing (not modified) pictures are located in the same folder as the first missing picture, you’ll get a prompt indicating that you can update them all at once.
XTensions Manager
In addition to the prompts that may appear when a file is opened, the XTensions Manager may open when the application is launched. To use the XTensions Manager, see page 377.
To specify whether the XTensions Manager should open automatically when the application is launched, go to QuarkXPress (Edit, in Windows) > Preferences > Application > XTensions Manager. Click Show XTensions Manager at Startup: Always to have the XTensions Manager appear with every launch; or click When: “XTension” folder changes to have the Manager open only if an XTension was added to or removed from the XTension folder; or click When: Error loading XTension occurs to have it open only if an error occurs when XTensions are loaded.
Closing files
To close one file
Mac OS X: Click the red close button in the upper-left corner of the project window ![]() .
.

Windows: If the project isn’t maximized, click the project close button in the upper-right corner of the project window ![]() . If the project is maximized, click the project close button directly below the application close button
. If the project is maximized, click the project close button directly below the application close button ![]() .
.

![]() Windows: If the project isn’t maximized, click the close button in the upper-right corner of the project window.
Windows: If the project isn’t maximized, click the close button in the upper-right corner of the project window.
![]() Windows: If the project is maximized, click the close button directly below the application close button.
Windows: If the project is maximized, click the close button directly below the application close button.
or
Choose File > Close (Cmd-W/Ctrl-F4).
Tip
If you try to close a file that has never been saved, a prompt will appear. You can cancel the close operation (click Cancel), discard the file altogether (click No), or save the file before it’s closed (click Yes) ![]() .
.
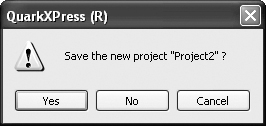
![]() If you attempt to close a file that has never been saved, this prompt will appear.
If you attempt to close a file that has never been saved, this prompt will appear.
To close all open QuarkXPress files
Mac OS X: Option-click the red close button in the upper-left corner of the project window or press Cmd-Option-W.
Windows: Choose Window > Close All.
To quit/exit the application
In Mac OS X: Choose QuarkXPress > Quit QuarkXPress (Cmd-Q).
In Windows: Choose File > Exit (Ctrl-Q).
Tip
When you try to quit/exit the application, a prompt will appear for each open file that has unsaved changes. You can cancel the quit/exit operation (click Cancel), close the file without saving the changes (click No), or save the changes before the file is closed (click Yes)![]() .
.
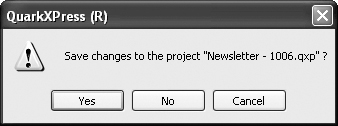
![]() If you try to quit/exit the application and changes were made to the file since it was last saved, this prompt will appear.
If you try to quit/exit the application and changes were made to the file since it was last saved, this prompt will appear.
Appending specifications
Using the Append dialog box, you can append one or more style sheets, colors, H&Js, lists, and dashes & stripes from one project or library to another project. But wait! There’s more: in QuarkXPress 7, you can also append entire layouts.
To append specifications from one project to another
- Open the file you want to append the specs to.
- Choose File > Append (Cmd-Option-A/Ctrl-Alt-A).
or
Click Append in the Style Sheets, Colors, H&Js, Lists, or Dashes & Stripes dialog box. (The other options are related to web layouts, which are not covered in this book.)
A file navigation dialog box opens.
- Locate and click the name of the file that contains the components that you want to append, then click Open.
The Append dialog box opens.
Tip
Only specifications that were saved with the file that you’re appending from will show up on the list.
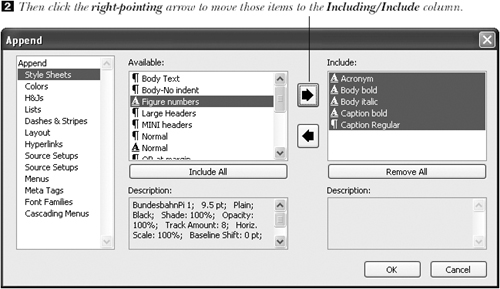
- Click a category on the left side of the dialog box.
- In the Available column, click the name of the component you want to append .
or
To append multiple components, click the first component in a series of consecutively listed components, then Shift-click the last in the series. Or Cmd-click/Ctrl-click to select/deselect individual components.
- Click the right-pointing arrow .
- Click OK. A warning prompt may appear . Check “Do not show this warning again” to prevent the prompt from reappearing, if desired, then click OK again.
Click OK when this warning prompt appears.
- If an appending component has the same name as a component in the file you’re appending to, the Append Conflict dialog box will open. Do one of the following for each conflict that arises:
Note: To have the same response be applied automatically to any remaining conflicts, check Repeat For All Conflicts before clicking Rename, Auto-Rename, Use New, or Use Existing.
To keep the existing component, append the new component, and rename an individual component yourself, click Rename
, type a new name, then click OK.or
To have an asterisk be inserted automatically next to the name of any appending component that has a match in the open, destination project, click Auto-Rename.
or
To replace the existing item with the appending component, click Use New
.or
To cancel the append of that item, click Use Existing
 .
. - Click OK.


Tip
To append all the components listed, instead of selecting them, click Include All. Click Remove All to delete the whole list from the Including/Include column.
Tip
If a style sheet that you’re appending has the same keyboard equivalent as a style sheet in the project that you’re appending to, the style sheet will append but not its keyboard equivalent.