
20. Synchronize
Synchronizing content
What is synchronized content?
If you have specific content that you need to use in different parts of a project, either within a layout or across several layouts, you can synchronize it so if it’s modified in one place, the changes are automatically applied to the same content throughout the project. Synchronizing content helps you keep things such as mastheads, legal copy, or prices consistent throughout a project.
Synchronized content expands upon the concept of synchronized text, which was introduced in QuarkXPress 6. As the name implies, synchronized text applied only to text; now shared content can include text (with and without formatting), pictures, boxes, lines, and composition zones.
Synchronized content is kept in a virtual storage bin called the shared content library. The Shared Content palette is your window into the shared content library ![]() . When you add an item to the Shared Content palette, the Shared Item Properties dialog box opens, allowing you to choose which attributes of that item are shared.
. When you add an item to the Shared Content palette, the Shared Item Properties dialog box opens, allowing you to choose which attributes of that item are shared.
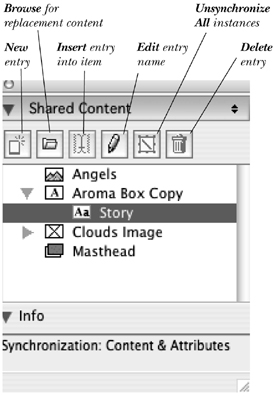
![]() Shared content is listed in the upper portion of the palette. Click an item, then click the Info triangle to see a listing of what type of shared content is synchronized in that item.
Shared content is listed in the upper portion of the palette. Click an item, then click the Info triangle to see a listing of what type of shared content is synchronized in that item.
Here are the basics, in brief:
To create a shared content entry, you add an item to the Shared Content palette.
When you insert a shared content entry into a project, it’s called an “instance.”
When you edit any instance in a project, your changes are reflected in other instances of the same shared content, depending on which shared item properties you’ve chosen for that entry.
Things that are eligible to become shared content include items (boxes, text paths, and lines) and contents (a picture; or all the text in a box, on a path, or in a table cell). You can also synchronize a composition zone, which is discussed in Chapter 23. You can’t synchronize groups, entire tables, or anything on a master page.
To add an entry to the Shared Content palette
- Display the Shared Content palette (Window > Shared Content).
- Choose the Item or Content tool.
- Click the item you want to become shared content
 .
Click an item that contains attributes and/or content that you want to use throughout the layout or project.
.
Click an item that contains attributes and/or content that you want to use throughout the layout or project. - Click New on the Shared Content palette.
or
Control-click/Right-click the item in your layout and choose Share.
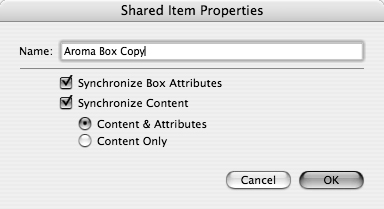
- The Shared Item Properties dialog box opens
 . Enter a descriptive name in the Name field.
In the Shared Item Properties dialog box, type a name and specify which aspects of the item are to be synchronized.
. Enter a descriptive name in the Name field.
In the Shared Item Properties dialog box, type a name and specify which aspects of the item are to be synchronized. - Specify how you want to synchronize the item. For lines and contentless boxes, it’s easy—Synchronize Attributes is checked for you and dimmed so you can’t uncheck it.
Note: The settings chosen here can’t be changed, so think carefully about how you want the selection to be synchronized. For text and pictures, you can check any of the following:
Synchronize Box Attributes to keep all the box attributes (size, frame, background color, etc.) the same, except for the location of the item in the layout.
Synchronize Content to synchronize the text or picture content and keep the words or picture exactly the same.
If you check Synchronize Content, you can fine tune how it works by clicking Content & Attributes to preserve the attributes of the picture and/or text, or Content Only to keep the words or picture the same but allow the attributes of individual instances to be edited.
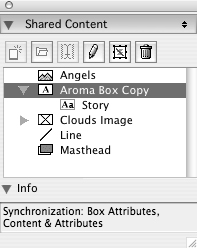
- Click OK. The new entry will appear on the Shared Content palette . Once you add this entry to a layout, any changes you make to it will be reflected in all the instances of the entry, depending on the chosen properties.
Entries on the Shared Content palette have icons indicating the content type.

Tip
When you synchronize text, all the text in the item is synchronized, so in some cases you may need to break up text into different boxes.
Tip
Locked content remains locked, even if you add it as shared content. For example, if Item > Lock > Story is checked and you check Synchronize Content when you add a text box to the palette, all instances of that story will be locked when added to the layout. Similarly, if Item > Lock > Position is checked and you check Synchronize Box Attributes, all instances of the text box will also be locked in a layout. Changes to the locked/unlocked status of one instance of shared content will be reflected in the other instances.
Creating instances
The synchronization options selected when an entry is created determine how you create instances of that entry. If Synchronize Box Attributes or Synchronize Attributes is checked, you can drag the entire entry into a layout. If only Synchronize Content is checked, you have to add the entry to an existing box in the layout.
To insert a synchronized item into a layout
- Choose Window > Shared Content.
- Select the Item tool or Content tool.
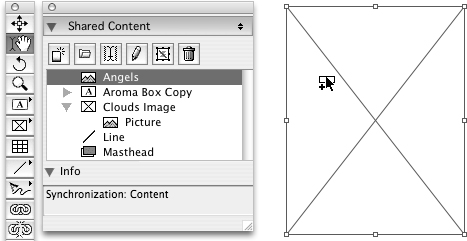
- Click an entry in the palette whose Box Attributes (or simply Attributes) are synchronized (check the Info area to be sure) or look at the icon for the entry (picture box, text box, or line) .
Dragging a synchronized item to a layout
- Drag the entry into the layout.

To insert a synchronized picture into a layout
- Choose Window > Shared Content.
- Select the Item tool or Content tool.
- Click a picture entry in the palette.
- Drag the picture to a picture box in the layout . If the box already contains a picture, an alert warns you that the existing picture will be replaced.
Dragging a synchronized picture to a picture box
Tip
To replace a synchronized picture, click a picture icon in the palette, then click the Browse button. All instances of that picture will change.
To insert a synchronized story into a layout
- Choose Window > Shared Content.
- Select the Content tool and click in a text box.
- Click a story entry in the palette.
- Click the Insert button on the palette. If the box already contains text, an alert warns you that all that existing text will be replaced.
If you check only Synchronize Content (and not Synchronize Box Attributes), the text or picture will be listed as an individual entry in the palette with a story icon ![]() or picture icon.
or picture icon. ![]() You have to add a synchronized story to an existing text box, text path, or table cell, or add a synchronized picture to an existing picture box.
You have to add a synchronized story to an existing text box, text path, or table cell, or add a synchronized picture to an existing picture box.
Unsynchronizing
You can unsynchronize one instance of shared content at a time or you can unsynchronized all the instances of a particular entry. All the former instances remain in the project, but the link to the Shared Content palette and any other former instances is broken. The entry remains in the Shared Content palette and can be added anew to a layout.
To unsynchronize one instance
- Select the Item tool or Content tool.
- Click an instance of shared content. Tiny lightning bolts will appear on the item’s resize handles, indicating the item is an instance .
When shared content is selected, lightning bolt icons display on its resize handles.
- Choose Item > Unsynchronize.
or
Or Control-click/Right-click the item and choose Unsynchronize.
- When the alert dialog box appears , click OK.
This prompt appears if you unsynchronize one instance of shared content.

To unsynchronize all instances of an entry
- Choose Window > Shared Content.
- Click an entry whose current instances you want to unsynchronize.
- Click the Unsynchronize All button
 .
The Unsynchronize All button on the Shared Content palette
.
The Unsynchronize All button on the Shared Content paletteor
Control-click/Right-click the entry on the palette and choose Unsynchronize All.
- When the alert dialog box appears
 , click OK. This can be undone.
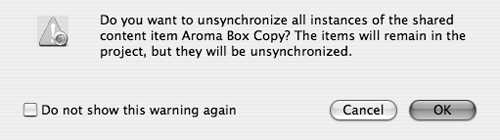
This prompt will appear if you unsynchronize all the instances of a shared content entry.
, click OK. This can be undone.
This prompt will appear if you unsynchronize all the instances of a shared content entry.

Tip
The entry will remain on the palette, so you can still use it to add new instances to the layout.
If the Shared Content palette starts to fill up with entries that you no longer have any use for, it’s time to weed some of them out. If you remove an entry from the Shared Content palette, any former instances of that entry will remain in the project, but they will no longer be synchronized with one another and can be edited independently of one another.
To delete an entry from the Shared Content palette
- Display the Shared Content palette (Window > Shared Content).
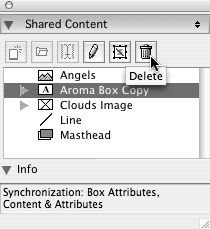
- Click an entry to delete and click the Delete button .
The Delete button
or
Control-click/Right-click the entry on the palette and choose Delete.
- When the alert dialog box appears , click OK. This can be undone.
This prompt will appear if you delete an entry from the Shared Content palette.

Tip
Deleting a layout that contains shared content has no effect on entries on the Shared Content palette or instances in other layouts.