Windows Server 2003 Terminal Services is a client/server system that enables clients to remotely run applications or manage a server from any node with a Terminal Server client and network access. In a Terminal Server session, whether a client requires a complete remote desktop environment or just needs to run a single application, the Terminal Server performs all the processing and uses its hardware resources. In a basic Terminal Server session, the client sends out only keyboard and mouse signals and receives video images, which requires only a small amount of bandwidth on the network. For a more robust multimedia-intensive session, Terminal Services provides true-color video support along with audio, local printer, COM port, and local disk redirection to provide ease of data transfer between the client and server through a single network port. Terminal Services also provides local time zone redirection, which allows users to view time stamps of email and files relative to their location.
A Terminal Services implementation can provide remote administration services, but also can be used as a centralized application server, thus reducing the need to deploy high-end workstations to end users who rarely need high performance on their local workstations. A Terminal Services implementation can also improve network performance for enterprise messaging, database applications, and other multitiered applications by reducing the amount of network traffic each backend server and network device needs to process. Costs in desktop application support can also be reduced as a result of a Terminal Services implementation by limiting application upgrades and security patch installations to the Terminal Server instead of the administrator having to visit every workstation.
In this chapter, planning, implementation, management, and support of Windows Server 2003 Terminal Services systems are covered. This chapter addresses not only the new features added in Windows Server 2003, but also how these new technologies can be leveraged to improve remote access services by users, as well as administration and management by network administrators.
Terminal Services is a versatile product that can be implemented to meet several different business needs. Administrators can use it to remotely administer a server, or users can run applications and utilize network resources remotely. Terminal Services can be accessed and used by local area network (LAN) users and remote Internet-based users, to provide access to a single application or a full desktop environment within a terminal session. User desktop support can also be provided to users while running in Terminal Server sessions or if the users are working on desktops running Windows XP Professional with Remote Desktop enabled.
Note
Windows XP Professional includes a scaled-down version of Windows Server 2003 Terminal Services that can be enabled and used for remote administration or remote workstation console access.
Lastly, Terminal Services can be implemented by application service providers (ASPs) to create managed application services to which clients can subscribe. This eliminates the need for each business to buy server hardware, software, and support.
As a remote administration tool, Terminal Services technology gives an administrator the option of performing server administration from the server console or from any other server or workstation with a Terminal Services client. This option is installed by default, but is not automatically enabled. This capability simplifies administration for the IT department by allowing the personnel to do their job from almost any console on the network. This can improve IT response times to complete trouble tickets concerning access to network resources or user account management. Server maintenance tasks such as reviewing logs or gathering server performance data can be accomplished through the client.
Applications and updates can be installed through a Terminal Server session, but should be done only when the installation does not involve a Windows Component installation or when users are running Terminal Services server sessions. Installing applications from the local server console is recommended, but if an application must be installed remotely, you should connect to the server console to run the session.
There are many benefits of making Terminal Services available to LAN users. Company hardware costs can be reduced, application availability and licensing management can be simplified, and network performance may increase.
Because a terminal session is really a virtual desktop session running on the Terminal Server, all Terminal Server users run applications on the Terminal Server, utilizing the processing power of the server while reducing the load on the local workstation. This can extend the life of an underpowered machine whose deficient resources may impede workflow through high processor, memory, or disk utilization.
From a desktop support perspective, a Terminal Server can be put in place and used as a secondary means of providing users access to their applications if problems are encountered with the applications on their local workstations. Although this approach may seem to be overkill, providing a secondary means of application access can be vital to user productivity and company revenue when support personnel may not be readily available to fix end user application issues.
Providing centralized applications for LAN users though Terminal Services can simplify application management by reducing the number of machines on which application upgrades, security updates, and fixes need to be installed. Because all the applications run on the Terminal Services server, only the Terminal Services server itself needs to be updated, and the entire user base benefits from the change immediately. This way, the updates can be performed for all Terminal Services server users at one time.
Terminal Services can be used to provide application support for end users within a Terminal Server session. When users are running in a Terminal Server session, an administrator can configure remote control or shadowing functionality to view or completely interact with a user’s session. This feature can be used to train users, provide application support, or create configuration changes such as installing a printer or connecting to a network file share. This capability can greatly reduce the number of administrators needed during the regular work day because multiple users can be assisted from one location.
Note
To comply with many organizations’ security and privacy polices, Windows Server 2003 Terminal Services provides an option for the remote control function to be completely disabled. Alternatively, rather than completely disabling the function for all users, Terminal Services can be configured to give users the ability to choose whether or not to allow an administrator to interact with her terminal server session.
Terminal Services running in Terminal Server mode allows applications and services to be made available to users in any location. Companies that provide services to businesses through proprietary applications can standardize and provide their applications exclusively through Windows Server 2003 Terminal Services and gain all the benefits outlined in the preceding LAN and remote user sections. An added bonus for these companies is that Terminal Services reduces the need to send application media out to each client, and end user support can be provided in a way never before possible.
Application service providers who make several applications available to clients can use Terminal Services to service hundreds or thousands of users from different organizations while charging a fee for application usage or terminal session time usage.
Note
Windows Server 2003 does not provide a standard reporting mechanism to present Terminal Services session data. However, some valuable information can be gathered by filtering the security event log for user logon and logoff events, using the Terminal Services Licensing Reporter (lsreport.exe) from the Windows Server 2003 Resource Kit, as well as teaming this information with data gathered by creating performance logs configured to monitor Terminal Server Services session counters using the Performance Microsoft Management Console (MMC) snap-in, included with Windows Server 2003. It is also important to note that Microsoft Operations Manager (MOM) and some third-party solutions for Terminal Services provide exceptional reporting functionality.
Terminal Services provides a client/server session that creates a virtual desktop within a single client window that emulates a true local desktop environment. Using primarily keyboard and mouse redirects, Terminal Services clients run applications on the Terminal Server, so almost no processing power is needed on the client system.
The Terminal Services client software communicates with the Terminal Services server by redirecting the local workstation’s keyboard and mouse signals to the Terminal Server. These commands are sent to the Terminal Server via a single TCP port (3389), and only minimal network bandwidth per user is needed. In fact, so little network bandwidth is needed that Terminal Server clients can connect to Terminal Servers using 28.8Kbps modem connections. For richer terminal sessions utilizing advanced features such as port redirection, color settings higher than 256 colors, file transfer, and 128-bit encryption, increased line speed is recommended.
Windows Server 2003 Terminal Services can be run in two different modes of operation. One is called the Remote Desktop for Administration mode and the other is called Terminal Server mode.
Terminal Services Remote Desktop for Administration mode is included and installed with the Windows Server 2003 operating system and only needs to be enabled. This eases automated and unattended server deployment by allowing an administrator to deploy servers that can be managed remotely after the operating systems have completed installation. This mode can also be used to manage a headless server, which reduces the amount of space needed in any server rack. More space can be dedicated to servers instead of switch boxes, monitors, keyboards, and mouse devices.
The Remote Desktop for Administration mode limits the number of terminal sessions to two, and only local administrators can connect to these sessions by default. No additional licenses are needed to run a server in this Terminal Services mode, which allows an administrator to perform almost all the server management duties remotely.
Even though Remote Desktop for Administration is installed by default, this mode does not have to be enabled. Some organizations may see this as an unneeded security risk and choose to keep it disabled. This function can easily be disabled throughout the entire Active Directory forest by using a Group Policy setting to disable users and groups from connecting to Terminal Servers located in the containers that the policy applies to. This mode of Terminal Services is available in every Windows Server 2003 version as well as in Windows XP Professional.
Terminal Server mode allows any authorized user to connect to the server and run a single application or a complete desktop session from the client workstation.
Running Terminal Services in this mode requires the purchase of a Terminal Server client access license (CAL) for each simultaneous connection. To manage these CALs, a Terminal Services License server is needed to allocate and track the licenses for the Terminal Server. The Terminal Services License server service can be installed on any Windows Server 2003 Enterprise or DataCenter server. The License server does not need to have Terminal Services enabled in any mode to run this service.
Note
To quickly obtain client license information on a client computer, use the Windows Server 2003 Resource Kit tool called Terminal Server Client License Dump (TscTst.exe).
Installing applications for Terminal Server mode requires that a strict process be followed to ensure that each application runs as it should in multiple user sessions. Some applications may not be properly suited to run on a Terminal Server; in such cases, special Terminal Server application compatibility scripts need to be run against the programs for these applications to run correctly. Thorough testing of each Terminal Server application is highly recommended before it is released into the production Terminal Server environment.
Windows XP Professional includes a scaled-down version of Terminal Services called Remote Desktop. Remote Desktop allows a user to connect to the XP workstation and remotely take over the workstation to run applications that he would normally run from his desk locally. This feature allows a user who works from home part time to connect to the company workstation to complete work or check email from a workstation that is already configured for him.
As an administration tool, this client-side Terminal Services can be used to install software on an end user’s workstation from a remote machine. Also, it can be used to log in to a user’s desktop environment to remotely configure a user’s profile settings.
Remote Assistance is a feature new to Windows Server 2003 and Windows XP Professional. This feature allows a user to request assistance from a trusted friend or administrator to help deal with desktop issues and configurations. This feature gives the end user the power to control what level of participation the remote assistant can have. The remote assistant can be granted the ability to chat with the end user, view the desktop, or remotely control the desktop. During remote assistance sessions, both the end user and remote assistant can hand off control of the keyboard and mouse. Remote assistance uses the underlying Remote Desktop Protocol (RDP) used by Terminal Services.
Remote Desktop Connection is the newly improved and renamed Terminal Server client. This full-featured client now enables the end user to control Terminal Server session settings such as local disk, audio, and port redirection, plus additional settings such as running only a single program or logging on automatically. Remote Desktop Connection information can be saved and reused to connect to Terminal Servers with previously defined session specifications.
Although some of the uses of Terminal Services have already been touched on, this section covers the features that enhance the basic Terminal Server sessions.
Terminal Services enables a Terminal Server client to redirect many of the local resources so they can be easily used within the Terminal Server session. Serial and printer ports can be made available in Terminal Server sessions to allow a user to send Terminal Server print jobs to locally configured printers, as well as access serial devices such as modems from within the Terminal Server session. Audio can also be redirected from a session to local sound cards to enable sound from the terminal session to be heard from local speakers. Also, the Windows Clipboard can be redirected to allow cutting and pasting between the Terminal Server session and the local workstation console.
Each of these resource redirections works only if the operating system and the Terminal Services client on the end user’s workstation support these configurations. Some of these local resource redirections require user modification or reconfiguration for proper use. Some of the common changes are described next.
Local disk drives can be redirected to Terminal Services sessions and appear in the Windows Explorer as networked drives using the naming convention local drive letter on computer name—for example, C on workstation5. There is no level of granularity here; all local drives are redirected, including floppy and CD-ROM drives. To access from a graphical window, simply browse the drive as you would a local or networked drive. Accessing this drive from the command prompt requires a little bit of education. Within a command prompt, the redirected local drives are referenced as \tsclientDrive letter. Directory listings can be created using this UNC, but for file transfer or quick browsing, a client should map a network drive letter to this local drive resource. To do so, follow these steps:
Open a command prompt.
Type
net use * \tsclientc, where the local C: drive is the disk you want to access within the command-prompt window. The local drive is automatically mapped to the next available drive letter, starting from drive letter Z: and working backward through the alphabet.At the command prompt, type
Z:and press Enter to connect directly to the mapped local drive and begin using this drive.After you finish working with this resource, disconnect the drive by typing
net use Z: /delete, where the Z: drive is the local mapped drive.Close the command-prompt window.
Caution
The preceding steps refer to a machine called tsclient. You should not replace this name with the actual machine account name. The Terminal Server session recognizes the machine’s local disk resources only from within a terminal session command window by tsclient, so do not consider this a substitute for the actual machine name.
With the Windows Server 2003 version of Terminal Services, locally defined print devices can also be redirected. This includes printers directly attached to the client workstation as well as network printers. When a client opens a Terminal Services session that is configured to redirect window printers as well as LPT ports, the Terminal Server attempts to install each printer for use in the Terminal Services session. If the local print device is using a print driver native to Windows Server 2003, the printer will be automatically installed and configured to the specifications configured on the end user’s desktop. If the local print device is using a foreign driver, the printer must be installed and configured manually in the Terminal Services session. To install these types of printers, it is best to have an administrator install them; however, the end user can do so with the appropriate permissions. When the port is requested, the correct client workstation port must be specified. This port is named computername:PortX, where PortX is used to describe the type of port—for example, workstation1:lpt1.
Session Directory server introduces a new level of resilience and fault tolerance for Terminal Server session management. The Terminal Server allows a session to remain active even when the client becomes disconnected. This enables users who encounter network connectivity issues between the client and server to reconnect and resume the disconnected session where they left off. Users who need to take a break or attend a meeting can manually disconnect from a session. When a user returns, all the user needs to do is start a connection to the Terminal Server and the session will be resumed.
Many environments with large numbers of users to support sometimes use network load-balanced Terminal Server cluster farms to evenly distribute the session load across multiple servers. If a user forcibly or unexpectedly disconnects from a Terminal Server session on a clustered Terminal Server, chances are that upon reconnection the user will be connected to a different cluster node and start a new session. This occurs because session information is not shared between cluster nodes.
With the introduction of the Session Directory server, participating Terminal Server cluster nodes send session information to the Session Directory server, where it is maintained. When a Terminal Server is part of a cluster that uses a Session Directory server, it sends a list of active sessions to the server periodically. When a user connects to a Terminal Server cluster to start a session, the particular Terminal Server node checks with the Session Directory server to make sure the user does not already have an active session on another Terminal Server cluster node. If a session is active, the user is redirected to the correct server to resume the disconnected session; otherwise, the session is started on the node that first answered the request.
The Session Directory server service is installed on all Windows Server 2003 Enterprise and Datacenter servers. The service need only be configured to run automatically to start using it. The Terminal Server cluster nodes must be configured to participate in a Terminal Services cluster and to send session information to the Session Directory server. This can be configured throughout the enterprise using Terminal Server Manager or Group Policies that apply to the Terminal Server computer objects. Also, for security purposes, each Terminal Server using the Session Directory server must be made a member of a local group on the Session Directory server called Session Directory Computers.
With the addition of many great features in Terminal Services also comes the ability for a Terminal Server administrator to granularly control the configuration of Terminal Services sessions. All the features available to the end user’s Terminal Services session can be managed, limited, and overridden by the Terminal Services administrator. Configuring administrative settings through Group Policy or Terminal Services Configuration can override most user-configurable settings. This can greatly benefit the Terminal Server by freeing the server from spending valuable server resources for features that may not be required in an enterprise deployment, such as audio redirection or high-color resolution.
With this granular administrative capability, the Terminal Services administrator can also improve Terminal Services server security by requiring high encryption for sessions or setting the Terminal Server to run in Full Security mode.
Terminal Services clients can be configured to access a Terminal Server’s console remotely. This improves the functionality of remote administration by allowing the administrator to perform tasks that could previously be accomplished only at the local server console. For instance, the administrator can view pop-up messages on the console or install software for the Terminal Server. Even though console access is available for pop-up messages, the Terminal Services administrator should use the event log to review all errors or alerts that may have been logged on the Terminal Server.
In Windows 2000 Terminal Services, Terminal Services nodes could be clustered using network load balancing (NLB) to split the client load across several servers. This feature has been greatly improved in Windows Server 2003 with Session Directory server when using multiple Terminal Servers in an NLB configuration.
Note
Windows Server 2003 Terminal Services can be used with Microsoft Cluster Service (MSCS), but it is generally not recommended because of scalability constraints and increased manageability. Microsoft doesn’t support using both MSCS and NLB on the same servers, and Terminal Services using MSCS doesn’t provide session failover.
To achieve the most successful Terminal Services project deployment, careful and thorough planning and testing must be performed prior to production rollout. Criteria such as application resource usage, security requirements, physical location, network access, licensing, fault tolerance, and information indicating how users will be utilizing the Terminal Server all contribute to the way the Terminal Services implementation should be designed.
Unless Terminal Services is viewed as a security risk, it is recommended to enable Remote Desktop for Administration mode on all internal servers to allow for remote administration. For servers that are on the Internet and for DMZ networks, Terminal Services may be used, but access should be limited to predefined separate IP addresses using firewall access lists to eliminate unauthorized attempts to log on to the Terminal Server. In addition, those servers should be closely monitored for unauthorized attempts to access the system.
Terminal Server mode can require a lot of planning. Because this mode is used to make applications available to end users, server hardware specification and application compatibility are key components to test before a production rollout.
It is important to determine user requirements based on typical usage patterns, the number of users accessing the system, and the number of applications that are required to run. For instance, the more applications that a user will run in a session, the more processing power and memory will be required in order to optimize session performance. On average, a Terminal Server user who runs one application may take 10MB of RAM and use little more than 3% of a server’s total processing time per session. A power user who runs three or more applications simultaneously may require 40MB of RAM or much more, depending on the applications and features being used. Use the Terminal Services Manager tool and the Performance System Monitor console to test and validate usage statistics. The key is to not overload the server to the point where performance is too slow to be cost effective. Bandwidth to the Terminal Server required by each user will also affect how well the system performs under various workloads.
Just as standard servers require operating system (OS)–level antivirus software, so do Terminal Servers. When choosing an antivirus product, be sure to choose one that is certified to run on Windows Server 2003 Terminal Servers. For Terminal Server mode deployments, install the antivirus software after installing the Terminal Server so that scanning will work for all Terminal Server sessions. Follow installation guidelines for installing applications as outlined in the “Installing Applications for Terminal Server” section later in this chapter.
Upgrading Terminal Servers can be tricky and should be handled with caution. Before any operating system or application updates or patches are applied on a production Terminal Server, they should be thoroughly tested in an isolated lab server. This process includes knowing how to properly test the application before and after the update to be sure the update does not cause any problems and, in some cases, adds the functionality that you intended to add.
When a Terminal Server’s operating system is to be upgraded to the next version, many issues can arise during the upgrade process. Applications may not run properly in the next version because key system files might be completely different. Even printer drivers can be changed drastically, causing severe performance loss or even loss of functionality. Lastly, you need to consider that the existing Terminal Server could have been modified or changed in ways that can cause the upgrade to fail, requiring a full restore from backup.
Note
Complete disaster recovery and rollback plans should be available during upgrades. This way, if problems arise, the administrator does not have to create the plan on the spot ensuring that no important steps are overlooked.
As a best practice and to ensure successful upgrades of Terminal Servers, replace existing servers with clean built Terminal Servers with the latest updates. This includes re-creating each of the file shares and print devices and using the latest compatible drivers to support each of your clients. Avoid upgrading a Terminal Server from Windows NT 4.0 to avoid driver and application conflicts. You can upgrade Windows 2000 Terminal Servers to Windows Server 2003 rather easily. However, to make your Terminal Server operating system upgrade as painless as possible, replace the existing server with a new one. If necessary, rebuild the old server from scratch and redeploy to the production environment if the hardware can still meet performance requirements.
Place your Terminal Servers where they can be readily accessed by the clients that will primarily be using them. Also, to keep network performance optimized, try to place Terminal Servers on the same network segment as other servers that clients may use in their session, such as domain controllers, database servers, and mail servers, as shown in Figure 27.1. This way, you can reduce traffic on the network and improve Terminal Server performance. However, if security, as opposed to performance, is of concern, you should place the Terminal Server system between the client and the servers to create a barrier between external and internal resources.

Whenever possible, choose applications that have been tested and certified by Microsoft to run on Windows Server 2003 Terminal Servers. If you must run third-party applications on Terminal Services, run the necessary compatibility scripts provided with Windows Server 2003, when applicable, and also review the software vendors’ information on installing the applications on a Windows Server 2003 Terminal Server. Certified or compatible applications should be capable of running multiple instances simultaneously on the server as independent processes. Test applications completely to note the resource requirements and functionality.
To keep Terminal Server sessions running efficiently, adequate available network bandwidth is a must. A Terminal Server requires network access to each Terminal Server client, along with any other server the client accesses during that session. For optimum performance for multitiered applications, install two or more network cards on a Terminal Server and configure the server to use one exclusively for Terminal Server client connectivity and the others for back-end server communication.
A fault-tolerant Terminal Server environment can be created using Windows Server 2003 NLB or other hardware vendor load-balancing technologies. If using a third-party load-balancing solution, also ensure that it supports Session Directory server for session failover capabilities, or provides a similar solution. This increases server availability and also gives administrators the flexibility to remove a specific Terminal Server from production without affecting the availability of the Terminal Server environment.
Keep in mind that if a Terminal Server session is disconnected from a failed network load-balanced Terminal Server, the disconnected session is lost and a completely new session must be started on a remaining Terminal Server node if Session Directory server is not used. Also, upgrades and patches need to be performed on each node in the cluster independently.
Note
Refer to Chapter 31, “System-Level Fault Tolerance (Clustering/Network Load Balancing),” for NLB configuration and installation assistance.
Terminal Services deployed in Terminal Server mode requires the purchase of client access licenses (CALs) for each client device or session. Also, a Terminal Services License server must be available on the network to allocate and manage these client access licenses. When a Terminal Server is establishing a session with a client, it checks with the Terminal Services License server to verify whether this client has a license. A license is allocated if the client does not already have one.
To install licenses on the Terminal Services License server, the Terminal Services License server must first be installed and then activated online. To activate the Terminal Services License server, the wizard can automate the process or the administrator can choose to activate the server using a Web page form or by calling the Microsoft Clearing House via an 800 number to get an activate key.
When a Terminal Server cannot locate a Terminal Services License server on the network, it still allows unlicensed clients to connect. This can go on for 120 days without contacting a License server, and then the server stops serving Terminal Server sessions. This is why it is imperative to get a Terminal Services License server installed on the network as soon as possible or before Terminal Servers are deployed to production.
When servers are running in Terminal Services Remote Desktop for Administration mode, no CALs are required, so no Terminal Services License server is required either.
After you take the time to carefully plan Terminal Services deployment in the enterprise, the installation can begin. After the planning phase of a Terminal Services deployment, the service and applications can be installed and configured and later tested by the IT personnel or a designated pilot group. After all functionality and applications are tested and verified, the Terminal Server can be released to the production end users or clients.
For the step-by-step instructions in the following sections, the desktop environment uses the Windows Server 2003 standard Start menu. To verify the Start menu is in this mode, perform the following steps:
Right-click the Start button and click Properties.
On the Start Menu tab, be sure that Start Menu is selected as shown in Figure 27.2 and click OK.

Terminal Services Remote Desktop for Administration mode is installed on all Windows Server 2003 servers by default and only needs to be enabled. To enable this feature, follow these steps:
Log on to the desired server with Local Administrator privileges.
Click Start, right-click the My Computer shortcut, and then click Properties.
Select the Remote tab, and under the Remote Desktop section, check the Allow Users to Connect Remotely to This Computer check box, as shown in Figure 27.3.
A Remote Sessions dialog box will open stating that accounts must not have blank passwords to use Remote Desktop; click OK to continue.
Click OK in the Systems Properties page to complete this process.

To configure remote assistance, follow these steps:
Log on to the desired server with Local Administrator privileges.
Click Start, right-click the My Computer shortcut, and then click Properties.
Select the Remote tab, and under the Remote Assistance settings, check the Turn On Remote Assistance and Allow Invitations to Be Sent from this Computer check box.
Click the Advanced button to configure whether remote control will be allowed and also to set an expiration policy for remote assistance invitations as shown in Figure 27.4.
Click OK in the Advanced window and click OK in the System Properties page to complete this process.

Remote assistance for domain computer accounts can be configured using Group Policy. The following two settings are located in Computer ConfigurationAdministrative TemplatesSystemRemote Assistance, as shown in Figure 27.5:

Solicited Remote Assistance—. This particular setting contains the same options available in the Remote System property page, previously described in this chapter. Use this setting to configure remote assistance standards across multiple workstations and servers.
Offer Remote Assistance—. This setting can be configured only using Group Policy. Offer Remote Assistance allows a predefined “helper” to request a remote assistance session from another workstation on the network. Enabling this setting still leaves the end user with the control to allow or decline a session and also to set the level of remote assistance allowed.
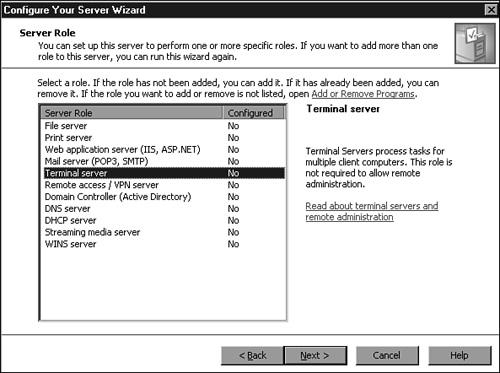
To install Terminal Services in Terminal Server mode, a Terminal Server administrator can use the Configure Your Server Wizard as follows:
Log on to the desired server with Local Administrator privileges.
Insert the Windows Server 2003 CD in the CD-ROM drive and close any autorun pop-up windows that open.
Click Start, All Programs, Administrative Tools, Configure Your Server Wizard, as shown in Figure 27.6.
Click Next on the Welcome screen to continue.
Verify that you have completed the steps as outlined on the Preliminary Steps page and click Next to continue.
From the Server Role page, shown in Figure 27.7, select Terminal Server from the list and click Next to continue.
On the Summary of Selections page, Install Terminal Server should be listed in the summary. If this is correct, click Next to continue.
When a pop-up warning message states that the server will be restarted as part of the installation process, click OK to continue.
After the system restarts, log in with the same account used to install the Terminal Server.
After the logon process completes, Terminal Server Help appears with direct links to Terminal Server checklists. Close this window or minimize it to review information later.
When you see the Configure Your Server Wizard message stating This Server Is Now a Terminal Server, click Finish to complete the installation.

Applications should be installed on a Terminal Server after the Terminal Server is installed. Applications that are installed prior to installing the Terminal Server may not function properly for all users.
Applications must be installed on Terminal Servers only when the server is in Application Install mode. An administrator can put the server into Install mode by opening Add/Remove Programs from the Control Panel or at the command prompt. After the application is installed, the administrator can simply close the Add/Remove Programs window or change the server back to Execute mode at the command line. Execute mode allows users to access and use the applications from Terminal Server sessions.
To change modes at the command prompt, type
Several applications have special instructions for Terminal Server installations, whereas others require running application compatibility scripts. Microsoft has tested some third-party applications such as Eudora Version 4 to run on a Terminal Server, and it has provided the application compatibility script to run after installing that program on the Terminal Server. The provided compatibility scripts are located in %SystemRoot% Application Compatibility Scriptsinstall, where %SystemRoot% is the directory containing your operating system files. Consult your software manufacturer’s documentation before deploying applications on a Terminal Server.
Microsoft Windows Server 2003 Terminal Services can be managed and configured using several tools included with the operating system. This gives administrators flexibility and choice on how to manage Terminal Services in the enterprise. Because many of the tools described in the following sections overlap in function, their management and administrative functions will be described in the following sections. After you become familiar with each of these tools, you can decide which tool best fits your administrative needs.
The Local Security Policy snap-in, as it applies to Terminal Services, is very limited but also very powerful. Only two settings can be configured for Terminal Services: Allow Logon Through Terminal Services and Deny Logon Through Terminal Services. These settings are located in Security SettingsLocal PoliciesUser Rights Assignment.
By default, only the Local Administrators and Remote Desktop Users groups are allowed the right to log on through Terminal Services.
On a standalone or member server implementation of Terminal Services, user-specific Terminal Server settings can be configured using the Computer Management tool. Under the Local Users and Groups section, Terminal Server settings, including profile location, logon script, and remote control permissions, are configured by editing user property pages. Because these configurations are made on an individual user basis, they make administration tedious and inefficient.
Note
Terminal Server settings configured within the Computer Management tool override client-specified settings.
The User Properties pages for configuring Terminal Server settings are the Sessions, Environment, Remote Control, and Terminal Services Profile tabs, as shown in Figure 27.8. The terminal service profile settings for a user include profile path, home directory, and Terminal Server logon access.

The remaining tabs are covered in the “Terminal Services Configuration (Tscc.msc)” section. To use the Computer Management tool, choose Start, Administrative Tools, Computer Management.
To manage domain user Terminal Server settings, use the Active Directory Users and Computers MMC snap-in available on all domain controllers and computers with the Windows Server 2003 Administration Tools installed. The user-specific settings here are similar to the settings configured using Computer Management, but they are for domain user accounts. See the next section to learn more about configuring user-specific Terminal Server settings.
The Terminal Services Configuration MMC snap-in is installed on all servers by default. It can be used only to change local Terminal Server configuration. This tool has two sections, Connections and Server Settings. These settings are set at the server level and override user settings.
This Terminal Services Configuration MMC snap-in section gives seven policies to configure:
Delete Temporary Folders on Exit—. This setting will delete user session–specific temporary folders when the user logs out of a terminal session. This setting only works if the setting to use temporary folders per-sessions is enabled or set to Yes.
Use Temporary Folders Per Session—. Terminal Server creates temporary folders on a per session basis. Disabling this setting makes all Terminal Server sessions use the same temporary folders.
Licensing—. Terminal Server supports per-device and per-session licensing mode. Choose the correct mode for your Terminal Servers.
Active Desktop—. This setting allows users to have active content in their Terminal Server sessions. Disabling this setting conserves server resources by reducing the amount of server processing and network power required to paint the session screens with active content on the desktop.
Permission Compatibility—. This setting offers two choices: Full Security and Relaxed Security. The choice here is made in regard to what resources users will need access to in order to properly run the applications installed on Terminal Server. Relaxed mode was created to support legacy applications.
Restrict Each User to One Session—. This setting was created to help support the Session Directory server for use with Terminal Server clusters. This setting allows users to reconnect to the correct node running the disconnected session by allowing only one session to run per cluster. You cannot reconnect to the wrong session if you have only one.
Session Directory—. This setting should be enabled if the Terminal Server is part of a cluster; it sends session data to a Session Directory server to manage disconnected terminal sessions.
In the Connections section of Terminal Services Configuration, the administrator can configure Terminal Server options such as session time limitations, number of maximum sessions, resource redirection policy, remote control permissions, logon settings, encryption settings, application permission levels, and whether the user can run just one application or have a full desktop session.
Within a defined Terminal Server connection object’s property page, there are eight tabs to set configuration options:
General—. Within this tab, the Terminal Services administrator can configure the required client encryption level. Low encryption runs the Terminal Services sessions at 56-bit encryption; client-compatible encryption allows a client to connect at the highest negotiable encryption to the server; high encryption runs Terminal Services sessions at the highest encryption the Terminal Services server can handle; finally, FIPS Compliant encryption is the standard used by the U.S. government.
Logon Settings—. On this tab, the user logon credentials settings can be set. The Terminal Server can log on sessions using a predefined user account, or client-provided logon information can be used. There is a check box to have the server always prompt for a password; this feature adds a level of security.
Sessions—. The configurations set on the Sessions tab, shown in Figure 27.9, allow time limitations to be set for active, disconnected, or idle sessions. Configuring idle and disconnect session time helps to free server resources to keep performance high.
Environment—. On this tab, a session can be configured to run only a single application as opposed to a full desktop session.
Remote Control—. On this tab, remote control options can be configured so that they do not conflict with an organization’s privacy policies, while still providing the desired administrative function.
Client Settings—. The Client Settings tab is used to manage which local client resources can be made available within a Terminal Server session to enhance functionality or to secure the environment. For instance, some organizations require that data remain only on local file servers, thus requiring that mapping of local client disk drives and printers be disabled to prevent users from saving data on their remote workstations, or even worse, unknowingly uploading infected files to the Terminal Server network.
Network Adapter—. This tab limits the number of connections a Terminal Server can have and also specifies a single network adapter for a particular Terminal Server connection object.
Permissions—. This tab specifies who can access and/or administer the particular Terminal Server connection object.

Group Policy contains several Terminal Server user and computer settings to configure Terminal Server sessions within Active Directory. A Terminal Server administrator can modify existing group policies or create new group policies to manage Terminal Server configurations on an Active Directory site, domain, or organizational unit level. The individual Terminal Server polices are applied to users individually or based on group membership.
Group Policy is the preferred method of standardizing Terminal Services configurations throughout Active Directory because user and server configurations can be centrally administered. Because so many Terminal Server settings are available in Group Policy, the following list outlines where Terminal Server settings can be found:
Computer ConfigurationWindows SettingsSecurity SettingsLocal PoliciesUser Rights Assignment
Allow Logon Through Terminal Services
Deny Logon Through Terminal Services
Computer ConfigurationAdministrative TemplatesWindows ComponentsTerminal Services
Almost all Terminal Server settings can be configured here. Settings here override user or client configurations and also override settings made in the User Configuration section of Group Policy.
User ConfigurationAdministrative TemplatesWindows ComponentsTerminal Services
User session settings can be configured in this section. Settings here override user or client configurations.
A simple and effective way to manage the GPOs for your Terminal Services servers is to create an OU for your terminal servers and apply GPOs to the OU. Enabling the Computer ConfigurationAdministrative TemplatesSystemGroup PolicyUser Group Policy loopback processing mode is very important if you want the user-context GPO settings to take effect. The loopback processing can be set to either merge or replace. Merging allows existing domain-based GPOs to merge with the ones for Terminal Services, while the replace option overrides all other settings and the Terminal Services–specific settings are only applied.
Some additional GPO configuration options that might be useful for your environment include, but aren’t limited to, the following:
Automatic Reconnection—. Allows the client to attempt to reconnect to a broken session every 5 seconds for 20 attempts.
Restrict Terminal Services users to a single remote session—. This option improves system performance and can significantly reduce end user confusion by limiting each user to a single session.
Encryption and Security section—. There are many useful configuration settings, such as forcing an encryption level and prompting for a password during a connection.
Servers running in Terminal Server mode require a Terminal Services License server to allocate client access licenses. To install a Terminal Services License server, follow these steps:
Log on to the desired server with Local Administrator privileges.
Insert the Windows Server 2003 CD in the CD-ROM drive and close any autorun pop-up windows that open.
Click Start, Control Panel.
Locate and double-click the Add/Remove Programs icon.
Select the Add/Remove Windows Components button.
In the Windows Component Wizard window, scroll down and check Terminal Server Licensing and click Next.
In the Terminal Server Licensing Setup page, choose whether the Terminal Server will allocate licensing for current domain or workgroup or for the entire enterprise if this machine is a member of a Active Directory Forest by selecting the correct radio button.
Note the location of the Terminal Services licensing database, change the location if necessary, and click Next to install the Terminal Services License server.
When the installation is complete, click Finish in the Windows Component Wizard window.
Close the Add/Remove Programs window.
A Terminal Services License server can be activated automatically if the server has Internet access, through a Web page from any computer with Internet access, or by the administrator calling a Microsoft Clearinghouse using an 800 number. The License server is activated by contacting the Microsoft Clearinghouse server that will send the Terminal Services server a digital certificate. To activate a Terminal Services License server, follow these steps:
Log on to the desired server with Local Administrator privileges.
Click Start, All Programs, Administrative Tools, Terminal Server Licensing.
Right-click the Terminal Services License server and select Activate Server.
Click Next on the Welcome screen.
Choose the proper connection method and click Next.
If the Web browser or Phone connection method is chosen, follow the instructions in the window to complete Terminal Services licensing activation. Click Finish when done.
If Automatic activation is chosen, enter the appropriate Company information to send to the Microsoft Clearinghouse and click Next at each window.
After the server is activated, uncheck the Start Terminal Server Client Licensing Wizard Now check box and click Next to return to the Terminal Services Licensing console.
The Terminal Services License server should now be activated and ready for installing client access licenses.
After the Terminal Services License server is activated, client access licenses must be installed. Windows 2000 comes with a built-in Terminal Services CAL, so Windows 2000 CALs are already installed. To provide CALs for other operating systems, follow these steps:
Log on to the desired server with Local Administrator privileges.
Click Start, All Programs, Administrative Tools, Terminal Server Licensing.
Right-click the Terminal Services License server and click Install Licenses.
Click Next on the Welcome screen and the Terminal Services Licensing Server screen, and depending on the default connection method, the CAL Installation Wizard will try to connect to the Microsoft activation server.
When the wizard connects to the activation server, choose the license program that the organization participates in and click Next. For example, select Retail, Open, or Select Licensing from Microsoft, as shown in Figure 27.10.
On the Licensing Program page, enter the license number or agreement number for your licensing pack and click Next.
In the Program and License Information page, choose the Windows Server 2003 or Windows 2000 product version; then choose the correct license type as described in the following options:
Windows Server 2003 Per User CAL—. Allocates licenses on a per-user basis.
Windows Server 2003 Per Device CAL—. Allocates licenses to each device that connects to a Terminal Server session.
Windows 2000 Per Device CAL—. Allocates licenses to each device that connects to a Terminal Server session.
Windows 2000 Internet Connector CAL—. Allows nonemployees to connect to the Terminal Server from the Internet.
Enter the quantity of licenses and click Next.
After the licensing information is verified and the CALs are installed, click Finish to close the CAL Installation Wizard.

Now that the licenses are installed, you must configure each Terminal Server to use the correct licensing type.
In Windows Server 2003 Terminal Services, there are two methods of licensing. One option is setting the licensing based on a per-device basis, and the other option is setting the licensing on a per-user basis. To set the licensing type of a Terminal Server, follow these steps:
Log on to the Terminal Server with Administrative rights.
Click Start, All Programs, Administrative Tools, Terminal Server Configuration.
Select Server Settings in the left pane.
In the right pane, double-click the Licensing setting.
Under Licensing Mode, choose the correct licensing type, per device or per user, to match the type of client access license purchased.
Click OK to update the Terminal Server.
Terminal Services reliability and performance can be maintained and improved by implementing fault tolerance using Windows Server 2003 network load balancing and/or Windows Server 2003 Session Directory server.
Terminal Servers can be easily scaled out using Windows Server 2003 NLB. Creating NLB clusters to spread server load across multiple Terminal Servers not only increases fault tolerance, but also allows the administrator to take a particular server offline for maintenance without affecting the availability of the Terminal Server environment.
Using NLB clusters along with Windows Server 2003 Session Directory server enables an end user to reconnect to a disconnected Terminal Server session that is currently running on an NLB cluster node. This way, users who want to close a session and return to it later can be assured that they will connect to the same session. Using NLB without Session Directory server could result in a disconnected user creating an entirely new session on a different cluster node when attempting to reconnect to the existing session.
To make a Terminal Server running on Windows Server 2003 part of an NLB cluster, follow these steps:
Log on to the Terminal Server with Administrative rights.
Open the property page of the desired network adapter.
Add the cluster IP address to the network adapter in the Internet Protocol (TCP/IP) Advanced section and click OK twice to return to the network adapter property page.
Check the Network Load Balancing box on the General tab of the network adapter property page.
To make specific changes to the Network Load Balancing settings, click Properties.
Enter the cluster IP address and full Internet name in the Cluster Parameters page, and on the Host Parameters page, enter Priority (unique host identifier) and the dedicated IP address.
On the Port Rules page, configure a port rule to allow port TCP 3389 (RDP) and configure only single or class C affinity filtering mode. Do not use the None filtering mode because Terminal Server sessions will fail.
Disable any unnecessary port ranges by creating additional port rules. Refer to Figure 27.11 for basic Terminal Server port rules. Click Next and then Finish when completed.

You need to perform the preceding steps on each server in the cluster, or you can configure all the servers in the cluster at one time by using the Network Load Balancing Manager, which is discussed in Chapter 31, “System-Level Fault tolerance (Clustering/Network Load Balancing).”
To make use of a Session Directory server, a Terminal Server load-balanced cluster must be built. It can be a Microsoft NLB cluster or a cluster built using a hardware-based loadbalancing device.
Session Directory server service can be run from any Windows Server 2003 Enterprise or Datacenter server. To create a Session Directory server, follow these steps:
Open the Services applet on the server that will be the Session Directory server. The Session Directory server does not need to run a Terminal Services server but needs to be running on a Windows Server 2003 Enterprise or Datacenter server.
Find the Terminal Services Session Directory service and double-click it.
On the General tab, in the section labeled Startup Type, change the startup type to Automatic.
Click Apply to submit the change and click Start to begin the Session Directory service. Click OK to close the service window and close the services console.
After the service is started, each terminal server computer object that will use the Session Directory server must be added to the newly created local group called Session Directory Computers. This task can be performed using the Local Users and Computers applet in Computer Management on a Session Directory Server that is a domain member server, or it can be performed using Active Directory Users and Computers if the Session Directory server is a domain controller.
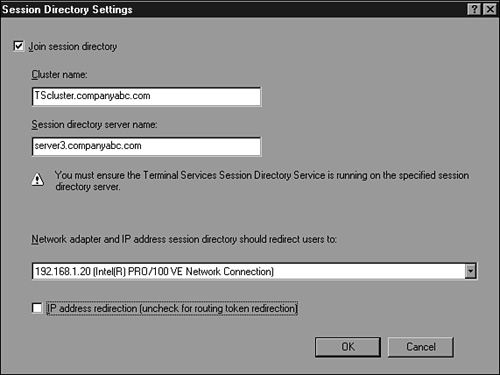
Now you must configure the nodes in the Terminal Server cluster to use the Session Directory server. On individual nodes in the cluster, use the Terminal Services Configuration snap-in and select the Server Settings section to configure the following settings.
Enable the next setting, Session Directory, shown in Figure 27.12, by checking the Join Session Directory box.
Add the fully qualified domain names of the Terminal Server cluster and the Session Directory server.
Choose whether the clients will reconnect to the virtual cluster IP address or the actual dedicated IP address of the server node. Connecting to the virtual cluster IP address is preferred. Leaving this option unchecked is preferred for Windows 2000 and Windows Server 2003 Terminal Server clients.
When you’re finished, click OK to return to the Terminal Server Configuration snap-in.
Terminal Servers should be secured using standard security guidelines and policies defined by the organization. In addition to the organization’s security standards and guidelines, it is advisable that organizations use recommended best practices compiled by Microsoft, as well as the National Institute of Standards and Technologies (NIST) and the National Security Agency (NSA). Both NIST and NSA provide security lockdown configuration standards and guidelines that can be downloaded from their Web sites (http://www.nist.gov and http://www.nsa.gov, respectively).
Windows Server 2003 Terminal Services in Terminal Server mode can be run in either the Full Security compatibility mode or Relaxed Security Permission compatibility mode to meet an organization’s security policy and application requirements. Permission compatibility mode was created to help lock down the Terminal Server environment to reduce the risk of users mistakenly installing software or inadvertently disabling the Terminal Server by moving directories or deleting Registry keys. This mode can be used for most certified Terminal Server applications. Relaxed Security mode was created to support legacy applications that require extended access into the server system directory and the system Registry.
As mentioned earlier, Terminal Services securely communicates over TCP port 3389 using RDP. Organizations requiring even greater security can change the default port by modifying the following Registry key:
HKEY_LOCAL_MACHINESystemCurrentControlSetControlTerminal Server
WinStationsRDP-TcpPortNumber
If Terminal Services is being accessed through a firewall, there are a few considerations to take into account. Many firewalls are configured to close connections after a specified period of inactivity. This feature, although a good one to employ, may affect Terminal Services by prematurely disconnecting user sessions. In addition, this may unnecessarily use server resources, or worse, it can prevent users from connecting back into the same session.
To mitigate this problem, you can increase the Terminal Services keepalive values or reconfigure the firewall. The keepalive values are located in the following:
HKEY_LOCAL_MACHINESYSTEMCurrentControlSetControlTerminal Server
The
DWORD "KeepAliveEnable"value should be set to1The
DWORD "KeepAliveInterval"value should be set to1HKEY_LOCAL_MACHINESYSTEMCurrentControlSetServicesTcpipParametersThe
DWORD "KeepAliveInterval"value in millisecondsThe
DWORD "KeepAliveTime"value in millisecondsThe
DWORD "TcpMaxDataRetransmissions"numeric value
Next, use the Terminal Services Configuration snap-in and under Sessions, check the Override Users Settings box and choose Disconnect from Session.
When building security into Terminal Servers, keep in mind that you are giving users certain levels of access to a server. Essentially the users are logging in to the server and using the applications and services installed on that server. With this in mind, it is important to strike a balance between a user’s productive capability and what the user can do (intentionally or accidentally) to the server. Otherwise, a single session can significantly affect other user sessions, as well as the entire Terminal Services server.
Terminal Server resources should be segmented in such a way that users can only modify specific settings. This sounds simple, but requires careful planning. For instance, partitioning the server’s disk subsystem can keep the operating system, logs, applications, and profiles separated. Each of these partitions should also be formatted with NTFS so that the proper permissions can be applied. This also makes it easier for administrators to manage and lock down specific resources.
The profile partition should be given particular attention because of the nature of the content it stores. For smaller installations, profiles can be stored on the local server on a separate partition. For larger installations, profiles should be kept on a separate server just to hold those profiles. This not only improves security, it can significantly improve performance.
Typically, these temporary Terminal Services profiles are stored under %SystemDrive% Documents and Settings\%Username%, even if roaming profiles are used in the network environment. To change the location to another partition, do the following:
As mentioned earlier in the “Group Policy for Terminal Server” section, GPOs can and should be used to secure the Terminal Services environment. For instance, if an application or department working with sensitive information uses Terminal Services, the Remote Control setting can be disabled to ensure that only authorized users can view these sessions. GPOs can also be used to set disconnect timeout values and allow reconnections from only the original client.
The Terminal Server can be sized to deliver high-performance terminal sessions by estimating the amount of resources each user will require and the number of users who will utilize Terminal Services. Performing frequent performance testing on the Terminal Servers helps generate accurate information on Terminal Server usage. You should perform performance testing during both peak and nonpeak times to ensure proper data collection. Increase memory and processors or introduce additional Terminal Servers as necessary. Understanding the users’ resource needs and the number of users will help you decide how to specify the server hardware requirements and determine how many Terminal Servers you need to support the load.
Scaling Terminal Services can be achieved by increasing server resources such as the number of processors and the amount of memory, as well as by increasing the number of servers that are servicing requests. When determining how to scale, also consider manageability, cost, and how end users may be affected if a server goes offline. For instance, using a greater number of lower-powered servers may increase manageability (such as updating applications, keeping up with operating system updates, and other maintenance), but if a server goes down, fewer users will be affected. The solution will vary depending upon your organization’s needs and circumstances.
Another consideration is the amount of flexibility your organization requires. Using more instead of bigger servers gives more flexibility because of the redundancy, as well as the capability to take servers offline for maintenance. In this scenario, it is important to use servers with enough power to sustain slightly greater workloads during those times when other servers in the farm go offline.
Note
For more information on scaling Terminal Services, refer to Microsoft’s “Windows Server 2003 Terminal Server Capacity and Scaling” whitepaper.
Using Session Directory server in Terminal Services farms is a great way to provide failover for user sessions. To avoid this service from becoming a single point of failure and scale it to meet the performance needs of the organization, you can configure Session Directory to run as a clustered service using MSCS. To create the cluster for Session Directory, do the following:
Ensure that the Terminal Services Session Directory Server service is set to Automatic.
Ensure that the following resources are available in the server cluster configuration:
Physical Disk—. In addition to the quorum disk, the cluster will require a shared disk for the shared data.
IP Address—. A static IP address that is accessible to all the terminal servers.
Network Name—. A name that is resolvable from all the terminal servers in the cluster. Kerberos is required for all communication between the terminal server and the Session Directory server. Make sure to select Enable Kerberos Authentication and DNS Registrations Must Succeed before bringing the network name resource online.
Select File, New, Resource. When the wizard starts, enter the name and description, and set the resource type to Generic.
Click Next and accept the defaults.
Define your dependencies. Specify the Physical Disk and Network Name resources.
Define the Generic Service Parameters. Specify the service name (TSSDIS) in the Service Name box, and check the box next to Use Network Name for Computer Name.
Configure Registry Replication. Click Add and type
SystemCurrentControlSetServicesTssdisParameters.
Note
For more information on MSCS, refer to Chapter 31.
Optimizing Terminal Services is a challenging task because of the complexities in any environment. Hardware resources, applications, usage, the number of users to support, and much more can affect how well Terminal Services responds to users. There are rarely cases where there is one “silver bullet” that can improve overall performance; it takes a combined approach. For instance, from a user perspective, video, color depth, audio redirection, printer redirection, and encryption level all affect how well a system performs.
The following are best practices for ensuring that the Terminal Services implementation runs as efficiently and effectively as possible:
Limit users to a single session.
Log off disconnected or idle sessions after a specified period of time.
Use only Windows Server 2003 certified printer drivers.
Use Windows Server 2003 certified applications and consult the vendor for specific application optimizations.
Use Microsoft Operations Manager (MOM) or other operations management software to monitor the Terminal Services farm.
For medium and enterprise deployments, use a separate server or group of servers with a fast disk subsystem to store user profiles.
Consider using third-party Web browser pop-up blockers.
Block Internet Web sites that use a lot of animation.
Prevent users from installing applications such as games or desktop enhancements/themes.
Automate Web browser cookie deletion.
The Performance MMC snap-in can be used to monitor Terminal Services and to gather session statistics. The two specific performance objects for Terminal Services are Terminal Services and Terminal Services Session.
The first object, Terminal Services, has only three counters: active sessions, inactive sessions, and total sessions. Gathering this session data and teaming it with information such as Server MemoryAvailable Bytes and Processor\% Idle can give an administrator a clear understanding of Terminal Server usage and load. This information can be used to determine whether additional resources or servers need to be added to accommodate load or enhance performance. One adjustment that may be made after taking readings from these counters is the implementation of disconnected session time limits to free server hardware resources for active sessions.
The second performance object, Terminal Services Session, can be used to monitor all counters available for a particular Terminal Server session. This object can be used to get accurate statistical information, such as how much memory and processor time the average Terminal Server session uses. Be sure to monitor network interfaces for available bandwidth to ensure that the Terminal Server is not creating a bottleneck between clients and other back-end servers.
With Windows System Resource Manager (WSRM), you can limit the amount of CPU and memory an application can use. In the Terminal Services environment, you can assign distinct settings based not only on an application, but on a specific user or group as well. This helps to enforce consistency among user sessions and prevent rogue applications or sessions from negatively affecting other user sessions. For more information on using the Windows Resource Manager, refer to Chapter 35, “Capacity Analysis and Performance Optimization.”
Supporting Terminal Servers involves more than just proper configuration; it also involves supporting end users, installing and maintaining applications, and securing and optimizing Terminal Server settings, among other server duties.
The Terminal Server Manager can be used to manage sessions on a Terminal Server. Process and resource usage on the Terminal Server can be monitored here on a server or per-user basis. When an administrator requires remote control access of a terminal session, she must be running in a terminal session and start the remote control function from within Terminal Server Manager. This tool can also be used to send messages to active session users.
Windows Server 2003 has many new command-line tools to make Terminal Server administrative tasks much more flexible and scriptable. There are nearly 20 different command-line utilities for Terminal Services. For the complete listing, refer to Windows Server 2003 online help; we’ve listed a few of the utilities that may prove to be most useful:
tskill.exe—. This tool can be used to kill hung or stuck processes or applications in any active session without having to connect to the session using remote control.
Shadow.exe—. This tool initiates a shadow or remote control session from a command prompt or script.
Query.exe {Process, Session, Termserver, User}—. This tool allows the administrator to query a particular server to get a list of current active and inactive sessions and processes.
TSShutdn.exe—. This tool allows an administrator to remotely shut down or reboot a Terminal Server. This tool can notify existing users how long before the shutdown occurs.
Windows Server 2003 has a great new Windows Management Instrumentation (WMI) Provider for Terminal Server management. Administrators can create WMI-based scripts to configure and manage Terminal Servers remotely. The WMI Provider allows an administrator to perform almost every task on a Terminal Server that could have been performed using the command-line tools, Terminal Server Manager, or Terminal Services Configuration snap-in. The general description of classes, properties, and methods available in this WMI Provider refer to the comments within the provider file at %SystemRootsystem32Wbem scfgwmi.mof.
The Windows Server 2003 and XP Professional systems contain a local group called Remote Desktop Users. This group and the Administrators group are allowed to log on using Terminal Services by default. When a Windows Server 2003 server joins a domain, the Domain Users group can be made a member of the local Remote Desktop Users group, giving all domain users the right to log on through Terminal Services if desired.
You can restrict which users can log on using Terminal Services by performing the following:
For a standalone implementation of a Terminal Server, add or remove members from the local Remote Desktop Users group to control Terminal Server logon access.
For Terminal Servers in a domain, use Group Policy to control logon access by defining the Allow Logon Through Terminal Services setting and add the appropriate groups or users.
When applicable, create a Domain Universal or Global Security group for Terminal Server users and add only this group to the Allow Logon Through Terminal Services setting.
To disable Terminal Services, use local security policy or Group Policy, where applicable, to define the Deny Logon Through Terminal Services setting and apply it to the Everyone group, as shown in Figure 27.13.

Terminal Server users may require support for tasks such as mapping to a file share, installing a third-party print driver, or just troubleshooting issues within the terminal session. While using the remote control features of Terminal Services, an administrator can interact with users in active sessions with view-only access or complete remote control functionality. The amount of access given to an administrator during a remote control session can be set by the user, but it can be configured at the server level by the administrator.
An administrator can remotely control a user’s terminal session only from within a separate terminal session. The remote control command can be initiated using Terminal Server Manager or the command-line tool Shadow.exe.
Applying service packs and updates on a Terminal Server follows the same strategy as outlined in the previous section “Installing Applications for Terminal Server.” Test all service packs and updates in an isolated lab environment prior to production release and always create a backup of the system first to allow for rollback, if necessary.
Backing up and restoring a Terminal Server follow the same procedures as backing up and restoring a standalone server. Administrators must be sure to back up any local user data, including profiles, and back up the current server system state. The data and system state backup, accompanied with a server build document, are all that an administrator needs to recover the Terminal Server. For detailed steps concerning the creation of server build documents and Windows Server 2003 backup and recovery techniques, refer to Chapter 24, “Documenting a Windows Server 2003 Environment,” Chapter 32, “Backing Up a Windows Server 2003 Environment,” and Chapter 33, “Recovering from a Disaster.”
A Windows Server 2003 Terminal Server can be accessed from a variety of clients. These clients include 32-bit Windows-based clients, 16-bit DOS-based graphic clients, and ActiveX Web-based clients.
All Windows Server 2003 server versions and Windows XP Professional include a 32-bit Terminal Server client called Remote Desktop Connection. This full-featured client enables end users to tune their connections to run in full-screen mode, utilizing advanced features such as server audio redirection, true-color video, and local disk, COM port, and printer redirection. Remote Desktop Connection can also be optimized to run over a 28.8Kbps connection. Down-level client workstations can get the RDP client as a free download from the Microsoft Web site.
Terminal Services provides a Web-based client that can easily be distributed through a Web browser. This client downloads as an ActiveX object and needs to be installed only once. Connecting to a Terminal Server using this client requires a Web port connection to the Terminal Server logon Web page and also access to TCP port 3389 on the Terminal Server. The Web-based client still uses the Remote Desktop Protocol (RDP) native to Windows Server 2003 Terminal Services.
Contrary to many Terminal Server administrators’ beliefs, the Web server system hosting the Web client pages does not need to be running on the Terminal Server. If there is no particular reason to run a Web server on the Terminal Server, for security and performance reasons, place the Terminal Server Web client on a separate Web server.
To install the Web server client on a Web server system, do the following:
Click Start and Select Control Panel.
Locate and double-click the Add/Remove Programs icon.
Select the Add/Remove Windows Components button.
Assuming this server does not already have the Application Server running, check the box next to Application Server and click the details button.
Ensure that the Internet Information Services (IIS) box is checked, highlight this option and click the details button.
Scroll down and check the World Wide Web Service box and click the Details button once again.
Check the box next to Remote Desktop Web Connection and press OK three times followed by pressing the Next button to begin the installation.
Once the installation has completed, click Finish and close the Add/Remove Program window. To access this page, open a Web browser and type
http://servername/tsweb.
Remote Desktops is a utility that provides a way to manage several Terminal Services sessions from within one window. This utility still uses the RDP protocol to connect to servers and workstations, but it allows an administrator to switch between terminal sessions by clicking a button instead of having to switch windows. Also, because the console settings can be saved, a new terminal session can also be established with the click of a button.
Administrators can connect to Terminal Server consoles remotely by using the Remote Desktop Connection client or the Remote Desktops MMC snap-in. With remote console access, administrators can use Terminal Services to log on to the server remotely as though they were logged on at the console.
Using the Remote Desktops MMC snap-in, administrators can configure remote desktop sessions that always connect to the Terminal Server console session shown in Figure 27.14. This enables administrators to successfully install and update the operating system and applications remotely.

Caution
You need to know whether to leave the console session logged in and/or locked. If a user logs out of the session, the console will also be logged out. So, you need to be informed and be safe.
To connect to a Terminal Server console using Remote Desktop Connection, run mstsc.exe from the command prompt with the /console switch to gain console access.
Windows Server 2003 Terminal Services is a flexible tool that can be used to provide administrative and remote user functionality. Depending on the needs of your organization, Terminal Services can be used for remote administration and end user support and to provide full remote desktop functionality. Terminal Services enables users and system administrators alike to perform job functions productively from the office or remotely with simplicity.
Avoid installing applications and services from within a Terminal Server session to avoid getting locked out of your Terminal Server sessions.
Filter the security event log for user logon and logoff events and review performance logs.
Configure each of the Terminal Server nodes in a cluster to restrict each user to one Terminal Services session through Group Policy or in the Terminal Services configuration snap-in.
When clustering or load balancing Windows Server 2003 Terminal Servers, use Session Directory server to manage sessions within the Terminal Services cluster.
Enable Remote Desktop for Administration mode on all internal servers to allow for remote administration.
When choosing an antivirus product, be sure to choose one that is certified to run on Windows Server 2003 Terminal Servers.
When a Terminal Server is due for an operating system upgrade, if possible replace the server with a clean build and test all applications, instead of performing in-place upgrades to avoid server or application failures.
Place your Terminal Servers where they can be readily accessed by the clients that will primarily be using them.
Whenever possible, choose applications that have been tested and certified by Microsoft to run on Windows Server 2003 Terminal Servers.
For optimum performance for multitiered applications, install two or more network cards on a Terminal Server and configure the server to use one exclusively for Terminal Server client connectivity and the others for back-end server communication.
Use Group Policy to limit client functionality as needed to enhance server security, and if increased network security is a requirement, consider requiring clients to run sessions in 128-bit high encryption mode.