Windows Server 2003 Routing and Remote Access Features and Services
</objective> <objective> </objective> <objective> </objective> <objective> </objective> <objective> </objective> <objective> </objective> <objective> </objective> <objective> </objective> <objective> </objective> <objective>Leveraging the Capabilities of the Quarantine Policy Check Tool
</objective> <objective> </objective> </feature>As the Internet grows year after year, so does the need to work productively away from the office. Companies are always looking for alternative cost-effective methods of connecting their remote and mobile users and offices without sacrificing performance or security. Microsoft Windows Server 2003’s Routing and Remote Access Service (RRAS) offers integrated multiprotocol routing and remote access services for Microsoft Windows–based computers; RRAS provides multiprotocol LAN-to-LAN, LAN-to-WAN, virtual private network (VPN), and Network Address Translation (NAT) routing services. RRAS enables companies to provide remote access services to their remote and mobile users; it also provides an alternative for connecting their branch offices. RRAS also works with a wide variety of hardware platforms and network adapters as well as various media types such as Ethernet, FDDI, ATM, frame relay, xDSL, and cable modems. In addition, RRAS is extensible, providing an application programming interface (API) that third-party developers can use to create custom networking solutions.
Windows Server 2003 builds on the Routing and Remote Access features that were provided by Windows NT 4.0 and Windows 2000. Routing and Remote Access in Windows Server 2003 includes all the features and services from all previous versions of the Windows server product combined.
The following features were provided by Windows NT 4.0:
RIP version 2 routing protocol for IP
Open Shortest Path First (OSPF) routing protocol for IP
Demand-dial routing and routing over on-demand or persistent WAN links, such as analog phone, ISDN, or Point-to-Point Tunneling Protocol (PPTP)
Internet Control Message Protocol (ICMP) router discovery
Remote Authentication Dial-In User Service (RADIUS) client
IP and IPX packet filtering
PPTP support for router-to-router VPN connections
Routing and RAS Admin administrative tool and the Routemon command-line utility
The following features were provided by Windows 2000:
Multiprotocol Routing and Remote Access Service that can route IP, IPX, and AppleTalk simultaneously
Internet Group Management Protocol (IGMP) and support for multicast boundaries
Network Address Translation (NAT) that simplifies small office or home office (SOHO) network connections to the Internet through addressing and name resolution components
Layer 2 Tunneling Protocol (L2TP) over Internet Protocol Security (IPSec) support for router-to-router VPN connections and remote access
Demand-dial routing that can route IP and IPX over on-demand or persistent WAN links, such as analog phone lines, ISDN, or over VPN connections that use either PPTP or L2TP over IPSec
RRAS integration that provides the capability to integrate a firewall with RRAS and NAT functions
Windows Server 2003 continues the evolution of RRAS by adding some new features. Some of the Routing and Remote Access Service for Windows 2000 and Windows Server 2003 features include the following:
Point-to-Point Protocol over Ethernet (PPPoE) Dial-On-Demand
Background Intelligent Transfer Service (BITS)
NAT Traversal using Universal Plug and Play (UPnP)
Quarantine Policy Check
Improved administration and management tools that use a Microsoft Management Console (MMC) snap-in or the Netsh command-line tool
The PPPoE Dial-On-Demand feature provides the option to use Point-to-Point Protocol over Ethernet (PPPoE) in a dial-on-demand network connection, which enables the use of PPPoE with the RRAS NAT feature to connect to the Internet. PPPoE allows an RRAS server to connect to the Internet through a common broadband medium, such as a single DSL line, wireless device, or cable modem. All the users over the Ethernet share a common connection.
Background Intelligent Transfer Service (BITS) is a background file-transfer mechanism and queue manager. File transfers through BITS are throttled to help minimize the effect on the system’s network performance while transferring large amounts of data. File transfer requests are also persistent across network disconnects and workstation reboots until the file transfer is complete. When the transfer is complete, the application that requested the file transfer is notified of the completion. This feature enables low-priority download operations to complete in the background without affecting users’ bandwidth.
Version 1.5 of BITS adds down-level client support through redistribution, file upload support, and optional advanced upload features. Background File Upload requires the BITS server application, which is included in Windows Server 2003 and is available for redistribution for Windows 2000–based servers.
NAT Traversal technology was designed to enable network applications to detect the presence of a local NAT device. NAT Traversal provides a means for applications to create port mappings on local NAT devices such as Internet Connection Sharing (ICS) and other Internet gateway devices that support Universal Plug and Play (UPnP). The applications can identify the external IP address and automatically configure port mappings to forward packets from the external port of the NAT to the internal port used by the network application. Independent Software Vendors (ISVs) can use this feature to develop applications that create port mappings on UPnP-enabled NAT devices.
Hidden in the Windows 2003 Resource Kit is an add-in utility called the Remote Quarantine Client. This tool provides administrators with the capability to check the status of remote systems for patch updates and virus scans, and quarantine the systems to be cleaned and updated before being allowed to access the network.
Quarantine Policy Check provides administrators with the tools necessary to minimize the risk of having viruses or worms inserted into a network by a remote access user by ensuring remote systems are up to date on the latest patches and updates.
Routing and Remote Access is built on a series of communications and management agents, transport protocols, forwarders, and APIs. These components have been built, expanded, and improved over the years to provide a secure, efficient, effective, and reliable communications system for client-to-server and server-to-server communications in a Windows networking environment.
Figure 26.1 diagrams the various components detailed through the balance of this section, noting each component and its role in the communications system.
Windows Server 2003 RRAS supports the Simple Network Management Protocol (SNMP) management information bases (MIBs). The SNMP agent provides monitoring and alerting information for SNMP management systems. The SNMP agent is a critical component to the reliability and manageability of RRAS as a cornerstone to remote and mobile communications.
Management applications for RRAS include the Routing and Remote Access snap-in and the Netsh command-line utility. These applications are utilities that help an organization better administer the remote and mobile communications environment.
AAA is a set of components that provides authentication, authorization, and accounting for RRAS when it is configured for the Windows authentication provider or the Windows accounting provider. The local AAA components are not used when RRAS is configured for the RADIUS authentication or accounting provider. The AAA components are also used by the Internet Authentication Service (IAS).
The Dynamic Interface Manager component supports a Remote Procedure Call (RPC) interface for SNMP-based management functions used by management utilities such as the Routing and Remote Access snap-in. It communicates with the Connection Manager for demand-dial connections and configuration information to the router managers (such as the IP Router Manager and IPX Router Manager). The Dynamic Interface Manager also loads configuration information from the Windows Server 2003 Registry. In addition, it manages all routing interfaces, including local area network, persistent demand-dial, and IP-in-IP interfaces.
The Connection Manager components manage WAN devices and establish connections by using TAPI. The Connection Manager also negotiates PPP control protocols, including Extensible Authentication Protocol (EAP) and also implements Multilink and Bandwidth Allocation Protocol (BAP).
The Telephony Application Programming Interface (Telephony API or TAPI) provides services to create, monitor, and terminate connections independently of hardware. The Connection Manager uses TAPI to create or receive demand-dial connections.
The IP Router Manager component obtains configuration information from the Dynamic Interface Manager. It loads and communicates configuration information to IP routing protocols, such as RIP for IP and OSPF supplied with Windows Server 2003. It also communicates IP packet filtering configuration information to the IP filtering driver as well as communicates IP routing configuration information to the IP forwarder in the TCP/IP protocol. The IP Router Manager also maintains an interface database of all IP routing interfaces. In addition, it initiates demand-dial connections for routing protocols by communicating with the Dynamic Interface Manager.
The IPX Router Manager obtains configuration information from the Dynamic Interface Manager and maintains an interface database of all IPX routing interfaces. It communicates IPX packet filtering configuration information to the IPX filtering driver as well as communicates IPX routing configuration information to the IPX forwarder driver. The IPX Router Manager loads and communicates configuration information to IPX routing protocols (RIP for IPX, SAP for IPX). In addition, it initiates demand-dial connections for routing protocols by communicating with the Dynamic Interface Manager.
RRAS provides the following four unicast routing protocols:
RIP for IP (Iprip2.dll)—. The RIP for IP routing protocol communicates RIP for IP–learned routes by using the Route Table Manager. It also uses Winsock to send and receive RIP for IP traffic and exports management APIs to support MIBs and management applications through the IP Router Manager.
OSPF Routing Protocol (Ospf.dll)—. The OSPF routing protocol communicates OSPF-learned routes by using the Route Table Manager. It uses Winsock to send and receive OSPF traffic as well as exports management APIs to support MIBs and management applications through the IP Router Manager.
RIP for IPX (ipxrip.dll)—. The RIP for IPX routing protocol communicates RIP for IPX–learned routes by using the Route Table Manager. It uses Winsock to send and receive RIP for IPX traffic. It also exports management APIs to support MIBs and management applications through the IPX Router Manager.
SAP for IPX (ipxsap.dll)—. The SAP for IPX routing protocol communicates SAP for IPX–learned routes by using the Route Table Manager. It uses Winsock to send and receive SAP for IPX traffic and also exports management APIs to support MIBs and management applications through the IPX Router Manager.
The IP multicast routing protocol that RRAS uses is IGMP (versions 1, 2, and 3). IGMP communicates multicast group membership information to the Multicast Group Manager. It also uses Winsock to send and receive IGMP traffic and exports management APIs to support MIBs and management applications through the Multicast Group Manager.
The Route Table Manager maintains a user-mode route table for all routes from all possible route sources. It displays APIs for adding, deleting, and enumerating routes that are used by the routing protocols. The Route Table Manager also communicates only the best routes to the appropriate forwarder driver. The best routes are those that have the lowest preference level (for IP routes) and the lowest metrics. The best routes become the routes in the IP forwarding table and IPX forwarding table.
The Multicast Group Manager maintains all multicast group memberships and communicates multicast forwarding entries (MFEs) in the IP Multicast Forwarder. It also reflects group membership between IP multicast routing protocols.
The IP filtering driver obtains configuration information from the IP Router Manager. It also applies IP filters after the IP forwarder has found a route.
The IP Unicast Forwarder, a component of the TCP/IP protocol (Tcpip.sys), obtains configuration information from the IP Router Manager. It stores the IP forwarding table, a table of the best routes obtained from the Route Table Manager. It can also initiate a demand-dial connection and forward unicast IP traffic.
The IP Multicast Forwarder, which is a component of the TCP/IP protocol (Tcpip.sys), stores multicast forward entries obtained from IP multicast routing protocols through the Multicast Group Manager. It is based on multicast traffic received and communicates new source or group information to the Multicast Group Manager. It also forwards IP multicast packets.
The IPX filtering driver obtains configuration information from the IPX Router Manager and applies IPX filters after the IPX forwarder driver has found a route.
The IPX forwarder driver obtains configuration information from the IPX Router Manager and also stores the IPX forwarding table, a table of the best routes obtained from the Route Table Manager. The IPX forwarder driver can initiate a demand-dial connection as well as forward IPX traffic.
A virtual private network (VPN) is the extension of a private network that encompasses links across shared or public networks like the Internet. A VPN allows data to be sent between two computers across the Internet in a manner that emulates a point-to-point private link. With a virtual private network, illustrated in Figure 26.2, a point-to-point link, or tunnel, is created by encapsulating or wrapping the data with a header that provides routing information that allows the data to travel through the Internet. A private link is created by encrypting the data for confidentiality; data packets that are intercepted while traveling through the Internet are unreadable without the proper encryption keys.

VPN technology provides corporations with a scalable and low-cost solution for remote access to corporate resources. VPN connections allow remote users to securely connect to their corporate networks across the Internet. Remote users would access resources as if they were physically connected to the corporate LAN.
A virtual private network connection requires a VPN client and a VPN server. A secured connection is created between the client and server through encryption that establishes a tunnel, as shown in Figure 26.3.
A VPN client is a computer that initiates a VPN connection to a VPN server. It can be a remote computer that establishes a VPN connection or a router that establishes a router-to-router VPN connection. Microsoft clients including Windows NT 4.0, Windows 9x, Windows 2000, and Windows XP can create a remote access VPN connection to a Windows Server 2003 system.
Windows NT Server 4.0, Windows 2000 Server, and Windows Server 2003–based computers running RRAS can create router-to-router VPN connections to a Windows Server 2003 VPN server. VPN clients can also be any non-Microsoft PPTP client or L2TP client using IPSec.
A VPN server is a computer that accepts VPN connections from VPN clients. It can provide a remote access VPN connection or a router-to-router VPN connection. The VPN server name or IP address must be resolvable as well as accessible through corporate firewalls.
The tunnel is the portion of the connection in which data is encapsulated. The VPN connection is the portion of the connection where the data is encrypted. The data encapsulation, along with the encryption, provides a secure VPN connection.
Authentication in any networking environment is critical for validating whether the individual wanting access should be allowed access to network resources. Authentication is an important component in the Windows Server 2003 security initiative. Windows Server 2003 can authenticate a remote access user connection through a variety of PPP authentication protocols, including
Challenge-Handshake Authentication Protocol (CHAP)
Microsoft Challenge Handshake Authentication Protocol (MS-CHAP)
MS-CHAP version 2 (MS-CHAP v2)
Extensible Authentication Protocol-Message Digest 5 (EAP-MD5)
Extensible Authentication Protocol-Transport Layer Security (EAP-TLS)
For PPTP connections, only three authentication protocols (MS-CHAP, MS-CHAP v2, and EAP-TLS) provide a mechanism to generate the same encryption key on both the VPN client and VPN server. Microsoft Point-to-Point Encryption (MPPE) uses this encryption key to encrypt all PPTP data sent on the VPN connection. MS-CHAP and MS-CHAP v2 are password-based authentication protocols.
Without a Certificate Authority (CA) server or smartcards, MS-CHAP v2 is highly recommended because it provides a stronger authentication protocol than MS-CHAP. MS-CHAP v2 also provides mutual authentication, which allows the VPN client to be authenticated by the VPN server and the VPN server to be authenticated by the VPN client.
If a password-based authentication protocol must be used, it is good practice to enforce the use of strong passwords (passwords greater than eight characters) that contain a random mixture of upper and lowercase letters, numbers, and punctuation. Group Policies can be used in Active Directory to enforce strong user passwords.
Extensible Authentication Protocol-Transport Layer Security (EAP-TLS) is designed to be used along with a certificate infrastructure that uses user certificates or smartcards. With EAP-TLS, the VPN client sends its user certificate for authentication, and the VPN server sends a computer certificate for authentication. This is the strongest authentication method because it does not rely on passwords. Third-party CAs can be used as long as the certificate in the computer store of the IAS server contains the Server Authentication certificate purpose (also known as a certificate usage or certificate issuance policy). A certificate purpose is identified using an object identifier (OID). If the OID for Server Authentication is 1.3.6.1.5.5.7.3.1, the user certificate installed on the Windows 2000 remote access client must contain the Client Authentication certificate purpose (OID 1.3.6.1.5.5.7.3.2).
For L2TP/IPSec connections, any authentication protocol can be used because the authentication occurs after the VPN client and VPN server have established a secure connection known as an IPSec security association (SA). The use of either MS-CHAP v2 or EAP-TLS is recommended to provide strong user authentication.
Organizations spend very little time choosing the most appropriate authentication protocol to use with their VPN connections. In many cases, the lack of knowledge about the differences between the various authentication protocols is the reason a selection is not made. In other cases, the desire for simplicity is the reason heightened security is not chosen as part of the organization’s authentication protocol decisions. Whatever the case, we make the following suggestions to assist you in selecting the best authentication protocol for VPN connections:
Using the EAP-TLS authentication protocol for both PPTP and L2TP connections is highly recommended if the following conditions exist in an organization. If a smartcard will be used, or if a certificate infrastructure that issues user certificates exists, then EAP-TLS is the best and most secure option. Note that EAP-TLS is supported only by VPN clients running Windows XP and Windows 2000.
Use MS-CHAP v2 and enforce strong passwords using group policy if you must use a password-based authentication protocol. Although not as strong of a security protocol as EAP-TLS, MS-CHAP v2 is supported by computers running Windows XP, Windows 2000, Windows NT 4.0 with Service Pack 4 and higher, Windows Me, Windows 98, and Windows 95 with the Windows Dial-Up Networking 1.3 or higher Performance and Security Update.
PPTP and L2TP are the communication standards used to manage tunnels and encapsulate private data. It is important to note that data traveling through a tunnel must also be encrypted to be a VPN connection. Windows Server 2003 includes both PPTP and L2TP tunneling protocols.
To establish a tunnel, both the tunnel client and tunnel server must be using the same tunneling protocol. Tunneling technology can be based on either a Layer 2 or Layer 3 tunneling protocol that corresponds to the Open System Interconnection (OSI) Reference Model. Layer 2 protocols correspond to the Data-link layer and use frames as their unit of exchange. PPTP and L2TP are Layer 2 tunneling protocols that encapsulate the payload in a PPP frame before it is sent across the Internet. Layer 3 protocols correspond to the Network layer and use packets. IPSec tunnel mode is a Layer 3 tunneling protocol that encapsulates IP packets in an additional IP header before sending them across the Internet.
For Layer 2 tunneling technologies, such as PPTP and L2TP, a tunnel is similar to a session; both of the tunnel endpoints must agree to the tunnel and must negotiate configuration variables, such as address assignment or encryption or compression parameters. In most cases, data transferred across the tunnel is sent using a datagram-based protocol. A tunnel maintenance protocol is used as the mechanism to manage the tunnel. Layer 3 tunneling technologies generally assume that all the configuration settings are preconfigured, often by manual processes. For these protocols, there may be no tunnel maintenance phase. For Layer 2 protocols (PPTP and L2TP), however, a tunnel must be created, maintained, and then terminated.
After the tunnel is established, tunneled data can be sent. The tunnel client or server uses a tunnel data transfer protocol to prepare the data for transfer. For example, as illustrated in Figure 26.4, when the tunnel client sends a payload to the tunnel server, the tunnel client first appends a tunnel data transfer protocol header to the payload. The client then sends the resulting encapsulated payload across the internetwork, which routes it to the tunnel server. The tunnel server accepts the packets, removes the tunnel data transfer protocol header, and forwards the payload to the target network. Information sent between the tunnel server and tunnel client behaves similarly.

The Point-to-Point Tunneling Protocol (PPTP) is a Layer 2 protocol that encapsulates PPP frames in IP datagrams for transmission over the Internet. PPTP can be used for remote access and router-to-router VPN connections. It uses a TCP connection for tunnel maintenance and a modified version of Generic Routing Encapsulation (GRE) to encapsulate PPP frames for tunneled data. The payloads of the encapsulated PPP frames can be encrypted and/or compressed. Figure 26.5 shows the structure of a PPTP packet containing user data.
Layer 2 Tunneling Protocol (L2TP) is a combination of the Point-to-Point Tunneling Protocol (PPTP) and Layer 2 Forwarding (L2F), a technology proposed by Cisco Systems, Inc. L2TP encapsulates PPP frames that are sent over IP, X.25, frame relay, and ATM networks. The payloads of encapsulated PPP frames can be encrypted and/or compressed. When sent over the Internet, L2TP frames are encapsulated as User Datagram Protocol (UDP) messages, as shown in Figure 26.6.

L2TP frames include L2TP connection maintenance messages and tunneled data. L2TP connection maintenance messages include only the L2TP header. L2TP tunneled data includes a PPP header and PPP payload. The PPP payload can be encrypted or compressed (or both) using standard PPP encryption and compression methods.
In Windows Server 2003, L2TP connections do not negotiate the use of PPP encryption through Microsoft Point-to-Point Encryption (MPPE). Instead, encryption is provided through the use of the IP Security (IPSec) Encapsulating Security Payload (ESP) header and trailer.
IP Security (IPSec) was designed as an end-to-end mechanism for ensuring data security in IP-based communications. Illustrated in Figure 26.7, the IPSec architecture includes an authentication header to verify data integrity and an encapsulation security payload for both data integrity and data encryption. IPSec provides two important functions that ensure confidentiality: data encryption and data integrity. IPSec uses an authentication header (AH) to provide source authentication and integrity without encryption and the Encapsulating Security Payload (ESP) to provide authentication and integrity along with encryption. With IPSec, only the sender and recipient know the security key. If the authentication data is valid, the recipient knows that the communication came from the sender and that it was not changed in transit.

One of the choices to make when you’re deploying Windows Server 2003–based VPNs is whether to use L2TP/IPSec or PPTP. Windows XP and Windows 2000 VPN client and server computers support both L2TP/IPSec and PPTP by default. Both PPTP and L2TP/IPSec use PPP to provide an initial envelope for the data and then append additional headers for transport through the Internet. PPTP and L2TP also provide a logical transport mechanism to send PPP payloads and provide tunneling or encapsulation so that PPP payloads based on any protocol can be sent across the Internet. PPTP and L2TP rely on the PPP connection process to perform user authentication and protocol configuration.
There are a few differences between the PPTP and L2TP protocols. First, when using PPTP, the data encryption begins after the PPP connection process is completed, which means PPP authentication is used. With L2TP/IPSec, data encryption begins before the PPP connection process by negotiating an IPSec security association. Second, PPTP connections use MPPE, a stream cipher that is based on the Rivest-Shamir-Aldeman (RSA) RC-4 encryption algorithm and uses 40-, 56-, or 128-bit encryption keys. Stream ciphers encrypt data as a bit stream. L2TP/IPSec connections use the Data Encryption Standard (DES), which is a block cipher that uses either a 56-bit key for DES or three 56-bit keys for 3-DES. Block ciphers encrypt data in discrete blocks (64-bit blocks, in the case of DES). Finally, PPTP connections require only user-level authentication through a PPP-based authentication protocol. L2TP/IPSec connections require the same user-level authentication as well as computer-level authentication using computer certificates.
Although PPTP users significantly outnumber L2TP/IPSec users, because of a higher level of security in L2TP/IPSec as well as several other benefits of L2TP/IPSec, organizations that are seeking to improve secured remote connectivity are beginning to implement L2TP/IPSec VPN as their remote and mobile access standard. The following are the advantages of using L2TP/IPSec over PPTP:
IPSec provides per packet data authentication (proof that the data was sent by the authorized user), data integrity (proof that the data was not modified in transit), replay protection (prevention from resending a stream of captured packets), and data confidentiality (prevention from interpreting captured packets without the encryption key). PPTP provides only per-packet data confidentiality.
L2TP/IPSec connections provide stronger authentication by requiring both computer-level authentication through certificates and user-level authentication through a PPP authentication protocol.
PPP packets exchanged during user-level authentication are never sent unencrypted because the PPP connection process for L2TP/IPSec occurs after the IPSec security associations are established. If intercepted, the PPP authentication exchange for some types of PPP authentication protocols can be used to perform offline dictionary attacks and determine user passwords. If the PPP authentication exchange is encrypted, offline dictionary attacks are possible only after the encrypted packets have been successfully decrypted.
Although L2TP/IPSec is perceived to be more secure than a PPTP VPN session, there are significant reasons organizations choose PPTP over L2TP/IPSec. The following are advantages of PPTP over L2TP/IPSec:
PPTP does not require a certificate infrastructure. L2TP/IPSec requires a certificate infrastructure for issuing computer certificates to the VPN server computer (or other authenticating server) and all VPN client computers.
PPTP can be used by all Windows desktop platforms (Windows XP, Windows 2000, Windows NT 4.0, Windows Millennium Edition (Me), Windows 98, and Windows 95 with the Windows Dial-Up Networking 1.3 Performance and Security Update). Windows XP and Windows 2000 VPN clients are the only clients that support L2TP/IPSec and the use of certificates.
IPSec functions at a layer below the TCP/IP stack. This layer is controlled by a security policy on each computer and a negotiated security association between the sender and receiver. The policy consists of a set of filters and associated security behaviors. If a packet’s IP address, protocol, and port number match a filter, the packet is subject to the associated security behavior.
Unlike with most network services of Windows Server 2003, RRAS cannot be installed or uninstalled through the Add or Remove Programs applet in the Control Panel. After you install Windows Server 2003, Routing and Remote Access is automatically installed in a disabled state.
To enable and configure the Routing and Remote Access Service, log on using an account that has local administrator privileges. Then follow these steps:
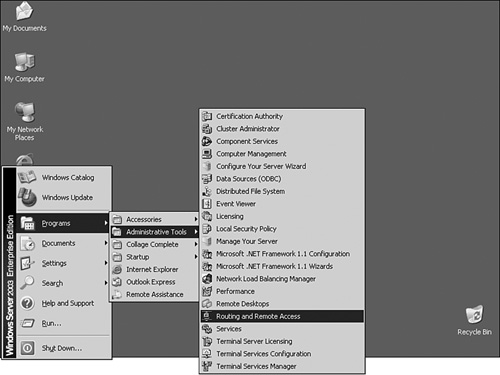
Choose Start, Programs, Administrative Tools, Routing and Remote Access, as shown in Figure 26.8.
For the local computer, right-click the server icon and select Configure and Enable Routing and Remote Access, as shown in Figure 26.9.
For a remote computer, right-click the Server Status icon and click Add Server. In the Add Server property page, select the server you want to add. Then right-click the remote server icon and select Configure and Enable Routing and Remote Access.
Press Next on the Routing and Remote Access Setup Wizard Welcome page to continue.
Select the custom configuration option and then click Next.
Choose the options you want to configure in the Routing and Remote Access Server Setup Wizard, as shown in Figure 26.10.
After you complete the wizard steps, the remote access router is enabled and configured based on your selections in the wizard. To configure additional features, use the Routing and Remote Access snap-in.


In a remote access networking environment, the server component is only half of the configuration, and the remote access clients need to be properly configured to complete the secured mobile access environment. There are many variations in remote access client systems that make choosing the right client configuration important.
A client system could vary based on the operating system such as Windows 95/98, Windows NT4, Windows 2000, or Windows XP, or the client system could be Macintosh, Unix, or even a system at an Internet café or kiosk in an airport. The configuration of the client system also varies based on the type of information being transferred, such as just email, or the transmission of files or confidential database information.
This section covers the technologies available and the decisions that need to be made to choose the right configuration for remote access client systems.
If you have a small number of VPN clients, you can configure the connections manually for each client. For an environment with a hundred or more remote access VPN clients, it makes more sense to configure the remote access configuration automatically. Some of the problems encountered when automatically configuring VPN connections for a large environment include the following:
The organization has a variety of Windows desktop clients.
End users make configuration errors.
A VPN connection may need a double-dial configuration, where a user must dial the Internet first before creating a VPN connection with the organization’s intranet.
The solution to these configuration issues is to use the Connection Manager, which contains the following features:
Connection Manager Client Dialer
Connection Manager Administration Kit
Connection Point Services
The Connection Manager (CM) client dialer is software that is installed on each remote access client. It includes advanced features that make it a superset of basic dial-up networking. CM simplifies the client configuration for the users by enabling them to do the following:
Select from a list of phone numbers to use, based on physical location.
Use customized graphics, icons, messages, and help.
Automatically create a dial-up connection before the VPN connection is made.
Run custom actions during various parts of the connection process, such as pre-connect and post-connect actions.
A customized CM client dialer package (CM profile) is a self-extracting executable file created by the Connection Manager Administration Kit. The CM profile can be distributed to VPN users via CD-ROM, email, Web site, or file share. The CM profile automatically configures the appropriate dial-up and VPN connections. The Connection Manager profile does not require a specific version of Windows and will run on the following platforms: Windows XP, Windows 2000, Windows NT 4.0, Windows Millennium Edition, and Windows 98.
The Connection Manager Administration Kit (CMAK) allows administrators to preconfigure the appearance and behavior of the CM. With CMAK, client dialer and connection software allows users to connect to the network using only the connection features that are defined for them. CMAK also allows administrators to build profiles customizing the Connection Manager Installation package sent to remote access users.
Connection Point Services (CPS) allows the automatic distribution and update of custom phone books. These phone books contain one or more Point of Presence (POP) entries, with each POP containing a telephone number that provides dial-up access information for an Internet access point. The phone books give users a complete POP list, which enables remote users to connect to different Internet access points when they travel. CPS also can automatically update the phone book when changes are made to the POP list.
CPS has two components:
Phone Book Administrator—. A tool used to create and maintain the phone book database and to publish new phone book information to the Phone Book Service.
Phone Book Service—. A Microsoft Internet Information Services (IIS) extension that runs on a Windows Server 2003 server configured with IIS. Phone Book Service automatically checks the current phone book and downloads a phone book update if required.
The Connection Manager Administration Kit (CMAK) and the Connection Point Service (CPS) are not installed by default on a Windows Server 2003 system. To install the CMAK and CPS, do the following:
Click on Start, Control Panel, Add or Remove Programs.
Click on Add/Remote Windows Components.
On the Windows Components Wizard screen, double-click Management and Monitoring Tools.
Select Connection Manager Administration Kit and Connection Point Service.
Click OK and then click Next to complete the installation of the components. Click Finished when done.
Single sign-on enables remote access users to create a remote access connection to an organization and log on to the organization’s domain by using the same set of credentials. For a Windows Active Directory domain-based infrastructure, the username and password or a smartcard is used for both authenticating and authorizing a remote access connection and for authenticating and logging on to a Windows domain. You enable single sign-on by selecting the Logon by Using Dial-Up Networking option on the Windows XP and Windows 2000 logon property page and then selecting a dial-up or VPN connection to connect to the organization. For VPN connections, the user must first connect to the Internet before creating a VPN connection. After the Internet connection is made, the VPN connection and logon to the domain can be established.
Network Address Translation Traversal (NAT-T) is a set of capabilities that allows network-aware applications to discover they are behind a NAT device, learn the external IP address, and configure port mappings to forward packets from the external port of the NAT to the internal port used by the application. This process happens automatically, so the user does not have to manually configure port mappings. NAT Traversal relies on discovery and control protocols that are part of the Universal Plug and Play Forum–defined specifications. The UPnP Forum has a working committee focused on defining the control protocol for Internet gateway devices and defining the services for these devices. NAT and NAT Traversal will no longer be needed in an IPv6 world where every client has a globally routable IP address.
The significance of NAT Traversal is the ability of a privately addressed L2TP/IPSec client to access an RRAS system. In Windows 2000, although L2TP/IPSec was introduced, it was rarely used for remote users because individuals who connect to the Internet frequently connect through a private address public provider using NAT. As an example, when a user connects to the Internet from a hotel, airport, wireless Internet café connection, or the like, the host provider of Internet connectivity usually does not issue a public IP address. Rather the provider uses Network Address Translation, effectively providing the user a private 10.x.x.x address behind a proxy. With Windows 2000, the L2TP/IPSec client cannot traverse out of the private address space.
With Windows Server 2003, NAT Traversal allows the privately addressed L2TP/IPSec client to route outside the private address zone, thus allowing the client to gain VPN connectivity. In early implementations of Windows Server 2003, many organizations have migrated to this new OS specifically for the benefit of being able to set up a NAT Traversal RRAS system.
Several tools and utilities are available for Windows Server 2003 Routing and Remote Access Service. The following utilities allow administrators to configure and obtain information for accounting, auditing, and troubleshooting RRAS:
Routing and Remote Access MMC snap-in
Netsh command-line tool
Authentication and accounting logging
Event logging
Tracing
The Routing and Remote Access snap-in, shown in Figure 26.11, is located in the Administrative Tools folder. It is the primary management tool for configuring Windows Server 2003 RRAS.

Within the RRAS snap-in is a series of floating windows that display table entries or statistics. After a floating window is displayed, you can move it anywhere on the screen, and it remains on top of the Routing and Remote Access snap-in. Table 26.1 lists the floating windows in the Routing and Remote Access snap-in and includes their location.
Table 26.1. Routing and Remote Access Floating Windows
Floating Window | Location | Description |
|---|---|---|
IP Routing/General/Interface | Global TCP/IP statistics, such as the number of routes, incoming and outgoing bytes | |
IP Routing/General/Interface | The contents of the TCP/IP multicast boundaries | |
IP Routing/General | Statistics per group, such as the number of multicast packets received | |
IP Routing/General/Interface | The contents of the Address Resolution Protocol (ARP) cache | |
IP Routing/General/Interface | The IP addresses assigned to routing interfaces | |
IP Routing/General/Static Routes | The contents of the IP routing table | |
Remote Access Clients | The list of client connections, including local and remote addresses and TCP ports | |
Ports | The list of UDP ports on which the router is listening | |
IP Routing/OSPF | The list of configured OSPF areas | |
IP Routing/OSPF | The contents of the OSPF link state database | |
IP Routing/OSPF | The list of neighboring OSPF routers and their state | |
IP Routing/OSPF | The list of configured virtual interfaces and their state | |
IP Routing/RIP | The list of neighboring RIP routers | |
IP Routing/NAT/Basic Firewall | Statistics on the number and types of DHCP messages sent and received | |
IP Routing/Network Address Translation | Statistics on the number of types of DNS messages sent and received | |
IP Routing/NAT/Basic Firewall/Interface | Contents of the Network Address Translation mapping table | |
IP Routing/IGMP | Global list of groups detected by using the IGMP routing protocol | |
IP Routing/IGMP/Interface | Interface list of groups detected by using the IGMP routing protocol | |
IPX Routing/General | Global IPX statistics, such as the number of routes and services, packets received, and packets forwarded | |
IPX Routing/Static Routes | The contents of the IPX routing table | |
IPX Routing/Static Services | ||
IPX Routing/RIP for IPX | Global statistics on the RIP for IPX protocol | |
SAP parameters | IPX Routing/SAP for IPX |
Netsh is a command-line and scripting tool used to configure Windows Server 2003 networking components on local or remote computers. Windows Server 2003 Netsh also enables you to save a configuration script in a text file for archiving or for configuring other servers. Netsh is installed with the Windows Server 2003 operating system.
Netsh is a shell that can support multiple Windows Server 2003 components through the addition of Netsh helper DLLs. A Netsh helper DLL extends Netsh functionality by providing additional commands to monitor or configure a specific Windows Server 2003 networking component. Each Netsh helper DLL provides a context or group of commands for a specific networking component. Subcontexts can exist within each context; for example, within the routing context, the subcontexts IP and IPX exist to group IP routing and IPX routing commands together.
Netsh command-line options include the following:
–a <AliasFile>—. Specifies that an alias file be used. An alias file contains a list of Netsh commands and an aliased version so that the aliased command line can be used in place of the Netsh command. Alias files can be used to map commands to the appropriate Netsh command that might be more familiar in other platforms.–c <Context>—. Specifies the context of the command corresponding to an installed helper DLL.Command—. Specifies the Netsh command to carry out.
–f <ScriptFile>—. Specifies that all the Netsh commands in the file ScriptFile be run.–r <Remote Computer Name or IP Address>—. Specifies that Netsh commands are run on the remote computer specified by its name or IP address.
You can abbreviate Netsh commands to the shortest unambiguous string. For example, typing the command ro ip sh int is equivalent to typing routing ip show interface. Netsh commands can be either global or context specific. You can issue global commands in any context and use them for general Netsh functions. Context-specific commands vary according to the context. Table 26.2 lists the global commands for Netsh.
Table 26.2. Netsh Commands
Netsh can function in two modes: Online and Offline. In Online mode, commands executed by Netsh are carried out immediately. In Offline mode, commands executed at the Netsh prompt are accumulated and carried out as a batch by using the commit global command. The flush global command discards the batch commands. Netsh commands can also run through a script. You can run the script by using the –f option or by executing the exec global command at the Netsh command prompt.
The dump command can be used to generate a script that captures the current RRAS configuration. This command generates the current running configuration in terms of Netsh commands. The generated script can be used to configure a new RRAS server or modify the current one.
For the Routing and Remote Access Service, Netsh has the following contexts:
ras—. Use commands in the ras context to configure remote access configuration.aaa—. Use commands in the aaa context to configure the AAA component used by both Routing and Remote Access Service and Internet Authentication Service.routing—. Use commands in the routing context to configure IP and IPX routing.interface—. Use commands in the interface context to configure demand-dial interfaces.
The Routing and Remote Access Service can log authentication and accounting information for PPP-based connection attempts. This logging is separate from the events found in the system event log and can assist in tracking remote access usage and authentication attempts. Authentication and accounting logging is useful for troubleshooting remote access policy issues; the result of each authentication attempt is recorded, as is the remote access policy that was applied. The authentication and accounting information is stored in a configurable log file or in files stored in the %systemroot%System32LogFiles folder. The log files are saved in Internet Authentication Service (IAS) or in database-compatible format, which can allow database programs to read the log file directly for analysis. Logging can be configured for the type of activity you want to log (accounting or authentication activity). The log file settings can be configured from the properties of the Local File object in the Remote Access Logging folder in the Routing and Remote Access snap-in.
Windows Server 2003 RRAS also performs extensive error logging in the system event log. You can use information in the event logs to troubleshoot routing or remote access problems.
The following four levels of logging are available:
Log errors only (the default)
Log errors and warnings
Log the maximum amount of information
Disable event logging
You can set the level of event logging on the General tab of the following property pages:
IP Routing/General
IP Routing/NAT/Basic Firewall
IP Routing/OSPF
IP Routing/IGMP
IPX Routing/General
Routing/RIP for IPX
IPX Routing/SAP for IPX
RRAS for Windows Server 2003 provides extensive tracing capability that can be used to troubleshoot complex network problems. By enabling file tracing, you can record internal component variables, function calls, and interactions. File tracing can be enabled on various RRAS components to log tracing information to files. Enabling file tracing requires changing settings in the Windows Server 2003 Registry.
Caution
Do not edit the Registry unless you have no alternative. The Registry Editor bypasses standard safeguards, allowing settings that can damage your system or even require you to reinstall Windows.
Each installed routing protocol or component is capable of tracing, and each appears as a subkey, such as OSPF and RIPV2.
Similar to the authentication and accounting logging, tracing consumes system resources; therefore, you should use it sparingly to help identify network problems. After the trace is complete or the problem is identified, immediately disable tracing. Do not leave tracing enabled on multiprocessor computers.
The tracing information can be complex and detailed. Often, this information is useful only to Microsoft support engineers or network administrators who are experts in using the Windows Server 2003 Routing and Remote Access service. To enable file tracing for each component, do the following:
Run regedit.exe and navigate to the following Registry key: HKEY_LOCAL_MACHINESOFTWAREMicrosoftTracing
<Component>(<Component>represents the component for which you want to enable file tracing.)Select the component for which you want to enable file tracing.
Right-click the EnableFileTracing entry, click Modify, and then assign a value of 1 (the default value is 0).
For the selected component, modify additional entries as needed:
To set the location of the trace file, right-click the FileDirectory entry, click Modify, and then type the location of the log file as a path. The filename for the log file is the name of the component for which tracing is enabled. By default, log files are placed in the %windir%Tracing directory.
To set the level of file tracing, right-click the FileTracingMask entry, click Modify, and then type a value for the tracing level. The tracing level can be from 0 to 0xFFFF0000. By default, the level of file tracing is set to 0xFFFF0000, which is the maximum level of tracing.
To set the maximum size of a log file, right-click the MaxFileSize entry, click Modify, and then type a size for the log file. The default value is 0x00100000, or 64KB.
The most significant tool in the Windows 2003 Resource Kit for remote access environments is the Quarantine Policy Check add-in. This is one of those hidden gems buried in the Resource Kit that would otherwise be overlooked if not brought to your attention. The Quarantine Policy Check tool enables an administrator to stop a VPN user from directly accessing a network by first checking to make sure the user’s system meets minimum network requirements before accessing the network. The policy check can confirm whether the remote system has the latest security patches applied, or that the system has been recently scanned for viruses and worms. If the system fails the validation, the system is quarantined and an additional policy can be initiated to conduct the appropriate patch updates and virus scan and cleaning before the remote system is connected to the production network. If the system passes the policy check, the remote user system is allowed connection to the network.
The Quarantine Policy Check works in conjunction with the Connection Manager and is a post-connection action that initiates a network policy script immediately after a remote user properly authenticates into the network, but before the user is actually connected to the production network. The network policy script performs a validation check on the remote access client system to verify that the system conforms to the security policies for patch updates and virus-clean requirements of the organization. When the script has run successfully and the remote system has satisfied the requirements of the network policy, the system is allowed access to the network. If the script fails, the remote access user is denied access to the production network and is commonly redirected to an organization Web page that describes how users can make their systems comply with organizational policies. This may include redirecting the user to a script that performs the appropriate updates and virus-scan cleans necessary to get the remote system updated for a subsequent logon attempt to the production network.
The various files in the Windows 2003 Resource kit for the Quarantine Policy Check tool are rqc.exe, rqs.exe, and rqs_setup.bat. After RRAS is up and running on a Windows 2003 server for VPN and/or dial-up client access use, an administrator can run the rqs_setup batch file that “installs” the rqs server agent. The rqc agent is installed on remote systems and acts as the remote administrative control component for the quarantine check and validation processes.
To be able to use the Quarantine Policy Check tools, a network should be running Windows Active Directory so that group policies can be enabled to manage the quarantine checks. Although it is possible to put a Windows 2003 RRAS server on a Windows NT4 domain and use system policies to enable the Quarantine Policy Check functionality, for the purpose of this Windows 2003-focused book, it is assumed that the organization already has Active Directory enabled in the environment and that all policies will be group policies in Active Directory.
The components needed to enable Quarantine Policy Check include the following:
The remote access clients that are supported for the Quarantine Policy Check include the following:
Windows Server 2003 systems
Windows Server 2000 systems
Windows XP Professional workstations
Windows 2000 Professional workstations
Windows Millennium edition and Windows 98 Second Edition workstations (with limitations)
Note
Although Windows Millennium and Windows 98 Second Edition systems are supported by the Quarantine Policy Check client tool, because these editions of Windows do not support Windows 2003 group policies, the quarantine policies cannot be enforced on these systems. Without the ability of forcing policies, the full benefits of Quarantine Policy Check enforcement are greatly limited. It is recommended that remote client systems use Windows 2000 or XP Professional, or Windows 2000/2003 Server at a minimum.
To get the Quarantine Policy Check working, download and install the Windows 2003 Resource Kit on the Windows 2003 server that will be the RRAS server for the organization. The Windows 2003 Resource Kit can be downloaded at http://www.microsoft.com/windowsserver2003/downloads/default.mspx.
After the Resource Kit has been installed, three files will be needed to run the Quarantine Policy Check: RQS.EXE, RQC.EXE, and RQS_Setup.BAT. After confirming the files exist, do the following:
Launch Notepad on the system (Start, Run, Notepad, OK). Load the RQS_Setup.BAT into Notepad.
Search for the string “Version1�” in the file (Edit, Find, Version1�, OK). The result should return the string “REG ADD %ServicePath% /v AllowedSet /t REG_MULTI_SZ /d QScript1.0a”.
Delete the REM at the start of the line to make the line an active command line.
Save the file (File, Save) and exit (File, Exit).
Type
RQS_Setup/installto configure the registry settings needed for the Quarantine Policy Check software to work properly.
RQS_Setup /install installs all of the necessary files in the c:system32RAS folder on the server system.
Note
RQS_Setup/install does not start the Remote Access Quarantine Agent service, nor is the Remote Access Quarantine Agent service configured to start automatically. The agent requires the RRAS service to start before it starts.
After the RQS Registry settings have been set up and configured, a script file should be created and a CM Profile created and installed on remote client systems.
During the Quarantine Policy check process, a script is run to check the status of system parameters on the remote client system. Dependent on the results of the script, the remote system either is logged on to the network or is quarantined for further system updates.
The script file can be set to look for specific system variables or parameters that indicate the status of patch installations, antivirus software checks and updates, and so on. A sample script file is shown here. The %1, %2, %3, and %4 variables will be passed to the batch file when the batch file is executed. The variables will be highlighted in the next section of this chapter, “Creating a Quarantine Connection Manager Profile.”
@echo off
REM This file should be saved as script.bat

echo RAS Connection = %1
echo Tunnel Connection = %2
echo Domain = %3
echo User Name = %4

set MYSTATUS=

REM
REM Check if Internet Connection Firewall is enabled.
REM Set ICFCHECK to 1 if it is (pass).
REM Set ICFCHECK to 2 if it is not (fail).
REM
REM Check if Virus checker is running and has correct signature file installed.
REM Set VIRCHECK to 1 if it is (pass).
REM Set VIRCHECK to 2 if it is not (fail).
REM
REM Based on the test results, run Rqc.exe.
REM

if "%ICFCHECK%" == "2" goto :TESTFAIL
if "%VIRCHECK%" == "2" goto :TESTFAIL

rqc.exe %1 %2 7250 %3 %4 Version1

REM %1 = %DialRasEntry%
REM %2 = %TunnelRasEntry%
REM 7250 is the TCP port on which Rqs.exe is listening
REM %3 = %Domain%
REM %4 = %UserName%
REM Version1 is the script version string

if "%ERRORLEVEL%" == "0" (
 set MYERRMSG=Success!
) else if "%ERRORLEVEL%" == "1" (
 set MYERRMSG=Unable to contact remote access gateway.
 Quarantine support may be disabled.
) else if "%ERRORLEVEL%" == "2" (
 set MYERRMSG=Access denied. Please install the Connection Manager profile from
http://www.companyabc.com/VPNDenied.htm and reconnect.
) else (
 set MYERRMSG=Unknown failure. The client will remain in quarantine mode.
)
echo %MYERRMSG%
goto :EOF

:TESTFAIL
echo
echo Your computer has failed network compliance tests. Either
echo Internet Connection Firewall is not enabled or you do not
echo have the correct virus-checking program with the current
echo signature file loaded. For information about how to configure
echo or install these components, see
echo http://www.companyabc.com/remote_access_tshoot.htm.
echo

:EOF
This is just a sample of what the script.bat file can screen for during the connect process. The batch file can be customized for the specific needs of the organization.
After a script batch file has been created, a new quarantine Connection Manager (CM) profile needs to be created with the Windows 2003 Connection Manager Administration Kit (CMAK). The CM Profile will be part of the remote client access connection manager configuration that instructs the remote client system to launch the script.bat file and prepare information that the Quarantine Policy Check Server will be able to validate that the remote system can connect to the network.
The CMAK is a Windows component of Windows Server 2003. To install the CMAK, do the following:
Click on Start, Settings, Control Panel, Add/Remove Programs.
Click on the Add/Remove Windows Components icon in the left frame.
Scroll down and highlight Management and Monitoring Tools and click on Details.
Click to select the Connection Manager Administration Kit, then OK, and then Next to install the component.
Click Finished when prompted.
After CMAK has been installed, a custom action needs to be configured in a profile that will be distributed to remote client systems. To configure the custom action, do the following:
Launch the CMAK (Start, Programs, Administrative Tools, Connection Manager Administration Kit).
At the Welcome screen, click Next.
For Service Profile Selection, choose to create a New Profile, and click Next.
For Service and File name, enter a description name for the server (such as
CompanyABC Connection) and for the filename, name of a file (likecmprof), and then click on Next.If you have a realm name, enter it; otherwise just choose Do Not Add A Realm Name To The User Name and click Next.
If you have an existing profile, choose to merge the profiles; otherwise just click Next.
For VPN support, typically because the connection manager profiles are to secure VPN connections, choose the check box Phone Book From This Profile, and under VPN Server Name Or IP Address, enter the VPN name that the remote client will be accessing and click Next.
Your newly created profile will appear at the VPN Entries screen. Choose to edit any settings at this point, or click Next to continue.
If a static phone book will be used, enter it in the Phone Book File location; otherwise keep Automatically Download Phone Book Updates and click Next.
If you did not enter a phone book filename in the previous screen, enter a phone book name such as
pbook, and for the Connection Point server name, enter the URL for the server. Click Next to continue.At the Dial-up Networking entries screen, your newly created profile will appear. Choose to edit any settings at this point, or click Next to continue.
If you plan to change routing tables, enter the routing file; otherwise click Next.
If your remote connection requires a proxy setting, enter it in the Automatic Proxy Confirmation page; otherwise, click Next.
Finally, to configure the Custom Actions for the Quarantine Policy Check, click the New button to bring up the New Custom Action page.
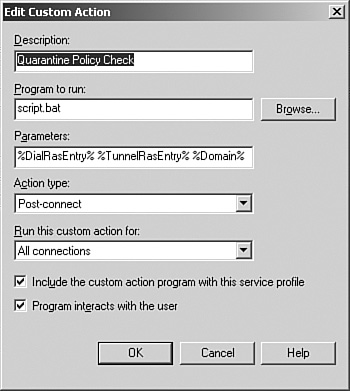
Enter a description (such as Quarantine Policy Check), program to run (such as script.bat), parameters (%DialRasEntry% %TunnelRasEntry% %Domain% %UserName%). Choose Post-connect for the Action type, choose All Connections for the type of connection that the action will run, and make sure the two check boxes at the bottom of the page are selected. The configuration will look something similar to Figure 26.12. Click OK when this is completed.
Click Next to get to the Logon Bitmap screen, and either enter a new graphic or leave it on the default and click Next to continue.
For Phone Book Bitmap, either enter a new graphic or leave it on the default and click on Next.
On the Icons page, choose new icons, or leave with the default icons and click on Next.
Choose a new shortcut menu command, or leave the default and click Next.
Select a new Help file or leave the default and click Next.
Enter in a Support Information contact line, such as
Call Corporate Helpdesk for Support (510) 555-1234so that users with problems have a contact number for assistance. Click Next.If your users do not have the Connection Manager v1.3 installed on their system, by selecting the Installation option, Connection Manager 1.3 will be installed with the profile. Click Next.
For any organization disclaimers, such as notices of privacy, security, appropriate use, or the like, a text file can be displayed at the time of logon. Enter the filename (or leave blank) and click Next.
If you have additional files that need to be launched, click Add and specify rqc.exe in the Program FilesWindows Resource KitsTools directory. Click Next.
Choose Advanced customization and then Next to give the customization file a unique value. In the example used to create the RQS_Setup.bat, the authorized versions were Version 0, Version 1, and Test. If you plan to allow this connection manager to work, choose an option like Test for the “value” as shown in Figure 26.13. Click Apply and then click Next. You will notice a DOS session open that will configure the Connection Manager settings.
Click Finished when done.

After creating the CM Profile, the files stored on the RRAS server in the Program FilesCmakProfilescmprof directory need to be distributed to remote users accessing the network. Use any number of software distribution tools to deploy the CM Profile files, such as using a Group Policy, Logon Script installation, or Microsoft Systems Management Server (SMS).
After the CM Profile has been created with the CMAK and distributed to remote access client systems, the executable file created (cmprof.exe in the case of the file created from the “Creating a Quarantine Connection Manager Profile” section) needs to be run. When executed, the file installs the connection manager system profile that creates a network connection icon on the remote system.
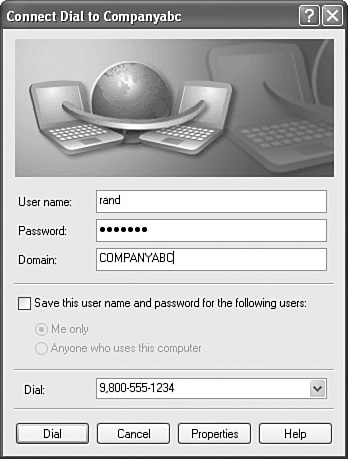
When remote users launch the network connection icon, they are prompted with the information entered into the CMAK configuration wizard. In the example in the “Creating a Quarantine Connection Manager Profile” section, the user will see a screen similar to the one in Figure 26.14.

If the remote access user settings do not comply with the settings defined in the script.bat file, the user logon will be halted, effectively quarantining the user session until action is taken. The action, dependent on what was noted in the CMAK, may be to send users to a Web site where they are prompted to call for help desk support or to install certain patches and updates, or the remote system may be scanned, cleaned, and updated automatically.
To help you better understand how Routing and Remote Access can be leveraged in an enterprise environment, we’ve created a couple of scenarios. The following two scenarios include mobile and home user access of RRAS and a site-to-site connected RRAS environment.
Remote access users connecting from home or a hotel have several options. The connection options depend on the available hardware connection and the version of the Windows desktop operating system. The following list discusses some options available to remote mobile and home users:
Dial-up remote access—. Remote and mobile users can access corporate network resources by dialing up to an RRAS server. The dial-up client, shown in Figure 26.15, initiates a connection to an RRAS server to authenticate the user and then provides access to the corporate intranet.
Windows Terminal Services (WTS)—. Windows Terminal Services provides remote and mobile users access to Windows-based programs running on a Windows Server 2003. With WTS, users can run programs, open and save files, and use corporate network resources as if they were installed on their local computers. Using Windows Server 2003 WTS also allows users to access their local drives for file transfers, access serial devices, and print to their local printers. Remote home users can access the WTS server through direct dial-up, Internet Explorer (requires an ActiveX plug-in), and Windows Terminal Server Client. Terminal Services is covered in detail in Chapter 27, “Windows Server 2005 Terminal Services.”
VPN connection—. Remote and mobile users who have access to the Internet can create VPN connections to establish remote access connections to a corporate intranet. VPN remote access eliminates the need for long-distance calls to corporate RAS servers. Remote clients can use their connections to local ISPs to create VPN connections to their corporate office. The VPN software creates a virtual private network between the dial-up user and the corporate VPN server across the Internet. VPN clients have a choice of connecting using PPTP or L2TP or having the connection automatically selected, as shown in Figure 26.16. As stated earlier in this chapter, PPTP is supported by a variety of Windows desktop platforms but does not have the level of security provided by L2TP/IPSec. L2TP/IPSec provides a higher level of data integrity and security but requires a certificate infrastructure.

Organizations can also use VPN connections to establish routed and secure connections between geographically separate offices or other organizations over the Internet. A routed VPN connection across the Internet logically operates as a dedicated WAN link. The two methods for using VPNs to connect local area networks at remote sites are as follows:
Using dedicated lines to connect branch offices—. Rather than using an expensive dedicated circuit between the branch offices, both the branch office RRAS servers can use a local dedicated circuit and local ISP to connect to the Internet. The VPN software uses the local ISP connections and the Internet to create a virtual private network between the branch office servers.
Using a dial-up line to connect branch offices—. Instead of having an RRAS server initiate a long-distance call to another RRAS server, the server at each branch office can call a local ISP to establish a connection to the Internet. The VPN software uses the Internet connection to create a VPN between the branch office servers across the Internet, as illustrated in Figure 26.17.

In both cases, the services that connect the branch offices to the Internet are local. The office routers that act as VPN servers must be connected to a local ISP with a dedicated line. This VPN server must be listening 24 hours a day for incoming VPN traffic.
Remote and mobile connectivity has increased over the years because the extended office now includes hotels, airports, client sites, other campus buildings, and wireless users. With the expansion of the network from which users need to connect to a Windows Server 2003 environment, the improvement of security, reliability, compatibility, and performance becomes extremely important for an organization. Windows Server 2003 Routing and Remote Access Services (RRAS) includes all the enhancements added to the technology over the past several Windows Server product revisions, and includes several new technologies that further expand the capability of the technology. Although it may not have met all the needs of organizations in the past, RRAS now provides an extremely robust set of tools, technologies, and utilities to implement, support, monitor, and manage a truly enterprise-mobile communication environment.
Use the EAP-TLS authentication protocol for both PPTP and L2TP connections.
Use EAP-TLS if a smartcard will be used or if a certificate infrastructure that issues user certificates exists.
Use MS-CHAP v2 and enforce strong passwords using Group Policy if you must use a password-based authentication protocol.
Use IPSec to provide per-packet data authentication (proof that the data was sent by the authorized user), data integrity (proof that the data was not modified in transit), replay protection (prevention from resending a stream of captured packets), and data confidentiality (prevention from interpreting captured packets without the encryption key).
L2TP/IPSec connections provide stronger authentication by requiring both computer-level authentication through certificates and user-level authentication through a PPP authentication protocol.
PPTP does not require a certificate infrastructure. L2TP/IPSec requires a certificate infrastructure for issuing computer certificates to the VPN server computer (or other authenticating server) and all VPN client computers.
Use PPTP for versions of Windows prior to Windows 2000 and Windows XP.
Configure a remote access solution automatically using the Connection Manager Administration Kit for an environment with a hundred or more remote access VPN clients.
Use logging sparingly to help identify network problems because logging remote access activity uses system resources.
To minimize the risk of remote-access users bringing viruses and worms into the network, use the Quarantine Client Check utility in the Windows Resource Kit to make sure remote systems meet minimum organizational update policies.
Do not leave tracing enabled on multiprocessor computers.