
Monitoring the Health of Lync Server 2013 with SCOM
Deploying SCOM to monitor Lync Server 2013 is a relatively simple task. The model of importing preconfigured managed packs allows administrators to enable Lync Server 2013 monitoring with little effort. Lync Server 2013 has two management pack offerings for SCOM:
• Component and User Management Pack—This management pack is responsible for tracking event logs, performance counters, and CDR/QoE data. This allows for an out-of-the-box monitoring experience for the service health and performance of Lync Server 2013.
• Active Monitoring Pack—This management pack is responsible for running synthetic transactions through SCOM. This allows for a greater level of monitoring, but requires additional configuration.
Both management packs can be downloaded from the following URL: http://www.microsoft.com/en-us/download/details.aspx?id=35842&WT.mc_id=rss_alldownloads_all.
The sections that follow outline basic configuration tasks required to monitor Lync Server 2013 with SCOM.
Configure Component Monitoring by Importing the Component and User Management Pack
The following tasks assume that a SCOM server has been deployed already. Additionally, all Lync Servers in the environment should already have a SCOM agent deployed to them.
1. Open the SCOM Operations Console, and navigate to the Administration pane.
2. Right-click on Management Packs and choose Import Management Pack.
3. In the Import Management Packs Wizard, choose Add and then Add from Disk.
4. Navigate to the location where you downloaded your Lync Server 2013 management packs; by default this location is %SystemDrive%Program FilesMicrosoft Lync Server 2013Management PacksManagement Packs. Choose the Microsoft.LS.2013.Monitoring.ComponentAndUser.mp and Microsoft.LS.2013.Monitoring.ActiveMonitoring.mp files and click Open.
5. Click Install and wait for the import to be completed.
6. Every Lync Server must be configured as a System Center Agent Proxy. To do this, in the Administration panel click on the Agent Managed section.
7. Right-click on each Lync Server computer and choose Properties.
8. Under the Security tab, check the box for Allow This Agent to Act as a Proxy and Discover Managed Objects on Other Computers. See Figure 13.16 for an example.

The discovery process will happen over a random period. To validate proper discovery of your environment, expand the Microsoft Lync Server 2013 folder under the Monitoring Pane, and validate that Lync Server 2013 computers show under the Servers tab, and that services are monitored.
It is recommended to monitor the frequency of events in your environment to establish a proper notification configuration. Before configuring email alerts, consider analyzing the active alerts in the environment over a set period. After the environment has been stabilized and cleaned up, it is then appropriate to configure email alerting for critical issues in the environment.
Deploying Synthetic Transaction Monitoring with SCOM
SCOM also allows for synthetic transactions to be automated through the SCOM service. Enabling this functionality requires the deployment of a watcher node. The watcher node acts as a trusted Lync Server 2013 computer that is running synthetic transactions on behalf of test users. This watcher node reports statuses to SCOM servers, resulting in real-time monitoring and alerting on real user scenarios.
The synthetic transactions available in the Lync Server 2013 Management Pack test the scenarios given in Table 13.1.


Transactions in Table 13.1 marked as Default are transactions that are turned on by default when you configure a watcher node in SCOM. Transactions marked as Nondefault are not run by default, but can easily be enabled on the watcher node. Transactions marked as Extended are nondefault transactions that can also be run multiple times during each pass. Extended transactions are targeted at scenarios such as multiple voice routes for a pool.
The watcher node used for Lync Server 2013 monitoring should be a dedicated server. Synthetic transactions can generate a large amount of traffic, as such an existing production server should not be used. A server that will act as a watcher node must meet the following requirements:
• All Lync Server 2013 prerequisites
• Full version of .NET Framework 4.5
• Windows Identity Foundation
• Windows PowerShell 3.0
The high-level steps required for deploying a watcher node are as listed here:
1. Install the Lync Server 2013 core files on the watcher node computer. You can do this by running the Lync Deployment Wizard and choosing to install administrative tools.
2. Install the SCOM agent files by deploying an agent to the watcher node computer using the SCOM console.
3. Run the watchernode.msi file included as part of the Lync Server 2013 Management Pack on the watcher node computer.
4. Configure the watcher node settings in Lync Server 2013 using Lync Management Shell and New-CSWatcherNodeConfiguration.
A watcher node computer can authenticate with Lync Server 2013 in two ways to run synthetic transactions. The authentication method will decide configuration steps that are required. See Table 13.2 for an overview of these authentication methods.
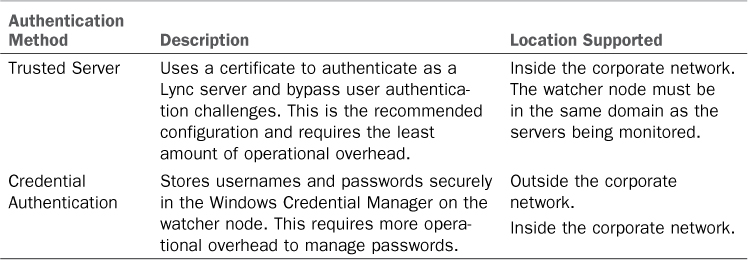
If the watcher node will be used inside the corporate network, it should be deployed as a trusted server. To configure the watcher node computer as a trusted server, perform the following steps:
1. Open Lync Server Management Shell (PowerShell).
2. Run a command similar to the following. This example shows creating watcher.companyabc.com as a watcher node:
New-CSTrustedApplicationPool -identity watcher.companyabc.com -Registrar NYPOOL01.companyabc.com -ThrottleAsServer $True -TreatAsAuthenticated $True - OutboundOnly $false -RequiresReplication $True -ComputerFQDN watcher.companyabc.com -site "New York"
3. After creating the trusted application pool, a trusted application identity must be created. Run the following command:
New-CSTrustedApplication -ApplicationID STWatcherNode -TrustedApplicationPoolFQDN watcher.companyabc.com -Port 5061
4. Next, run Enable-CSTopology in the Lync Management Shell. When it has completed, restart the watcher node computer.
After the watcher node computer has been configured as a trusted application server, run the Lync Server Deployment Wizard and install a certificate using the Request, Install or Assign Certificate Wizard.
After the previous steps are completed, the watchernode.msi file must be run on the watcher node computer. Perform the following steps on the watcher node computer:
1. Open a command prompt as Administrator.
2. Navigate to the folder where watchernode.msi is located.
3. Run the following command:
watchernode.msi Authentication=TrustedServer
Tip
The watchernode.msi syntax is case-sensitive. TrustedServer must be entered exactly as shown or the install will fail.
After the watcher node computer has had all files installed, the watcher node must be configured to run synthetic transactions. Before enabling synthetic transactions, health testing accounts should be created. For information on how to create test accounts, see the section “Creating Lync Test Accounts for Synthetic Transactions,” earlier in this chapter. To test all scenarios, you must enable three test accounts for use with the watcher node.
When test accounts have been created, perform the following steps to enable a new watcher node to run synthetic transactions:
1. Open the Lync Server Management Shell (PowerShell).
2. Run the following command to deploy the default synthetic transactions:
New-CSWatcherNodeConfiguration -TargetFQDN nypool01.companaybc.com -PortNumber 5061 –TestUsers @{add="sip:[email protected]","sip:[email protected]", "sip:[email protected]"}
This command will create a new watcher node using default settings. The target Front End Pool will be NYpool01.companaybc.com. The watcher node will use the test accounts [email protected], [email protected], and [email protected].
At this point, the environment will be configured with basic activity monitoring. To validate the configuration of the watcher nodes in the environment, run the cmdlet Test-CSWatcherNodeConfiguration.
This section has provided a summary of the benefits of monitoring Lync Server 2013 with SCOM and how to enable this functionality in a Lync Server 2013 environment. This monitoring solution includes many more features than described here, and it is recommended that you explore all the available configuration options and capabilities of SCOM monitoring. For a complete guide on monitoring Lync with SCOM, see the TechNet library located at http://technet.microsoft.com/en-us/library/jj205188.aspx.