
Chapter 11

Compositing Images Using SketchUp and Artlantis
For 7 years, Frédéric Blanc occupied the post of Product Manager, Graphics & Design, at Abvent, the French distributor of SketchUp and creator of Artlantis. During his time there, he developed a considerable level of expertise in modelling, rendering, and animation. Using this experience to good effect, he created Mr. White SAS, a practice whose principal areas are modeling, rendering, and animation for architects, interior designers, product designers, and advertising agencies.
This project deals with the creation of renders for a project for the conversion and renovation of a derelict apartment building and the construction of a new housing block.
Project: Open architectural competition, compositing of winning entry onto site photographs.
Tools: SketchUp 7, Artlantis 2.1, Photoshop CS, and SketchUp–Artlantis export plug-in.
In May 2009, the Argenteuil-Bezons Environment Agency launched an open competition for the design of a block of social housing. The focus of this competition was the conversion and renovation of a derelict, 10-unit apartment block and the construction of a new complex containing 28 apartments.
The architects Jean Filhol and Mathieu Guéroult of the SEPRA practice – an office with wide-ranging experience in public-sector architecture – decided to enter the competition and called upon Frédéric Blanc’s expertise to create the renders for the competition entry.
Project Context
In an open competition, the architect has to respond quickly and decisively to the client’s brief.
Using plans, sections, and elevations, architects tried their best to respond to the expectations of the client and to describe the solutions that they put forward. Perspective renders of the project allow those involved to judge the esthetic quality of the building and, if needs be, to get an idea of its integration into the existing built environment.
The SEPRA practice uses PowerCADD drafting software on the Mac. This technical drawing package allows them to produce all the necessary plans, sections, and elevations for a project. The first step in this development was to create a 3D model using the 2D technical drawings provided by SEPRA. In a public competition, the time factor is vital, since the deadline for submission cannot be missed. It is also not unusual for architects to be making modifications to their proposals right up until the last moment.
In the case under consideration here, only 3 days were penciled in for building the model, creating two perspectives and compositing the model onto a site photograph: an extremely tight deadline.
Techniques Used
Before beginning a job, it is essential to choose the tools that best meet the constraints of the project. SketchUp showed itself to be the best choice for modeling for the following reasons:
• It can easily import plans, sections, and elevations in DWG format that can then be used as reference drawings. For this project, only the building facades needed to be modeled: there would be no interior perspectives.
• SketchUp allows you to work quickly and efficiently.
• Creating repeating elements in the project as SketchUp components helps to manage any changes made to those elements as the project progresses: changes made to one component will be reflected in all the instances of that component.
• Using the free version of SketchUp or the SketchUp Viewer application, the model can be sent quickly and easily to the client to evaluate the project’s progress.
• SketchUp and Artlantis (a photorealistic rendering application) work synergistically with each other. Artlantis is able to create extremely realistic images, thanks to a lighting model based on real-world physics, its ability to produce realistic-looking materials, and its tools for compositing a 3D model onto a site photograph (one of the stipulations of competition entry). Using Artlantis you move from SketchUp’s somewhat hand-drawn rendering style into a new world of photorealism.
• The pipeline between the two programs functions particularly well. You do not have to completely finish your modeling in SketchUp before you can carry out your first test renders in Artlantis. Artlantis can also add realism to the project with its library of objects such as street furniture, trees and vegetation, vehicles, people, etc. Also, changes made to the original SketchUp model can be easily passed on to the Artlantis project.
New Approaches
Frédéric Blanc: “SketchUp is used in a large number of projects in my work, since it’s a modeling tool completely unlike traditional modelers.”
“The fact that you are always working in 3D, that you can explore the model from every angle using a simple flick of the mouse, that you don’t have a screen cluttered up with complex dialog boxes, that you can edit geometry simply by moving faces, that you can construct on top of already existing geometry….SketchUp’s ability to pick up inferences from geometry and use them to guide your modeling makes working with the program simple and intuitive. Also, SketchUp’s signature, hand-drawn rendering style lends an approachable aspect to the models.”
“I mostly use SketchUp’s basic toolset; plug-ins are rarely used. The features of the program I use most are groups, components and layers.”
“Artlantis is used as a complement to SketchUp. You could almost describe it as the SketchUp of the rendering world. It can import almost any 3D format and can produce high-quality renders quickly and easily. One of its great advantages is its ability to control and display the changes to lighting and material effects in real time in a preview window, and at a quality close to that of the final render. This cuts down greatly on the number of intermediate renders that need to be performed, with all the time savings that that brings.”
Stage 1: Importing Plans and Elevations in DWG Format
Objective: Bringing together the existing 2D drawings and data; creation of facade volumes; and standardization of the project.
Data: DWG and PDF files.
Tool: SketchUp.
In this stage, the DWG files were imported (see Figure 11.1) and used as reference drawings. In order to work as quickly as possible, a group was created for each elevation. The imported drawings were grouped so that their individual elements could not be selected or altered. The goal here was to re-create the plans from scratch by tracing over the DWGs: it is the easiest and most efficient method. The original document is also kept as a reference for the subsequent modeling work. Also, it is not uncommon that there are problems with the 2D documents arising from the import/export process, and you do not want to copy these over into the 3D model.

FIG 11.1 Imported DWG.

FIG 11.2 Color reference document in PDF format.
When importing a DWG into SketchUp, there is always a loss of some information: the colors of lines and hatchings are not preserved, for example. However, any layer structure present is maintained. In order to see any original color information in the file, it is essential to have a PDF reference document of the file (See Figure 11.2).
Tip
When importing a DXF or DWG file, it is vital to know the units of measurement in the original file in order to get the correct scale (meters, centimeters, millimeters, feet, inches, etc.) in the SketchUp file. If this information is not known, it is possible to rescale after importing the drawing.
If, for example, you have imported a file in inches instead of feet, use the Tape Measure tool to measure a line segment in the drawing, then type directly on the keyboard the length of the segment multiplied by 12, and hit return. SketchUp will then ask you if you want to rescale the whole model (See Figure 11.4).
FIG 11.3 DWG file import options.

FIG 11.4 Rescaling the file.

Stage 2: Identifying the Materials and Preparing the File for Export
Objective: To export the file to a rendering program or to another model.
Data: 3D model.
Tool: SketchUp’s Material Selection tool.
When a SketchUp file needs to be exported to a rendering program or to another modeler, it is essential to identify all the different materials in the project. SketchUp’s tools allow you to assign different colors to different materials in the project, and the best method is to make sure that these colors are easily distinguishable one from the other (See Figure 11.5).

FIG 11.5 Textures and materials in SketchUp.
In SketchUp, colors or materials can be assigned directly to a surface or to a collection of selected surfaces. Colors and materials can also be applied directly to groups or to collections of groups. In this case, it is still always possible to enter the groups and to change the colors or materials of individual surfaces within the group.
Attention
SketchUp allows you to assign different colors or materials to both the inside and outside surface of a face, something that can create problems when you come to export, since most rendering engines can only deal with one material on any one face. Generally, the material that is “seen” by the renderer is the one applied to the exterior surface (the one with the surface normal). You therefore need to check that the correct material is applied to the correct surface. To do this, you need to select the surface and right-click > Entity Info from the contextual menu. In the Entity Info palette, you will see two swatches, indicating the materials present on the surface. The left swatch indicates the material on the exterior surface, and the right swatch indicates that on the interior surface.
Applying the material to a group allows you to get over this problem since, whatever the face orientation, the material is applied uniformly to all faces, front and back.
Stage 3: Exporting to Artlantis Format
Objective: To get the SketchUp model into Artlantis.
Data: SketchUp model.
Tool: Artlantis export plug-in.
It is possible to export directly to Artlantis format if you have the correct plug-in installed. The plug-in can be downloaded from Artlantis’s website (www.Artlantis.com) under Downloads > Plug-Ins. Once installed in SketchUp’s plug-ins directory, the program can export in native Artlantis format.
Before the model is exported, it is good practice to select all the elements in the model (Ctrl-A in Windows and Cmd-A on the Mac) before calling up the export dialog box (see Figure 11.6). Doing this will prevent you from exporting hidden layers or groups. Once everything is selected, from the Menu Bar, choose File > Export > 3D Model… and choose ATL format from the drop-down menu.
Stage 4: Modifying the SketchUp Model and Updating the Artlantis Scene
Objectives: To modify and add detail to the SketchUp model and to update these changes in Artlantis.
Data: Imported 3D model.
Tool: Artlantis’ Use Reference File… function.
When using a third-party piece of software with SketchUp, it is extremely important to make sure that any changes made to the SketchUp a model can be easily reflected in the external software (in this case Artlantis). This enables both projects to develop in parallel.
Luckily, Artlantis has just such a function, and it can be found under the File menu as Use Reference File…. (See Figure 11.7). The following describes how to use this function:

FIG 11.6 Exporting the SketchUp model to Artlantis format.
1. The SketchUp file is exported to Artlantis format and is given a name, for example, Project_01.atl.
2. The file can now be worked on in Artlantis, adding point light sources, creating materials, adding reflection and bump mapping, adding 3D objects from Artlantis’ own libraries, etc.
3. Because of a demand from the client, drastic changes have to be made to the original SketchUp model. However, the work already done in Artlantis will not have to be repeated.
4. A new Artlantis file is exported from SketchUp and given the name Project_02.atl.
5. This new file is now opened in Artlantis and saved.
6. Now, from the File menu, Use Reference File… is chosen. A dialog box opens that allows you to navigate to your reference file, in this case the Project_01. atl file. Certain options appear in the dialog, which allow some or all of the changes made in the first Artlantis file to be copied over to the new file, such as camera views, applied textures, placed objects, and sources of illumination.
Thanks to this method, work already carried out never has to be repeated and no time is wasted. The Artlantis and SketchUp files are linked, and work on the model’s geometry and render setup can be carried out in parallel.

FIG 11.7 Artlantis’ interface, showing the Use Reference File… function.
Stage 5: Artlantis’ Site Insertion Module
Objective: To place the virtual building in context using a site photograph.
Data: Site photography and textured 3D model.
Tool: Artlantis’ Site Insertion function.
At this point, the principal difficulty is the absence of a magic and totally automatic tool that allows you to painlessly composite a 3D vector model onto a 2D bitmapped photograph. There are, however, some tools that can ease the task of matching the perspective of the virtual building to that of a photograph (see Figure 11.8).

FIG 11.8 Site photos taken from various angles.

FIG 11.9 Photoshop’s interface, with Alpha mask applied to the image.
As a first step, some preparatory work needs to be done on the site photo in an image editor, such as Photoshop (see Figure 11.9), and items in the foreground, such as vehicles, people, vegetation or even street furniture, need to be cut or masked out.
Attention
It is fundamental to choose your viewpoints wisely, to take photos that are not cluttered by nonessential elements, to use a digital camera that will give you a good, high-resolution image, and to use lenses with as little distortion or aberration as possible. You should also make sure that the daylighting is good and that your photo contains some elements that you can use to establish a sense of scale.
In Artlantis, the site photo is placed as a background image in the preview window. In the Site Insertion module, the 3D and 2D control windows appear. The X, Y, and Z axis guides are also shown in both these windows (See Figure 11.10).
1. In the 2D View, find an edge of the building that is prominent in the site photo and use it to place the axis origin.
2. In the site photo (3D View), line up the X, Y, and Z axes with guide edges, such as pavements, roadways, and the horizontals and verticals of neighboring buildings.
3. Start the insertion calculation. The 3D building will be composited over the site photo. The position of the three axes can now be tweaked in real time to fine-tune how the building sits in the site photograph. The focal length of the virtual camera can also be adjusted to refine the positioning of the building.
4. Now, it is just a matter of placing the image prepared in Photoshop in the foreground. This will mask out any parts of the building that should be in the background.

FIG 11.10 Artlantis studio – Site Insertion interface.

FIG 11.11 Final render – Perspective view of the building in its site context.
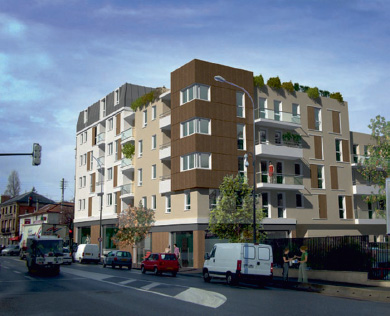
FIG 11.12 Final render – Perspective view of the building in its site context.
Once the base image is created, it will more often than not need to be retouched in an image editor to obtain the final presentation image: Photoshop is often a 3D artist’s best friend.
Conclusion
In this type of project, SketchUp demonstrates all of its simplicity and efficiency. Other than the Artlantis export script, no other plug-ins were used: the basic toolset was more than sufficient to model this type of building.
Regular communication with a client is always vital in any project to keep abreast of the latest demands and to keep the client informed about the state of the project. SketchUp is an ideal tool for this type of communication.
SketchUp fits in perfectly into the graphics pipeline and can be used to feed data into much more sophisticated modeling or rendering programs.
In this project, the combination of SketchUp and Artlantis allowed some extremely tight deadlines to be met and allowed the production of images of the highest quality of a virtual project within a real urban context.
Resources
SketchUp to Artlantis export plug-in. Available at http://www.artlantis.com/.
Artlantis Render. Available at http://www.artlantis.com/.
Adobe Photoshop. Available at http://www.adobe.com/.