
Today, collaboration and team effort have become critical factors, both inside and outside of the workplace. More and more users want simplicity and familiarity with the tools they use day in and day out. They achieve this by searching in Google, reading in Wikipedia, writing on a blog, finding people on Facebook, being notified in a simple RSS reader, viewing friends, activities on Facebook, and bringing all of this together in iGoogle. Alfresco Share delivers all of this functionality to enterprise users, projects, and teams.
Imagine a business user, if given the permission, being able to set up their project web site quickly, being able to invite users to the site, and assign permissions to users within that web site. What previously required a customized solution is now offered out of the box by Alfresco Share.
By the end of this chapter you will have learned about:
- The Alfresco Share User Interface
- Creating and managing collaborative web sites
- Effective management of project content
- Customizing and managing your dashboard
- Configuring blogs
- Using Wikis
- Using the Alfresco repository with Microsoft Office tools
Alfresco Share (referred to simply as Share from now on) is built on the Alfresco enterprise-class document repository, and delivers out of the box collaborative content management. It simplifies the capture, sharing, and retrieval of information across virtual teams. Team members or project members can rapidly find relevant content or excerpts, look at past or similar projects, and stay on top of any relevant changes, in order to make them more efficient.
Share is focused on collaboration tasks and includes integration with popular blogging, Wiki, and forum or discussion products, out of the box. It provides a great interface into more traditional document management libraries (think folders) as well. Keep in mind that all of the web site's contents and documents are still stored in the Alfresco repository. Therefore they are secured, versioned, searchable, and auditable.
Share is an independent client application that accesses the repository through web scripts. It is built on the Alfresco Surf (referred to simply as Surf from now on) platform. Alfresco Share is a web application that runs on a machine that is separate from that of the repository.
Share provides a paradigm for creating collaborative applications by aggregating Surf components, and incorporating new Surf components as they are developed. With Share, users can modify their workspaces to fit their collaborative requirements inside or outside of the organization. Users can invite their peers to share and collaborate on the project and the content. With the addition of Share, Alfresco delivers a Web 2.0 application that leverages Flash and AJAX with a polished interface, which any business person can enjoy.
Features like Document Libraries, Search, Activity Feeds, Virtual Teams, personalized dashboard, N-tier Architecture, and draft CMIS support make it a really competent tool for collaborative content management. Share allows you to:
- Bulk-upload content, select content from thumbnails, and view it in a Flash viewer. The content is automatically generated in Flash format. This allows users to view content regardless of the original format.
- Search for people and experts to contribute to their projects as easily as searching for content. Share provides updates on what is new in a project, especially details of content that has been added, edited, or commented upon. Share can track deliverables and import the information into your personal calendar by using iCal.
- Use an interactive interface to configure a customizable dashboard, and sites, based on what is critical to a specific role or project. Share allows you to create a virtual team for projects and communities.
- Develop applications in an environment that uses lightweight scripting and reusable components, as well as deliver scalability and allow more users to access existing resources.
The URL to access the Alfresco Share application is different from the URL used to access Alfresco Explorer. The Alfresco Share application can be launched in the web browser by visiting the URL, http://<server name> /share/
If you have already installed Alfresco in Windows, then you can invoke the Alfresco Share application by selecting the application, as shown in the following screenshot:

You need to provide your authentication credentials, which are similar to those used in the Alfresco Share application. For the administrator, the default username and password are both admin.
Once you have been authenticated, the Administrator Dashboard will be displayed, as shown in the following screenshot. At the top of the page you will find the application toolbar. This toolbar contains links to the various Share pages.
Your Administrator Dashboard will look similar to the following screenshot:

These components are as follows:
- My Dashboard: This component displays your personal, configurable dashboard
- My Profile: This component displays your Profile page, where you can view and edit your user details
- Sites: This component displays the Site Finder page, where you can search for specific sites and manage the membership of Share sites
- People: This component displays the People Finder page, where you search for specific Share users
- Help: This component displays the online help available for Alfresco Share
- Logout: This component logs you out of the Alfresco Share application.
- Search: This component enables you to perform a quick search for content in the current site, or across all of the sites
This is your personal dashboard and consists of dashlets that allow you to track all of the information that is relevant to you. These dashlets appear on your personal dashboard and on site dashboards. Each dashlet provides a summarized view of a page. However, the presence of a corresponding page is not mandatory. Wherever a page exists, it generates the contents of the related dashlet.
When customizing your personal dashboard, each dashlet that you select is displayed as a pane on the dashboard. The following dashlets are available:
- Getting Started: This dashlet displays the instructions for getting started, and provides you with links to perform common tasks.
- My Profile: This dashlet contains a summary of the personal details provided in your user profile.
- My Sites: This dashlet displays all of the sites that you have either created or are a member of. You can access a site from this dashlet. Creating or deleting a site can be done by using this dashlet.
- My Calendar: This dashlet provides a list of events that you have created, as well as events for each site that you are a member of.
- My Tasks: This dashlet displays a list of all of your incomplete tasks.
- My Activities: This dashlet maintains the most recent activities that have been performed for any site that you are a member of.
- Documents I'm Editing: This dashlet displays all of the files that you currently have checked out from any Document Library.
- Alfresco Network: This is a portal that gives Alfresco Share customers access to the latest Alfresco news.
- RSS Feed: This dashlet is configured to display the Alfresco web site feed. This is the default setting.
- CMIS Feed: This dashlet displays links specific to the Content Management Interoperability Services (CMIS) specification and implementation.
You can customize your personal dashboard to suit your purposes. You can modify the dashboard layout, select the dashlets that will appear in your dashboard, or configure the order in which the selected dashlets are displayed.
To customize the dashboard layout and its contents, carry out the following steps:
- Click on the My Dashboard option on the toolbar
- Click on the Customize Dashboard button on the dashboard banner. As a result, the Customize User Dashboard page appears
The image in the Current Layout section represents the current layout. The Dashlets section displays the current selection of dashlets, as they will appear on your dashboard.

To change the dashboard layout, carry out the following steps:
- Click on the Change Layout. This opens a page that lists the available dashboard layouts.
- You can select a layout by clicking on it or on the Select button beside it.
To add, remove, or rearrange dashlets, carry out the following steps:
- Click on the Add Dashlets option to display the available dashlets
- Click on the desired dashlet in the Add Dashlets section and drag it to the desired column
- To remove a dashlet, click on the dashlet and drag it to the bin
- Click and drag the dashlets up and down, within and across columns, to set the display order
- Click on the OK button to save your changes
Now your dashboard has been customized as per your selections, and will display the selected dashlets in the order specified and with the layout chosen.
The profile page contains your detailed personal and business information. Share publishes these credentials for all of the site members to view.
You can access your User Profile to review the information that is being published to the site members. You can access your My Profile page from anywhere in Share.

In order to view your complete profile, click on the My Profile option on the toolbar. Alternatively, on your dashboard, you can click on the View full profile option in the My Profile dashlet. As a result, the User Profile page will be displayed.
You can edit your profile in order to manage the information about you that is available to the site members. In addition to personal and business information, you can also upload a photograph.
In order to edit your user profile, carry out the following steps:
- Click on the My Profile option on the toolbar. The User Profile page appears.
- Click on the Edit Profile button. Fields that currently specify your information are displayed. Mandatory fields are marked with an asterisk (*).

- Edit the User Profile details, making changes and adding new information as desired.
In order to upload a photo to be displayed along with your profile, carry out the following steps:
- Click on the Upload button in the Photo section. Click on the Browse button on the Upload File page.
- Browse to and then Upload the image. The selected file appears in the Upload File page. Click Remove to delete the file listed.
- Click Upload File(s) to upload the picture.
- Click on the Save Changes to save the profile details. The User Profile page now displays your updated User Profile.
You can also reset your password, for example for security reasons. To change your password, carry out the following steps:
- Click on the My Profile option on the toolbar, which opens the User Profile page. Next, click on the Change Password option, which will display the Change Password page.
- In the Enter Old Password box, type your current password. In the Enter New Password box, type your new password. In the Confirm New Password box, type the new password again.
- Click on the OK button to complete the password reset process. You are then returned to your User Profile page.

A site is a collaborative area for a project or some task that is being undertaken. Sites can be either public or private sites.
Private sites are visible only to site members. A Site Manager must extend an invitation to you in order for you to be able to and become a member of the private site.
Public sites can be viewed by everyone, but can be worked on only by the site members. The tasks that can be performed by a member user, depends on the role assigned to him/her.
From the Sites option on the toolbar, you can create a new site or display the Site Finder component. This component allows you to search for a particular site or display a list of all of the web sites that you can access, the sites created by you, sites (public and private) of which you are a member, and Share public sites. From the site list, you can enter a site, delete a site, and manage your site membership.
You can create a site from anywhere in the application by using the Sites option on the toolbar. You can make the site a public or a private site. If you create a site, you become the Site Manager. A site can also have multiple Site Managers.
We shall create a sample site named Alfresco Book project and use that as a basis for explaining how to use a site with Alfresco Share.
To create a site, carry out the following steps:
- On the toolbar, expand the Sites option, and then click on the Create Site option. Alternatively, on your personal dashboard, you can click on the Create Site option on the My Sites dashlet. As a result, the Create Site page appears as shown in the following screenshot:

- Complete the site information by filling in the fields, namely the Name, URL name, and Description. Fields marked with an asterisk (*) are, mandatorly. The site name is a descriptive name that will be displayed as the title of your site. This is a mandatory field. Enter Alfresco Book project as the site name.
- The URL name is a short version of the name to be used as the URL. It cannot have any special characters or spaces. In the URL name option, alfrescobookproject has been entered as the URL.
- Specify the type of site access. By default, each new site has public access. To create a private site, clear the Make Site Public checkbox.
- Finally, click on the OK button.
- The application now displays the site dashboard of the newly-created site.
You can search for a site from the Sites tab on the toolbar.
To search for a site, carry out the following steps:
- Click on the Sites tab on the toolbar. The Site Finder component appears.
- In the search box, type the full or partial name of the site that you are searching for, and then click the Search button. Leave the search box empty and click on the Search button to return a list of all of the public sites, sites that you created, and sites of which you are a member (both public and private).
- The results list appears below the search box, and displays all of the existing sites that match the criteria entered. This list includes only public sites, sites created by you, and private sites of which you are a member of.

To the righthand side of a site, the action Join indicates that you are not a member of that site. Similarly, the action Leave indicates that you are currently a member of that site. In order to enter a site from this page, you must click on the site name.
You can choose to join or leave a site. Managing membership is easy in Alfresco share.To manage your site membership, carry out the following steps:
- Click on the Sites tab on the toolbar. The Site Finder page appears.
- Perform a search. The results list appears below the Search box.
- In the results list, you can manage your membership on sites by clicking on the Join option to become a member of a site. Click on the Leave option to remove yourself from the site, that you no longer wish to be a member of.
Deleting a site means to permanently remove it from the repository. Deleting a site also removes all of the site content, including the Document Library content, Wiki pages, Blog posts, and discussion topics. Only a Site Manager or the application administrator can delete a site.
To delete a site, carry out the following steps:
- Click on the Sites tab on the toolbar. The Site Finder page appears. Perform a search. The results list appears below the search box. If a site can be deleted, then the Delete button is displayed for that site.
- Click on the Delete button for the site that you want to delete. A message prompts you to confirm the deletion.
- Click on the OK button to delete the selected site. A message informs you that the selected action deletes all of the site content. Click on the Yes button. As a result, the selected site is deleted in its entirety.
The People tab on the toolbar displays the People Finder page. You can use this search feature to find a particular user. Once the user has been found, you can view the user's full profile.
The People Finder page enables you to search for a particular user and allows you to view the user's profile from the list displayed.
To search for a user, carry out the following steps:
- Click on the People tab on the toolbar, and as a result the People Finder page appears. In the search box, type the full or partial name of the desired user. You must enter a minimum of three characters. The search is not case-sensitive.
- Click on the Search option. The results list appears beneath the search box and displays all of the users that match the search criteria provided. Click on a user's name to view the user's profile.
You can view the details of and perform operations on the dashlets that make up your personal dashboard.
You can enter a site from the My Sites dashlet on your personal dashboard. This dashlet lists all of the sites that you created or of which you are a member. We shall use the Alfresco Book project Site, which was created in the earlier example, as the sample site to help us to understand all of the operations that can be performed on or for a site.
If the site that you want to access is not listed in the My Sites dashlet, you can search for it using the Site Finder page. If the desired site does not exist, then click on the Create Site option to create it.
To access a site, carry out the following steps:
- Click on the My Dashboard component on the toolbar, if your personal dashboard is not already displayed.
- On the My Sites dashlet, click on the site that you wish to enter. The application displays the site.
The Alfresco Global Feed can be configured to display any RSS feed on your dashboard.
This appears as the RSS Feed dashlet on the Customize User Dashboard page.
To configure the RSS feed, carry out the following steps:
- Click on the My Dashboard component on the toolbar, if your personal dashboard is not already displayed.
- In the Alfresco Global Feed dashlet, click on Configure. The Enter URL dialog box is displayed. Enter the link of the feed that you want to subscribe to in the URL field.
- In the Number of items to display field, select the number of items to be displayed in the dashlet for the specified feed. Select All in order to display all of the items available for the feed.
- You can select the Open links in new window option to have the target story displayed in a new window. Click on the OK button, and the Alfresco Global Feed dashlet displays the feeds for the URL specified, as shown in the following screenshot:

The My Calendar personal dashlet summarizes the scheduled items from all of the sites that you are associated with. It contains a rolled-up view of events that you have created, as well as events for each site that you are associated with, either as a member or as the Site Manager.
To view the events, you must first configure your personal dashboard to display the My Calendar personal dashlet.
To view scheduled events, carry out the following steps:
- Click on the My Dashboard tab on the toolbar, if your personal dashboard is not already displayed. The My Calendar personal dashlet displays the name, date, and time of each event, as well as the site in which it was created.
- With the help of the My Calendar dashlet, you can view additional information about an event:
- Click on the event name to display the Calendar page where the event was created. This is a convenient method of accessing and editing the events that you have created.
- Click on the site name to display the corresponding site dashboard.
The Alfresco Network personal dashlet displays the most recent Alfresco news and information, conveniently on your personal dashboard.
To view this information, you must first configure your personal dashboard to display the Alfresco Network personal dashlet.
To use the Alfresco Network dashlet, carry out the following steps:
- Click on the My Dashboard tab on the toolbar, if your personal dashboard is not already displayed. The Alfresco Network personal dashlet displays links to information including the news items, knowledge base, and downloads.
- Click on a link present on the Alfresco Network dashlet, in order to open the associated content in a separate window.
We shall use the Alfresco Book project site as an example to explain the various aspects of using the site. By default, sites include Wiki, Blog, Document Library, Calendar, and Discussion Forum pages. However, you can customize the site to contain any combination of these components.
When you enter the Alfresco Book project site, the site dashboard is displayed. The site dashboard consists of site dashlets, which organize and display information that is relevant to the site.
When you customize the Alfresco Book project site dashboard, you can specify the desired dashlets. Each dashlet that is selected is displayed as a tab on the dashboard. The tabs available on the site are:
The Getting Started tab displays helpful information for getting started in the Alfresco Book project site, and provides links to common tasks.
The Site Colleagues tab lists all of the Alfresco Book project site members and the roles assigned to them.
The Recently Modified Documents tab displays the documents present in this site's Document Library that have been added or edited in the past seven days.
Customizing a site enables you to choose the pages that you want to include in the site. By default, all components (Wiki, Blog, Document Library, Calendar, and Discussions) are included when you create a site. Only the Site Manager can customize the site. Once you customize the site, you can customize the site dashboard, which provides a summary of the available pages.
To customize a site, carry out the following steps:
- Access the Alfresco Book project site.
- Click on the Customize Site option on the dashboard banner. The Customize Site page displays the current pages for that site.
- To remove a page from the site, click on the Remove icon below the page.
To add a page to the site, carry out the following steps:
- Click on the Add Pages option to display the available pages. In the Select New Page section, click on the Select button to the right of the component that you want to include in the site.
- Click on the OK button to save your changes.

You are returned to the site dashboard. The banner displays the selected pages in the order of their configuration.
With the site customized, you can now customize the site dashboard to display information that is relevant to the site.
The Alfresco Book project dashboard is an interactive user interface that contains information specific to the site. Similar to your personal dashboard, site information is organized and displayed in dashlets, which represent the configured pages.
For each site, you can modify the dashboard appearance, select the site dashlets to appear on the dashboard, or configure the display order of the selected dashlets.
In order to customize the appearance and content of the site dashboard, carry out the following steps:
- Enter the Alfresco Book project site.
- On the dashboard banner, click Customize Dashboard to display the Customize Site Dashboard page. The image in the Current Layout section represents the currently-selected layout. The Dashlets section displays the currently-selected dashlets as they will appear on the site dashboard.
In order to change the site dashboard layout, click on the Change Layout option to display the available dashboard layouts. Either click on the graphic of the desired layout, or click on the Select button to the right of it.
To select site dashlets, carry out the following steps:
- Click on the Add Dashlets option to display the available dashlets.
- To add a dashlet, click the desired dashlet in the Add Dashlets section and drag it to the desired column.
- To remove a dashlet, click on the unwanted dashlet and drag it to the garbage bin.
- Click and drag the dashlets within and across columns to configure the display order. Click on the OK button to save your changes. You will be returned to the site dashboard, which displays the selected pages in the order configured.

You can edit the name and description of the site from anywhere within the site. You can also change the site's access to public or private.
To edit the site, details, carry out the following steps:
- Enter the Alfresco Book project site.
- On the dashboard banner, click on the Edit Site Details option. The Edit Site Details page displays the current details for this site.
- Make the desired changes to the site's Name and Description.
- Change the site's access, if desired. To make this a private site, clear the Public check box, and click on the OK button.
As a result, the site dashboard displays the updated details on the banner and the Site Profile dashlet.
You can configure the RSS Feed site dashlet to display any RSS feed on a site dashboard. To perform this task, you must first customize your site dashboard to display the Alfresco Global Feed dashlet. This appears as the RSS Feed dashlet on the Customize Site Dashboard page.
The steps to configure the RSS Feed dashlet on a site dashboard are the same as for your personal dashboard (see above).
To perform this task, the Wiki page must contain at least one page and the Wiki site dashlet must be configured to be displayed on the site dashboard.
To configure the Wiki site dashlet, carry out the following steps:
- Enter the desired site. On the Wiki site dashlet, click on the Configure option. The Select Wiki Page page appears. This page lists all of the pages in this site's Wiki.
- Select the page whose content you want to display on the Wiki dashlet. If no Wiki pages have been created, the message There are no pages available to select is displayed.
- Click on the OK button. The Wiki dashlet is displayed the selected page.
Share allows you to subscribe to RSS feeds. These feeds enable you to automatically receive regular updates on various Share activities.
The RSS Feed feature is available in the following Share locations:
- Wiki page
- Blog page
- Document Library page
- Discussions page
- My Site Activities dashlet on your personal dashboard
- Site Activities dashlet on the site dashboard
To subscribe to an RSS feed, carry out the following steps:
- Click on the RSS Feed link or icon. This initiates the subscription process. The user interface presented depends on your browser.
- Choose to subscribe to the feed. Select a location in which to store the feed, and then subscribe to it.
When you use Share, you can use tags to categorize similar or related content across pages within a site. This enables you to easily locate the content again.
You can associate a tag with the following types of content:
- Wiki pages
- Blog posts
- Discussion topics
- Calendar events
- Document Library items
- Document Library folders
You can create your own tags for each component. The Wiki, Blog, and Discussions components also allow you to select from a list of tags that are already used within the current site.
The Wiki, Blog, Document Library, Calendar, and Discussion page, all contain a browsing pane. The Tags list in this pane displays the tags that are referenced by items in the current component. Clicking on a tag displays the items associated with that tag. The number in parentheses indicates the number of component items that are tagged with this tag.
Once you enter a site, you can navigate between the pages to view information and perform functions on the site content. The pages included in the site are listed in the site banner.
To select a page, carry out the following steps:
- Enter the Alfresco Book project site. The site banner beneath the application toolbar displays the name of the selected site. Below the Alfresco Book project site name, the Site Dashboard link is highlighted. This indicates that this is the current page. To the right of this link are links to the pages included in this site. The banner also includes the Members link, for the purpose of managing the site's membership.
- On the Alfresco Book Project dashboard banner, click on the page that you want to access. The application displays the selected page, and the current component is highlighted on the banner. Each component has its own functionality. See the appropriate section of the documentation for instructions on using each page.
- On the site dashboard banner, click on any page link to navigate to that page, or click on the Site Dashboard component to return to the dashboard of the current site.
The Wiki Page List displays a summary of all of the pages created for the current site's Wiki. A browsing pane on the lefthand side of the page enables you to populate the Wiki list with a subset of the Wiki content. Selecting a page in the Wiki list displays the entire Wiki page in the page view.
When you enter the Wiki page, the page view displays the Wiki main page. Click on Wiki Page List to display the Wiki list.
In both of the views you are allowed to create, delete, view the details for, and edit a Wiki page. You must be in the page view to rename a Wiki page. To perform operations on a Wiki page, you must be on the Wiki page.
Accessing the Wiki page gives you access to all of the Wiki content. Within the Wiki, you can create, delete, rename, and edit the Wiki pages. You can perform most actions from both the Wiki list and the page view.
To access the Wiki page, carry out the following steps:
- Enter the Alfresco Book project site.
- Click on Wiki in the banner. The Wiki page appears, displaying the main Wiki page for this site in the page view. In this view, the actions that you can perform on the current Wiki page appear as buttons below the banner (New Page, Delete, and Rename) and as links in the upper-right corner of the content area (View Page, Edit Page, and Details).
- Click on the Wiki Page List to display the Wiki list. The Wiki list displays a summary of all of the pages in the Wiki for the current site. In this view, the actions that you can perform on a Wiki page appear as buttons below the banner (only new page is available in this view) and as links to the right of each page summary.
Assuming that you are on the Wiki page of the Alfresco Book project site, the browsing pane to the left-hand side of the Wiki Page List enables you to filter the Wiki content in order to make it easier to locate specific Wiki pages.
The Wiki page lists all of the Wiki pages in the current site, organized chronologically. Therefore, the most recent page appears at the top of the list.
The browsing pane to the left of the page enables you to display a subset of the Wiki's content by selecting a specific view or tag. Whether you are browsing by view or by tag, the Wiki list displays a summary of all of the pages matching the selected option. The summary includes the Wiki page name, the author, the creation and modification dates, a sample of the content, and the tags associated with the page.
The browsing pane provides us with the following views:
- Recently Modified: Displays a list of pages modified in the past seven days
- All: Displays a list of pages created in the Wiki for the current site
- Recently Added: Displays a list of pages created in the past seven days
- My Pages: Displays a list of pages created by the currently logged in user
The Tags list displays all of the tags currently associated with one or more Wiki pages.
To browse through the Wiki pages, carry out the following steps:
- Click on the Wiki Page List option on the page view, to navigate to the Wiki list, if it is not already displayed.
- Select the desired option in the browsing pane.
- In the Pages list, click the view representing the Wiki pages that you want to display. The Wiki list displays all of the pages in the current site that correspond to the selection.
- Click on the tag of interest in the Tags list. The Wiki list displays all of the pages in the current site, which are associated with the selected tag.
- Click on a Wiki page title to display that full page. The selected Wiki page appears in the page view.
When you create a new site, the site's Wiki contains a main page that is empty. You will likely opt to make this the introductory page for the site's Wiki.
To add content to the Wiki main page, carry out the following steps:
- Click on the Main Page option below the banner, if the main page is not already displayed. Then click on the Edit Page option.
- Type the content for the main page into the Text box. Use the formatting features provided to mark up the content, insert bulleted and numbered lists, and include hyperlinks,as required.
Optionally, add tags to and remove tags from the main page, as follows
- Type a tag into the box provided. Click on the Add button to add multiple tags, separating each tag with a space.
- Click on the Choose from popular tags in this site option in order to display the existing tags that are used in this site. Click on a tag to associate it with the main page.
- The newly-associated tags appear below the Text box. Click on a tag to remove it. When you are done, click on the Save button. The page view displays the main page.
You can create a new Wiki page from both the Wiki list and the page view.
To create a new Wiki page, carry out the following steps:
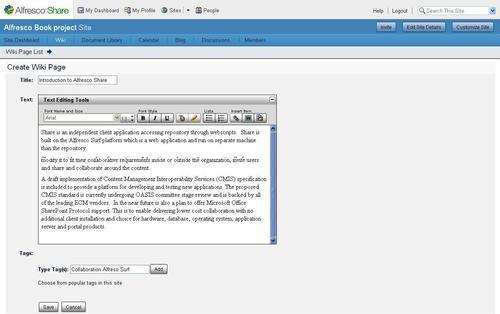
- Click on the New Page option. The Create Wiki Page appears.
- Enter a Title for the page. If your title contains a disallowed character, such as quotation marks, periods, colons, asterisks (*) and other special characters, then the Save button is disabled.
- Type the Wiki page content in the Text box. Use the formatting features provided to mark up the content, insert bulleted and numbered lists, and include hyperlinks, as required. To create a link to another Wiki page, type the Page Name. If the page indicated does not exist, then Share creates it. However, this is an empty Wiki page and it will not appear in the Wiki list until you select Edit Page and provide some content for it.
Optionally, you can add tags to the Wiki page by carrying out the following steps:
- Type a tag, or multiple tags separated by a spaces, in the box provided, and then click on the Add button. Click on the Choose from popular tags in this site option to display the existing tags used in this site. Click on a tag to associate it with the new Wiki page.
- The newly-associated tags appear beneath the Text box. Click on a tag to remove it.
- Click on the Save button. The new Wiki page is displayed, and the users will be able to see it. Click on the Wiki Page List option to return to the Wiki list.

Adding and editing Wiki content is done in a simple browser. You can perform this task from both, the Wiki list and the page view.
To edit a Wiki page, carry out the following steps:
- Click on the Edit option for the page that you want to modify. If the Wiki page that you want to edit is already open in the page view, then simply click on the Edit Page option. The content of the selected Wiki page is displayed in an editing box.
- Make the required changes to the content. To create a link to another Wiki page, type the Page Name. If the page indicated does not exist, then Share creates it. However, this is an empty Wiki page and it will not appear in the Wiki list until you select Edit Page and provide content for it.
You can edit the tags for this Wiki page by carrying out the following steps:
- To add a new tag, type a tag into the provided box and then click on the Add button. To add multiple tags, separate each tag with a space.
- To add an existing tag, click on the Choose from popular tags in this site option, in order to display the tags used in this site. Click a tag to associate it with the Wiki page.
- To remove an existing tag from the set below the Text box, click on the tag that you want to remove. Then click on the Save button. The page view displays the updated Wiki page.
You can rename a Wiki page from the Page view option. To rename a Wiki page, carry out the following steps:
- Click on the title of the page that you want to rename and then click on the Rename button. The Rename page is displayed.
- Type the new name of the Wiki page and click on the Save button.
The page view reflects the name change and this Wiki page retains the page history of the original page. Share creates a new page with the original page name, which links to the updated page.
You can delete a Wiki page that you no longer want to appear in the Wiki of the current site. You can perform this task from both the Wiki list and the Page View.
To delete a Wiki page, carry out the following steps:
- In the Wiki list, locate the Wiki page that you want to delete.
- Click on the Delete button for that page. If the Wiki page you want to delete is already open in the page view, then simply click on the Delete button on that page. A message prompts you to confirm the deletion.
- Click on the Yes button to delete the current Wiki page.
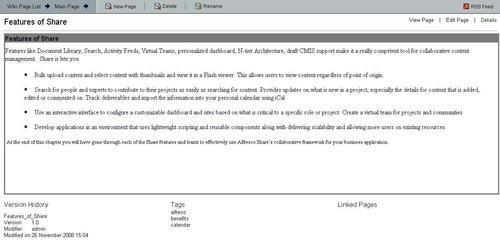
You can display the details of a Wiki page in order to see the version history, view the tags associated with the page, and list the Wiki pages that link to the selected page. You can view the page details from both the Wiki list and the page view.
To view the details of a Wiki page, carry out the following steps:
- Click on the Details option for the page whose details you want to view. If the Wiki page you want to view is already open in the page view, then simply click on the Details option on that page. The page view displays the Wiki page content in an expanded form that includes the Version History, Tags, and Linked Pages. From here, you can click on the Edit Page option to make any necessary changes.
- Click on the View Page option to hide the details again. The Wiki page is displayed in the page view.
The Document Library enables you to gather and store information, and collaboratively manage any content related to a site, such as documents, media files, and graphics. In this section, we assume that you are in the Document Library page of the desired site.
You need to access the Document Library page in order to view all of the content items for the current site. In the library, you can view, upload, edit, and delete items. You can also add comments to an item and edit its metadata.
To access the Document Library page, carry out the following steps:
- Enter the Alfresco Book project site.
- On the banner, click on the Document Library link in order to display the Document Library page. The content item list displays a summary of the items in the top level folder, which is the default selection of the browsing pane. The item summary includes the thumbnail of the content, the item title, the date and time that the item was uploaded to or last modified within the site, the user who uploaded or modified the item, the version number (set to 1.0 when a new item is uploaded), file size, a description, and the tags associated with the item.
- Click on the Show Folders option to display both folders and content items in this list. Click on the Hide Folders option to hide the folders.
- Click on the Simple View option to display only the basic item details (title, modification date and time and user responsible for the modifications) for the content items. Click on the Detailed View option to display the summary view.

The browsing feature in the Document Library page allows you to easily navigate through the library and to filter the items displayed in the item list. This task assumes that you are in the Document Library page of the desired site.
You can display a subset of the library items by selecting a specific view, a folder, or a tag, in the browsing pane on the left.
The Documents list in the browsing pane provides the following views for browsing library content:
- All Documents: Displays all of the items in the Document Library.
- I'm Editing: Displays the items checked out by the current user.
- Others are Editing: Displays the items checked out by other site members.
- Recently Modified: Displays items modified in the past seven days.
- Recently Added: Displays items added to the library in the past seven days.
- Library: Displays the folder structure in a tree view.
- Tags: Displays all of the tags currently associated with one or more items. The number in parentheses following a tag indicates the number of items in the library that are tagged with the tag.
To browse the Document Library items, carry out the following steps:
- Select the desired option in the browsing pane.
- In the Documents list, click on the view representing the items that you want to view. The item list displays all of the items in the current site that correspond to the selection.
- In the Library section, navigate to the tree and click on a folder to display the items that it contains. The Breadcrumb Path, which is located above the content item list, displays your current position within the folder structure. Each breadcrumb item is a link, allowing you easy access to any part of the current navigation path. The breadcrumbs allow you to return to any folder in the current path without having to repeat all of the steps. Click on a link to return to the corresponding folder. Click on the Hide Breadcrumb option to collapse the breadcrumb path. You can click on the Show Breadcrumb option in order to display it again.
- Click on the tag of interest in the Tags list. The item list displays all of the items in this site's library, which are associated with the selected tag.
- Position the cursor over an item in this list to display its available actions.
The Library section of the browsing pane displays the folder structure for the current site. A new site contains only the root folder, named Documents. You can add new folders beneath the root in order to create the site's folder structure.
To create a new folder, carry out the following steps:
- In the Library section of the browsing pane, navigate through the tree and click to select the location of the new folder. The New Folder will be created as a subfolder of the folder highlighted in the tree.
- Click on the New Folder link. The New Folder page is displayed. Type a Name for the folder. This is the name that will appear in the tree.
- Type a Title and Description to the folder. Click on the OK button. The page closes and the new folder appears in its appropriate position in the tree.
Adding content items from your computer to a site's Document Library is a simple process. Share allows you to upload individual files or several files at a time.
The first step in adding an item to your site's library is to determine where you want it to reside. The Library section of the browsing pane in the Document Library page displays the available folders. Create a new folder if necessary.
To upload content to the library, carry out the following steps:
- Navigate through the library's folder structure and click on the folder where the item or items to be uploaded will reside.
- Click on the Upload button. The Upload File(s) page appears. Click on the Browse option.
- Locate the file or files on your computer that you want to upload, and then click Open. Use the Shift button to select multiple, consecutive items, or use the Ctrl button to select multiple, non-consecutive items. The selected items appear in the list. Click on the Remove option to delete an item from this list, if necessary.
- Click on the Upload File(s) button when this list contains all of the items that you want to upload. An indicator informs you of the upload progress. When it displays 100% for all files, then you can proceed. The following screenshot shows what the uploading process looks like:

- Click on the OK button. As shown in the preceding figure, the page closes and the item list for the specified folder displays the uploaded content item(s). The thumbnails of each of the documents uploaded are displayed next to the document name.

Once the Document Library structure has been set up and content has been added, site members will be able to access and work with the content items within the library. In addition to adding more content, members can view, download, edit, and delete content items.
The preview feature allows you to view a content item directly in the application, without having to download it onto your computer or check it out. For documents containing multiple pages, navigation features enable you to view all of the pages. The preview page includes a comment feature that allows site members to add comments to the item being viewed.
To view an item, carry out the following steps:
- Navigate through the library's folder structure to locate the content item that you want to view.
- In the item list, click on the title or thumbnail of the desired item, and the preview page will open. On the left-hand side of the page, you will be able to see the name and a preview of the selected item. If the content item cannot be previewed, then a message is displayed asking you to download the file.

- The right-hand side of the page contains the item details, which includes metadata, tags, permissions, version history, document actions, and related URLs. Comments made on the selected item appear at the bottom of the page, along with the Add Comment box. In the header, the Location indicates the folder in which the selected item resides.
If the content item contains multiple pages, then use the features provided to navigate through the pages, as follows:
- Click on the Prev and Next buttons to move backward and forward through the pages. In the Jump to page box, you can type the number of the page that you want to view, and then press the Enter key.
- Click on the Full Screen option to view only the item without the item details. To return from the full screen view to the default view, click on the Close button.
- Use and share the URLs provided. You can bookmark the URLs or share them with other users via email or instant messaging. When invoked, these links prompt the user to save the content item locally (Download File URL), open the content item directly in the browser (Document URL), or display the current page (This Page URL).
- Scroll to the bottom of the page to view comments related to the selected item. In order to return to the item list, click on the Location folder in the header.
In the Document Library page, you can add a comment to a content item. To add a comment to an item in the library, carry out the following steps:
- Locate and preview the item that you wish to comment on. At the bottom of the page, enter your comments in the Add comment box.
- Then, click on the Create comment button. The Edit and Delete actions are available for each comment and are ready to be used as required. Only the Site Manager and the user who originally created the comment can perform these actions.
You can edit a comment on a library item to modify or add to its content. To edit a comment made on a library item, carry out the following steps:
- In the library, locate and preview the content item containing the comment that you want to edit. Scroll to the bottom of the page to view the comments.
- Click on the Edit button, located to the right of the comment that you want to change. This action is available only when the currently logged in user has permission to edit the comment. The Edit Comment box appears, displaying the selected comment.
- Make the desired changes to the comment. Click on the Update button and the updated comment will be displayed.
You can delete a comment to permanently remove it from a content item. Only a Site Manager and the user who originally created the comment can delete it.
To delete a comment made on a library item, carry out the following steps:
- In the library, locate and preview the content item containing the comment that you want to delete.
- Scroll to the bottom of the page to view the comments.
- Click on the Delete option, located to the right of the comment that you want to remove. This action is available only when the currently logged in user has the permission to delete the comment. A message prompts you to confirm the deletion of the selected comment.
- Click on the Delete button. As a result, you will get a message indicating that the selected comment has been deleted.
Editing an item, while offline, creates a working copy of the file that is placed in the I'm Editing view. Although the original item remains in the folder, site members are only able to view and download it. An icon indicates to users that the item is locked. Once checked out to your computer, you can edit the item and then upload the new version.
To edit an item, carry out the following steps:
- Navigate through the library's folder structure to locate the item that you want to edit.
- In the item list, position the cursor over the item of interest, in order to display the available actions.
- Click on the Edit Offline option. You are prompted to open or save the file.
- Choose to save the file on your computer. Depending on your browser, you are prompted to specify a destination. If you do not specify a destination, then the item is downloaded to a default location. Once the download is complete, close the dialog box.
-
Share places a working copy of the item in the I'm Editing view, which contains your other working copies. An icon
 indicates that the file is being edited by you.
You can download an item from the Library tree or from one of the browsing views (All Documents, I'm Editing, Others are Editing, Recently Modified, Recently Added) onto your computer.
The label for the download action (Download Original or simply Download) varies, depending on whether the item is locked or not. In both the cases, the procedure to download the item is the same. When you select a locked item, you are downloading the last version checked into the Document Library. It is important to realize that this version may be out of date. Because the item is being edited by another site member, a more recent version may exist outside of the library.
To download a content item, carry out the following steps:
- Navigate through the library's folder structure to locate the item that you want to download. In the item list, position the cursor over the item of interest, in order to display the available actions.
- Click on either the Download or Download Original option. You are prompted to Open or Save the file.
- Choose to Save the file to your computer. Depending on your browser, you are either prompted to specify a destination or the item is downloaded to a default location.
Once your offline edits are complete, you must upload your changes to the document library. This will check in the working copy of the item, removing it from the I'm Editing view.
This task assumes you are in the Document Library page of the desired site.
To update a content item, carry out the following steps:
- Click on the I'm Editing option in the Documents section of the browsing pane. The item list displays all of the items that you currently have checked out.
- In the item list, position the cursor over the working copy of the file that you want to update, in order to display the available actions. Click on the Upload New Version option. The Update File page appears. Click on the Browse button.
- Locate the file that you want to upload on your computer. Then click on the Open button. The selected item appears in the list. Click on the Remove button to delete the item, if necessary.
- Indicate whether the revision is a Minor Version or a Major Version.
- In the Comments box, type any information relevant to the updates.
- Click on the Upload File(s) button. An indicator informs you of the upload progress. When 100% appears beside the file, you can proceed.
- Click on the OK button. The page closes and the item is removed from the item list in the I'm Editing view.

Deleting a content item, or multiple content items, in order to permanently remove it from a site's library, is possible.
To delete a single content item, carry out the following steps:
- Navigate through the library's folder structure in order to locate the content item that you want to delete.
- In the item list, position the cursor over the item of interest to display the available actions.
- Click on the More button and then click on the Delete Document button. As a result, a message prompts you to confirm the deletion. Click on the Delete button.
Editing a library item's metadata means to renaming the item, editing its associated tags, and changing its description.
To edit the details of a library item, carry out the following steps:
- Navigate through the library's folder structure in order to locate the item that you want to work with.
- In the item list, position the cursor over the item of interest, in order to display the available actions.
- Click on the Edit Metadata option. The Details for [name] page appears.
- Edit the item details on this page as desired. Click on the OK button. The metadata details are updated for the selected item.
You can copy an item to another site within Share, or to any space in the Alfresco Explorer repository. The copied item remains in its original location and the copy is placed in the selected destination folder (Share) or space (Explorer).
This feature is also available for multiple selections that are being copied to a common destination.
To copy a library item, carry out the following steps:
- Navigate through the library's folder structure in order to locate the item that you want to copy.
- In the item list, position the cursor over the item of interest, in order to display the available actions.

- Click on the More button and then select the Copy to option. The Copy [name] to page appears, as shown in the preceding screenshot.
- Select the Destination.
- Click on the Sites tab in order to copy the selected item to another site in Share.
- Click on the Repository tab in order to copy the selected item to a space in the Explorer.
- Specify the path, as follows, depending on whether you are copying to a Share site or an Explorer repository:
- When copying to a site, click on the desired site in the Site list. For the Path, navigate through the folder structure and click on the destination folder.
- When copying to a repository, navigate through to the repository structure and click on the destination space.
- Click on the Copy button. As a result, a copy of the item is placed in the specified location.
You can move an item to relocate it to another folder within the current site, but you cannot relocate an item to a different site or a location outside Share. This is also applicable to multiple selections that are to be moved to a common destination.
To move a library item, carry out the following steps:
- Navigate through the library's folder structure in order to locate the item that you want to move.
- In the item list, position the cursor over the item of interest, in order to display the available actions.
- Click on the More button and then select the Move to option. The Move [name] to page appears.
- Navigate through the folder structure and select the destination for the selected item. Click on the Move button. As a result, the item is moved from its original location to the specified folder.
Share includes two preconfigured workflows—Adhoc Task (for assigning a task to a colleague) and Review & Approve (for setting up the review and approval of content). You manage the tasks that result from workflow on the My Tasks dashlet on your personal dashboard. Setting up a workflow enables you to attach the workflow directly to a content item and then assign the item to another user for review.
To assign a workflow to an item in the content library, carry out the following steps:
- Navigate through the library's folder structure, in order to locate the item that you want to work with. In the item list, position the cursor over the item of interest, in order to display the available actions.
- Click on the More option and then select Assign Workflow. The Assign Workflow to [name] page is displayed, as shown in the example below:

- In the Select Workflow list, select the type of workflow that you want to define, that is, whether you want either the Review & Approve workflow or the Adhoc Task workflow.
- In the search box, type the full or partial name of the site member that you want to be responsible for the task generated by the workflow. Leave the search box empty to return a list of all of the site members. Click on the Search button.
- In order to select the desired user, click on the Add >> option. You can assign the workflow to only one user.
- To specify a due date for the task, you can select the Due Date checkbox. This will display the calendar. You then select the desired due date. Deselect the checkbox to remove the due date.
- In the Comment box, describe what you want the recipient of this task to do, such as 'Please review the attached file'. Then click on the Assign Workflow option.
There are four roles or groups that are available for categorizing Share users. The four roles or groups are as follows:
- Manager
- Collaborator
- Contributor
- Consumer
Share allows you to manage permissions at the library item level by changing a group's default permissions for a particular library item, or a group of library items.
To manage the group permissions for an item, carry out the following steps:
- Navigate through the library's folder structure, in order to locate the item whose permissions you want to define. In the item list, position the cursor over the item of interest, in order to display the available actions.
- Click on More and then select Manage Permissions. As a result, the Manage Permissions for [name] page appears. A button on the right-hand side of each group displays the current permissions.
- In order to change the permissions of a group, click on the button that is located to the right of the group, and select the desired permission from the list that is displayed. Selecting the No privileges option blocks the users with that defined role from having any access to the currently-selected content item. The content item will not even appear in the Document Library to these users. Note that Site Managers always have full privileges within a site. Click on the Use Defaults option in order to return the settings to their default values.
- Click on the Save button, and the group permissions will be set as defined for the specified library item.
Selecting multiple items allows you to perform a single task on multiple items in the Document Library page. There are several methods available to do this.
Select multiple items in the current view by using the item checkboxes to the left of each item's thumbnail, or use the Select feature at the top of the item list. You can select items, folders, or a combination of the two.
You can select multiple items as follows:
- In the browsing pane, select a view, folder, or tag to display the desired library items. In the item list displayed, select the desired content item.
- Click on a checkbox to select the associated item.
- Click on the Select option at the top of the item list and click on the list element that you want to select, that is, Documents, Folders, or All.
- Click on the None option to clear your selection. Click on the Invert Selection option to toggle the checkboxes to their opposite state. The checkboxes of the specified items appear selected in the item list.
Once you select the library items and (or) folders that you want to work with, you can select an action to perform.
The Selected Items list in the header displays the actions that can be performed on multiple items. They are:
- Copy to…: This action copies the selected items or folders to a single location that you specify. This can be in the same site, a different site, or a space in the repository.
- Move to…: This action moves the selected items or folders to a single location within the current site.
- Delete: This action deletes the selected items or folders.
- Assign Workflow…: This action assigns an identical workflow to the selected items, as specified.
- Manage Permissions…: This action assigns identical permissions to the selected items or folders, as specified.
- Deselect All: This action clears the checkboxes of the currently-selected items or folders.
In order to perform an action on the selected library items and (or) folders, carry out the following steps:
- Click on the Selected Items option, which is situated in the header. A list appears, showing the available actions.
- Select the desired action. Click on the Deselect All option to clear the selected items. When you select this option, you cannot perform another action until you reselect the desired library items.
- Refer to the appropriate topic in the section named Working with library items, for details of how to complete the selected action.
The Calendar page allows you to schedule and track events related to the current site. Site members can create events that display on the calendar for all of the site users to view. You can view the calendar by day, week, or month. The Agenda view displays upcoming events. The tasks in this section assume that you are on the Calendar page of the desired site.
Accessing the Calendar page allows you to view the upcoming events for the current site. The calendar defaults to the monthly view.
To access the Calendar page, carry out the following steps:
- Enter the Alfresco Book project site.
- In the banner, click on the Calendar tab. The Calendar page appears, displaying the current month. Events scheduled in this month appear on the calendar.
The main view of the Calendar page defaults to a calendar displaying the current month. To the left of the calendar, we have a browsing pane, which provides another calendar for navigating the months, without affecting the main view.
To browse the calendar, carry out the following steps:
- Use the navigation buttons in the header to change the main calendar view. Use the Day, Week, and Month buttons to change the main display to a daily, weekly, or monthly view, respectively.
- Use the Previous and Next buttons to move backward and forward through the calendar, one day, week, or month at a time, depending on the current view, as shown in the following screenshot:

- Click on the Agenda button to display a list of the upcoming events that are scheduled for this site.
- Click on the Today button to display the current date.
- Use the calendar in the browsing pane to navigate through the months without affecting the main view.
- Click on the < button in the browsing pane, to the left of the calendar, to display the previous month.
- Click on the > button in the browsing pane, to the left of the calendar, to display the next month.
- Click on the This Month button, below the browsing pane calendar, to reset this calendar to the current month. As a result, the current day is highlighted.
- Click in a date in the browsing pane calendar to load the selected date onto the calendar in the main view. If the Agenda is currently displayed, then no update occurs in the main view.
- In the Tags list, click on the tag of interest to highlight associated events in the main view. The events in the current calendar view that are associated with the selected tag are displayed in black text. All other events are displayed in gray text.
- Click on the iCal Feed option in the header to take advantage of the calendar's data exchange features.
The calendar displays only the name of the event, so to view the complete details of the event, you must open the event. Once the event has been opened, you can edit or delete it.
To view a scheduled event, carry out the following steps:
- Locate the event of interest in one of the following ways:
To locate the event of interest, navigate through the calendar on the main view.
Navigate through the calendar in the browsing view and select a date, in order to update the main view calendar.
Click on the Agenda tab, to display all of the future events that are currently scheduled.
- In the main view, click on the event of interest. The Event Information page displays the full details of the selected event. You can then click on Close.
Once created, events appear on the site calendar. Any site member can schedule an event that is relevant to the site.
To add a new event, carry out the following steps:
- Using the browsing pane calendar, navigate to and click on the date that you want to schedule the event on. Select the event date on the browsing pane calendar to populate the event start and end dates with the selected date. You can choose to skip this step, in which case the start and end dates default to the current date.
- Click on the Add Event tab to open the Add Event page. Fields marked with an asterisk (*) are mandatory.
- Type a name for the event in the What box. Type the location of the event in the Where box.
- Provide a description to the event that you are scheduling in the Description box.
- Select the All Day option to schedule a full day event.
- Provide a date and time for both, the event's Start Date as well as the End Date. Click on the calendar icon to select a date from a calendar.
- In the Tags box, type the tags that you want to associate with the event. If you need to add multiple tags, then separate each tag with a space.
- Click on OK.
The page closes and the calendar displays the scheduled event on the specified day or days.

To edit a scheduled event, select and open the event. You can change any of the event's details, including the location, date, and time. You can also add and remove the tags associated with the event.
To edit a scheduled event, carry out the following steps:
- Select and view the event that you want to edit. The Event Information page displays the full details of the selected event.
- Click on Edit. The Add Event page is displayed. Make the desired changes to the event.
- Click on the OK button to save the changes. The calendar displays the updated event. Changes will not be evident on the calendar unless you changed the event name.
To delete a scheduled event, you must select and then open the event. Carry out the following steps to delete a scheduled event:
- Locate and view the event that you want to delete. The Event Information page displays the full details of the selected event.
- Click on the Delete button. The calendar no longer displays the deleted event.
The Agenda view displays all of the upcoming events scheduled for the current site.
The events that are scheduled for the current day and later appear in the Agenda list in chronological order. The information displayed includes the scheduled date and start time, along with the event name.
To browse through the events, carry out the following steps:
- Click on the Agenda tab in the header. The Agenda view displays the upcoming events.
- In the Tags list, you can click on the tag of interest to highlight the associated events in the agenda. The scheduled events that are associated with the selected tag are displayed in black text. All other events are displayed in gray text.
- Click on the Day, Week, or Month buttons in the header to return to the desired calendar view.

Site members can create, edit, and add comments to the blog postings. The Blog page enables you to add commentary, descriptions of events, and other materials that are related to your site.
The postings can be saved as drafts, and when ready, they can be published to the internal blog. Members can also choose to publish posts to an external blogging site, including WordPress and TypePad. To work with or perform operations on the Blog, you must be on the desired Blog page.
Accessing the Blog page allows you to view all of the published blog posts for the Alfresco Book project Site. Within the blog, you can create new posts, as well as edit, publish, and delete the posts, which you have previously created. You can also add comments to the existing blog posts.
To access the Blog page, carry out the following steps:
- Enter the Alfresco Book project Site. On the banner, click on the Blog tab. The Blog page appears. The default view, Latest, is selected. The post list displays a summary of the posts created or edited in the past seven days. The summary includes the post title, the date and time at which the post was published (if applicable), the author who created the post, a sample of the content, the number of replies to the post, and the tags associated with the post.
- The Previous and Next navigation buttons will help you to browse through multi-page posts (where necessary).
- Click on the Simple List option to display only the titles of the posts. Click on the Detailed List option to display the summary view.
The browsing feature in the Blog page allows you to filter the blog posts. This allows you to navigate through the blog content more easily.
You can display subset of the blog posts by selecting a specific view, a period of time (month), or a tag in the lefthand browsing pane.
The Posts list in the browsing pane provides the following views:
- All: Displays all of the posts in the blog
- Latest: Displays the posts created or edited in the past seven days
- My Drafts: Displays the posts created by the current user that are currently saved as drafts (that is, not yet published)
- My Published: Displays the posts created and published, either externally or internally, by the current user
- Published Externally: Displays all of the posts that have been published to an external blog
The Archives list organizes posts by month and year.
The Tags list displays all of the tags currently associated with one or more blog posts.
To browse through the blog posts, carry out the following steps:
- Select the desired option in the browsing pane. In the Posts list, click on the view that represents the posts that you want to view. The post list displays all of the blog posts in the current site that correspond to the selection.
- In the Archives list, you can click on the month of interest. The post list displays all of the blog posts in the current site that were published during that month.
- In the Tags list, you can click on the tag of interest. The post list displays all of the posts in the current site that have been tagged with the selected tag.
- Click on the Simple List option to display only the titles of the posts. Click on the Detailed List option to display the summary view.
You can create a new blog post to add information or a comment related to the current site.
When you create a new post, you can save it as a draft without publishing it, or you can immediately publish it to the Alfresco Book project Site blog. You also have the option of publishing the post to both the internal blog and a configured external blog.
To create a new post, carry out the following steps:
- Click on the Create Post button. The Create Blog Post page appears. Type a Title for the post.
- Type the post content in the Text box. Use the formatting features provided to mark up the content, insert bulleted and numbered lists, and include hyperlinks, as required.
Optionally, you can add tags to the blog post, as follows:
- Type a name for the tag in the box provided, and then click on Add. To add multiple tags, separate each tag by a space.
- Click on the Choose from popular tags in this site option to display the existing tags that are used in this site. Click on a tag to associate it with the new post.

The newly-associated tags appear beneath the Text box. Click on a tag to remove it.
To save or publish the new blog post:
- Click on the Save as Draft button to save the post without publishing it. The post will not appear in the post list.
- Click on the Publish Internally button to publish the post to the internal blog, making it available for other users of this site.
- Click on the Publish Internally and Externally button to publish the post to both the internal and external blogs.
The new post appears as users will see it. The text "Draft" appears after the title if the post remains unpublished. Click on the Go to Post List option to return to the main view.
Only an Alfresco Book Project Site Manager or the user who created the blog post can modify it, or add to its content.
To edit an existing post, carry out the following steps:
- In the post list, locate the blog post that you want to edit and click on the Edit button. The Edit Blog Post page appears , displaying the selected post.
- Make the desired changes to the post title and/or content.
To edit the tags for the post, do the following:
- To add a new tag, or multiple tags separated by spaces, type the tag(s) into the box provided, and then click on the Add button.
- To add an existing tag, click on the Choose from popular tags in this site button to display the tags used in this site. Click a tag to associate it with the new blog post.
- To remove an existing tag from the set below the Text box, click on the tag that you want to remove.
To save or publish the updated blog post, carry out the following steps:

- Click on the Update button to save the changes.
- Click on the Publish Internally option to save the changes and publish the post to the internal blog, thus making it available for the other site members. This option appears only for draft posts.
Click on the Update Internally and Publish Externally option to publish the post to both the internal and external blogs.
- The updated post appears as the users will see it. The text (updated) appears after the title. Click on the Go to Post List option to return to the main view.
Browsing the blog displays either a summary view or a simple list of the existing posts, in the main window of the Blog page. Viewing a post allows you to see the full contents of the post.
You can perform actions on a post from the main page, but viewing a post allows you to confirm that you have selected the correct post before performing any irreversible actions, such as deleting or publishing the post.
Although the same actions are available in both views (Edit, Publish Externally, and Delete), you must view a post to add a comment to it.
To view a blog post, carry out the following steps:
- Browse the blog posts to locate the post that you want to view.
- Click the title of the post or click Read below the post. If the main page displays the posts in a simple list, then you must click the title of the post. The post view displays the selected blog post in its entirety, along with any related comments.
- Click on the Go to Post List option to return to the main view.
To delete a blog post means to permanently remove it from the Alfresco Book Project site blog. Deleting a post also deletes all of its comments. Only a Site Manager or the user who created the blog post can delete it.
To delete a post, carry out the following steps:
- In the post list, locate the blog post that you want to delete.
- Click on the Delete button. A message prompts you to confirm the deletion of the selected post. Click on the Delete button. A message indicates that the selected blog post has been deleted.
In addition to creating blog posts and publishing them internally within the site, you can publish the blog posts to an existing WordPress or TypePad blog. To publish the site blogs externally, you must configure the external blog details. To publish a draft post externally, you must also publish it internally.
To configure an external blog, carry out the following steps:
- Click on the Configure External Blog option. The Configure External Blog page appears.
- In the Type list, select the appropriate option:
- Select WordPress in order to configure the external blog to run on the WordPress blog publishing system.
- Select TypePad in order to configure the external blog to run on a TypePad blogging service.
- Complete the remaining fields with the details of the external blog.
- The User Name and Password provided must be the user details of the author or administrator responsible for posting the external blog. Click on the OK button.

In addition to publishing a blog post to the Alfresco Book Project site's internal blog, you can publish a post to a configured external blog. In order to publish a draft post externally, you must also publish it internally. To publish a post externally, carry out the following steps:
- In the post list , locate the blog post that you want to publish externally.
- Click on the Publish Externally button. Optionally, open the post to perform this action.
A message indicates that the selected blog post has been published.
Adding comments to a blog post can help make a site blog more interactive. Although all of the users with access to the Alfresco Book project site can view the blog conversations, only the site members can add comments.
The number of replies added to a post is displayed in the post list beneath the post summary. You must view a post to add, view, and manage the related comments.
In the Blog page, you can add a comment to reply to any published blog post.
To add a comment, carry out the following steps:
- In the post list, locate the blog post to which you want to add a comment.
- Click on the post title to view the post. The post view displays the selected blog post in its entirety, along with any related comments.
- Type the post comment in the Add comment box. Use the formatting features that are provided to mark up the content, insert bulleted and numbered lists, and include hyperlinks, as required.
- Click on the Create comment button. The comment is displayed below the post. Click on the Go to Post List option to return to the main view.

To edit a blog comment means modifying or adding to its content. Only a Site Manager or the user who created the comment can edit it.
To edit a comment, carry out the following steps:
- In the post list, locate the blog post that contains the comment that you want to edit. Click on the post title to view the post. The post view displays the selected blog post and the related comments.
- Click on the Edit button to the right of the comment that you want to change. The Edit Comment box appears, displaying the selected comment.
- Make the desired changes to the comment. Click on the Update button. The updated comment then displays below the post.
- Click on the Go to Post List option to return to the main view.
To delete a comment means to permanently remove it from a blog post. Only the Site Manager or the user who created the comment can delete it.
To delete a comment, carry out the following steps:
- In the post list, locate the blog post that contains the comment that you want to delete. Click on the post title to view the post. The post view displays the selected blog post and the related comments.
- Click on the Delete button. A message prompts you to confirm the deletion of the selected comment.
- Click on the Delete button. A message indicates that the selected comment has been deleted. Click on the Go to Post List button to return to the main view.
The topics on the Discussions page can take the form of questions or comments with threaded discussions. Site members can use the Discussions page to post user-generated content related to the site.
Members of a site can create new topics and can also reply to a posting, in order to take part in a discussion on a specific topic.
To view the discussion topics for the current site, you must use the Discussions page. Within a discussion, you can create new topics, as well as edit and delete topics that you have created. You can also reply to existing topics to take part in the discussion.
To access the Discussions page, carry out the following steps:
- Enter the Alfresco Book project site, and click on the Discussions tab in the banner. The Discussions page appears, displaying the most recent topics in the topic list. This list displays a summary of all of the topics matching the selected browse option. The summary includes the topic title, the date and time at which the topic was created, the author who created the topic, the number of replies to the topic, sample content for the topic, and the tags associated with the topic.
- Use the Previous and Next navigation buttons to move backward and forward through multi-page of topics.
- Click on the Simple List button to display only the titles of the topics. Click on the Detailed List button to display the summary view.
Browsing through the Discussions page allows you to filter the discussion topics, as well as to easily navigate through the content. The browsing pane on the left-hand side of the page allows you to display a subset of the discussion topics, by selecting a specific view or tag.
The Topics list in the browsing pane provides the following options for browsing through the discussion topics:
- New: Displays all of the topics created or updated in the past seven days
- Most Active: Displays the topics that have been opened most often in the past seven days
- All: Displays all of the topics
- My Topics: Displays the topics that were created by the current user
In the Tags list, the browsing pane displays all of the tags that are currently associated with one or more discussion topics.

To browse the discussion topics, carry out the following steps:
Use the browsing pane to browse through the discussion topics:
- In the Topics list, click on the view representing the topics that you want to view. The topics list displays all of the discussion topics in the current site that correspond to the selection.
- In the Tags list, click on the tag of interest. The topic list displays all of the topics in the current site that have been tagged with the selected tag.
- Click on the Simple List button to display only the title of the topics. Click on the Detailed List button to display the summary view.
Browsing the discussion forum displays the existing topics in the main window of the Discussions page. These topics display in either, a summary view or a simple list view. Viewing a topic allows you to see the full contents of the discussion.
Although you can perform actions on a topic from the main page, viewing the topic enables you to confirm that you have selected the correct topic before you edit, delete, or reply to it.
To view a discussion topic, carry out the following steps:
- Browse through the discussion topics to locate the topic that you want to view.
- Click on the View button to the right of the topic. Alternatively, you can click on the title of the topic or click on the Read button below the topic. If the main page displays topics in a simple list, then you need to click on the View button or the topic title. The topic view displays the selected topic in its entirety, along with any replies.
- Click on the Go to Topic List button to return to the main view.
To create a new topic means to start a discussion relevant to the current site with the site members. This task assumes that you are on the Discussions page of the desired site.
To create a new discussion topic, carry out the following steps:
- Click on the Create Topic button. The Create New Topic page appears. Type a Title for the topic.
- Type the topic content in the Text box. Use the formatting features provided to mark up the content, insert bulleted and numbered lists, and include hyperlinks, as required.
Optionally, you can tags to the discussion topic, as follows:
- Type a tag in the box that is provided, and click on Add. To add multiple tags, separate each tag with a space.

- Click on the Choose from popular tags in this site option to display the existing tags used in this site. Click on a tag to associate it with the new topic.
- The newly-associated tags appear below the Text box. Click on a tag to remove it.
- Click on the Save button. The new topic appears as it appears to the users. Click on the Go to Topic List option to return to the main view.
To edit an existing discussion topic means modifying it or adding to its content. Only a Site Manager or the user who created the topic can edit it.
To edit a discussion topic or reply, carry out the following steps:
- In the topic list, locate the discussion topic that you want to edit.
- Click on the View button to the right of the topic. Alternatively, you can click on the title of the topic or click on the Read button below the topic. If the main page displays topics in a simple list, then you must click on the View button or the topic title. The topic view displays the selected topic in its entirety, along with any replies.
- Click on the Edit button to the right of the topic that you want to edit. The selected topic appears in its entirety in an edit box. Make the desired changes to the topic title and/or content.
You can the tags for a topic, as follows:
- To add a new tag, type the tag in the box provided and click on the Add button. To add multiple tags, separate each tag with a space.
- To add an existing tag, click on the Choose from popular tags in this site option to display the tags that are used in this site. Click on a tag to associate it with the topic.
- To remove an existing tag from the set below the Text box, click on the tag that you want to remove.
- Click on the Save button. The updated topic is displayed as it appears to the users. The text (Updated) appears after the title. Click on the Go to Topic List option to return to the main view.
To delete a topic means to permanently remove it from the Discussions page. Deleting a topic also deletes all of its replies. Only the Site Manager or the user who created the topic can delete it.
To delete a discussion topic:
- In the topic list , locate the topic that you want to delete. Click on the View option on the right-hand side of the topic. Viewing the topic before deleting it allows you to ensure that you have selected the correct topic. The topic view displays the selected topic in its entirety, along with any replies.
- Click on the Delete button to the right of the topic. A message prompts you to confirm the deletion of the selected topic. Click on the Delete button. A message indicates that the selected topic has been deleted.
Creating a reply allows you to begin or take part in a discussion related to the site. You can reply to the original discussion topic or any replies that have already been created for that topic. Each reply is nested to visually indicate the discussion flow.
To create a reply in a discussion, carry out the following steps:
- In the topic list, locate and view the topic that you want to reply to. The topic view displays the selected topic in its entirety, along with any existing replies.
- Click on the Reply button. Type your content in the Add Reply box. Use the formatting features provided to mark up the content, insert bulleted and numbered lists, and include hyperlinks, as required.
- Click on the Create button.

The reply appears below and indented from its parent topic or reply.
You can edit a reply just as you edit a discussion topic. To edit a topic reply, carry out the following steps:
- In the topic list, locate and view the desired topic. The topic view displays the selected topic in its entirety, along with its replies.
- Click on the Edit button to the right of the reply that you want to change. The selected reply appears in its entirety in an edit box.
- Make the desired changes to the topic title and/or content. Then, click on the Update button.
The updated reply appears as users will see it. The text (Updated) appears after the name of the member who originally created the reply.
In the Members page, the member management tasks are divided across three pages. The tasks and the sections mentioned below assume that you are on the Members page of the desired site. These pages are:
- Site Members: This is the default page. The Site Members page allows you to search for a site member and view the site's current members.
- Pending Invites: The Pending Invites page allows you to view the users that have been invited to join the current site but have not yet accepted the invite.
- Invite: The Invite page allows you to invite internal and external users to become members of the current site. The Invite link on the banner also displays this page.
The links to these pages appear below the site banner. The link of the currently-displayed page appears in green.
Accessing the Members page allows you to manage the members of any site of which you are a Site Manager.
To access the Members page, carry out the following steps:
- Enter the Alfresco Book project Site.
- On the banner, click on the Members page.
- The Members page displays the default page, Site Members.
The Invite page enables you to invite both, internal and external users to join the current site. This is multi-part process where you select the users to invite, assign a role to each user, and then issue the invitations. However, the invitation requires the configuration of the SMTP server. The following is what you need to do to invite users. The available user roles are Manager, Collaborator, Contributor, and Consumer.
To invite users to join the site, carry out the following steps:
- Click on the Invite button below the banner. Search for, and add internal users.
- In the Search box, type the full or partial name of the user that you want to invite. Leave this box empty to return a list of all of the internal users. Selecting the option to display all of the users may take some time if there are many users in the system.

- Click on the Search button. The application displays a list of all of the users matching the specified search criteria.
- Click on the Add button located to the right of a user in this list. The user appears in the Invite Users list.
To add an external user, carry out the following steps.
- Type the First Name and Last Name of the external user that you are inviting to the site.
- In the Email box, type the email address of the external user. This is the email address to which the invitation will be sent.
- Click on the Add button. The user appears in the Invite Users list.

In the Invite Users list, specify a role for each user.
To set the role for an individual user, click on the Select Role option, which is located to the right of the user, and then on the desired role.
- To set the same role for all of the users in the list, click on the Set All Roles to option at the top of the list and then click on the desired role.
- Click on the Add button, which is located beneath the Invite Users list, to extend invitations to all of the users that are displayed in the list.
Each user in the Invite Users list receives an email invitation from <[email protected]>. The users have the option to accept or reject the invitation to become a member of the site.
The Site Members page allows you to search for a particular site member, or to display all of the members of the current site.
To search for or view the site's members, carry out the following steps:
- Click on the Site Members tab, which is beneath the banner, if this page is not already selected.
- In the Search box, type the full or partial name of the site member that you want to locate. Leave the search box empty to return a list of all of the site members. Displaying all of the users may take some time if there are many members in the current site. Next, click on the Search button.
The page displays a list of the site's current members. From this list, you can change a member's role or remove a member from the site.
At any time, a Site Manager can change the role assigned to a site member. This task assumes that you are on the Members page of the desired site.
To change the role assigned to a site member, carry out the following steps:
- On the Site Members page, locate the site member whose role you want to change for the current site. The page displays a list of the current site members. A button to the right of the member's name indicates the currently-assigned assigned role for this member.
- Click on the button displaying the currently-assigned role. A list displays the available roles, such as, Manager, Collaborator, Contributor, and Consumer.
- Click on the appropriate role for the site member. Share assigns the selected role.
You can even assign a role different from the ones assigned to a site member for a specific content item in the Document Library. The Site Manager will have full privileges. To manage the permissions assigned to the site members, carry out the following steps:
- Click on the More option from the list of actions that can be performed on the document. From the list of options, select the Manage Permissions option.
- You can now manage permissions for the selected document in the library. You have the option of selecting the default options or changing the roles according to your requirements. For example, you can assign the role of a consumer to the coordinator. You can also completely remove privileges for a particular role by selecting the No privileges option from the available role list for the particular role.
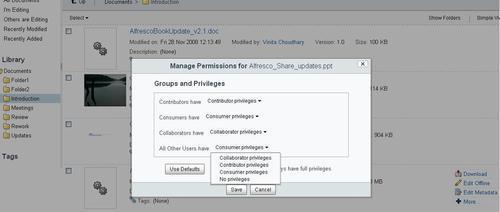
At any time, a Site Manager of a site can remove a member from that site. A removed member no longer has access to the site. However, if the site is public, then a user can choose to rejoin the site.
This task assumes that you are on the Members page of the desired site.
To remove a member from a site, carry out the following steps:
- On the Site Members page, locate the site member that you want to remove from the current site. The page displays a list of the current site members.
- Click on the Remove button, which is located to the right of the user that you want to remove from the site.
Share removes the specified member. If the Site Manager or the person who created the site leaves, then another site member can be assigned the role of the Manager. To do this, carry out the following steps:
- The Site Administrator should go to the Members tab on the dashboard of the site. Search for the members by clicking on the Search tab.
- In the list, click on the current Site Manager's role and change it to something other than Manager.
- From the list, click on the member who will be the new Site Manager, and change their role to Manager by clicking on the Manager role from the drop-down list.
- Now you can delete the old Site Manager, by changing the role and clicking on the Remove tab.

On the Pending Invites page, you can view the full list of invited users or search for a particular user. This page allows you to view the users that have been invited to join the current site. Once you have invited a user to join your site, you can revoke the invitation up until it has been accepted.
This task assumes that you are on the Members page of the desired site.
To search for or view invited users, carry out the following steps:
- Click on the Pending Invites option, below the banner.

- In the Filter box, type the full or partial name of the invited user that you want to locate. Leave this box empty to return a list of all of the users invited to this site. Displaying all of the users may take some time if many users have been invited to join the current site.
- Click on the Search button. The page displays a list of the users that have been invited to be members of the site.
- Click on the Cancel option, which is located to the right of the user whose invitation you wish to revoke. Share cancels the invitation and removes the user from the list.
Some very evident benefits of Alfresco Share are as follows:
- Rapid deployment, because of Alfresco's Web 2.0 functionality, delivers immediate business value. It enables organizations to simply and rapidly roll out collaborative content solutions
- Supports initiatives for knowledge retention, best practices and virtual
- Reduced costs with Alfresco's open source subscription model allows customers to implement an enterprise-wide collaboration tool at a low cost, without incurring the capital expenses (cap ex) associated with traditional licensing models
- Alfresco's open standards architecture enables organizations to leverage existing investments in hardware and software
- Alfresco supports rapid application development with components produced using lightweight, standards-based scripting, as opposed to a proprietary stack tying customers into a single vendor and the related maintenance costs.