
Content can be in any format, as mentioned at the start of this chapter. By using the Alfresco web client application, you can add or modify content and its properties. You can categorize content, lock content for editing, and can maintain several versions of the content. You can delete content, and you can also recover deleted content.
This section uses the space that you have already created as a part of your Intranet sample application. As a part of the sample application, you will manage the content in the Intranet > Marketing Communications space. Because you have secured this space earlier, only the administrator (admin) and the users belonging to the Marketing group (Peter Marketing and Harish Marketing) can add content to this space. You can log in as Peter Marketing to manage the content in this space.
A web client provides two different interfaces for adding content. One can be used to create inline editable content, such as HTML, text, XML, and the other can be used to add binary content, such as Microsoft Office files and scanned images.
You need to have one of the the administrator, contributor, collaborator, or coordinator roles on a space to be able to create content within that space. For more information about the user roles on a space, refer to Chapter 4.
To create an HTML file in a space, carry out the following steps:
- Ensure that you are in the Intranet > Marketing Communications > Switch to open source ECM > 02_Drafts space.
- In the header, click on Create > Create Content. The first pane of the Create Content wizard appears, as shown in the following screenshot. In this wizard, and in any Alfresco wizard, you can track your progress through the wizard from the list of steps shown on the leftmost side of the pane.

- Provide the name of the HTML file, select HTML as the Content Type, and then click on the Next button. The Enter Content pane of the wizard appears, as shown in the following screenshot. Note that Enter Content is now highlighted in the list of steps on the leftmost side of the pane.

- You can see that there is a comprehensive set of tools to help you format your HTML document. Enter some text, using some of the formatting features.
- If you know HTML, then you can also use the HTML editor by clicking on the HTML icon. The HTML source editor is displayed. Once you update the HTML content, click on the Update button to return to the Enter Content pane in the wizard, with the contents updated.
- After the content has been entered and edited in the Enter Content pane, click on Finish. You will see the Modify Content Properties screen, which can be used to update the metadata that is associated with the content, as shown in the following screenshot:
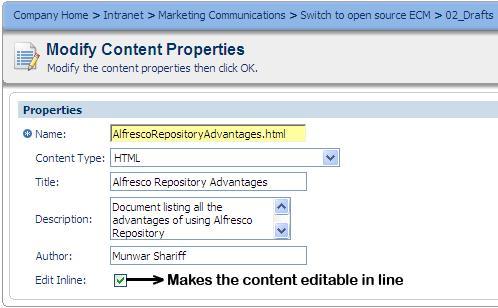
- If you are satisfied with the properties, then click on the OK button to return to the 02_Drafts space, with your newly-created file inserted in it.
You can launch the newly created HTML file by clicking on it. Your browser will automatically be launched for most of the common file types, which are HTML, text, and PDF. If the browser does not recognize the file, then you will be prompted by a Windows dialog box containing the list of applications, to choose an application. This is the normal behavior if you try to launch a file on any Internet page.
Using a web client, you can upload content from your hard drive. Choose a file from your hard disk that is not an HTML or text file. I shall choose the Alfresco_CIGNEX.doc file from my hard disk, for the sample application. Ensure that you are in the Intranet > Marketing Communications > Switch to open source ECM > 02_Drafts space.
To upload a binary file to a space, carry out the following steps:
- In the space header, click on the Add Content link. The Add Content Dialog window is displayed.
- To select the file that you want to upload, click on the Browse button. In the File Upload dialog box, browse to the file that you want to upload, select it, and then click on the Open button. Alfresco inserts the full path name of the selected file in the Location text box.
- Click on the Upload button to upload the file from your hard disk to the Alfresco repository. A message informs you that your upload was successful, as shown in the following screenshot:

- Click on the OK button to confirm. The Modify Content Properties Dialog is displayed
- Verify the pre-populated properties and enter information in the text boxes as required. Click on the OK button to save and return to the 02_Drafts space.
The file that you have uploaded appears in the Content Items pane. Alfresco extracts the file size from the disk properties of the file, and includes the value in the size field. Now that you have two files, you can edit them as you like.
You can edit the content in Alfresco in three different ways: by using the Edit Online, Edit Offline, and Update actions. Note that you need to have edit permission on the content to edit them, as explained in the previous chapter.
HTML files and plain text files can be created and edited online. If you have edit access to a file, then you will notice a small pencil (Edit Online) icon as shown in the following screenshot:
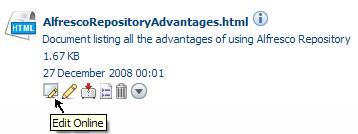
Clicking on the pencil icon will open the file in the appropriate editor. Each file type is edited in its own WYSIWYG editor. Once you select the option to Edit Online, a working copy of the file will be created for editing, and the original file is locked, as shown in the following screenshot:

The working copy can be further edited, as needed, by clicking on the Edit Online button. Once you are done with editing, you can commit all of the changes to the original document, by clicking on the Check In icon.
If, for some reason, you decide to cancel the editing of a document and discard any changes that you have made, then you can do so by clicking on the Cancel File Editing button. If you cancel the editing of a document, then the associated working copy is deleted, and all of the changes made to it since it was checked out will be lost.
If you want to download a file onto your local machine, edit it locally, and then upload the updated version to Alfresco, then you might consider using the Edit Offline option, as shown in the following screenshot:
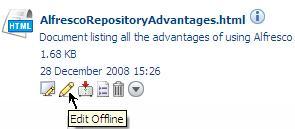
Once you click on the Edit Offline button, the original file is automatically locked. A working copy of the file is created for download. Then a window is displayed, giving you the option to save the working copy of the document locally on your personal computer, as shown in the following screenshot:

If you don't want to automatically download the file for offline editing, you can turn off this feature. In order to deactivate Offline Editing, click on the User Profile icon in the top menu, and deselect the option for Offline Editing, is shown to be selected in the following screenshot:

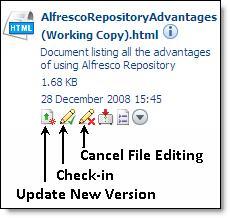
The working copy can be updated by clicking on the Update New Version button. Once you have finished editing the file, you can commit all of the changes to the original document, by clicking on the Check In icon. Alternatively, you can cancel all of the changes by clicking on the Cancel File Editing button, as shown in the following screenshot:
If you have edit access to a binary file, then you will see the Update action icon in the drop-down list for the More actions link, as shown in the upcoming screenshot. If you click the Update icon, then the Update pane is displayed. Click on the Browse button to upload the updated version of the document from your hard disk. It is always a good practice to check out the document and update the working copy, rather than directly updating the document. Checking the file out avoids conflicting updates by locking the document, as explained in the previous section.

Content has clickable actions (icons), as shown in the upcoming screenshot. These clickable actions are dynamically generated for content, based on the current user's permissions for that content. For example, if you have copy permission for the content, then you will see the Copy icon as a clickable action for that content.

Click on the Delete action, from the list of content actions, to delete the content. When the content is deleted, all of the previous versions of that content object will also be deleted.
From the list of content actions, as shown in the screenshot above, you can click on the Cut action to move content to the clipboard. Then, you can navigate to any space hierarchy and paste the cut content into it, as required.
Similarly, you can use the Copy action to copy the content to another space.
If you need to access a particular content object very frequently, then you can create a shortcut (similar to the way you can with Internet and Windows browser's Favorite option) to that content, in order to reach the content in one click. From the list of content actions, as shown in the preceding screenshot, you can click on the Create Shortcut action to create a shortcut to the content. Shortcuts are listed in the Shelf on the left-hand side.
Every content item in Alfresco has properties associated with it. Refer to the preceding screenshot to see the list of properties, such as Title, Description, Author, Size, and Creation Date. These properties are associated with the actual content file, which is named Alfresco_CIGNEX.doc.
The content properties are stored in relational database and are searchable using Advanced Search options.
Content properties are also known as Content Metadata. Metadata is structured data, that describes the characteristics of the content. It shares many similar characteristics with the cataloguing that takes place in libraries. The term Meta derives from the Greek word denoting a nature of a higher order or more fundamental kind. A metadata record consists of a number of pre-defined elements that represent specific attributes of the content, and each element can have one or more values.
Metadata is a systematic method for describing resources, and thereby simplifying access to them. If access to the content is required, then it should be described using metadata, so as to maximize the ability to locate it. Metadata provides the essential link between the information creator and the information user.
Although the primary aim of metadata is to improve resource discovery, metadata sets are also being developed for other reasons, including:
- Administrative control
- Security
- Management of information
- Content rating
- Rights management
Typically, in most Content Management Systems, once you upload the content file, you need to add the metadata (properties), such as the title, description, and keywords, to the content manually. Most of the content, such as Microsoft Office documents, media files, and PDF documents contain properties within the file itself. Therefore, it is double the effort, having to enter those values again in the Content Management System, as well as in the document.
Alfresco provides built-in metadata extractors for many popular document types, that extract the standard metadata values from a document, and populates the values automatically.
This is very useful if you are uploading the documents through FTP, CIFS, or a WebDAV interface, where you will not have to enter the properties manually, as Alfresco will transfer the document properties automatically.
To edit metadata, you need to click on the Edit Metadata icon ![]() in the content details view. Refer to the Edit Metadata icon shown in the upcoming screenshot, which shows a detailed view of the file
in the content details view. Refer to the Edit Metadata icon shown in the upcoming screenshot, which shows a detailed view of the file Alfresco_CIGNEX.doc. You can update the metadata values, such as Name and Description, for your content items. However, certain metadata values, such as Creator, Created Date, Modifier, and Modified Date are read-only values, and you cannot change them. Certain properties, such as, Modifier and Modified Date will be updated by Alfresco automatically, whenever the content is updated.
Additional properties can be added to the content in two ways. One way is to extend the data model and define more properties for a content type. More information on this is provided in Chapter 7.
The other way is to dynamically attach the properties and behaviour through Aspects. By using aspects, you can add additional properties, such as Effectivity, Dublin Core Metadata, and Thumbnailable, to the content. More information on this is provided in Chapter 6.