
Simple Workflows are good for implementing content-oriented workflow processes. However, there are certain limitations of the Simple Workflow that are as follows:
- They are unable to create multi-state workflow definitions
- They are restricted to one or two exit transitions (approve, reject)
- They are unable to define parallel workflows
- They rely on folder structure for multi-stage workflow and action triggering
- They have no notion of a task or assignment
To resolve these limitations, Alfresco has embedded the JBPM (JBoss Business Process Management) engine into its core. JBPM is an open source, standalone workflow engine. It can run in any servlet container, as it doesn't require the JBoss Application server. The JBPM engine is responsible for managing deployed processes, instantiating and executing processes, persisting process states, providing metadata to a relational database (via Hibernate), and tracking task assignment and task lists. With JBPM, the Alfresco platform is extended to support complex task-oriented processes.
JBPM is built on the idea that any process can be described as a graph or a set of connected nodes. JBPM maintains a list of tasks assigned to each participant. How the users interact with the task list depends on the respective application. In Alfresco, the task to do a dashlet is configured for the currently logged in user. As users complete their tasks, the tasks are removed from the to-do list.
JBPM is a flexible, extensible workflow management system with an intuitive process language. Workflows are described in process definitions, using an XML based language called Java Process Definition Language (jPDL). jPDL is an example of a graph-based execution language.
jPDL is a process language that is built on top of a common framework. It is an intuitive process language that can be used to express business processes graphically, in terms of tasks, wait states for asynchronous communication, timers, and automated actions. To bind these operations together, jPDL has a powerful and extensible control flow mechanism. jPDL has minimal dependencies and can be used as easily as using a Java library.
jPDL includes a designer tool, which is a graphical tool for authoring business processes. It's an Eclipse plugin. Later in the section, we will see how to configure the Eclipse plugins.
For more information, please visit the following web site:
http://docs.jboss.com/jbpm/v3.2/userguide/html/
As a user, you will be able to perform the following interactions using the Alfresco Explorer interface (such as a web browser):
- Start workflow
- Select from a list of pre-defined workflows
- Attach resources (additional related documents)
- Assign users to the workflow
- List my tasks (what have I got to do?)
- List the tasks that I can assign to myself
- Perform a task
- View associated task resources (if any)
- Change a task's state
- Mark a task done (or other outcome)
- Look back (display the trail of steps leading up to my task assignment)
- Look forward (why hasn't something happened yet?)
- Re-assign the task to someone else
- Take ownership of a task (if it is assigned to my group)
- Cancel or abort the workflow
The Advanced Workflow process is task-oriented. You create a task, attach documents to be reviewed, and assign it to appropriate reviewers. It could also be implemented by using business rules.
There are two advanced workflows available out of the box.
- Ad hoc task-based workflow: Assign tasks to your colleague on an ad hoc basis
- Review and Approve workflow: Assign tasks to your colleague for review and approval.
The following example will give you a better understanding of the concept:
The RajComp Company got a project from the United Nations Organization (UNO). For this project, they have to send a Request for a Proposal to the client. The Project Manager asks the Team Leader to prepare an RFP document, and within a week to send the document across to the manager for approval. The Project Manager will review the document and will either approve it and send it to the UNO, or reject it in order to get some corrections made.
For this purpose, create a RajComp space in the Company Home. Create Zoe Bull and Zarina Macaro as the users. For more information about creating a space and users refer to Chapter 4 and Chapter 5.
The following screenshot illustrates the process of creating a Review and Approve based workflow. Zarina Macaro prepares the RFP document and starts the workflow by providing the important information such as Due Date to complete the task, Priority of the task, and notification information. The workflow then assigns the document to Zoe Bull to Review or Approve. Please carry out the following steps to configure an ad hoc workflow.
- Click on the document's More Actions button, and then click on the Start Advanced Workflow link, as shown in the screenshot below.

- This wizard lists all of the available workflows, including custom workflow processes. From the list of available workflows, select the Adhoc Task option, and then click on the Next button.

- You will see the Workflow options pane of the Start Adhoc Task Workflow Wizard, as shown in the upcoming screenshot. Provide a meaningful Description for the task and choose the Priority, as well as the Due Date. Select the Notify Me checkbox to receive notification of the workflow status updates for the document.
- From the list of users, search for Zoe Bull and assign her the task. You can also add additional resources (documents) to this workflow task by clicking on the Add Resource button, as shown in the following screenshot. This step will help if you want to send a set of documents, for approval as a group. Once you have entered all required information, click on the OK button to start the workflow process.

- Log in as Zoe Bull. Click on the My Alfresco menu link in the toolbar to view your personal dashboard. The My Tasks To Do dashboard lists all of your pending tasks, as shown in the following screenshot:
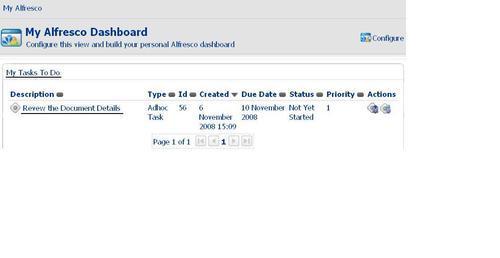
- Click on the Review the document details link shown in the preceding screenshot. To complete the task, choose a Status of Completed and then click on the Task Done button.

You can define and deploy your own task-oriented workflows in the Alfresco repository. However, you need to use a particular format in order to define your workflow, and follow a particular process to deploy it in Alfresco.
Note
A useful tutorial on creating and deploying your own custom workflow is provided at http://wiki.alfresco.com/wiki/WorkflowAdministration.
As an example, we will configure a workflow. The use case scenario is as follows.
Let us consider an example where a Global Placement company recruits nurses for various hospitals. The company has an internal process for the recruitment. Required documents for a nurse for a hospital are verified by the employees of this company. If the documents are found to be legal, the nurse is assigned to the hospital for seven weeks. After seven weeks, the process starts again for the same nurse for another assignment. This process goes on and on.
For this project, create a GlobalPlacement space in the Company Home. Inside the GlobalPlacement space, create the Nurse, Recruiter | Annet_Recruiter, and CredentialSpecialist | Lee_Credential spaces. Create the Annet_Recruiter and Lee_Credential users. For the home spaces, create the Annet_Recruiter and Lee_Credential spaces. Invite Annet_Recruiter and Lee_Credential as coordinators for the GlobalPlacement space. For more information about creating a space and users refer to Chapter 4 and Chapter 5.
Now that you have identified the spaces and the users, the next step is to identify the workflow processes.
Annet_Recruiter will be logged in. She starts a process workflow (we will be creating this workflow in the next section) for the document by specifying the metadata values such as nurse_id,
nurse_name,
assignemt_id,
driver_licence,
is_birthcert, and emp_expiration_date. She then assigns the task to her colleague Lee_Credential. Annet_Recruiter can track the status of the task from her Alfresco Explorer interface. If the task is not completed within a specified time, or is rejected for some other reason, then Annet_Recruiter can cancel the workflow request or reassign it to somebody else. On the other hand, Lee_Credential receives a notification about the new task in her My Tasks To Do window. She examines the task and completes the task. She can approve or reject the workflow. If approved, the document will be moved to the Company Home | GlobalPlacement | Nurse folder. If it is rejected, it will remain in the Annet_Recruiter home space pending further action.
Annet_Recruiter and Lee_Credential can both track the status through the customized dashlet named GlobalPlacement. We shall discuss this shortly, after implementing a workflow.
For any workflow to be deployed, you should have the following files:
- Task model: The task model provides a description of each task in the workflow. Each task description consists of Name, Title, Properties, and Association.
- Resource bundle (optional): A workflow resource bundle provides all of the human-readable messages that are displayed in the user interface for managing the workflow. Messages include task titles, task property names, task choices, and so on.
- Process definition: The process definition describes the states (steps) and transitions (choices) of a workflow.
Web-client-config-custom.xml: Web client configuration specifies the presentation of tasks to the user in the Alfresco Explorer.
The following steps need to be followed in order to create a custom advanced workflow:
For each task in the process definition (as defined by <task> elements), it is possible to associate a task description. The description specifies the information that may be attached to a task, that is, it's properties (name and data type) and associations (name and type of associated object). A user may view and edit this information in the task dialog within the Alfresco Explorer.
The task model is expressed as a content model, as supported by the Data Dictionary. To create a task model, you need to:
- Create a new content model for the Process Definition.
- Create a custom content Type for each Task.
- Within each Type, describe the Properties and Associations (information) required for that Task
The task model can be dynamically deployed without restarting the server.
Dynamic custom models are stored in the Models space (Company Home > Data Dictionary > Models). This is a feature that enables the dynamic customization of models without requiring a restart of the Alfresco server. This feature is provided in Alfresco 3.0.
Upload a custom XML model file to the Models space. By default, the model will not be active unless the Model Active checkbox is selected during the upload. To activate a previously inactive model, select the View Details option and then select the Modify properties icon. On the Modify Content Properties page, select the Model Active checkbox.
To deactivate a model, select the View Details option and then select the Modify properties icon. On the Modify Content Properties page, deselect the Model Active checkbox.
Deployment of the model files can be achieved by the administrator by navigating to the following URL: http://<server_name>:<port>/alfresco/faces/jsp/admin/repoadmin-console.jsp
Use the command activate model GlobalWorkflowModel.xml. This command is used to activate the repository model and load it into the runtime data dictionary.
Use the command deploy model alfresco/extension/GlobalWorkflowModel.xml. This command uploads the model to the repository and loads it into the runtime Data Dictionary. This will also activate the repository model.
Carry out the following steps to deploy a model dynamically:
- Go to Company Home | Data Dictionary | Models
- In the header, click on Create Content

- The Create Content Wizard is displayed, as shown in the following screenshot:

- In the Name text box, enter GlobalWorkflowModel
- Select xml as the Content Type
- Click on the Next button to enter content into the specified file
- Copy the following piece of code into the Content Wizard, as shown in following screenshot:

<type name="global:reviewTask">
<parent>bpm:startTask</parent>
<properties>
<property name="global:nurse_id">
<title>Nurse No.</title>
<type>d:int</type>
</property>
<property name="global:assignment_id">
<title>Assignment No</title>
<type>d:int</type>
</property>
<property name="global:nurse_name">
<title>Nurse Name</title>
<type>d:text</type>
</property>
<property name="global:is_birthcert">
<title>Birth Certification</title>
<type>d:boolean</type>
</property>
<property name="global:license_expiration_date">
<title>License Expiration Date</title>
<type>d:date</type>
</property>
<property name="global:is_driver_licence">
<title>Driver license</title>
<type>d:boolean</type>
</property>
<property name="global:wfDescription">
<type>d:text</type>
</property>
</properties>
<mandatory-aspects>
<aspect>bpm:assignee</aspect>
</mandatory-aspects>
</type>
<type name="global:submitReviewTask">
<parent>global:reviewTask</parent>
<overrides>
<property name="global:nurse_id">
</property>
<property name="global:assignment_id">
</property>
<property name="global:nurse_name">
</property>
<property name="global:is_birthcert">
</property>
<property name="global:license_expiration_date">
</property>
<property name="global:is_driver_licence">
</property>
<property name="global:wfDescription">
</property>
</overrides>
</type>
- Click on the Next Button, and then click on the Finish button
- Select the Model Active property, as shown in the following screenshot:

- Click on the OK button
- To verify the changes, first click on logout, and then click on login and log back in.
For localized workflow interaction, it is necessary to provide resource bundles containing UI labels for each piece of text that is exposed to the user. With the appropriate resource bundles, a single workflow instance may spawn tasks where the user interface for each task is rendered in a different language, based on the locale of the user. The resource bundles can also be dynamically deployed without restarting the server.
The associated message resource bundles are stored in the Messages space (Company Home > Data Dictionary > Messages). Upload the custom resource bundle by uploading each of the message property files (for all of the locales) to the Messages space. The messages will not be applied until either they are explicitly reloaded or the server is restarted.
The messages can be dynamically reloaded by using the repo admin console via the web site: http://<server-name>:<port>/alfresco/faces/jsp/admin/repoadmin-console.jsp.
The command line reload messages <resource bundle base name> will cause the message resource to be re-registered.
Carry out the following steps to create the content:
- Go to Company Home | Data Dictionary | Messages
- In the header, click on Create Content

- The Create Content Wizard is displayed, as shown in the following screenshot:

- In the Name text box, enter GlobalWorkflow-messages.properties
- Select Plain Text as the Content Type
- Click on the Next button, to add the content into the specified file
- Copy the following piece of code into the Content Wizard, as shown in the following screenshot:
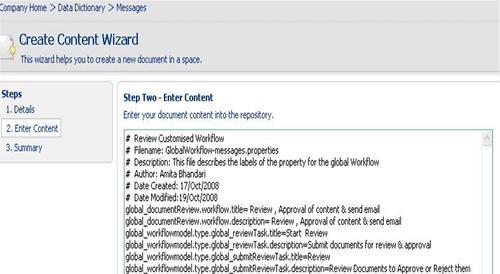
#  Review Customised Workflow                                                                                         #  Filename: GlobalWorkflow-messages.properties
#  Description: This file describes the labels of the property for the global Workflow. The first part of each key matches the name of the workflow content model (global). The process-related string keys matches the name of process(documentReview),
#  Author: Amita Bhandari
#  Date Created: 17/Oct/2008
#  Date Modified:19/Oct/2008
global_documentReview.workflow.title= Review , Approval of content & send email
global_documentReview.workflow.description= Review , Approval of content & send email
global_workflowmodel.type.global_reviewTask.title=Start  Review
global_workflowmodel.type.global_reviewTask.description=Submit documents for review & approval
global_workflowmodel.type.global_submitReviewTask.title=Review
global_workflowmodel.type.global_submitReviewTask.description=Review Documents to Approve or Reject them
- Click on the Next button, and then click on the Finish button.
- Click on the OK button.
- Deployment of the property files can be achieved by an administrator by navigating to the URL.
http://<server-name>:<port>/alfresco/faces/jsp/admin/repoadmin-console.jsp - Use the following command to deploy the file:
reload messages GlobalWorkflow-messages - To verify the changes, click on the logout button, and then click on the login button and log back in again.
Alfresco currently supports the ability to manage workflow process definitions dynamically via the Workflow Console, assuming that the definitions are using existing task models and messages. With the introduction of dynamic models, it is now possible to dynamically manage new workflow process definitions by using new task models and messages, and client configuration. In addition, it is also possible to deploy workflow definitions directly from a repository location.
Process definitions are stored in the Workflow Definitions space (Company Home > Data Dictionary > Workflow Definitions). Upload a custom XML process definition file to the Workflow Definitions space. By default, the process definition will not be deployed unless the Workflow Deployed checkbox is selected during the upload.
To make sure that a process definition is not deployed, select the View Details option and then click on the Modify properties icon. In the Modify Content Properties page, deselect the Workflow Deployed checkbox.
The workflow console can be used (as an alternative to the Alfresco Explorer) to deploy or withdraw process definitions. Its primary use is to test newly-developed workflow definitions. However, it also supports the debugging and diagnosis of current in-flight workflows. The workflow console can be deployed via the following web site:
http://<server-name>:<port>/alfresco/faces/jsp/admin/workflow-console.jsp
Process definitions can be configured into Alfresco so that they are deployed whenever Alfresco starts.
The Spring bean workflowDeployer deploys process definitions. It may be used with Alfresco's configuration extension mechanism to deploy custom workflows. A code snippet is provided for deploying workflows programmatically
<bean id="extension.workflowBootstrap" parent="workflowDeployer">
 <property name="workflowDefinitions">
	<list>
		   <props>
               <prop key="engineId">jbpm</prop>
               <prop key="location">alfresco/extension/ Global-review-process-definition.xml</prop>
               <prop key="mimetype">text/xml</prop>
               <prop key="redeploy">true</prop>
             </props>
      </list>
 </property>
</bean>There are two ways of building the process definition .One is by hand, that is, by creating a jPDL XML document. The second option is by designer, that is, by using a tool to generate the jPDL XML document.
Let's create a jPDL XML document by hand. Carry out the following steps to create a jPDL XML document by hand:
- Go to Company Home > Data Dictionary > Workflow Definitions.
- In the header, click on the Create Content option.
- The Create Content Wizard is displayed, as shown in the following screenshot:

- In the Name text box, enter Global-review-process-definition.
- Select XML as the Content Type.
- Click on the Next button to add content into the specified file.
- Copy the following piece of code into the Content Wizard, as shown in the following screenshot:

<process-definition xmlns="urn:jbpm.org:jpdl-3.1" name="global:documentReview"> <swimlane name="initiator"></swimlane> <swimlane name="assignee"> <assignment class="org.alfresco.repo.workflow.jbpm. AlfrescoAssignment"> <actor>#{bpm_assignee}</actor> </assignment> </swimlane> <start-state name="start"> <task name="global:reviewTask" swimlane="initiator" /> <transition name="" to="startreview"/> </start-state> <node name="startreview" > <transition name="review" to="review" > <action class="org.alfresco.repo.workflow.jbpm. AlfrescoJavaScript"> <script> </script> </action> </transition> </node> <task-node name="review"> <task name="global:submitReviewTask" swimlane="assignee"> </task> <transition name="Reject" to="end" > </transition> </transition> </task-node> <end-state name="end"/> </process-definition> - Click on the Next button, and then click on the Finish button.
- Select the Workflow Deployed checkbox. By default, the process definition will not be deployed unless the 'Workflow Deployed' checkbox is selected during the upload.
- In the Workflow Engine Id field, enter jbpm, as shown in the following screenshot:

- Click on the OK button.
- To verify the changes, click on the logout button, and then click on the login button and log back in again.
The definition above describes the three steps of the Review, Approve and sends email task workflow. The following are the things to be considered when creating a process definition:
- There's always a start and an end.
- The process definition's name and task names are important. These tasks are defined in the workflow model files. The properties are displayed on the basis of these tasks.
- Swimlanes are used to declare workflow roles.
- Tasks are associated with a swimlane.
- Certain actions are performed on the basis of these tasks, as defined in the process definition.
JBoss jBPM also includes a graphical designer tool for authoring business processes. The most important feature of the graphical designer tool is that it includes support for both the tasks of the business analyst as well as those of the technical developer. This enables a smooth transition from business process modeling to practical implementation. Carry out the following steps to configure jBPM:
- To implement the graphical designed tool, you have to download the jBPM plugins from http://labs.jboss.com/jbossjbpm/downloads.
- Once the installation is over, restart Eclipse.
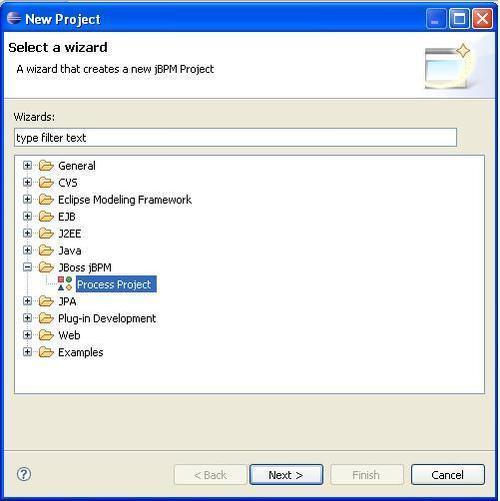
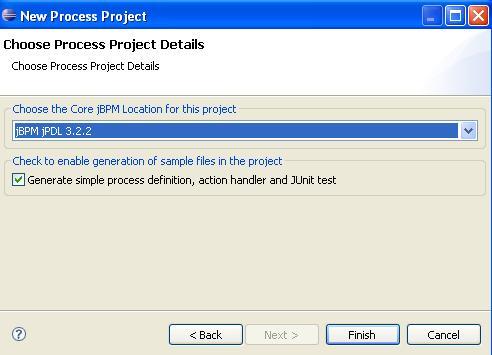
- Go to File | New | Project. Expand the JBoss jBPM process designer folder, and select Process Project, as shown in the following screenshot:
- Enter the Project Name, and then click on Next.
- Select the jBPM Location, as mentioned in the following screenshot. Click on the Finish button.
- Copy the process definition code and paste it into the
src/main/jpdpackage. - The process should look similar to the following screenshot:
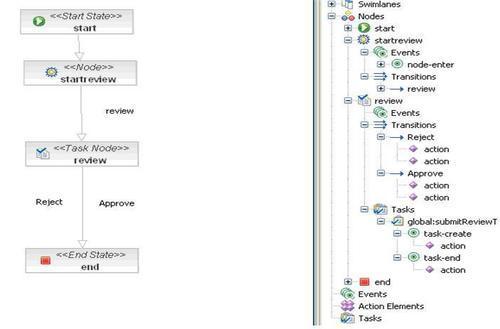
- Deploy it.
The following steps need to be followed in order to deploy a workflow via JBoss jBPM Process Designer. These steps will deploy the workflow without the need to restart the server.
- Ensure that the Alfresco Server is up and running.
- Click on the source tab and copy the content of the file
Global-review-process-definition. - Click on the Deployment tab and enter the following information:
- Server Name = machine name where Alfresco is installed
- Server Port = port number assigned to Alfresco (the default is 8080)
- Server Deployer =
/alfresco/jbpm/deployprocess - Click on Test Connection.
- When everything is
OK, then click on the Deploy Process Archive button.
The following screenshot shows the details mentioned earlier:

If Hot Deployment is done, then we can see the workflow images, which show the current status of the workflow, in Alfresco Explorer under the workflow outline section. The screenshot is shown in the next section of this chapter, which is titled Manage Adhoc Task of Out of Box Features Workflow Task Lists Dashboards.
Modify the following files:
/jsp/workflow/start-workflow-wizard/workflow-options.jsp
/jsp/workflow/manage-task-dialog.jsp
Change the rendered and expanded value to true.
Modify this code:
<a:panel rendered="false" id="workflow-outline" label="#{msg.workflow_outline}" progressive="true" expanded="false"
border="white" bgcolor="white" titleBorder="lbgrey" expandedTitleBorder="dotted" titleBgcolor="white" styleClass="mainSubTitle">
to:
The Start Workflow Wizard uses XML configuration to display the relevant controls to collect data from the user. The Manage Task dialog uses the same approach to display the data that it needs to collect. The Alfresco Explorer can also be dynamically deployed without restarting the server.
Dynamic Alfresco Explorer customizations are stored in the Web Client Extension space (Company Home > Data Dictionary > Web Client Extension). Upload a custom web-client-config-custom.xml file to the Web Client Extension space. The custom configuration will not be applied until either it is explicitly reloaded, or the server is restarted. If the web-client-config-custom.xml file has been added, edited, or updated, then it can be dynamically reloaded by using the Alfresco Explorer config console, by navigating to the following location: http://<server-name>:<port>/alfresco/faces/jsp/admin/webclientconfig-console.jsp.
This has a single command, reload, which will cause the Alfresco Explorer configurations to be reloaded. Carry out the following steps in order to create and deploy the Dynamic Alfresco Explorer tasks:
- Browse to the file
web-client-config-custom.xml, which can be found in the locationtomcat/shared/classes/alfresco/extension. - Copy the code below into this file
<config evaluator="node-type"
condition="global:reviewTask" replace="true">
<property-sheet>
<show-property name="global:nurse_id" display-label="Nurse Id"/>
<show-property name="global:assignment_id"
display-label="Assignment No" />
<show-property name="global:nurse_name"
display-label="Nurse Name" />
<show-property name="global:is_birthcert" display-label="Is BirthCertificate"/>
<show-property name="global:license_expiration_date" display-label="Licensce   Expiration Date"/>
<show-property name="global:is_driver_licence" display-label="Driver Licensce"/>
<show-property name="global:wfDescription" display-label="Description"/>
<separator name="sep2" display-label-id="users_and_roles"
component-generator="HeaderSeparatorGenerator" />
<show-association name="bpm:assignee" display-label-id="wf_reviewers" />
</property-sheet>
</config>
<config evaluator="node-type" condition="global:submitReviewTask"
replace="true">
<property-sheet>
<show-property name="global:nurse_id" display-label="Nurse Id"/>
<show-property name="global:assignment_id"
display-label="Assignment No" />
<show-property name="global:nurse_name"
display-label="Nurse Name" />
<show-property name="global:is_birthcert" display-label="Is BirthCertificate"/>
<show-property name="global:license_expiration_date" display-label="Licensce Expiration Date"/>
<show-property name="global:is_driver_licence" display-label="Driver Licensce"/>
<show-property name="global:wfDescription" display-label="Description"/>
</property-sheet>
</config>
- Deployment of the Alfresco Explorer can be achieved by the administrator by navigating to the URL
http://<server-name>:<port>/alfresco/faces/jsp/admin/webclientconfig-console.jsp - Use the following command to deploy the file:
reload
Let's test the workflow by carrying out the following steps:
- Log in as Annet_Recruiter.
- Upload a document to the Company Home > Global Placement > Recruiter > Annet_Recruiter space. Click on the document's More Actions button and then click on the Start Advance Workflow link.
- Select the Review, Approval of content & send email option from the list of predefined workflows. Click on the Next button.

- Provide meaningful values for the metadata, namely
nurse_id,nurse_name,assignemt_id,driver_licence,is_birthcert, andemp_expiration_date. - From the list of users, search for Lee_Credential and assign her the task. You can also add additional resources (documents) to this workflow task by clicking on the Add Resource button, as shown in the following screenshot. This activity helps if you want to send a set of documents for approval as a group.
- Once you fill up the entire relevant information, click on the OK button to start the workflow process, as shown in the following screenshot:

- Click on Next, and then click on the Finish button.
- Next, logged in as Lee_Credential, click on the My Alfresco menu in the toolbar to view your dashboard, that is, My Tasks To Do. You will notice that one task in the dashboard, which was assigned by Annet_Recruiter. You can also reassign the task to another, according to your business process. Shortly, we will discuss the various workflow related dashboards.

- You can complete the process by verifying the metadata specified by Annet_Recruiter. If the relevant information is there, then you can Approve or Reject the task.

- Now, If you have approved the task, then you will find the document in the
nursefolder. - If you have rejected the task, then the document will be available in the
recruiterfolder itself.
During the process of the Review and Approval workflows, two XMLs files are generated. These are userlogger.xml and logger.xml. These have the detailed information about the workflow in terms of initiator, assignee, start date, and end date of the workflows. These XML files will help us in generating the dashlet report.
Carry out the following steps to configure the dashlet for the workflow mentioned above:
- Create a custom dashlet script file of
/tomcat/shared/classes/alfresco/extension/templates/global_logs.ftl. For this purpose, you have to create atemplatesfolder within the following path:/tomcat/shared/classes/alfresco/extension. - Create a custom dashlet JSP. For this purpose, create a
global_logs.jspfile, which consists of the following piece of code. Place the file in the dashlet folder, and create the following hierarchyextensiondashboardsdashletsof folders inside thetomcatwebappsalfrescojspfolder.<%@ taglib uri="/WEB-INF/repo.tld" prefix="r" %> <%-- Note that this template is loaded from the classpath --%> <r:template template="alfresco/extension/templates/global_logs.ftl" />
- Open the file
web-client-config-custom.xml, which is located in:tomcat/shared/classes/alfresco/extension/. Replace the existing code in the file with the code in the fileweb-client-config-custom.xml. Then, before the</alfresco-config>tag, add the following piece of code:<config evaluator="string-compare" condition="Dashboards"> <dashboards><dashlets> <dashlet id="global_logs_horizontal" label="Global Placement" description="Log file for Global Placement" jsp="/jsp/extension/dashboards/dashlets/global_logs.jsp" /> </dashlets></dashboards></config>
- Restart the server.
- Log in as Lee_Credential. Click on the Configure button to configure the dashboard.
- Select the Global Placement component, and then click on the Add button, as shown in the following screenshot:

- Click on the Next button, and then click on the Finish button.
You will find the following screen in My Alfresco. Through the Global Placement dashlet, you can easily track the performance of the user and also determine the timelines related to each stage of the workflow.

Let's have a look at a few out of the box features.
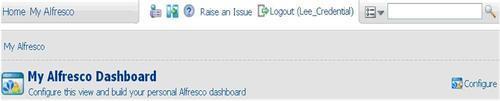
Click on the My Alfresco menu link in the toolbar to view your personal dashboard. This dashboard includes the tasks that you need to process, as shown in the following screenshot. You may notice that the new task listed in the My Tasks To Do window was assigned to you by Annet_Recruiter.

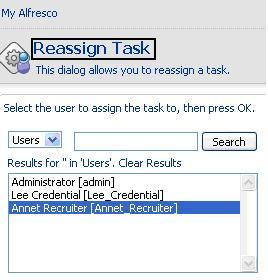
For various business reasons, you may need to reassign a task. You can do this by clicking on the Reassign Task button, as shown in the preceding screenshot. Once you click on the Reassign Task button, you will see the Reassign Task window, as shown in the following screenshot. You can search for the appropriate user to reassign the task to.
You can manage a task by clicking on the Manage Task button. Once you click on the Manage Task button, you will see the Manage Task window, as shown in the following screenshot. You can update the document and the properties based on the access permissions that you have on the document.
To complete the task, click on either the Approve button or the Reject button, as shown in the following screenshot:

Once you have completed a task that was assigned to you, you will notice that the task is removed from the My Tasks To Do window, and is moved to the My Completed Tasks window, as shown in the following screenshot:

As an initiator, you can view the status of a workflow by clicking on the View Status button. You can cancel a task by clicking on the Cancel Workflow button.

For a specific document in your space, you can determine the workflow details by clicking on the document's View Details button.
The document's details page also lists the workflow details, as shown in the following screenshot. If you have sent this document to multiple people for approval, then all of these workflow tasks will be listed here for your reference.

An Advanced Workflow may be initiated via a rule that is defined within the Alfresco Explorer. This allows for the automated initiation of a workflow, rather than relying on a user to manually start it.
The following script may be executed by a rule to initiate the Review and Approve workflow for the content that is acted upon by the rule. This script assigns the workflow to the person who kicked off the rule.
var workflow = actions.create("start-workflow");
workflow.parameters.workflowName = "jbpm$wf:review";
workflow.parameters["bpm:workflowDescription"] = document.name;
workflow.parameters["bpm:assignee"] = person;
workflow.execute(document);