
Content transformation simplifies and accelerates the web publishing process by transforming documents into web content. For example, you can leverage the built-in transformations engine to convert Microsoft Word documents into the HTML and PDF formats. Similarly, you can resize and transform images as required. The underlying technology supports a cross-platform environment, including Windows, Linux, and Solaris. You can benefit from the increased consistency across multiple channels including print, Web, wireless, and other content-centric applications.
Consider the following scenario, as a staff member of the Marketing Department. You want to keep the source document in Microsoft Word format for editing, but you would like to create a PDF version of the document for publishing on the web site. Also, you would like to ensure that whenever you update the source document (in Microsoft Word format), the target document also gets updated (a PDF is generated).
This section uses the space that you have already created as a part of your intranet sample application in Chapter 5. As a part of the sample application, you will manage content in the Intranet > Marketing Communications space. Because you secured this space earlier, only the administrator (admin
), and users belonging to the Marketing group (Peter
Marketing and Harish
Marketing), can add content to this space. You can log in as Peter
Marketing, in order to manage content in this space.
The following are the steps for you to transform and copy a Microsoft Word document from the Approved space to a PDF document in the Final space.
- Go to the Company Home > Intranet > Marketing Communications > Switch to open source ECM > 04_Approved space.
- Click on More Actions > Manage Content Rules.
- Click on the Create Rule link, and you will see the Create Rules Wizard.
- In the Step One window, from the Select Condition drop-down list, select Items with the specified mime type, and then click on the Set Values and Add button.
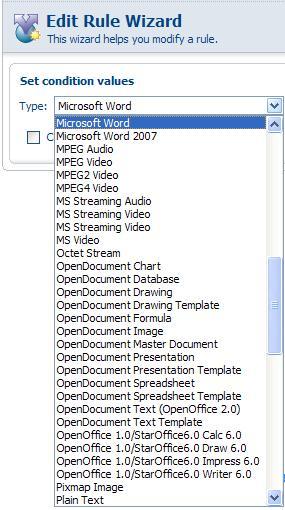
- From the Set condition values window (shown in the following screenshot), choose Microsoft Word as the required source format, and then click on OK. Then click on the Next button.
- In the Step Two window, from the Select Actions drop-down list, select Transform and copy content to a specific space, and click on the Set Values and Add button.
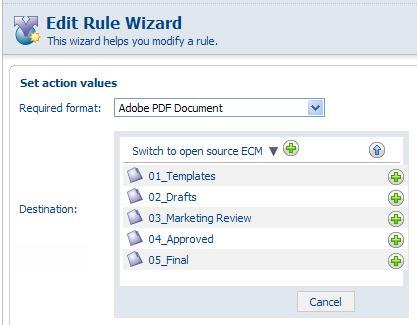
- From the Set action values window (shown in the following screenshot), choose Adobe PDF Document as the required format, and choose the 05_Final space as the destination space in which to copy the transformed PDF document.
- In the Step Three window, select Inbound Type, and provide an appropriate Title and Description for this rule. You can also select Update Type, if you would like to create the destination PDF document whenever you update the source Word document.
- Select the Run rule in background checkbox.
- Finish the Rule.
Now, transformation is enabled automatically for all of the Microsoft Word documents in this space. Whenever a Word document is uploaded or moved to the 04_Approved space, a PDF version of the document will be created in the 05_Final space.
Test this business rule by adding a Word document to this space and testing the PDF document in the 05_Final space.
Consider a scenario where you would like to keep the source of an image in PNG format and publish a fixed size (say 200 x 200 pixels), JPEG version of the image on the web site.
PNG is an extensible file format for the lossless, portable, well-compressed storage of raster images. Indexed-color, grayscale, and true color images are all supported, plus an optional alpha channel for transparency.
Joint Photographic Experts Group (JPEG) is a compression method standardized by ISO, and JPEG images are widely used on the Web. The amount of compression can be adjusted to achieve the desired trade-off between file size and visual quality. Progressive JPEG is a means of reordering the information so that, after only a small part has been downloaded, a hazy view of the entire image is presented rather than a crisp view of just a small part. This is a part of the original JPEG specification, but was not implemented in Web browsers until rather later on (around the year 1996). It is now fairly widely supported.
The following are the steps for transforming and resizing an image from PNG format to JPEG format.
- Go to the Company Home > Intranet > Marketing Communications > Switch to open source ECM > 04_Approved space.
- Click on More Actions > Manage Content Rules.
- Click on the Create Rule link, and you will see the Create Rules Wizard.
- In the Step One window, from the Select Condition drop-down list, select Items with the specified mime type, and then click on the Set Values and Add button.
- From the Set condition values window, choose PNG Image as the required source format, and then click OK. Then click on the Next button.
- In the Step Two window, from the Select Actions drop-down list, select Transform and copy image to a specific space, and click on the Set Values and Add button.
- From the Set action values window (shown in the following screenshot), choose JPEG Image as the required format. In the Options box, provide the resize options as -resize 200x200. Choose the 05_Final space as the destination space to which to copy the transformed image.

- In the Step Three window, select the Inbound Type, and provide an appropriate Title and Description for this rule.
- Select the Run rule in background checkbox.
- Finish the Rule.
Test this business rule by adding a PNG image to the 04_Approved space and testing the resized JPEG image in the 05_Final space.
OpenDocument Format (ODF) is an Open XML-based file format that is suitable for office applications. ODF is an open format for saving and exchanging office documents such as memos, reports, books, spreadsheets, databases, charts, and presentations.
The goal of ODF is to deliver an application-independent format that is vendor-neutral. This helps you to view, use, and update documents in the future when you no longer have software that you bought many years ago when you created the original documents. You will have the advantage of your content being shared across governments, and citizens, or multiple departments and organizations.
Alfresco's Virtual File System offers a simple shared drive interface to any office application. Microsoft Office and Open Office users alike can save or drag content into intelligent Drop Zones, where rules and actions transparently convert the incoming content into the ODF vendor-neutral format.
The ability to share documents across organizations without being tied to the technology, strategy, and pricing decisions of a single supplier is critical for businesses and government agencies today. The ability to access content without having a format and technology imposed on all of the users is equally important. Alfresco's ODF Virtual File System addresses these key issues.
The example in this section uses the Intranet > Marketing Communications space to create and test the ODF Virtual File System. The following are the steps for converting a Microsoft Word document to an ODF office document.
- Go to the Company Home > Intranet > Marketing Communications space.
- Create a space called Marketing Documents, and create two sub-spaces under that space called Inbox and ODF Virtual File System.
- Go to the Company Home > Intranet > Marketing Communications > Marketing Documents > Inbox space.
- Click on More Actions > Manage Content Rules.
- Click on the Create Rule link and you will see the Create Rules Wizard.
- In the Step One window, from the Select Condition drop-down list, select Items with the specified mime type and click on the Set Values and Add button.
- From the Set condition values window, choose Microsoft Word as the required source format and click OK. Then, click on the Next button.
- In the Step Two window, from the Select Actions drop-down list, select Transform and copy content to a specific space and click on the Set Values and Add button.
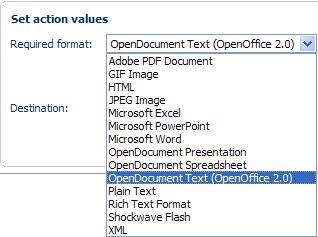
- From the Set action values window (shown in the following figure), choose OpenDocument Text (OpenOffice 2.0) as the required format and choose the ODF Virtual File System space as the destination space to copy the converted document.
- In the Step Three window, select Inbound Type, and then provide an appropriate Title and Description for this rule.
- Select the Run rule in background checkbox
- Finish the Rule.
Whenever a Microsoft Word document is uploaded or moved to the Inbox space, an ODF version of the document will be created in the ODF Virtual File System space.
Add a second business rule to the Inbox space that converts incoming Microsoft Excel documents to an OpenDocument Spreadsheet format, and copies it to the ODF Virtual File System space.
Add a third business rule to the Inbox space that converts the incoming Microsoft PowerPoint documents to an OpenDocument Presentation format, and copies it to the ODF Virtual File System space.
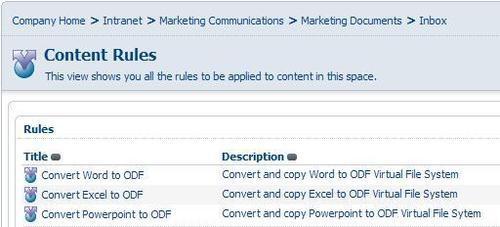
The business rules for the Inbox space, should be as shown in the following image.
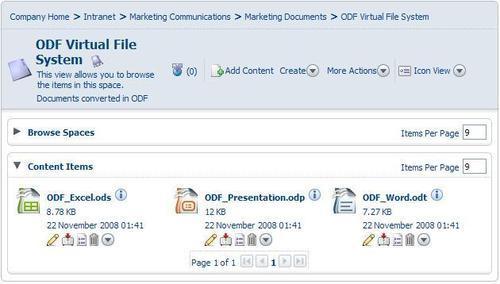
Test the business rules by copying Microsoft Word, Microsoft Excel and Microsoft PowerPoint files into the Inbox space. You should see the converted documents in the ODF Virtual File System space, as shown in the following screenshot:
You can apply the built-in content transformations in a variety of ways. For example, your marketing department might want to keep source presentations in Microsoft PowerPoint format, and publish a Flash versions of the presentation on the web site.
Try out the following transformations:
- Microsoft PowerPoint to Flash
- HTML to PDF
- HTML to JPEG image
- PDF to Text Document
Try out the various document and image transformations that are available out of the box.