
This section contains various production examples that are currently available. Hence, before developing integration with Alfresco, you can check these examples to evaluate if you can reuse any of them for your application.
Liferay is the world's leading open source enterprise portal. Corporations use it to provide a unified web interface to data and tools scattered across many sources. Within Liferay portal, a portal interface is composed of a number of portlets—self-contained, interactive elements written to a particular standard. For more information, refer to the Liferay web site at http://www.liferay.com.
Liferay provides Alfresco Portlets, which can be connected to your existing Alfresco repository. The Liferay framework supports web services, and thus offers various integration options.
Alfresco protocols have changed since version 3. To use Alfresco with Liferay, there are different options. Some of these are explained below.
Alfresco has de-coupled the Web Script Container from the core Alfresco application, so that it can be deployed independently as a portlet in Liferay or on other portals. The advantage of this approach is that any existing remote-enabled Web Script can easily be adapted to run as a portlet.
Recently, Alfresco, IBM, Microsoft, Documentum, and others announced the submission of a new content management standard proposal called CMIS (Content Management Interoperability Service). Alfresco has released an initial implementation of this proposed standard, which includes support for REST-like RPC and SOAP-based web services. This provides the Liferay community with a cross-platform mechanism for integrating not just with Alfresco, but with any other Content Management System that supports the specification.
In addition to the proposed CMIS standard, Alfresco has exposed a myriad of REST-like APIs for services such as workflow, tagging, thumbnailing, user management, and more. These services are documented on the Alfresco 3.0 REST API wiki page.
Create a portlet in Liferay and call the code given below from the controller of the portlet.
String _urlString=ResourceBundle.getBundle(REST_BUNDLE).getString(URL);

System.out.println("This is the url correct: " + _urlString);
String _content = null;

Request _request = new Request(Method.GET, _urlString);
_request.setChallengeResponse(new ChallengeResponse(ChallengeScheme.HTTP_BASIC, ResourceBundle.getBundle(REST_BUNDLE).getString(USER_NAME), ResourceBundle.getBundle(REST_BUNDLE).getString(PASSWORD)));

Response _response = new Client(Protocol.HTTP).handle(_request);
          if(_request.getChallengeResponse() != null)
          System.out.println("request.getChallengeResponse().getCredentials()  "+_request.getChallengeResponse().getCredentials());

          if (_response.getStatus().isSuccess())
          {
             if(_response!=null)
              _content=_response.getEntity().getText();
          	else
              System.out.println("CONTENT :" + _content);
}Liferay is a portal server in which we can include our portlet, in order to call the Alfresco Web Script.

You will find your Web Script's screen on the portlet page, as shown in the immediately preceding screenshot.
You can write your own API for communicating with Alfresco using Liferay.
This method consists of creating an API that communicates with Alfresco. This API is independent from Liferay. You can use it in a portlet, a servlet, or a normal Java application. This API allows you to search, delete, and send documents to Alfresco, and so on, through Web Services.
For example, you can search in a space (filtering by one property) and you obtain a list of all of the documents found. You can then work with that list as you wish in your Liferay portlet. The advantage is that it allows you to have Liferay and Alfresco on different machines.
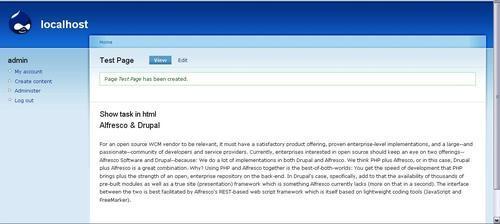
Drupal is a very powerful open source web content management framework. It is developed using the PHP language. More information about Drupal can be found at http://www.drupal.org.
A combination of Drupal and Alfresco is a good choice in scenarios where there is a significant amount of file-based content that requires services such as workflow, versioning, security, check-in/check-out, but needs to be shared in the context of a community. Alfresco acts as a back-end content repository, and Drupal acts as a front-end presentation layer. Here, Drupal really becomes equivalent, in terms of where it sits in the architecture and the role it plays, to traditional portals such as Liferay or JBoss Portal.
It is difficult for other systems to access content in Drupal when it is running on a separate machine, as compared to when it sits in Alfresco. There are Drupal modules that make it easier to syndicate, but Alfresco is designed to expose content in this way. Once it is in Alfresco, content can be routed through Alfresco workflows, and then be approved so that it is available to one or more front-end Drupal sites. Content could come from a Drupal site, be persisted to Alfresco, routed around for editorial review, and then made available.
Not all Drupal modules need to persist their data back to Alfresco. Things such as comments and ratings will probably never need to be treated as real content. Instead of trying to persist everything, you could either modify selected modules to integrate with Alfresco, or create new ones that work with Alfresco. For example, you might want to have Drupal put file uploads in Alfresco instead of the local file system. Or, it might make sense to have a "send to Alfresco" button that would send the current node to Alfresco that is visible to certain roles.
You may also want to get some Drupal data from within Alfresco, or may want to tag objects using the same set of tags that Drupal knows about, or may want to perform a mass import of Drupal objects into the Alfresco repository. All of this is possible by integrating Alfresco and Drupal.
The following code snippet can be used to access your Alfresco library through Drupal.
Helloworld is a simple Web Script created in Alfresco to test the Drupal alfresco integration. The code for this is as follows:
function data_from_webscript_block1() {
  $output = '';
  $url = 'http://<server_name>:<port>/alfresco/service/
   /facebook/helloworld';
  $http_result = drupal_http_request($url);
  if ($http_result->code == 200) {
    $doc = $http_result->data;
    $output .= $doc;
  }
  else {
    $msg = 'No content from %url.';
    $vars = array('%url' => $url);
    watchdog('data_from_webscript', $msg, $vars, WATCHDOG_WARNING);
    return t("The webscript is not accessible.");
  }
  return $output;
}
Joomla! is a very popular open source-based dynamic portal and web Content Management System. For more information, visit the Joomla! web site at http://www.joomla.org.
Joomla! tools and Alfresco can be integrated based on the CMIS standard that allows Alfresco repositories to act as backend for Joomla! web sites. Because the integration was developed using CMIS and not a proprietary API, it can be used to access content stored in either an Alfresco repository or any other CMIS-compliant repository.
The Joomla! module for Alfresco was built using the draft CMIS REST API, to allow organizations running Joomla-based web sites to access Alfresco's robust open source content management repository. This integration is a perfect example of how cooperation between open source projects can yield innovative solutions more rapidly as compared to a proprietary model.
This integration, built using the CMIS REST API, will enable millions of Joomla! web sites to access the powerful backend content repository services of Alfresco, ensuring security, compliance, and auditability. Users will be able to effectively manage, preview, and track increasing volumes of content and digital assets on collaborative Joomla! web sites using Alfresco's content library. Similarly, Alfresco users will be able to search, publish, share, download, and edit content directly on Joomla! sites.
The Joomla! module for Alfresco perfectly illustrates the promise of CMIS with this integration. Joomla! users can now leverage Alfresco's scalable document repository to manage content on Joomla! sites in a secure, compliant, and audited environment. The Joomla! module for Alfresco can be downloaded from http://www.alfresco.com/products/platform/try/.
Providing a Flex-based client to access an Alfresco content repository can improve user experience by delivering an easily customizable and highly-interactive interface, seamless integration in the user desktop, and cross-platform integration.
There can be two approaches to this. The first approach uses custom Java services and the second one uses Alfresco Web Scripts (REST).

LiveCycle DATA SERVICES is Adobe server-side component that allows communication between the Flex client and a Java application. There are several options to create an Alfresco client:
- Protocols : FTP, WebDAV, CIFS
- APIs: Web Services, Web Scripts
- A custom solution that uses the Alfresco Foundation API directly
The next steps could be to create an AIR application to leverage the following:
- Integration with user's desktop
- Drag-and-drop documents (inbound/outbound)
- Access file system
- Embedded SQL DB to provide offline functions
For more details on Alfresco and Flex integration, refer Chapter 11.
Alfresco can be configured as a Mail Server or a Mail Client Application using a third party product. This makes for effective email management for users, who will benefit from the convenience and speed. Users can simply drag-and-drop emails directly into the Alfresco repository for automatic filing. Familiarity with the tools makes the interaction easy. Users can find and view documents and emails from the email client or file system view. The document search is regardless of the document format. A user can configure rules, based on which they can store and share outgoing emails.
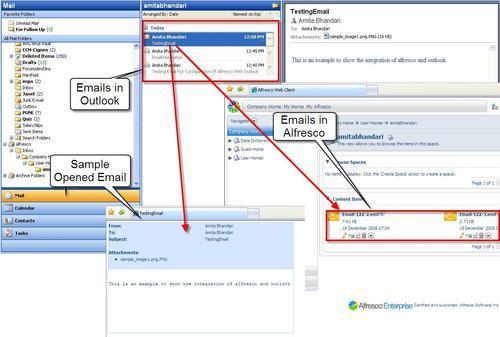
This can allow the organization to create a secure and auditable, central store of information and correspondence, which can easily demonstrate compliance with regulatory requirements and respond to requests for information. Information can be made available to everyone and duplication of data avoided. Enhanced productivity, along with facilitated and improved knowledge sharing and collaboration, are all byproducts. Even if a staff member leaves, key information is readily available within the organization. A cross-team or cross-project view of all communications, internally, along with customers or other external parties, is readily available.
We built a simple Alfresco navigator for iPhone. In fact, it is an iPhone-friendly web client. This navigator is backed by three Web Scripts—for DM space/doc navigation, for WCM navigation, and the third one for searching—and leverages the open source iUI package to provide the look and feel. The performance of the navigator is quite good on an iPhone. The script shows different branches of a single DOM tree based on where you are. When you navigate down to a new space or web project directory, it will add new nodes to the tree. The capabilities of the navigator include:
- Navigation of spaces, docs, and web projects
- Preview of images, PDF's web sites
- Search and display posts and topics attached to the docs

To install the package on your Alfresco, simply follow the steps described below:
- Unzip
iui.ziptotomcat/webapps/alfresco/scripts. - Import
iphone-navigator.zipto Company Home | Data Dictionary | Web Scripts | Web Scripts Extensions. - Open the URL
http://<server_name>:<port>/alfresco/service/indexin your browser, and click on the Refresh Web Script button on the screen. - Browse to the web script package | org | alfresco | demo | iphone and click on it to open Navigation (iPhone) web script.
- Next, click and open the URL
http://<server_name>:<port>/alfresco/service/iphone/navigation?p={path?}

With this new release of Alfresco 3.0, you can now have access your content repository, and Alfresco as a Gadget, on the iGoogle webpage. This allows you to manage, create, and edit the content stored in the repository from your iGoogle homepage. Also, you can integrate internal and external content and services. The Gadgets are basically interactive mini-applications, which you can place on your iGoogle homepage, and use them to search and manage your personalized information.
Alfresco provides three easy-to-use Google Gadgets by default. These are:
- Alfresco space browser: Create and browse spaces. Create, update, and view documents.
- Alfresco my tasks: Workflow tasks management.
- Alfresco search: Searching of documents in the repository.
Besides of these out of the box, provided by Alfresco Gadgets, you can also create your own Web Scripts and can use them as Gadgets in the iGoogle.
Alfresco Google Gadgets are completely powered by Web Scripts.
- If you have already installed ZIP file for Google Gadgets, move to the next step. Otherwise, download the
aggadget.zipfile from the Packt Publisher's official web site inside themoduledirectory. - Log in to Alfresco with admin as username and password.
- Browse to Company Home | Data Dictionary | Web Scripts Extensions.
- Click on More Actions | Import. Upload the
aggadget.zipfile (which contains he required files for Web Scripts), to import those Web Scripts. - Now, the space named
aggadgetwill be created containing all the related Web Script files provided by Alfresco. - The next step is to register these Web Scripts with the Alfresco server to activate it. To register, browse to
http://<server_name>:<port_number>/alfresco/service/indexand click on the Refresh list of Web Scripts button to register these new Web Scripts. You will be able to see a message telling with how many web scripts were found and registered recently. - Now, these Web Scripts are ready to be used in your iGoogle webpage.
- Some of the sample URLs are given below to create folder , search any text, or to see the task list:
http://localhost:8080/alfresco/wcservice/aggadget/search?dummy=1http://localhost:8080/alfresco/wcservice/aggadget/folder/?dummy=1http://localhost:8080/alfresco/wcservice/aggadget/tasks?dummy=1
The following screenshot will give you a brief idea of what we have just seen:

The following steps will guide you when using iGoogle Gadgets.
- You can use Gadgets Editor to add your own Gadget. Click on File, select Upload option. You will see the following screen:

- Browse to the XML file for the module that you want to have as a Google Gadget, and upload it. You will be able to see the file in the Google Gadget Editor, as shown in the following screenshot. Here, we have used
Alfresco_Search.xmlfor search the module.
- You can edit the file if you want. Here, you just need to modify the
href. Make it pointing to your alfresco server, which is already running. - To preview this gadget, click on the Preview tab. You can enter any keyword you want to search from Alfresco's repository, and you will be able to see the results with pagination support, as shown in the next figure:

FFMPEG is a popular video and audio transcoder having a high degree of performance. It is widely used in various commercial tools, to convert audio and video files from one format to another. It is basically a command line interface. We can easily integrate any such command-line application with Alfresco.
Let's take an example of one television company named STV. We assume they have Asset Repository System (ARS), which is a centralized repository for all of the media content and serves the media packages to the customers of STV, who are spread all over the world. The company always uploads the video in Quick time (.mov) format. However, CMS system requires the video to be transformed to 3G (for cell phones), MPEG4 (for iPod), and Flash (the default format for the web site).
You need to download FFMPEG binary version for Windows and put into <alfresco_install>/bin directory. The command used for transformation is:
ffmpeg.exe -i [input_file.extension] [options] [output_file.extension]
Following are the various options for video transcoding:
-b bitrate:Set the video bitrate in bit/s (default = 200 kb/s).
=> 512k
-r fps:Set frame rate (Hz value, fraction or abbreviation), (default = 25).
=> 15.02
-s size:Set frame size. The format is `wxh' (ffserver default = 160x128, ffmpeg default = same as source).
=> 320x240
-aspect aspect:Set aspect ratio (4:3, 16:9 or 1.3333, 1.7777).
=> 4:3
Following are the various options for audio transcoding:
-ar freq:Set the audio sampling frequency (default = 44100 Hz).
=> 44100
-ab bitrate:Set the audio bitrate in bit/s (default = 64k).
=> 64k
-ac channels:Set the number of audio channels (default = 1 Mono; 2 = stereo).
=> 2
In this section, we will see how we can use a FFMPEG transformations as a custom action in the Alfresco. We can then trigger some business rule on the spaces, which will execute this custom action to perform a transformation of all video files. Follow the steps mentioned next to execute this transformation:
- The very first step is to configure the extra mime types, which we want to use. Here, we are using 3GP, MP2, MP4, avi, mov, and so on. All others, except 3GP, are already supported by Alfresco and defined in the
mimetype-map.xmlfile in Alfresco. So, we need to add 3GP as a mime type, supported by Alfresco, in themimetype-mapfile.<config evaluator="string-compare" condition="Mimetype Map"> <mimetypes> <mimetype mimetype="video/3gp" display="Mobile video"> <extension>3gp</extension> </mimetype> </mimetypes> </config>
- As FFMPEG is a command line interface, we can use Alfresco's
org.alfresco.util.exec.RuntimeExecclass to execute this command. To accomplish this, we need to configure it as a bean that will be referred to by our custom action executer. We can make these beans entries in thecustom-service-context.xml file.<bean id="transformer.ffmpegVideo" class="org.stv.repo.content.transform.VideoContentTransformer " parent="baseContentTransformer" init-method=»init»> <property name=»executer»> <bean name=»transformer.ffmpegVideo.Command» class=»org.alfresco.util.exec.RuntimeExec»> <property name=»commandMap»> <map> <entry key=»Windows.*»> <value>ffmpeg -i «${source}» ${options} «${target}» </value> </entry> </map> </property> <property name=»defaultProperties»> <props> <prop key=»options»></prop> </props> </property> </bean> </property> </bean> <bean id=»transform-video» class=»org.stv.repo.action.executer.VideoTransformActionExecuter» parent=»transform»> <property name=»videoContentTransformer»> <ref bean=»transformer.ffmpegVideo» /> </property> </bean> - Once this is done, you have to create the custom action executer classes and perform the configurations for this. You can also refer to the wiki for more information on these. The wiki is available at: http://wiki.alfresco.com/wiki/Custom_Actions and http://wiki/alfresco.com/wiki/Wizard_Framework.
- After finishing creation and configuration of Action Executer, you are ready with the example code. Start the Alfresco server and we will see how you can configure the rule for transformation.
- We will create a folder structure of Company Home | STV | Videos. Inside the video space, create spaces for each of the different types of format (for video) that you want to support, that is, MPEG4, 3GP, and so on.
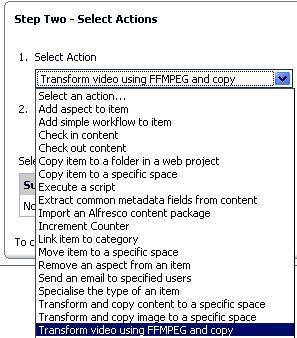
- Browse to Company Home | STV | Videos and click on More Actions | Manage Content Rules. In the next screen, click on Create Rule link. In the Create Rule Wizard, you can see the action created by us. Select the action as Transform Video using FFMPEG and copy as shown in the following figure:
- In the next step, you need to select the correct value for the Required format, which is the target format for transformation. Because we have configured 3GP, MP4, and AVI in the configuration file, we will have each of these three options that are available to us for transforming the video. After this, provide the correct, optional for a particular video transformation selection, based on the source and target type of the video file. You also need to provide the destination space, in order to copy the transformed video. Here, we have created the MP4 space inside the Videos folder. Therefore, provide the Videos folder as the destination folder.

- Now, whenever you upload any video in Videos space, it will be transformed in MP4 video format, and copied to MP4 space inside Videos space as shown in the following screenshot:

- You can create as many rules as you create transformations that you want to perform for different video types.
ViewOnePro is the world's first java applet image viewer to be extendable with additional modules without user installation, and that offers support for additional file formats (PDF Module, Universal Viewing Module), and for additional viewer functionality (Annotations Module, Permanent Redaction Server Module, Document Streaming Server Module, and the Print Accelerator Module). ViewOnePro is a powerful in-browser viewer with the ability to extend an applet's capabilities. This represents a major breakthrough for web-based document management users.
To protect the integrity of your records for compliance, ViewOnePro provides viewing (and crucially not editing) access to the wide range of documents stored in your repository. To integrate ViewOnePro with Alfresco, follow the steps given below:
- Download ViewOnePro pro from http://www.daeja.com.
- Extract the downloaded zip file and copy the v1files folder to
<<alfresco_server>>/tomcat/webapps/alfrescofolder. This folder contains required JAR files and applet classes. - Next, create your own presentation template, specifying the applet tag for the applet ViewONE, provided by viewOnePro package.
- You need to set some parameters in this template file, for look and feel of the applet, and also for the available options for the applet such as viewmode, pageButtons, fileMenus, and so on.
- Template file will have extension as
.ftl, similar to other FreeMarker template used by Alfresco. Following is the samplev1preview.ftlfile:<html> <body onLoad="setTimeout('delayer()', 500)"> <APPLET CODEBASE="/alfresco/v1files" ARCHIVE="ji.jar, daeja1.jar, daeja2.jar, daeja3.jar" CODE="ji.applet.jiApplet.class" NAME="ViewONE" WIDTH="980" HEIGHT="980" HSPACE="0" VSPACE="0" MAYSCRIPT="true" ALIGN="middle"> <PARAM NAME="cabbase" VALUE="viewone.cab"> <PARAM NAME="ACMPreloadFile" value="ji"> <PARAM NAME="fileMenus" value="false"> <PARAM NAME="pageButtons" value="true"> <PARAM NAME="draggingEnabled" value="true"> <param name="viewmode" value="thumbsleft"> <PARAM NAME="ACMRedirectTarget" value="_self"> <PARAM NAME="ACMDownloadPrompt" value="true"> <PARAM NAME="ACMUpdate" value="false"> <PARAM NAME="JavaScriptExtensions" VALUE="true"> <#assign counter = 1> <#list space.children as child> <#if child.isDocument > <#if child.mimetype = "image/gif" || child.mimetype="image/jpeg" || child.mimetype="application/pdf" || child.mimetype="image/tiff"> <param name="page${counter?string}" value="/alfresco${child.url}"> <#assign counter = counter + 1 > </#if> </#if> </#list> </APPLET> <script> function delayer() { ViewONE.setFileButtons(false); ViewONE.setAreaZoom (true); } </script> </body> </html> - Upload this template file to the Presentation Templates folder, under Company Home | Data Dictionary.
- To see the ViewOnePro functionality, you can apply this template as a custom view on any space.
- To accomplish this, click on the More Actions button for any space. You will have option to Preview in Template, as shown below:

- In the next screen, you will be asked to choose a template from the list of available presentation templates. Select your FTL presentation template file. In our case, this will be
v1preview.ftl.
- To accomplish this, click on the More Actions button for any space. You will have option to Preview in Template, as shown below:
- Now, you will be able to preview that space with ViewOnePro functionality. In our example, we are using ViewOnePro for previewing images. Therefore, we will preview
Imagesfolder as shown in the following screenshot:

Facebook is the most popular social network, where people share content, and connect with their friends, family, and businesses.
This integration will enable users of the Alfresco Enterprise Content Network to use Facebook to publish content. It is Alfresco's aim to make publishing and sharing enterprise content as simple and as familiar as possible.
A large enough segment of any workforce is active on one web-based social network or the other—if not Facebook, then MySpace, or LinkedIn, or one of the myriad boutique networks out there—to compel corporations to take them seriously as communication platforms.
Through the Facebook integration, Alfresco users can upload and share enterprise content with customers, fellow employees, and partners, in a secure and audited way. Platform functionality includes application registration, Facebook authorization and single sign-on, FBML support, and Facebook model support. The tools that are available to employees using the platform will be familiar if they are or have ever been users of Facebook. In a secure environment, the employees can upload documents. They can view My Documents, All Documents, or Recently Added Documents, along with documents owned or uploaded by colleagues and friends, through the Facebook newsfeed.
Now, social networks web sites such as Facebook can easily be built up with Alfresco's REST-based web services. This results into emerging the enterprise content management capabilities with the social graph of facebook integration. In this case study, we will see how we can develop Alfresco Facebook application with the help of Web Scripts. We will extend Web Scripts to support Facebook capabilities. As we are suing Web Script Framework, we don't use any core development with Java, but will just use the scripting language.
The following are the steps for creating a new Facebook application:
- Acquire the Alfresco Facebook package:
Download the
doclibfolder that contains the required files from the Packt web site. Create the folders if they don't already exist, and copy the files from the following path:tomcatwebappsalfrescoWEB-INFclassesalfresco emplateswebscriptsorgalfrescofacebookdoclib - Set up the Facebook application
Go to http://developers.facebook.com/, and then click on the Start Now, button as shown below:
- Next, you need to set up the application. You will see the Go to the Facebook Developer App, as shown in the figure below. Click on the link.

- Now, log in to your Facebook account, as prompted.
- Click on the link, as shown in the next figure:

- Next, you will see the various settings that you need to configure for your application.

- Enter the appropriate data and save. Provide proper application name that you can easily identify. Here, the Developer Contact Email and User Support Email is automatically filled up by Facebook (which is user who currently logged in Facebook). Callback URL is required for forwarding requests to Alfresco from Facebook. Provide unique Canvas URL. Provide Post-Add URL, which is mostly same as the Canvas URL. Once you complete all the necessary fields and submit, you will get screen like following:

Note
Here, the generated API key, Secret key, and Application ID are randomly generated each time, so these will not be the same as those shown in the above screenshot.
In addition, /facebook/alfrescobook/ should match with the URL provided for Alfresco. Therefore, the syntax would be http://<HOST>:<PORT>/alfresco/<WEBSCRIPT URL>
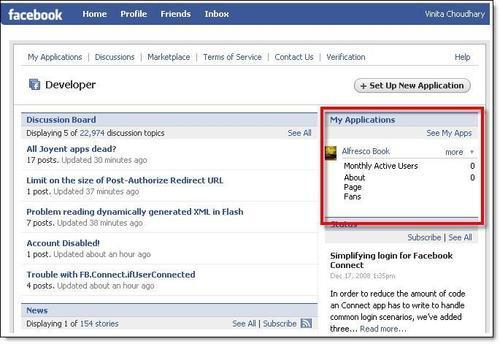
Once you have set up your application and submitted it, you can see your own application, as shown in the screenshot below
It is important to note that we need to pay more attention to the following property—Application Name, Callback URL, Canvas URL, and Post Add URL. Select the option Yes for the field Add application to Facebook, and select the Developer Mode checkbox.
Once you run a new instance of Alfresco 3.0, create the appropriate folder structure as described below:
- Create a folder named
Facebook<applicationID>inside Company Home. - Go to following path. If the folders don't exist, create them.
Data Dictionary > Web Scripts > com > Facebook > _apps
- Create the
app.<API_KEY>.jsfile inside_appsfolder. Please note that the API key is different in each case. - Now go to
Data Dictionary > Web Scripts > org > alfresco > Facebook > doclib. You may need to create the spaces in case they do not exist - Now, through CIFS, copy the modified
doclib.rarfiles to thedoclibfolder. Once you have copied all the files, the folders should appear as shown in the following screenshot: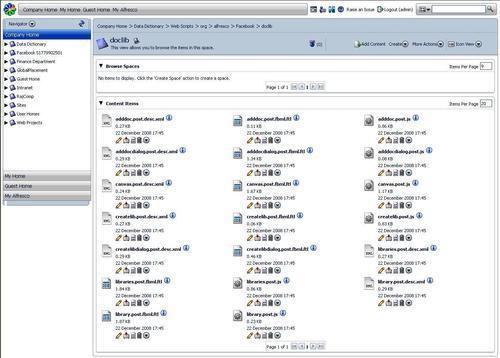
- Once you all are set up, register your new Web Scripts to Alfresco. If you get the following error: Error! Hyperlink reference not valid, then click on Refresh Web scripts.
- Now we are ready to run our application. Open new browser window and point URL to your given Canvas URL. In our case: http://apps.facebook.com/alfrescobook/ (which is our Canvas URL).