
Alfresco Explorer provides a web-based user interface for searching and locating content. When you log in (to http://<servername>:<port>/alfresco), you will notice a search box in the upper-right corner.
Performing a search in Alfresco is easy. Simply type one or more search terms (the words that best describe the information that you want to find) into the search box, and press the Enter key or click on the search icon ![]() as shown in the following screenshot:
as shown in the following screenshot:
You can use Google-style query syntax to search the content stored in the Alfresco repository. The following table provides several examples of search syntax with description, along with an explanation of them:
|
Search String |
Description |
|---|---|
|
Customer |
Returns all of the documents that contain the text 'Customer' (as file name or file content) |
|
- Customer |
Returns all of the documents that do not contain the text 'Customer' |
|
Customer Alfresco |
Returns all of the documents that contain the text 'Customer' or 'Alfresco'. This is equivalent to Customer +Alfresco |
|
Customer + Alfresco |
Returns all of the documents that contain the text 'Customer' or 'Alfresco' |
|
Customer - Alfresco |
Returns all of the documents that contain the text 'Customer' and do not contain the text 'Alfresco' |
|
Returns all of the documents that contain content that includes the text string 'inter', such as International, Interest, and so on. This is also known as a wild card search. |
It is faster to search the content by filenames if you know the filename or some portion of the filename. When you click on the search options icon ![]() , you will see the list of options that are available to you, as shown in the following screenshot:
, you will see the list of options that are available to you, as shown in the following screenshot:
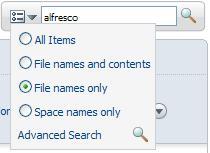
You can select an option by clicking on the option button, as shown in the preceding screenshot. You have the following options:
- All Items: Performs a search of the entire content and all of the properties.
- File names and contents: Performs a search of the entire content and the filename property.
- File names only: Performs a search on only the name property of files.
- Space names only: Performs a search on only the name property of spaces.
You can view the advanced search form by clicking on the Advanced Search link provided in the search drop-down list, as shown in the preceding screenshot. By using the advanced search form (as shown in the next screenshot), you can search content:
- Within a space, and optionally its sub-spaces
- Matching a given category, optionally sub-categories
- Of a specific content type or a mime type
- Matching the built-in properties such as title, description, and author
- Created or modified within certain date ranges
- Matching custom properties
The menu bar of the advanced search form contains a Reset All button, which is useful for clearing all of the options selected in the form. You can save the search options and execute the saved searches as reports. More information about saved searches is provided in subsequent sections of this chapter.

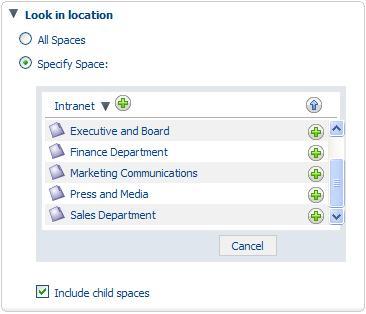
The options provided in the Look in location block of the advanced search form allow you to search for content based on its location. Clicking on the Specify Space radio button will list the spaces available for you to choose, as shown in the upcoming screenshot. From the list of spaces, click on a space name to browse to sub-spaces. You can click on the + icon in order to select a space and optionally choose to search in all of the sub-spaces by selecting the Include child spaces checkbox. You can choose only one space and its sub-spaces to search at a time.
The options that are provided in the Show me results in the categories block of the advanced search form allow you to search content belonging to one or more categories. Clicking on the Select Category link will list the categories, as shown in the upcoming screenshot. From the list of categories, click on a category name to browse through the sub-categories. You can click on the + image to select a category. Optionally, you can choose to search all of the sub‑categories by selecting the Include sub-categories checkbox. Click on the Add to List button to add the category to the list of selections. You can choose as many categories as you want.

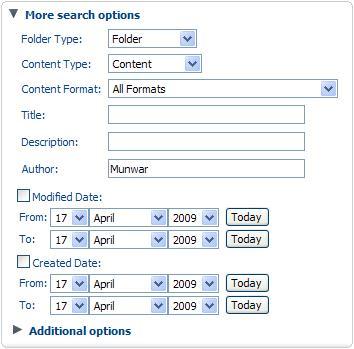
The options provided in the More search options block of the advanced search form allow you to search for content based on the property values of the content objects. You can search for content that belongs to a specific content type by selecting the Content Type drop-down option. You can search for content created by a specific author by providing the full or partial name of the author in the Author text box, as shown in the upcoming screenshot. You can search for the content created within a certain date range by selecting the Created Date checkbox and providing the From and To dates.
If you choose more than one option, then the content that satisfies all of the conditions will be listed in the search result. For example, if you have provided the author's name and a Created Date range, then only content created within that date range and authored by that specific person will be listed. This is equivalent to using logical AND criteria to select the content. The current limitation with the advanced search form is that you cannot use OR criteria. For example, you cannot search for content within a specific date range or which was created by a specific person.
In Chapter 7, you created a custom content type called Press Release and a custom aspect called Customer Details. You can search the content of the press release type. You can also search the content having a specific custom property value.
For the advanced search form to recognize and list the custom content types and custom aspects, you need to customize the web client.
Edit the web-client-config-custom.xml file in the extension (<alfresco_install_folder> omcatsharedclassesalfrescoextension) folder. Add the following XML code to extend the advanced search form:
<config evaluator="string-compare" condition="Advanced Search">
  <advanced-search>
    <content-types>
      <type name="custom:pressrelease" />
    </content-types>
    <custom-properties>
      <meta-data type="custom:pressrelease"
                                          property="custom:PRDate" />
      <meta-data aspect="custom:CustomerDetails"
                                    property="custom:CustomerName" />
       <meta-data aspect="custom:CustomerDetails"
                                     property="custom:NewCustomer" />
    </custom-properties>
  </advanced-search>
</config>This code in the <content-types> block will result in this content type being listed in the advanced search form. The code in the <custom-properties> block will result in the given custom properties being listed in the advanced search form.
After making the changes to the configuration file, restart Alfresco.
After you login to Alfresco Explorer, open the advanced search form and click on the Additional options block. You will notice the custom properties, as highlighted in the next screenshot. Similarly, when you click on the Content Type drop-down list, you will notice the custom content type listed, as shown in the upcoming screenshot.
You can search content by providing various values in the Additional options block. For example, you can list the documents belonging to new customers by selecting the New Customer checkbox, and then pressing the Enter button on your keyboard or clicking on the Search button in the advanced search form.

Sometimes, you will have to repeatedly search for content that satisfies a specific search criteria. Instead of typing or selecting the same options in the advanced search form repeatedly, you can save the search criteria to reuse when needed. This is like a personalized report for you. You can choose to share this report with others by setting the saved search to Public. You can keep certain reports to yourself by not sharing them with others. These reports will be listed as private reports.
For example, let us generate a report to list all of the sales documents authored by Munwar for new customers.
In order to define these search criteria, open the Advanced Search form. Under the Look in location block, select the Company Home | Intranet | Sales Department space and select sub-spaces. Under the More search options block, type Munwar for Author. Under the Additional options block, select the New Customer checkbox.
You can further complicate the search criteria by selecting a date range for Created Date.
Once you are done with your search criteria, click the Search button to display the search results.
The search results page is shown in the following screenshot. You can save the search criteria by clicking on the More Actions | Save New Search option, as shown in the following screenshot:

Clicking on the Save New Search link will open up the Save New Search dialog, as shown in the screenshot below:
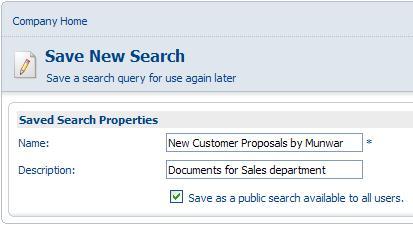
In the Save New Search dialog, enter a meaningful Name and, optionally, a Description for your custom report (saved search).
If you select the Save as a public search available to all users option, then this report becomes a public report and is visible to all other users, via the advanced search form. If you have not selected this option, then this report is visible only to you, as a private report.
All saved searches can be found in the Company Home | Data Dictionary | Saved Searches space.
You can reuse the search criteria that are saved earlier by selecting them in the Advanced Search form. In the Advanced Search form, click on the My Saved Search Options link, and then click on Public Searches. The rightmost drop-down box will list all of the available public reports (saved searches).
Selecting a saved search will automatically create the search criteria by selecting the options in the advanced search form. Similarly, you can reuse Your Searches, which are types of private reports for you.
