
The Alfresco Explorer user interface is designed to handle most of the common user interaction scenarios. However, each business application will have some specific user interface requirements. You can configure certain user-interface elements in Alfresco Explorer, such as space icons, menu options, and the custom look and feel of a space. Of course, you can also change the entire look and feel of the application through Java programming.
For each user of the system, you can provide a personalized dashboard view. In this chapter, you will examine various options for customizing the user interface, including custom dashlets (dashboard components). You will experience the power of FreeMarker Template Language in consolidating the content information and presenting it to the end users.
The Alfresco Share delivers out of the box collaborative content management. You can configure certain user interface elements, such as dashlets, page components, and the custom look and feel of the space. For each user of the system you can provide a personalized dashboard view, a customized site dashboard, and customized components. You will find that this is mostly built using CSS, Java Script, FTL, and XML files.
By the end of this chapter, you will have learned how to:
- Configure space portal views
- Add custom icons to spaces
- Extend the action menu items
- Write custom dashlets
- Using webscript as dashlets
- Write custom templates to preview content
- Write webscripts for Share
- Configure Share portlets through webscript
- Integrate share with flex
- Write custom JSPs
- Integration with external system
You can configure the look and feel of the Alfresco Explorer without programming by simply editing the XML configuration file. You can change the way Alfresco Explorer looks and operates, you can change the navigation elements, and you can modify the space views, as per your organizational or departmental requirements.
This section gives you an insight into configuring various views in Alfresco.
Every space can be viewed in four different ways. These are as follows:
- Details View: This displays detailed information about documents , displayed as rows.
- Icon View: This displays the icon, description, and modification time properties of the documents.
- Browse View: This displays information about sub-spaces.
- Custom View: This displays a custom view selected by the user for that space.
For Windows users, this is similar to having various view options for folders in Windows Explorer. The Details view, Icon view, and Browse view are provided out of the box. The Custom View is a customized view of that space, which is selected by the user.
The default view for a space is the Icon View. You can choose a specific view (say, Details View) by selecting it from the drop-down list, as highlighted in the screenshot below. However, the selection is going to be saved only for that session, and the next time you log in to the Alfresco web client, you will see the default view of the space. You can configure the default view for spaces. You can also specify the number of items to be displayed on a page.

You can find the details about the default configuration in the file named,web-client-config.xml, which is located in your configuration folder. To customize the default view, you need to update the web-client-config.xml file in the extensions folder. Go to extensions folder (for Tomcat installation it is in the following folder: <alfresco_install_folder> omcatsharedclassesalfrescoextension). Here, you will have to edit the web-client-config-custom.xml file, and add the following block of XML code. If you want to display the details of all of the documents in your space (as shown in the screenshot on the previous page), then you can set View Details to default. If you want to see more documents on a page, then you can increase the number of documents displayed per page from 10 to 25.
<config evaluator="string-compare" condition="Views">
       <!-- the views available in the client -->
  <views>
       <!-- default values for the views available in the client -->
    <view-defaults>
      <browse>
       <!-- allowable values: list|details|icons -->
        <view>details</view>
        <page-size>
        <list>10</list>
        <details>25</details>
        <icons>9</icons>
        </page-size>
       </browse>
    </view-defaults>
  </views>
</config>A Custom View is a portal window that shows up on the top of each space when a Custom View option is selected. This is useful for representing the content in a space in a specific manner, such as showing recent documents and a summary of the documents. For example, you can apply a custom view on the Finance Department | Checks space to display a list of checks received in the past week.
This enables you to have an alternate view of spaces through templates. Other such examples include:
- Show a space and its sub-spaces (collapse the tree).
- Traverse the entire repository, displaying content whose date is effective.
- Show the file names of all of the images, along with their thumbnails, and create HTML links to the actual images.
- Display summaries of the information within a space, such as the total number of documents, the number of documents under review, the number of documents belonging to a category, and the number of documents published or approved.
Let us say you would like to see all of the documents in your home space that have been either created or modified in the past one week. Carry out the following steps to apply a custom view to do this your home space.
- Go to the space to which you would like to apply the Custom View. For example, go to your home space by clicking on the My Home menu link in the tool bar.
- Using the More Actions | View details menu option, go to the details page.
- Click on the Add Custom View icon, as shown in the following screenshot, to select a custom view. The Remove Custom View icon (also shown in the following screenshot) is useful for removing an existing custom view from a space.
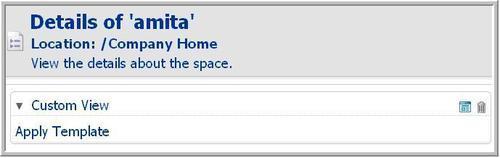
- Clicking on the Add Custom View icon will open an Apply Template window, as shown in the screenshot below. You can select a template to be applied to the space as a Custom View. There are already some built-in templates provided for most generic use cases. You can also apply your own custom templates to this space. The process of adding a custom template is explained later in this chapter.

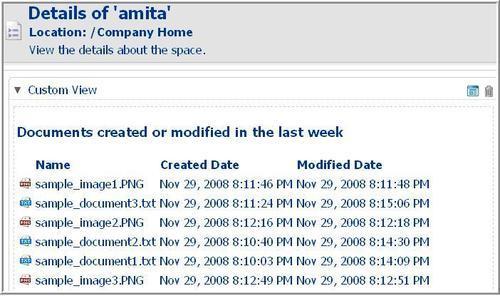
- From the list of presentation templates, select the
recent_docs.ftltemplate, which displays the list of documents in the current space that were either created or updated in the past week. - Once you select the presentation template, click on the OK button and close the View Details page. You will notice that the presentation template you have chosen is applied to the space as a Custom View (refer to the following screenshot).
By default, the topic view in the forums functionality lists the posts in descending order, that is, the most recent post is at the top of the list. If you wish to change this, then add the following XML text to the web-client-config-custom.xml file. You can also define the number of posts listed per page.
<topic>
       <!-- allowable values: details|bubble -->
  <view>bubble</view>
  <sort-column>created</sort-column>
       <!-- allowable values: ascending|descending -->
  <sort-direction>ascending</sort-direction>
  <page-size>
    <bubble>5</bubble>
    <details>20</details>
  </page-size>
</topic>In order
to add another space icon to the list from which we choose from when creating a space, add the following code to the web-client-config-custom.xml file.
  <!-- Example of adding a custom icon to the Create Space dialog -->
<config evaluator="string-compare" condition="cm:folder icons">
  <icons>
    <icon name="space-icon-custom" path="/images/icons/
                                           space-icon-custom1.gif" />
  </icons>
</config>
A similar approach can be used to add icons to the forums space types (fm:forums, fm:forum and fm:topic).
Once you add the custom icon names to the web-client-config-custom.xml file, you need to make sure that the icons with the same filename are copied to the file system icons folder. For an installation of Tomcat, the icons folder is at <install_folder> omcatwebappsalfrescoimagesicons. Also, for uniformity, ensure that all of the icons are sized to 32 x 32 pixels.
As per the example, create a .gif file icon named space-icon-custom1.gif (32 x 32 pixels in size) and copy it to icons folder. Once you reload the web-client-config-custom.xml file, you will notice the new icon when creating a space, as shown in the following screenshot:

You can control certain HTML links that appear in the web client. For example, there is a small help icon in the menu at the top. By clicking on this icon, you can navigate to Alfresco's web site. You can update the lines that follow in the web client configuration file to point the help index to your internal online help guide (if you have any). The URL to the client Help file is <help-url>http://www.alfresco.org/help/webclient</help-url>.
In the Alfresco Explorer user interface, the My Alfresco area is known as the dashboard. The end users can construct their own dashboard page from a list of pre‑configured components known as dashlets. As a developer, you can configure these components, or create new components, and make them available for selection to users when they are configuring their pages. For more details about configuring your personal dashboard, refer to Chapter 3.
There are certain dashlets provided to you out of the box. Because the dashboard is a place where you can see dynamic information, you might consider having custom dashlets to provide you with important information. For example, you might want to see the list of contracts approved in the last seven days. You might also want to see the latest press releases.
Usually, custom dashlets are written in a scripting language such as FreeMarker, and are called from a JSP (Java Server Page). The JSP can be configured in the web client so that the custom dashlet is visible for you to select in the dashboard.
The following steps need to be followed in order to write and configure a custom dashlet:
As an example, write a custom dashlet script, using the FreeMarker template language, to display the latest press releases from the Company Home > Intranet > Press and Media > Press Releases space.
The dashlet script could be plain HTML text, a FreeMarker template, JavaScript, or a JSP page. For this example, let us use a FreeMarker template.
Using the following code, create a file named chapter11_press_releases.ftl in your Alfresco configuration's templates folder. For the installation of Tomcat, the folder is <install_folder> omcatwebappsalfrescoWEB‑INFclassesalfresco templates.
<#------------------------------------------------------------------>
<#-- Name: chapter11_press_releases.ftl                           -->
<#--Displays a table of all the documents from a "Press Releases"-->
<#-- folder under Company Home/Intranet/Press and Media space     -->
<#-- NOTE: Obviously this folder needs to exist and               -->
<#--      the docs in it should have the title and content       -->
<#------------------------------------------------------------------>
<table>
  <#assign l_space = companyhome.childByNamePath["Intranet/Press and
                                            Media/Press Releases"]>
    <#list l_space.children as doc>
      <#if doc.isDocument>
      <tr>
        <td>
          <a class="title"href="/alfresco/${doc.url}">$
                                      {doc.properties.title}</a></td>
        </tr>
      <tr>
        <td style="padding-left:8px">
          <#if (doc.content?length > 500)>
            <small>${doc.content[0..500]}...</small>
          <#else>
            <small>${doc.content}</small>
           </#if>
         </td>
      </tr>
      <tr><td> <HR> </td></tr>
      </#if>
    </#list>
</table>Once the custom dashlet script has been created in the templates folder, the next step is to create a custom dashlet JSP, which uses the custom dashlet script.
Create the chapter11_press_releases.jsp file, containing the following code, and place the file in the dashlets folder. For a Tomcat installation, the folder is <install_folder> omcatwebappsalfrescojspdashboardsdashlets.
Now you need to configure the web client to use the custom dashlet and to make it visible in the dashboard wizard.
Add the following code to the web-client-config-custom.xml file, before the last xml tag, which is </alfresco-config>.
<config evaluator="string-compare" condition="Dashboards">
<!-- Dashboard layouts and available dashlets for the My Alfresco
                                                         Pages -->
  <dashboards>
    <dashlets>
<!-- Add additional dashlet for press releases -->
      <dashlet id="press-releases" label="Press Releases"
                          description="Lists Press Releases with URL"
         jsp="/jsp/dashboards/dashlets/chapter11_press_releases.jsp"
                                               allow-narrow="true" />
    </dashlets>
  </dashboards>
</config>
The following table describes each dashlet element used in the XML configuration.
|
Dashlet element |
Description |
|---|---|
|
|
An identifier string that uniquely identifies the dashlet. |
|
|
The JSP page to be used for the implementation of the dashlet. |
|
|
The label text or label I18N message ID for the dashlet. This label is shown in the list of available components that is presented to the user in the Dashboard Configuration Wizard. |
|
|
The description text or description I18N message ID for the layout. This description text is shown in the list of available components that is presented to the user in the Dashboard Configuration Wizard. |
To make the configuration changes effective, you need to restart Alfresco. The newly-created custom dashlet example requires one or two press releases to be available in the Company Home > Intranet > Press and Media > Press Releases space. In Chapter 7, you created few press releases in the Company Home > Intranet > Press and Media > Press Releases space. Refer to the Create Press Release as HTML Content section in Chapter 7 for further details.
Click on the My Alfresco link provided in the tool bar menu to view the Dashboard. Click on the Configure icon shown in the My Alfresco Dashboard, and the Configure Dashboard Wizard will display the custom dashlet in Step Two. Then, select the Components screen, as shown in the following screenshot:

Select the Press Releases dashlet for Column 2, as shown in the preceding screenshot. Once you finish the configuration, the custom dashlet in your dashboard will look similar to the one shown in following screenshot:

Alfresco provides a webscript feature as an easy way to interface other applications with the repository. In the previous section we saw how to customise a dashlet by using FreeMarker templates. Using the example that is given below, we will use webscript as a dashlet.
The following steps are required to configure a dashlet as webscripts:
- Create a custom dashlet JSP.
- Configure a custom dashlet JSP.
- Configure custom My Spaces dashlet in Alfresco Explorer.
Create a new JSP page named Chapter11-myspaces-webscript.jsp, containing the following code. Place the file in the dashlets folder. For a Tomcat installation, the folder is: <install_folder> omcatwebappsalfrescojspdashboardsdashlets.
<%--Purpose : Dashlet to display the summary information of Home SpaceCreated by: Amita BhandariCreated on: November 27, 2008--%><%@ taglib uri="/WEB-INF/repo.tld" prefix="r" %>http://localhost:8080/alfresco/service/ui/myspaces?f=0<r:webScript scriptUrl="/wcs/ui/myspaces?f=0" />
Here <r:webscript> is a built-in tag. In order to call webscript, put the webscript URL in the scriptUrl attribute of this tag. We have used an out of the box webscript, which is provided by the My Spaces webscript URL in the code above.
Add the following code to the web-client-config-custom.xml file, before the last xml tag, which is </alfresco-config>:
<config evaluator="string-compare" condition="Dashboards">
    <!-- Dashboard layouts and available dashlets for the My Alfresco Pages -->
	  <dashboards>
		<dashlets>
	      <!-- Add additional dashlet for press releases -->
		  <dashlet id="MySpaces" label="MySpaces"
							  description="Webscript Dashlet for My Spaces"
			 jsp="/jsp/dashboards/dashlets/Chpater11-myspaces-webscript.jsp"
   allow-narrow="true" />
		</dashlets>
	  </dashboards>
</config>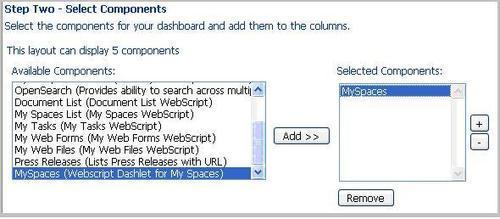

Dashlet components can contain any selection of JSF components, including the template component. This means that it is possible to use the results of a FreeMarker template as the dashlet contents. In the example above, you have used the FreeMarker template from the file system.
However, you can also use the FreeMarker template from your Alfresco Explorer's Company Home > Data Dictionary > Presentation Templates space.
To display a template that is stored in the repository, copy the NodeRef of the template file and create the page as follows, pasting your NodeRef value into the template attribute in the following example:
<%@ taglib uri="/WEB-INF/repo.tld" prefix="r" %>
<r:template template="workspace://SpacesStore/
e4d1c727-e98b-11da-821a-936824f635fe" />The
space Company Home > Data Dictionary > Presentation Templates contains both, built-in and custom presentation templates. A presentation template can be used to preview the content and to provide the look and feel of the content. An example of a presentation template is provided in Chapter 7, where a custom template is used to preview the Press Release content. Presentation templates are written in the FreeMarker template language and will have an .ftl extension.
FreeMarker is an open-source template engine. It is a generic tool for generating text output (which can be anything from HTML to auto-generated source code) based on templates. FreeMarker is designed to be practical for the generation of HTML web pages, by following the MVC (Model View Controller) pattern. The idea behind using the MVC pattern for dynamic web pages is that you separate the content authors from the programmers. This separation is useful, even for projects where the programmer and the HMTL page author are the same person, as it helps to keep the application clear and easier to maintain.
In the diagram below, the content authors create document content in Alfresco. The programmers create the presentation template file with stylesheets, HTML code, and take care of the look and feel. The final content will be generated by the FreeMarker engine (which is embedded in Alfresco), by applying the presentation template to the document content, as shown in the diagram.
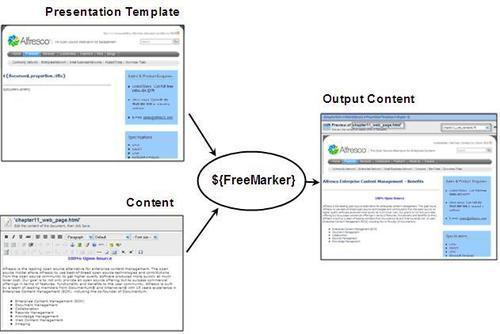
The FreeMarker template engine is embedded within Alfresco. FreeMarker takes the Alfresco data model as input and generates text (HTML or XML) as output. FreeMarker also supports XSLT to translate XML content.
The default model provides a set of named objects that wrap Alfresco node objects, to provide a rich, object-oriented layer that is suitable for scripting usage. If you are accessing the templates through the web-client UI, then the following named objects are provided by default.
For example, consider the following FreeMarker template.
<html>
  <head>
    <title>Welcome!</title>
  </head>
  <body>
    <h1>Welcome ${person.properties.userName}!</h1>
  </body>
</html>
At run-time, the value of the variable person.properties.userName will be the name of the current user who is accessing the system. Therefore, the template generates a dynamic greeting message.
Note
The Alfresco Wiki we bsite (http://wiki.alfresco.com) contains a complete reference to the FreeMarker template.
These objects, and any child node objects of them, are called template node objects. These template node objects provide the following API:
As with any other programming language, FreeMarker template language also supports fundamental directives, such as the following ones:
Note
For your reference, a complete guide to Freemarker directives is available at: http://FreeMarker.sourceforge.net/docs/
Let us develop a custom template to preview HTML documents.
Log in as the admin, go to the Company Home | Data Dictionary | Presentation Templates space, and create a new template and name it appropriately (say, chapter11_web_template.ftl). The template should display the web-page layout, as shown in the screenshot below. The template can be applied to any text or HTML document in the Alfresco repository, in order to generate a web page with layout, as shown in the following screenshot:
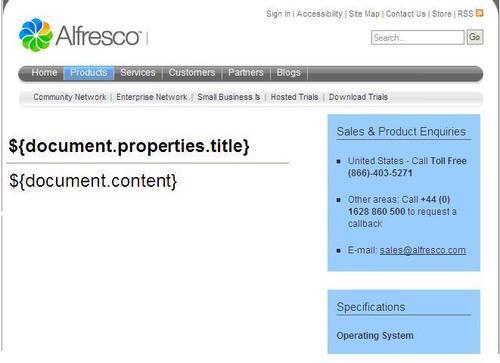
You can consider using the following code to create a custom template. The code uses the images in the Alfresco repository to display the horizontal bar at the top and the vertical bar on the righthand side. Note that the image URLs may change in the code, based on the location of the actual images in your repository. You can use your own images or you can even create the HTML header and table structure in your application.
The template extracts the document titles and displays them as page headings. Refer to the FreeMarker template code ${document.properties.title}. Similarly, the template extracts the document content and displays it in center portion of the page, as shown in the screenshot below the code. Refer to the FreeMarker template code ${document.content}.
<#------------------------------------------------------------------>
<#-- Extracts Title and Description from Content and              -->
<#--                    shows in web template                     -->
<#------------------------------------------------------------------>
<table width="100%" border="0" cellspacing="0" cellpadding="0">
  <tr>
    <td colspan="2" valign="top">
      <img src=
"http://localhost:8080/alfresco/download/direct/workspace/SpacesStore
                                /bfcc8130-4537-11db-972a953696db55bc/
                                 chapter11_template_top_image.png" />
    </td>
  </tr>
  <tr>
    <td valign="top">
      <BR>
      <H4> ${document.properties.title} </H4>
      <HR>
      ${document.content}
    </td>
    <td valign="top">
      <img src=
           "http://localhost:8080/alfresco/download/direct/workspace/
                    SpacesStore/c87378c9-4537-11db-972a-953696db55bc/
                               chapter11_template_right_image.png" />
    </td>
  </tr>
</table>Create a new HTML document in one of the spaces in your Alfresco Explorer. Use the Preview in Template action button to preview the document. Choose the custom template (in this example it is chapter11_web_template.ftl) to display the document content. The sample preview screen is shown in the following screenshot:

The FreeMarker template engine can be used for XSLT (XML transformations) to transform XML content to HTML, with an appropriate look and feel.
This is a classic solution for storing the data in the Alfresco's repository in native XML format and using FreeMarker custom templates to display the XML data in HTML format.
To test the XML transformation features, you will first need to create an XML document in Alfresco. You can either create this as an XML file (say, book.xml) on your desktop and upload it to the Alfresco web client, or you can directly create this XML document in Alfresco. Create a document called mybook.xml in one of your Company Home | Intranet spaces, with the following content:
<?xml version="1.0" standalone="yes"?>
<book title="Book Title">
  <chapter>
    <title>Chapter 1</title>
    <para>p1.1</para>
    <para>p1.2</para>
    <para>p1.3</para>
  </chapter>
  <chapter>
    <title>Chapter 2</title>
    <para>p2.1</para>
    <para>p2.2</para>
  </chapter>
</book>Create a template in the Company Home | Data Dictionary | Presentation Templates space called xmlbook.ftl, containing the following code:
<#if document.mimetype = "text/xml">
<#assign dom=document.xmlNodeModel>
<h1>${dom.book.@title}</h1>
<#list dom.book.chapter as c>
<h2>${c.title}</2>
<#list c.para as p>
<p> ${p} </p>
</#list>
</#list> </#assign>
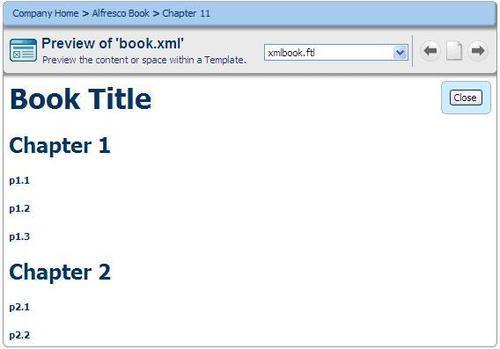
</#if>The template displays the title of the book and chapters using HTML tags. When you apply the xmlbook.ftl template to the book.xml document, you will see output is similar to that shown in the screenshot below:
Custom space view is a portal window, which shows up on the top of each space when a Custom View is selected. If you are implementing Alfresco for various departments and groups, then you might consider having custom home pages for each department or group space.
As an example, let us build a Custom View for all of the department spaces. Let us say each department space contains two files: home_image.png and home_page.html. Let us apply a presentation template, as a Custom View for the department space, which displays these two local files in that department as the department home page.
Create a template in the Company Home > Data Dictionary > Presentation Templates space called chapter11_dept_home_template.ftl, and containing the following code:
<#------------------------------------------------------------------>
<#--      Displays Home Page for each department using    -->
<#-- (1) Home Page Image file home_image.png and                 -->
<#-- (2) Home Page HTML file home_page.html                      -->
<#-- By Munwar Shariff, Nov 16, 2006                              -->
<#------------------------------------------------------------------>
<H4> Welcome to ${space.properties.title} </H4>
<#list space.children as child>
  <#if child.properties.name = 'home_image.png'>
    <img src="/alfresco${child.url}">
  </#if>
</#list>
  <#list space.children as child>
    <#if child.properties.name = 'home_page.html'>
      ${child.content}
  </#if>
</#list>
Next, create a sample space (say Department A). Within that space, create two content files, with names home_image.png (the department image) and home_page.html (the department description). Next select chapter11_dept_home_template.ftl template as a Custom View for your space (the Department A space).
The steps to apply a presentation template as a Custom View are explained in the Applying Custom View on a space section of this chapter. You will notice that the Custom View of your space is as shown in the screenshot on the next page.
This can be applied to each and every department and group within your organization. Consider having the department space as the space template, so that you can reuse the department space template to create spaces for many departments. More information about space templates is provided in Chapter 5.
Department members can update the image file and the HTML file, as required, to alter the home page information dynamically. Similarly, you can use the various presentation templates to display the information in a specific space.

You can configure the look and feel of the Alfresco Share simply by editing the XML configuration files, FTL files, CSS files, and JavaScript files. You can change the way that Alfresco Share dashboards look and operate. You can customize the set of page components for the site. You can add new dashlets to the application. For this we will customize the Alfresco Book site, which we configured in chapter 10.
An introduction to Presentation templates was provided in the previous section. For Alfresco Share, templates are stored in the following location:
<install_folder> omcatsharedclassesalfrescoweb-extension emplates
The
alfresco-template.ftl file can be considered as the base template. This is placed within the following location:
<install_folder>	omcatsharedclassesalfrescoweb-extension	emplates
orgalfrescoimportalfresco-template.ftl
As an example, consider the following FreeMarker template:
<#import "import/alfresco-template.ftl" as template />

<@template.header>
  <script type="text/javascript"
   src="${url.context}/templates/welcome/welcome-view.css"></script>
   <script type="text/javascript"
   src="${url.context}/templates/blog/welcome-view.js"></script>
</@>

<@template.body>
   <div id="hd">
      <@region id="header" scope="global" protected=true />
      <@region id="title" scope="template" protected=true />
      <@region id="navigation" scope="template" protected=true />
      <h1 class="sub-title">${page.title}</h1>
   </div>

   <div id="bd">
	   WelCome ${user.properties["firstName"]}
	</div>
</@>

<@template.footer>
   <div id="ft">
      <@region id="footer" scope="global" protected=true />
   </div>
</@>
At run-time, the value of the variable user.properties["firstName"] will be the name of the current user who is accessing the system. Therefore, the template generates a dynamic greeting message.
Let us customize a Getting Started Dashlet . As an example, you want to display the information about the Alfresco book in the Getting Started Dashlet for the site that you have configured. For this, you have to customize the Getting Started Dashlet.
Carry the following steps in order to customize the dashlet:
- Browse to the folder <install_folder> omcatsharedclassesalfrescoweb-extensionsite-webscriptsorgalfrescocomponentsdashlets.
- Open the file
site-welcome.get.propertiesand add the following code to the end of the file:header.featureBook=Alfresco Book Tour text.featureBook=Take a tour of some of the key features of the Alfresco Enterprise Content Management Implementation Book by Munwar Shariff. link.featureBook=Visit Alfresco Book
- Open the file
site-welcome.get.htmland add the following code before the<#else>directive:<div class="detail-list-item last-item"> <h4>${msg("header.featureBook")}</h4> <div>${msg("text.featureBook")}</div> <div><a href="http://www.alfrescobook.com/" target="_new">${msg("link.featureBook")}</a></div> - Restart Alfresco.
- Log in to Alfresco Share.
- Click on the Alfresco site that you have configured.
- Once you click on the Alfresco Book Project link, the application displays the Site Dashboard of the site. You will find the customized Getting Started Dashlet.

- Click on the Visit Alfresco Book link. It will take you to www.alfrescobook.com. For the Alfresco Book dashlet, the configuration of the dashlet is explained in the next section.
Web Scripts provide RESTful access to content held in your Alfresco Enterprise Content Repository. This allows you to place controls on your enterprise content to manage it, and at the same time provide uniform access for a wide variety of client applications and services. With Web Scripts, you can build your own RESTful interface by using light-weight scripting technologies such as JavaScript and FreeMarker.
Alfresco Share accesses the repository through web scripts. As an example, we will configure a webscript that will add a new dashlet to the Book web site, with a title of Book Published. Carry the following steps:
- Navigate to the following folder:
<install_folder> omcatsharedclassesalfrescoweb-extensionsite-webscriptsorgalfrescocomponentsdashlets. - Create a new file named
alfrescobook.get.desc.xmland add the following code:<shortname>Alfresco Book</shortname> <description>Alfresco Book Dashlet</description> <family>site-dashlet</family> <url>/components/dashlets/Alfresco-Book</url> </webscript> <webscript>
- Create another file, named
alfrescobook.get.html.ftl. The code snippet is provided below:<div class="dashlet"> <div class="title"> Book Published </div> <div class="body"> <div> First ever book on Alfresco<br> <div style="color: rgb(153, 51, 0);" class="header"> <table style="width: 100%; text-align: left;" border="1" cellpadding="5" cellspacing="0"> <tbody> <tr> <td style="background-color: rgb(255, 153, 102);"><span style="font-weight: bold;"><a href="http://www.packtpub.com/alfresco/book">Book Site</a> | <a href="http://alfrescobook.blogspot.com/">Book Blog</a> | </span><span style="font-weight: bold;"> </span><span style="font-weight: bold;"></span><span style="font-weight: bold;"></span></td> </tr> </tbody> </table> <h2>Alfresco Enterprise Content Management Implementation</h2> </div> </div> </div> - Restart Alfresco.
- Log in to Alfresco Share.
- Open the URL
http://localhost:8080/share/service/. Click on the Browse 'site-dashlet' Web Scripts option.
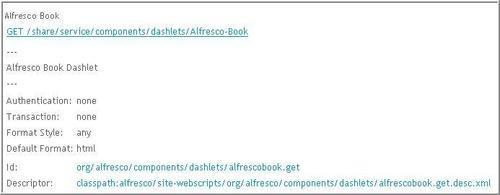
- You will see the Alfresco Book web script. To display the details, click on the hyperlink, as shown in the following screenshot:
All of the dashlets provided by Alfresco Share are configured by using webscripts. We just need to provide the family when configuring the webscripts.
Three families are available out of the box:
- Site-dashlet
- User-dashlet
- Dashlet
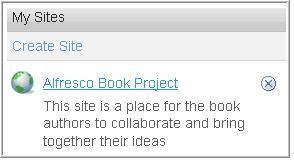
In the previous section, we created the webscript that belongs to the site-dashlet family. This dashlet will be displayed in your site under the name Alfresco Book Project.
<webscript>
   <shortname>Alfresco Book</shortname>
   <description>Alfresco Book Dashlet</description>
   <family>site-dashlet</family>
   <url>/components/dashlets/Alfresco-Book</url>
</webscript>
To add the new dashlet that you have created, perform the following steps:
- Go to the Customize Dashboard option in your site dashboard toolbar. Select and add the dashlet.

- If you change the family to user-dashlet, it will be displayed as:
- Restart Alfresco.
- Log in to Alfresco Share.
To add the new dashlet that you have created, go to the Customize Dashboard on your dashboard toolbar and then select and add the dashlet.
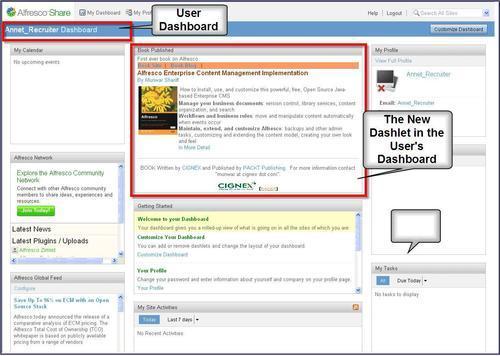
You can add a page component. As an example, we will create one component, the Alfresco Book for the Alfresco Book Project site. The following screenshot displays a configured page component:

Carry out the following steps to create a new page component, as shown in the preceding screenshot:
- Navigate to the following folder:
<install_folder> omcatsharedclassesalfrescoweb-extensionsite-datacomponents. - Create a new file, named
template.title.alfrescobook,and add the following code:<?xml version='1.0' encoding='UTF-8'?> <component> <scope>template</scope> <region-id>title</region-id> <source-id>alfresco</source-id> <url>/components/title/collaboration-title</url> </component> - Create a new file, named
template.navigation.alfrescobook,and add the following code:<?xml version='1.0' encoding='UTF-8'?> <component> <scope>template</scope> <region-id>navigation</region-id> <source-id>alfresco</source-id> <url>/components/navigation/collaboration-navigation</url> </component> - Create a new file, named
template.alfresco.book,and add the following code:<?xml version='1.0' encoding='UTF-8'?> <component> <scope>template</scope> <region-id>alfresco</region-id> <source-id>alfresco</source-id> <url>/components/alfresco/book</url> </component>
- Navigate to the following folder:
<install_folder> omcatsharedclassesalfrescoweb-extensionsite-datatemplate-instances. - Create a new file, named
alfrescobook.xml,and add the following code<?xml version='1.0' encoding='UTF-8'?> <template-instance> <template-type>org/alfresco/alfrescobook</template-type> </template-instance>
- Go to the following folder:
<install_folder> omcatsharedclassesalfrescoweb-extensionsite-datapages. - Create a new file, named
alfrescobook.xml,and add the following code: - Go to the following folder:
<install_folder> omcatwebappsshareWEB-INFclassesalfresco emplatesorgalfrescoimport. - Modify the file named
alfresco-template.ftl. The code snippet is provided below. Add the following line under the section<!-- Common YUI components: RELEASE --><script type="text/javascript" src="${url.context}/yui/tabview/tabview-min.js"></script> - Go to the following folder:
<install_folder> omcatsharedclassesalfrescoweb-extension emplatesorgalfresco. - Create a new file, named
alfrescobook.ftl. The code snippet is provided below:<#import "import/alfresco-template.ftl" as template /> <@template.header> </@> <@template.body> <div id="hd"> <@region id="header" scope="global" protected=true /> <@region id="title" scope="template" protected=true /> <@region id="navigation" scope="template" protected=true /> </div> </@> <@template.footer> <div id="ft"> <@region id="footer" scope="global" protected=true /> </div> </@> - Navigate to the following folder:
<install_folder> omcatsharedclassesalfrescoweb-extensionsite-datapresets. - Modify the file
presets.xmland add the code in the pages tag of the site dashboard section. The pages section should look like the following:<pages> <page id="site/${siteid}/dashboard"> <title>Collaboration Site Dashboard</title> <description>Collaboration site's dashboard page</description> <template-instance>dashboard-3-columns</template-instance> <authentication>user</authentication> <properties> <sitePages>[{"pageId":"wiki-page"}, {"pageId":"blog-postlist"}, {"pageId":"documentlibrary"}, {"pageId":"calendar"}, {"pageId":"discussions-topiclist"},{"pageId":"alfrescobook"} ]</sitePages> </properties> </page> </pages> - This entry is optional. If you want to see the component in the new site, that you will be configuring after adding this code, then the component will be displayed without configuring the Customize Site.
- Navigate to the following folder:
<install_folder> omcatsharedclassesalfrescoweb-extension. - Create the file
web-framework-config-custom.xml. Modify the file to include the following code:<alfresco-config> <config evaluator="string-compare" condition="SitePages" replace="true"> <pages> <page id="calendar">calendar</page> <page id="wiki-page">wiki-page?title=Main_Page</page> <page id="documentlibrary">documentlibrary</page> <page id="discussions-topiclist">discussions- topiclist</page> <page id="blog-postlist">blog-postlist</page> <page id="alfrescobook">AlfrescoBook</page> </pages> </config> </alfresco-config> - Restart the Alfresco Server.
- Log in to Alfresco Share.
- Open the Alfresco project site. You will find a new component has been added, as shown in the screenshot above. If you are not able to see this, then go to the Customize Site and select add pages. The component will be there.
You can customize the user interface by using Adobe Flex 3, RIA clients. Flex is a highly-productive, free, open-source framework for building and maintaining expressive web applications that deploy consistently on all of the major browsers, desktops, and operating systems. FlexSpaces is a RIA client for Alfresco that runs in browsers (Firefox, IE, Safari, Chrome, etc.) with a Flash player. FlexSpaces was developed with Adobe Flex 3 and ActionScript 3 on the client side. This makes it easy for the designers and developers to work together. To learn more about FlexSpaces, visit the following web site: http://forge.alfresco.com/projects/flexspaces/.
The following are the two features of Alfresco Share 3.0:
- Five site page components that run FlexSpaces views inside Share, running in a browser
- An additional tab running Share in FlexSpaces
The Alfresco Book Project Site will look similar to the following screenshot:

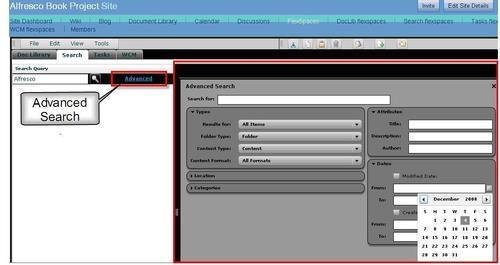
The Alfresco Book Project Site has a Search option, which helps us to search for the file that we are looking for. We just need to enter the name of file that we are looking for, in the Search Query box, and then click on the Advanced button, as shown in the following screenshot:
You can develop a custom user interface by using JSPs and Alfresco Foundation APIs. Let's go ahead and learn more about this.
The following are the Alfresco foundation APIs:
Suppose there is an existing portal for a travel agency named Fun Travels Ltd. This portal is developed on another platform. The agency has various Galleries, Articles, Guidelines, Forms, etc. They want to store, this content on, and fetch this content from, the Alfresco repository.
In order to implement this, you have to customize the user interface of this portal in such a way that when you click on any of their existing links, such as Galleries, Articles, Guidelines, and so on, the screen should appear so that we can enter some useful data. On the basis of this information, you have to fetch content from, or add content into, the Alfresco repository.
The JSP's will have their own UI to deal with Alfresco, and these JSPs will be called on each link, asking for the data to be entered. On submission, Alfresco beans will be called, which will fetch the content and send it to the portal.
The following are the code snippets provided:
- Define a managed bean that contains the properties of the UI elements and properties for the Alfresco services.
Custom UI Properties:
Public class ArticleBean { private String contentTitle = null; public String getContentTitle() { return contentTitle; } public void setContentTitle(String contentTitle) { this.contentTitle = contentTitle; }//Alfresco Service properties:
Private SearchService searchService = null; /** * @return the searchService */ public SearchService getSearchService() { return searchService; } /** * @param searchService the searchService to set */ public void setSearchService(SearchService searchService) { this.searchService = searchService; } Public void addContent(){ } - Add the following code to the
faces-config-custom.xmlfile. For a Tomcat installation, this file is in the following folder:<alfresco_install_folder> omcatwebappsalfrescoWEB-INF.<managed-bean> <managed-bean-name> ArticleBean</managed-bean-name> <managed-bean-class> com.alfresco.bean.ArticleBean </managed- bean-class> <managed-bean-scope>session</managed-bean-scope> <managed-property> <property-name>searchService</property-name> <value>#{SearchService}</value> </managed-property> </managed-bean> - Add the following code to a new file named
faces-config-navigation-custom.xmlfile. For a Tomcat installation, create the file in the following folder:<alfresco_install_folder> omcatwebappsalfrescoWEB-INF<navigation-rule> <from-view-id>/jsp/extension/displayAllTravels.jsp</from- view-id> <navigation-case> <from-outcome>addContent</from-outcome> <to-view-id>/jsp/extension/addContent.jsp</to-view-id> </navigation-case> </navigation-rule> - Write various JSP pages. These JSPs will access the bean properties for setting elements and for displaying content.
<h:inputText ="#{articleBean.contentTitle}" /> <h:outputText ="#{articleBean.contentTitle}" /> <h:commandButton action="#{articleBean.getContent" value="ADD"/> - Attach the JSP to the links provided on the portal. Click on each link, and a custom JSP Page will be called, as shown in the following screenshot:

- The following screenshot shows the Alfresco custom JSP integrated with the external application:
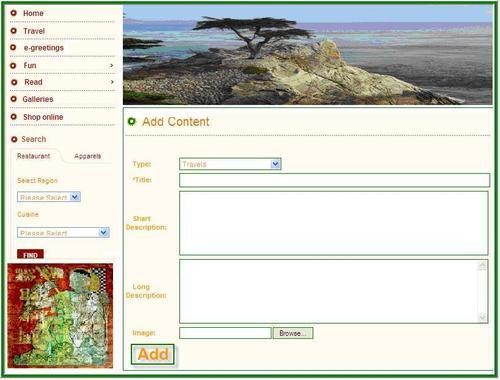
- When the Add button is clicked, the content is fetched from the Alfresco repository and is displayed in the portal, as shown in the following screenshot:
