
Let's now take a look at how you can manage your Microsoft Office documents in Alfresco, without being an Alfresco Expert.
This is facilitated by the SharePoint protocol support that is offered by Alfresco. Alfresco is the first ECM system to implement the Microsoft Office and Windows SharePoint Services protocols as a compatible server. With this implementation, users can now look forward to an open alternative that delivers equivalent benefits but with true platform choice.
The Alfresco repository now offers:
- Microsoft Office SharePoint protocol support, without the need for an additional client installation
- Alfresco Surf platform for building dynamic, REST-oriented web applications and collaborative web sites
- A RESTful API delivering content and collaboration services for customizing and developing Alfresco applications
- Preview of Alfresco Share, a new social computing application
- A Document Library that can scale to over 100 million documents
Alfresco's new Surf platform is built on Alfresco Web Scripts technology, which utilizes light-weight scripting and templating. The Surf platform is designed to work in a number of different web environments, as well as a Web Part in a Microsoft SharePoint Portal.
The SharePoint Protocol support built into Alfresco Enterprise Edition 3.0 SP1 lets users work with documents in the Alfresco Share repository without using the Share interface. We will now go through how to manage documents within Microsoft Office. For the case scenarios, we shall use Microsoft Word 2003. You can also carry out the same tasks using Word 2007.
A Document Workspace is an Alfresco Share site that contains a document. For our example, we shall use The Alfresco Book project Site that we have created.
To create a Document Workspace, carry out the following steps in MS Word 2003:
- Open MS Word , create a new document, enter the required content, and then save this document as
Alfresco Update.docon your machine. - On the MS Word toolbar, click on the View menu and select the task pane or press Ctrl+F1. The task pane opens in MS Word to the right of the document. If you are using MS Word 2007, you have to click on the Windows icon in the upper-left corner of the screen and then select the Publish | Create Document Workspace option.
- Select the Shared Workspace option from the drop-down menu at the top of the task pane. A pane similar to the following screenshot will be displayed:

- Change the default entry in the Document Workspace name field to AlfrescoBookUpdate.

There are six tabbed panels available on this pane. They are: Status, Members, Tasks, Documents, Links, and Document Information (as shown in the preceding screenshot). Position your cursor over a tab to display the tab name.
- In the Location for new workspace field, type the URL
http://<Alfresco serverinstance>/alfresco, for example,http://alfrescoserver:8080/alfresco. - You also need to add the Alfresco server as a trusted site before you can create the workspace. Otherwise, you will be prompted to do the same.Click on the Create button.
- Now, you can log in with your credentials. You can also save them to avoid re-entering them every time. Word creates the Document Workspace in Share, adds the document
Alfresco Update.docto the new site, and displays the familiar Shared Workspace task pane. Office may prompt you to log in again. If so, use the same username and password. - Verify whether the new site has been created. Open
http://< Alfresco server instance >/share/on the browser. Sign in with your credentials. The Alfresco Update Site then displays in your My Sites dashlet on your personal dashboard, as shown in the following screenshot:

On clicking the site link, the site is opened and you can see the Alfresco Update.doc file in the site's Document Library in the Recently Modified Documents dashlet, as highlighted in the following screenshot:

To edit a document, carry out the following steps:
- Open a document stored in the Document Workspace from MS Word. MS Word automatically displays the Shared Workspace task pane, which contains many of the document management features that are available.
- To edit a document, open the Document Workspace document that was created and added to Share in the previous section. To do this, click on File | Open.
- Enter
http://<Alfresco server instance>/alfrescoas the file name and click on Open. As a result, a list of all of the existing Share sites is displayed. - Select the Alfresco Update option and click on the Open button to navigate to that site. The MS Word window in this case will switch to a Web view.
- Select Alfresco Update.doc from the Document Library and open it. MS Word displays the selected Share document.
When you check a document during or before editing, the document is locked for all other users. Site members can still view or download the original version of the document while you edit it and have it checked out.
- To check out the file Alfresco Update.doc from the site, select the Document Information tab from the task pane, and then click on File | Check Out
- A new Check in link in the task pane indicates that the document is now checked out. Moreover, the Alfresco Update site in Share displays a lock icon to the left of the file named Alfresco Update.doc.
After editing the checked out document, check it in to update the document in the Document Workspace Library. This removes the lock from the document. As a result, the updated version is available to the other users.
- To check in the document, after saving the document, click on File | Check In. Enter check in comments, if any, and then click on Ok.
- The Check In link in the task pane changes to Check out, indicating that the document is now checked back in. Once the page refreshes, the Alfresco Update site in Share will no longer display the lock icon.
When a document is added to the document workspace, it has a version. Each time it is updated, a version history is maintained. The versions can be managed through MS Word. Alfresco does not support the deletion of individual document versions.
Ensure that Alfresco Update.doc is open. We will use this document to view the version history and then explore the other document version features available.
To check the version history, carry out the following steps:
- On the Shared Workspace task pane of the document Alfresco Update.doc, select the Document Information tab.
- In the Document Library, select on File | Version History. The Versions saved for Alfresco Update.doc window appears, displaying all of the previous versions of the document. The window displays the version number, the user who made the modification, the date and time of the modification, and a truncated comment (if any was entered when the document was checked in).

- You can click on the View Comments button to view the full comment for a version. Click on the Modify settings for document versions link to view the details for
Alfresco Update.doc. - Log in to Share. On the left-hand side, you will see the name and a preview of the document. The right-hand side of the page contains the item details, including metadata, tags, permissions, version history, document actions, and related URLs. Comments made on the item selected are displayed at the bottom of the page.
Any version that was saved for Alfresco Update.doc file can be viewed. To view the original version of the document, select version 1.0 in the version list, and then click on the Open button.
The document opens in a new window as a read-only version. Close the window, when you have finished reviewing the content.
Selecting a previous version of the document in the Versions saved for Alfresco Update.doc window enables both, the Restore and Delete buttons. We can restore the original version of the document as our current version. In order to replace the current document with a previous version, carry out the following steps:
- In the Document Library, click on File | Version History.
- In the Versions saved for Alfresco Update.doc window, select the original document (version 1.0) in the version list, and then click on the Restore button.
- Click on the Yes button to confirm that you want to replace the current version of the document with the selected version. You might be prompted to log in again.
- MS Word replaces the content of the current version with the content of version 1.0. Select the Document Information tab and click on Version history. Notice that restoring the original content has created a new version, 3.0. A read-only copy of version 2.0 of the document remains open.
- Close the version 2.0 copy of
Alfresco Update.doc. Click on the Close button on the Versions saved for Alfresco Update.doc window. TheAlfresco Update.docthat has been reverted to its original content remains open.
You can create a separate folder in the document library to contain content, and then add a document to the folder. To do this, carry out the following steps:
- On the Shared Workspace task pane of the document
Alfresco Update.doc, select the Documents tab. The files and folders that currently reside in the site's document library are displayed here. You can manage the contents of the Document Workspace document library from here. - Next, click on the Add new folder option. Enter New Updates as the Folder Name and then click on the OK button. The newly-created folder now appears in the Documents list. You can now upload a document to it.

- Click on the New Updates folder and then click on the Upload button. Browse and locate an MS Word file on your computer to upload, and then click on the Open button.
- Click on OK. The document appears in the Documents list within the New Updates folder. The label New indicates that the document has been recently uploaded.
A Document Workspace allows you to collaborate on documents with one or more colleagues. We shall use the Alfresco Update site that we created previously, as an example in this section. The site, after the exercises performed earlier, now contains two documents, namely the Alfresco Update.doc and the document uploaded in the New Updates folder.
We have created the Document Workspace and can now save MS Word documents directly to the site. To save an MS Word document to the Document Workspace, carry out the following steps:
- Create a new Word document, enter content, and click on File | Save As.
- Enter
http://<Alfresco server: 8080>/alfresco/AlfrescoUpdate/DocumentLibrary/Update.docas the File name. The URL takes the following form:http://<Alfresco server: 8080>/alfresco/<site URL name>/DocumentLibrary/<folder structure>/<filename>.Note
<Alfresco server:8080>is the server and port where Alfresco is installed and running on your machine. Alfresco's SharePoint Protocol Support name must be used with all URLs.<site URL name>is the URL name of the Document Workspace (Share site) where the document is being saved. In our case it is the Alfresco Update site.DocumentLibraryis the Site's Document Library page component.<folder structure>is the path and destination of the folder, where a folder structure has been established within the site's library. In our example, the folder is theNew Updatesfolder.<filename>is the filename of the current document. In our case, it isUpdate.doc - When you click on the Save button, MS Word saves the new document (titled
Update.doc) to the Document Library of the specified Share site. - Next, open the task pane and click on the Open site button in the browser to verify that the new document has been saved to the Alfresco Update site.
- Log in with your credentials and the Alfresco Update site dashboard is displayed. The Update.doc document is listed in the Recently Modified Documents dashlet.

The document workspace URL name is automatically generated from the name of the site provided. This name is not editable. In this tutorial, both the site name and the URL name are AlfrescoUpdate. Once the Document Workspace has been created, you can manage the site directly from Microsoft Word.
Ensure that the document Update.doc is opened on your computer, and that the Shared Workspace task pane is open in the document window, with the site name AlfrescoUpdate displayed at the top. This is the name that you will edit by carrying out the following steps:
- To edit the site's display name, position your cursor on the site name AlfrescoUpdate in the Shared Workspace task pane of the document
Update.doc. - Open the now active menu and select the Change Site Title option. Change the site title to Alfresco SPP Support and click on the OK button. You can open the site to confirm that the site name has been changed in Share.
- Open the site in the browser by clicking on the Open site in browser option below the Document Workspace name, and log in. Your browser displays the dashboard of the Alfresco SPP Support site in Share
http://localhost:8080/share/page/site/alfrescoupdate/dashboard. The Document Library page component link appears beneath the site name.
There are five page components available for a site namely, the Document Library, Calendar, Blog, Discussions, and Wiki in Alfresco Share. When you create a Document Workspace from MS Word, the site includes only the Document Library component by default. From MS Word, you can easily access the Share page to customize the site. Again, you will work from the document Update.doc.
- To customize the site, on the Shared Workspace task pane of the document
Update.doc, position your cursor over the site name, that is, Alfresco SPP Support. Open the context menu and select the option Change Site Settings. - Log in to Share. The browser opens, displaying the Customize Site page for the Alfresco SPP Support site. Only the Document Library page component is included in the site.
- Add and remove pages from the site as desired. Refer to the earlier sections on collaboration with Share for details.
Only the members of the Document Workspace can work with the documents stored there. The tasks relating to site members are displayed on the Members tab of the Shared Workspace task pane.
Currently, only Bob, whose login credentials you used to create the Document Workspace, is a member of the Alfresco SPP Support site. The user who creates the site is automatically given the role of Site Manager. We will now add users to the site, by carrying out the following steps:
- On the Shared Workspace task pane of the document
Update.doc, select the Members tab. The Admin appears at the top of the tab. - Click on the Add new members option. Type Tom and Ann to add User Tom (tom/tom) and User Ann (ann/ann) as members of the site. Select SiteCollaborator as the site role for these users, and then click on the Next button.
- When adding multiple users, all of the users will be assigned the same role. Once added, you can change the role of an individual site member.
- Confirm the member details that are displayed, and then click on the Finish button. The Members tab displays the newly-added site members, Tom and Ann.
A user can only edit his or her profile details. However, he or she can view the profiles of all of the site members. To edit a user profile, carry out the following steps:
- To edit your profile go to the Shared Workspace task pane of the document
Update.doc, position your cursor over Admin, open the context menu, and then select the Edit User Information option. - As a result, Alfresco Share opens. The User Profile page component displays your user details. From here, you can change your password and can also edit your profile.
There are four roles available in Share sites, namely, Manager, Collaborator, Contributor, and Consumer. Only a Site Manager can manage site membership by changing a member's role. To do this, position your cursor over (for example) Ann on the Shared Workspace task pane of the document Update.doc. Open the context menu and select the Edit Site Group Membership option.
Log in as Bob. Share opens and displays the Search for Site Members page. Type in the username in the field provided, and then click on the Search button. Share returns a list of the site's members matching the search criteria entered. The assigned role is displayed for each member. As the Site Manager, you can change the member roles and remove members from the site.
When you add or save a document to the Document Workspace, the original version of the document remains on your computer. This document copy is linked to the copy in the site's Document Library. Once linked, you can work on one version, and then update the other, to keep them synchronized.
Use the file Alfresco Update.doc, which you used to create the Alfresco SPP Support site. It should still reside on your desktop. A copy also exists in the site's library. Double-click on the Alfresco Update.doc document that is saved on your desktop. The following pop-up window will appear:
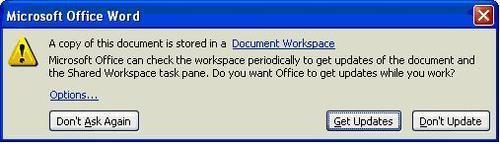
Because a copy of the Alfresco Update.doc document exists in the collaboration site, it is possible that your local copy is no longer current. You need to synchronize your local copy with the site copy to ensure that you have the current version.
- Click on the Get Updates button. MS Word checks for and applies changes made by other members to the local copy of the document.
When a local copy of a document is linked to a Document Workspace, MS Word detects the changes made to the document and prompts you to resolve the discrepancy. In the previous task, you updated the local copy with the version from the workspace. In this task, you will update the workspace copy with the local version. To update the site copy, carry out the following steps:
- Make some changes to your open document (
Alfresco Update.doc) and then save the document. The Status tab displays a warning, indicating that there is a discrepancy between the local copy and the workspace copy of the document.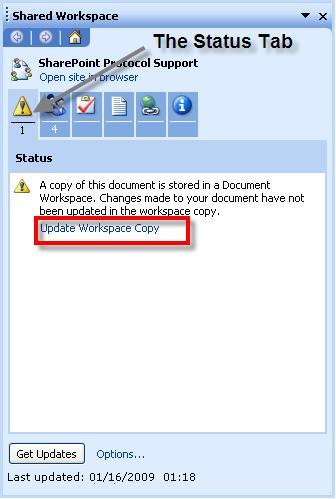
- Click on the Update Workspace Copy link on the Status tabbed page.
- MS Word checks for and applies changes made in the local copy to the version in the site's document library. Click on the Open site in browser option and verify that the new document has been saved to the site.
Currently, user Bob has the original copy of the document Alfresco Update.doc on his desktop. The Save Updatable Copy feature in MS Word enables other site members to obtain a copy of this document for their own machines. This copy, similar to the original document on your own machine, is linked to the Alfresco Update.doc document in the Document Workspace. This can only be done if there is access to a second machine that uses Internet Explorer as the default browser, and that has your Alfresco Server as a Trusted Site. To save an updatable copy to the local machine itself, you have to carry out the following steps:
- On another machine , open MS Word and select Open in the File menu. Enter
http://<Alfresco server URL:8080>/alfresco. - At the login page, log in as Tom (tom/tom). Browse to
/AlfrescoUpdate/documentLibraryand open theAlfresco Update.docfile. - User Tom now has the server copy of the document
Alfresco Update.docopen. On the Shared Workspace task pane, select the Documents tab. The document Alfresco Update.doc is highlighted in the Documents list. Position your cursor over the document name, open the menu that becomes active, and select the Save Updatable Copy option. Save the document locally when the Save As window appears. - Log in as Tom again, if prompted to.
Tom now has a local copy of the Alfresco Update.doc file, just as Bob does. Make some changes to the Alfresco Update.doc file, save the document, and upload it to the Document Workspace.
When multiple users hold local copies of a Document Workspace document, the Document Updates pane provides you with options for managing the edits. When changes to your local copy conflict with the version stored in the site, this feature enables you to compare the two versions, and either overwrite one copy, or merge the two copies. All of this can be done by carrying out the following steps:
- Return to your original machine, where the document
Alfresco Update.docis open. On the Shared Workspace task pane, select the Documents tab. - The document
Alfresco Update.docis highlighted in the Documents list. Position your cursor over the document name, open the context menu, and then select Document Updates. - The Document Updates task pane is displayed. Click on the Open Updated Copy option to obtain the updates.
Once you complete the collaboration on the document, you would typically delete the Document Workspace, as it is no longer required. This action permanently deletes the site and all of its contents. With the tutorial now complete, you can perform this task to remove the sample site, Alfresco SPP Support, and its contents, from Share. Ensure that the document Alfresco Update.doc is open, and then carry out the following steps:
- On the Shared Workspace task pane, position your cursor over the site name, namely, Alfresco SPP Support. Open the context menu and select the Delete Workspace option.
- Click on the Yes button in order to confirm the deletion. The site is removed.
With the addition of Share, Alfresco delivers a Web 2.0 application that leverages Flash and AJAX with a richer user interface than more traditional document management libraries. Share is heavily focused on collaboration tasks, and includes integration with popular blogs that you can publish to internally and externally, Wiki, and Forum/Discussion products are provided out of the box. Share's ability to perform rapid user site creation, site user invitation, permissions and management is noteworthy.
In SharePoint, you can open a document from the web interface, have it automatically load in the appropriate Office application, make your edits, and then check the file in to automatically upload the new version. In Alfresco Share, you have to navigate down to the document manager area of your desired site, and then open the file. Then, check out the file, edit it, and check it back in. The difference in the two methods seems to be that the SharePoint way uses the web interface as the starting point, whereas Alfresco Share uses Microsoft Office as the starting point.