
Consider a purchase order that moves through various departments for authorization and eventual purchase. To implement Simple Workflow for this in Alfresco, you will create spaces for each department and allow documents to move through various department spaces. Each department space is secured, only allowing the users of that department to edit the document and to move it to the next departmental space in the workflow process.
The workflow process is so flexible that you could introduce new steps for approval into the operation without changing any code.
Simple Workflow is implemented as an aspect that can be attached to any document in a space through the use of business rules. Workflow can also be invoked on individual content items as actions.
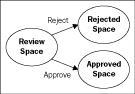
Workflow has two steps. One is for approval while the other one is for rejection. You can refer to the upcoming image, where workflow is defined for the documents in a space called Review Space. The users belonging to the Review Space can act upon the document. If they choose to Reject, then the document moves to a space called Rejected Space. If they choose to Approve, then the document moves to a space called Approved Space. You can define the names of the spaces and the users on the spaces, according to your business requirements. The following figure gives a graphical view of the Approved Space and the Rejected Space:
The process to define and use Simple Workflow in Alfresco is as follows:
- Identify spaces and set security on those spaces
- Define your workflow process
- Add workflow to content in those spaces, accordingly
- Select the email template and the people to send email notifications to
- Test the workflow process
As an example, let us define and use a Simple Workflow process to review and approve the engineering documents on your intranet. Go to the Company Home > Intranet > Engineering Department space and create a space named ProjectA by using an existing Software Engineering Project space template. For more information on creating a space using an existing space template, refer Chapter 5.
If you go to the Company Home > Intranet > Engineering Department > ProjectA > Documentation space, then you will notice the following sub-spaces:
- Samples: This space is for storing sample project documents. Set the security on this space in such a way that only the managers can edit the documents, and others can only copy the documents from this space.
- Drafts: This space contains initial drafts and documents of ProjectA that are being edited. Set the security in such a way that only a few selected users (such as Engineer1, Engineer2—as shown in the upcoming image) can add or edit the documents in this space.
- Pending Approval: This space contains all of the documents that are under review. Set the security in such a way that only the Project Manager of ProjectA can edit these documents.
- Published: This space contains all of the documents that are Approved and visible to others. Nobody should edit the documents while they are in the Published space. If you need to edit a document, then you need to Retract it to the Drafts space and follow the workflow process, as shown in the following image:

Set the security on these sub-spaces according to your requirements. For more information about securing spaces, refer to Chapter 4.
Now that you have identified the spaces, the next step is to define your workflow process. The preceding image illustrates the spaces and the workflow.
We will add workflow to all of the documents in the Drafts space. When a user selects the Approve action called Submit for Approval on a document, then the document moves from the Drafts space to the Pending Approval space.
We will add workflow to all of the documents in the Pending Approval space. When a user selects the Approve action called Approved on a document, then the document moves from the Pending Approval space to the Published space. Similarly, when a user selects the Reject action called Re-submit on a document, then it moves from the Pending Approval space to the Drafts space.
We will add workflow to all of the documents in the Published space. When a user selects the Reject action called Retract on a document, then it moves from the Published space to the Drafts space.
You can have as many review steps (spaces) as needed and you can choose the workflow action names according to your business's requirements.
Now that you have defined your workflow process, the next step is to add workflow to the documents in these spaces.
To add workflow to the Drafts space, carry out the following steps:
- Ensure that you are in the Company Home > Intranet > Engineering Department > ProjectA > Documentation > Drafts space.
- Click on the More Actions > Manage Content Rules link.
- Click on the Create Rule link and you will see the Create Rules Wizard.
- In Step One, from the Select Condition drop‑down list, select the All Items option, and then click on the Add to List button. Click on the Next button.
- In Step Two, from the Select Actions drop‑down list, select the Add simple workflow to item option, and then click on the Set Values and Add button. The Set action values dialog box appears, as shown in the following screenshot:

- In the Approve Flow section, provide a workflow step name of Submit for Approval, and move the content to the Pending Approval space. This is as per your workflow design, as shown in the screenshot under the section Identify spaces and security for the Drafts space.
- The workflow for the Drafts space does not require a 'reject' step. Hence, select the option No for Reject Flow.
- Click on the OK button, and then click on the Next button.
- In Step Three, select a Type of Inbound, and provide an appropriate name and description for this rule. Finish the rule.
Similarly, create workflow for the Pending Approval space, as per the design, as shown in the screenshot under the section Identify Spaces and Security. Remember that this space has both the approve step and reject step, options available, as shown in the following screenshot:

Next, create a workflow for the Published space, as per the design shown in the screenshot under the section Identify Spaces and Security. Remember that this space only has the approve step option, which moves the content to the Drafts space upon retract. Specify retract as the name for the approve step option.
You can send a notification by email to the Project Manager whenever a document is waiting for approval. Follow the steps below to send an email notification to the Project Manager of ProjectA whenever a document gets into the Pending Approval space:
- Ensure that you are in the Company Home > Intranet > Engineering Department > ProjectA > Documentation > Pending Approval space.
- Click on the More Actions > Manage Content Rules link.
- Click the Create Rule link and you will see the Create Rule Wizard.
- In Step One, from the Select Condition drop‑down list, select the All Items option, and then click on the Add to List button. Next, click on the Next button.
- In Step Two, from the Select Actions drop‑down list, select the Send an email to specified user's, and then click on the Set Values and Add button.
- You will notice a Set action values dialog box, as shown in the following screenshot:

- Search for and select the Project Manager's name as the email recipient, and then click on the Add button. Provide an appropriate subject for the email. As an email message, you can either provide your own text or use a built-in email template (
notify_user_email.ftl), as shown in the preceding screenshot. - Click on the OK button and then click on the Next button. Select the Type as Inbound. Provide an appropriate name and description for this rule.
- Finish the rule.
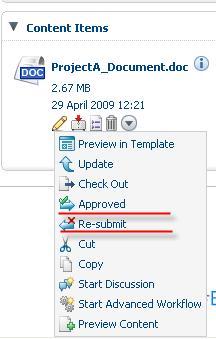
To test the workflow process, go to the Drafts space and upload a sample document. You will notice that the available workflow actions in the more actions drop‑down menu are as shown in the following screenshot. When you click on the Submit for Approval action, the document will be moved automatically to the Pending Approval space, as per the workflow rule.

When the document moves into the Pending Approval space, two business rules will be applied.
One business rule is to send an email notification to the Project Manager, indicating to him or her that the document is pending for approval. If your email server is correctly configured, then the Project Manager will receive email notifications with information about the document.
The second business rule is the workflow on all of the incoming documents that arrive in this space. When the Project Manager logs in he will notice the workflow actions in the more actions drop‑down menu, as shown in the following screenshot:
If the Project Manager is fine with the document, then he can click on the Approved action and the document will be moved to the Published space automatically. If the Project Manager requires more details, or if he's not satisfied with the document, then he can click on the Re-submit action to send the document to the original author to edit and Re-submit it. In this situation, the document will be moved to the Drafts space automatically. Once the document is in the Drafts space, the workflow process starts all over again.
If you select the Approved action, you will notice that the document is moved to the Published space. When the document is in the Published state, it is typically visible to all of the required employees, as it has already been reviewed and approved. You can Retract the document to the Drafts space (as shown in the following screenshot) for further edits and approvals.

For email notifications, you can either use your own email message or use a standard email notification template (as shown in the screenshot under the section Send notification for approval to the Manager). You can also create your own email templates to reuse whenever required. For more details about the DataDictionary and templates, please refer to Chapter 5.
The space at Company Home > Data Dictionary > Email Templates contains various email templates. The email templates are written in the FreeMarker template language and will have an extension of .ftl. Now we shall learn how to create your email template. For more details about Data dictionary and templates, please refer to Chapter 5.
Create a file named chapter8_notify_pending_approval_email.ftl on your personal computer , and populate it with the following code. This is FreeMarker template code, which includes the details of the document and the author in order to send them to the reviewer. Fill in Your Title, Company Name, and other details, as required.
<#-- Sends email to people when a document is pending approval -->

A document titled '${document.name}' is pending your approval in the '${space.name}' space.

You can view it through this link:
http://<server-name>:<port>/alfresco${document.url}

Please review and approve it as soon as possible.

Best Regards

'${person.properties.firstName}<#if person.properties.lastName?exists> ${person.properties.lastName}</#if>'
Your Title
Your Company Name
Your Signature
Go to the Company Home > Data Dictionary > Email Templates space, and click on the Add Content link. Upload the chapter8_notify_pending_approval_email.ftl file, which you have created earlier, in this space.
The email template is now ready to be used. You can go back to the email notification business rule that was created for the Pending Approval space, and edit it to include the new email template that you have created.
You can implement complex workflows by chaining the spaces with business rules, as long as each step in the workflow results in either an approved or a rejected result. Once such a workflow is clearly defined—identifying various steps (spaces), people, and the business rules involved—it is easy to implement using Alfresco.
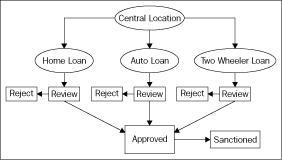
For example, let's consider a company named Secure Loaning Ltd. that provides loans such as Home Loan, Auto Loan, and Two Wheeler Loan. Therefore, the company has three departments run by three different groups of people. Each group has roles based on the department that they belong to. These groups of people review and then approve or reject the document, based on the category of the documents processed by the customers. On approval of the document, it is converted into PDF format and sent to the Sanctioned department. One copy of the PDF file is sent to the customer and another copy is kept within the department itself. On rejection of the document, it is send to the Rejected department. Notifications are sent to various parties when a document is received into a department, as well as when a document is sent to the Approved or Sanctioned departments.
Consider the sample workflow shown in the following image, where a document on the basis of its category, goes through different spaces, that is, departments for Review, Reject, Approved, and Sanctioned. In the image, each circle indicates the department, which can be considered as a folder. The document workflow process is identical for Home Loan, Auto Loan, and the Two Wheeler Loan documents. However, the actors (various groups of people) differ, based on the category of the document.
The workflow implemented here is the Home Load Document Workflow. The following steps should be followed for the Home Load Document Workflow. The same can be followed by the auto and two wheeler documents.
- The user will drop all of the documents into a centralized location (Central Location) and will specify the desired type of loan. For this purpose, you can create a content type which has metadata such as
CustomerName,typeofresidence,locality,references,salary,andtypeofLoan. Based on the type of loan, the document will be moved to the appropriate Loan folders (according to the business rules). - Next, a member of the relevant group will update the document and the related metadata. He or she then sends the document to the appropriate Review folder for review (through Simple Workflow).
- A member of the next group will review that document, add comments to it, and either Approve or Reject it (through Simple Workflow).
- If approved, the document will be moved to the Approved folder, and if rejected, the document will be moved to the Rejected folder.
- When any document enters the Approved folder, it is transformed into PDF format and copied into the Sanctioned folder (according to the business rule).