Let us say your Corporate Communications group would like to create press releases and execute certain business rules if the content is of a press release type. They would like to have the additional properties listed as follows:
Earlier in this chapter, you saw the advantages and disadvantages of having a custom aspect over having a custom content type. You need a custom content type if that type of content has some significance for you, such as in the case of press release. You will be able to add Press Release content in any space as you like, without going through the hassles of applying all kinds of business rules on spaces. Similarly, with a custom content type, you will be able to execute business rules based on the content type. For example, you can send notifications to certain people when a Press Release is created.
The following process needs to be followed in order to add a custom content type to the Alfresco content model:
- Define the custom content type, the properties, and the mandatory aspects.
- Extend the content model with the custom content type.
- Configure the web client for the custom aspect.
- Restart Alfresco to make sure that the new changes are in effect.
You may consider calling your custom content type Press Release, with the properties shown in the following table:
|
Property Type |
Property Name |
Property Label |
|---|---|---|
|
text |
|
PR Person Name |
|
text |
|
PR Person Email |
|
text |
|
PR Person Phone |
|
Int |
|
PR Released Date |
Now that you have identified your custom content type and the properties, the next step is to extend the Alfresco content model with the XML representation of your custom content type.
Open the customModel.xml file and add the following XML code before the aspects block:
   <types>

      <!-- Definition of new Content Type: Press Release -->
      <type name="custom:pressrelease">
         <title>Press Release</title>
         <parent>cm:content</parent>
         <properties>
            <property name=»custom:PRName»>
               <title>PR Person Name</title>
               <type>d:text</type>
            </property>
            <property name=»custom:PREmail»>
               <title>PR Person Email</title>
               <type>d:text</type>
            </property>
            <property name=»custom:PRPhone»>
               <title>PR Person Phone</title>
               <type>d:text</type>
            </property>
            <property name=»custom:PRDate»>
               <title>PR Released Date</title>
               <type>d:date</type>
            </property>
         </properties>
      </type>

</types>You need to make sure that the web client program recognizes this new custom content type and displays appropriate dialog screens in the web-based interface. In order to make this happen, you need to configure the web client file web-client-config-custom.xml, which is in the extension (<alfresco_install_folder> omcatsharedclassesalfrescoextension) folder.
Open the web-client-config-custom.xml file and add the highlighted lines of the following code:
   <!-- Lists the custom aspect and custom content type in business rules Action wizard -->
   <config evaluator="string-compare" condition="Action Wizards">
      <aspects>
         <aspect name="custom:CustomerDetails"/>
      </aspects>
      <subtypes>
         <type name="custom:pressrelease"/>
      </subtypes>
   </config>
This code ensures that the pressrelease content is shown in the business rules Action wizard.
Add the following XML code, just before the block shown above. This code ensures that the press release content type is listed when you create new content.
   <config evaluator="string-compare" condition="Content Wizards">
      <content-types>
         <type name="custom:pressrelease" />
      </content-types>
   </config>
Add the following XML code, just before the block shown above. This code ensures that the properties are available for editing in the edit properties window for the pressrelease content.
   <config evaluator="node-type" condition="custom:pressrelease">
      <property-sheet>
         <show-property name="mimetype"
           display-label-id="content_type"
           component-generator="MimeTypeSelectorGenerator" />
         <show-property name="size"
           display-label-id="size"
           converter="org.alfresco.faces.ByteSizeConverter"
           show-in-edit-mode="false" />
         <show-property name="custom:PRName" />
         <show-property name="custom:PREmail" />
         <show-property name="custom:PRPhone" />
         <show-property name="custom:PRDate" />
      </property-sheet>
   </config>
After making changes to the configuration files, restart Alfresco.
The new content type, called pressrelease, is now available to add anywhere you like. On your personal computer, create a sample press release in HTML format, and save it as PressRelease1.html. Follow the steps given below to upload your pressrelease content:
- Go to the Company Home > Intranet > Press and Media space, and create a sub-space called Press Releases.
- Ensure that you are in the Company Home > Intranet > Press and Media > Press Releases space.
- In the space header, click on the Add Content link. The Add Content dialog box appears.
- To specify the file that you want to upload, click the Browse button. In the File Upload dialog box, browse to the file that you created earlier, (
PressRelease1.html) and click the Upload button. - A message informs you that your upload was successful, as shown in the screenshot on the next page.
- Select Press Release as the Type, from the drop‑down list.
- Click the OK button to confirm.

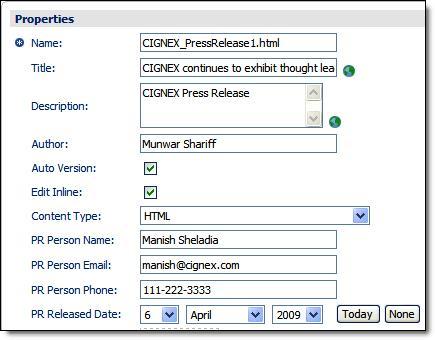
- The Modify Content Properties dialog box appears, as shown in the screenshot below.
- The Name, Tile, Description, and Author properties are basic properties that are populated by default. Auto Version is a mandatory aspect that is attached to the
pressreleasecontent. The properties PR Person Name, PR Person Email, PR Person Phone, and PR Released Date are part of thepressreleasecontent. Also notice that Edit Inline is selected for HTML content. Enter the appropriate data for the properties. - Click on the OK button to save your changes and return to the Press Releases space.
You can also create a pressrelease as HTML content, directly in the web client, without uploading the file from your personal computer. To create an HTML file in a space, follow the instructions given below:
Ensure that you are in the Company Home > Intranet > Press and Media > Press Releases space. In the header, click on the Create > Create Content link. The first pane of the Create Content Wizard appears, as shown in the following screenshot:

You need to provide the Name of the HTML file, select HTML as the Content Type, and then click on the Next button. The Enter Content pane of the wizard appears, as shown in the screenshot below.

You can enter some sample press release text by using the text formatting features. After the content has been entered and edited in the Enter Content pane, click Finish. You will see the Modify Content Properties screen used to update metadata that is associated with the content, as shown in the screenshot under the section Add Custom Content Type. You can modify the properties as required, and click on the OK button. You can preview the newly-created Press Release by clicking on it.
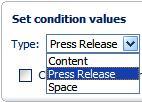
You can create a business rule targeting a custom content type. For example, you can send notifications to concerned people when a press release is added. When creating the business rule, select the Items of a specified type or its sub-types condition, as shown in the following screenshot.

Click the Set Values and Add button to set the condition. This will display a dialog box for setting condition values, as shown below. Select the Press Release option as Type.