
Let us assume that your sales people would like to track all of their proposals that are related to a customer. They would like to search the documents and execute business rules, based on the customer details. They would like to capture the following customer details for all of the documents in the sales department space:
- Name of the customer
- Contact's name at the customer's place
- Contact person's phone number
- Project identification number, internally allocated
- Whether this is a new customer
You can extend the Alfresco content model to include the properties listed above as an aspect. You can then apply this aspect to be part of all of your documents in the sales department space.
The
Alfresco content model is designed to be extensible. You can introduce custom properties to your objects in two different ways. The first is to create a custom aspect (in our example, called Customer Details) and dynamically attach it to the documents in a specific space. The custom aspect would define the required properties. The other way is to create a custom content type (again, called Proposal Document) and define all the required properties on the type itself. The process of creating custom content types is explained in detail in the next section of this chapter.
Choosing a custom aspect over a custom content type is up to you, based on your business requirements.
The following are the advantages of having custom aspect over custom content type:
- Flexibility: You will have more flexibility. A custom aspect will give you flexibility to add additional sets of properties to the documents in specific spaces. For example, you can define these additional properties for documents in Sales Department > Proposals and Finance Department > Customer Checks spaces.
- Efficiency: Because these properties are applied selectively to certain documents in certain spaces only, you will consume limited storage in the relational database for these properties.
- Behaviors: A custom aspect can introduce new behaviors for objects. Using Spring's aspect-oriented support, you can define new beans that intercept content-related events and handle them according to your exact needs. This is an advanced capability of aspects. Although this is not covered in this chapter, it is worthwhile to keep in mind when considering the pros and cons of aspects.
The following is the disadvantage of having custom aspect over custom content type:
The following process needs to be followed to add a custom aspect to the Alfresco content model:
- Define the custom properties and types of properties.
- Extend the Alfresco Content Model with the custom aspect.
- Configure the Web Client application for the custom aspect.
- Restart Alfresco to make sure that the new changes are effective.
Each one of these steps is explained in detail in the following sections.
You need to define the name of the custom aspect and the properties. For each property, you need to define the type of the property. Some of the property types are listed in the following table. For a complete list of property types, please refer to the <configRoot>/Alfresco/model/dictionaryModel.xml file.
|
Property Data Type |
Description |
|---|---|
|
text |
Any string or name |
|
content |
Binary document |
|
int |
Integer or number |
|
long |
Big integer |
|
float |
Number with decimal values, such as an nterest rate of 7.5 |
|
date |
Year, month, and day |
|
datetime |
Timestamp |
|
Boolean |
true or false |
|
category |
Reference to a category within a classification |
|
path |
URL |
You may consider calling your custom aspect Customer Details, with the following properties:
|
Property Name |
Property Label |
Property Type |
Mandatory |
Default Value |
|---|---|---|---|---|
|
|
Customer Name |
text |
No |
None |
|
|
Customer Contact Name |
text |
No |
None |
|
|
Customer Contact Phone |
text |
No |
None |
|
|
Customer Project ID |
int |
No |
None |
|
|
New Customer |
Boolean |
No |
True |
Now that you have identified your custom aspect and the properties, the next step is to extend the Alfresco content model with the XML representation of your custom aspect.
Go to the extension folder and rename the custom-model-context.xml.sample file to custom-model-context.xml. Now examine the contents of the custom-model-context.xml file, which includes the name of the custom content model file—customModel.xml.
Open the customModel.xml file and add your custom aspect, as shown in the following code, before the last line in the file, which is </model>.
   <aspects>

      <!-- Definition of new Content Aspect: Customer Details -->
      <aspect name="custom:CustomerDetails">
         <title>Customer Details</title>
         <properties>
            <property name="custom:CustomerName">
               <title>Customer Name</title>
               <type>d:text</type>
               <protected>false</protected>
               <mandatory>false</mandatory>
               <multiple>false</multiple>
            </property>
            <property name="custom:CustomerContactName">
               <title>Customer Contact Name</title>
               <type>d:text</type>
            </property>
            <property name="custom:CustomerContactPhone">
               <title>Customer Contact Phone</title>
               <type>d:text</type>
            </property>
            <property name="custom:CustomerProjectID">
               <title>Customer Project ID</title>
               <type>d:int</type>
            </property>
            <property name="custom:NewCustomer">
               <title>New Customer</title>
               <type>d:boolean</type>
               <default>true</default>
            </property>
         </properties>
      </aspect>

   </aspects>
A property can have various elements as shown in the following table.
|
Property Element |
Description |
|---|---|
|
Property name |
Unique Id of the property, along with the namespace. |
|
Title |
This element will act as a label to display a meaningful name for the property. |
|
Type |
Specifies the data type of the property, such as text, int or date |
|
Protected |
If this element is set is "true", then it becomes a "read-only" property in the Alfresco web client. The default value is "false", which means that users can edit the property in the web client. |
|
Mandatory |
If this element is set to "true", then a value has to be either set or entered by the user before saving the property. The default value is "false", which means the property is optional. |
|
Multiple |
If this element is set to "true", then the property can have multiple values set. The default value is "false". |
|
Default |
Provides a default value for the property. |
The content model is extended with a custom aspect called Customer Details. You need to make sure that the web client program recognizes this new custom aspect and displays it in the web-based interface. In order to make this happen, you need to configure the web client file web-client-config-custom.xml in the extension folder.
Open the web-client-config-custom.xml file and add the following XML code before the last line, which is </alfresco-config>.
<!-- Lists the custom aspect in business rules Action wizard -->
<config evaluator="string-compare" condition="Action Wizards">
<aspects>
<aspect name="custom:CustomerDetails"/>
</aspects>
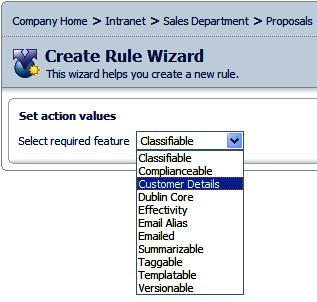
</config>This code ensures that the new aspect, called Customer Details, is listed in the business rules Set action values page, as shown in screenshot under the section Use Custom Aspect as Business Rule.
Open the web-client-config-custom.xml file and add the following XML code before the last line, which is </alfresco-config>.
<!-- Displays the properties in view details page -->
<config evaluator="aspect-name" condition="custom:CustomerDetails">
<property-sheet>
<separator name="sepCust1" display-label="Customer Details" component-generator="HeaderSeparatorGenerator" />
<show-property name="custom:CustomerName"/>
<show-property name="custom:CustomerContactName"/>
<show-property name="custom:CustomerContactPhone"/>
<show-property name="custom:CustomerProjectID"/>
<show-property name="custom:NewCustomer"/>
</property-sheet>
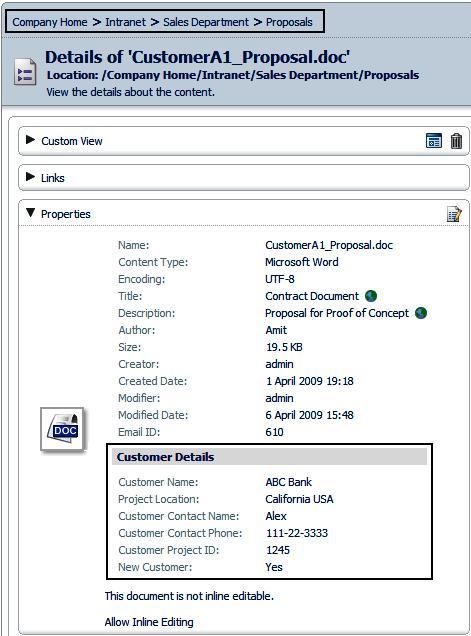
</config>This code ensures that the properties added to the content due to the CustomerDetails aspect will be displayed in the content's view details page, as shown in the screenshot in the next section. The separator tag that is defined above is useful to group these properties, and to separate them from the other list of properties in the property sheet, by creating a bar with the label Customer Details.
Now, restart Alfresco to make sure that the changes are in effect.
Now that the Customer Details aspect is available, you can use it to add to your documents as if this aspect was available to you out of the box.
You can define a business rule to dynamically include customer details for all of the documents in a space. Consider the example provided earlier, where the Sales Department group needs to maintain the customer details for all of their proposals. Follow the steps provided below to add the Customer Details aspect to all of the documents in the Sales Department > Proposals space.
- Go to the Company Home > Intranet >Sales Department space and create a sub-space for proposals, called Proposals.
- Ensure that you are in the Company Home > Intranet >Sales Department > Proposals space.
- In the Proposals space, click the More Actions > Manage Content Rules.
- Click on the Create Rule link, and you will see the Create Rules Wizard.
- In Step One, from the Select Condition drop‑down list, select All Items, and then click on the Add to List button. Then click on the Next button.
- In Step Two, from the Select Actions drop‑down list, select Add aspect to item, and then click on the Set Values and Add button.
- In the Set action values pane, select the Customer Details aspect, as shown in the following image, and then click on OK. Finally, click on the Next button.
- In Step Three, select the Inbound option from the Type drop-down list, and provide an appropriate name and description for this rule.
- Select the Apply rule to sub spaces option and then click on Finish to apply the rule.
Test this business rule by adding a document in the Proposals space. You will notice five additional properties have been dynamically added to the document. Add some meaningful customer data, and then click on the OK button.
Navigate to the document and click on the View Details icon to view the details page. You will notice that the properties have been added to the document because of the custom aspect are visible in the details page of the document, as shown in the following screenshot:
Similarly, create a business rule on the Company Home > Intranet >Financial Department > Customer Checks space to add customer details to all of the incoming checks, as shown in the following screenshot. Add an image file (scanned customer check) to this space, and notice that the check has additional properties , as defined by the customer details aspect.
