
Cubase 6 offers the possibility of mixing in several surround modes, as well as in traditional stereo mode. When it comes to an audio recording mix, the word “surround” refers to a multichannel positioning system, rather than a standard stereo (left/right) positioning. The advantage of mixing in surround is that beyond the left/right field available in stereo mixes, you can literally place your sound anywhere in space around the listener by using various surround configurations. Surround mixing is particularly effective—and necessary—with video projects, where you want the soundtrack and sound effects to surround the listener.
Here’s a summary of what you will learn in this chapter:
How to create a child input or output bus
How to use the SurroundPanner
How to mute speakers in the SurroundPanner
How to edit the routing of an insert effect in a surround output bus configuration
How to export a surround mix
Cubase offers a number of different multichannel surround configurations; which configuration you choose depends on the surround standard you want to use and the room for which you are mixing. For example, a surround movie soundtrack typically uses a 5.1-channel configuration, with three front speakers (left, center, and right, located in front of the listener), two surround speakers (left and right, located to the sides of the listener), and a single subwoofer. The subwoofer reproduces the lowest bass notes in the Low Frequency Effects (LFE) channel.
Table 37.1 details the various surround modes supported in Cubase 6.
Table 37.1. Surround Sound Modes
Mode | Description |
|---|---|
5.1 | This is the most popular surround sound format, with three front channels (left, center, and front), two side-mounted surround channels (left and right), and a single LFE (subwoofer) channel. This format is used in both Dolby Digital and DTS systems. |
5.0 | The same as the 5.1 format, but without the LFE channel. |
LRCS | Left Right Center Surround, a four-channel system with three front channels (left, center, and right) and a single surround channel positioned behind the listener. This is the original surround format, first appearing in movie houses as Dolby Stereo and in the home as Dolby ProLogic. |
LRCS+Lfe | The same as LRCS but with an added LFE (subwoofer) channel. |
LRC | Left Right Center, essentially the same as the LRCS format but with only front channels (no surround channel). |
LRC+Lfe | The same as LRC but with an added LFE (subwoofer) channel. |
LRS | Left Right Surround, essentially the same as the LRCS format but with no front center channel. |
LRS+Lfe | The same as LRS but with an added LFE (subwoofer) channel. |
Quadro | A four-channel system for music, replicating the original quadraphonic recordings of the 1970s. This places two speakers (left and right) in the front, and a matching two speakers (left and right) behind the listener. |
Quadro+Lfe | The same as the Quadro format, but with an added LFE (subwoofer) channel. |
6.0 Cine | A six-channel setup for movie soundtracks, utilizing three front channels (left, center, right) and three surround channels (left, center, right). |
6.0 | A six-channel setup for music, utilizing two front channels (left and right), two side channels (left and right), and two rear surround channels (left and right). |
To use surround mixing in Cubase, you must create a surround output bus that is connected to multi-output audio hardware. You also could create a surround input bus, but your input sources and audio tracks don’t have to be multichannel in order to be routed to a surround output bus. When any audio channel is sent to a surround output bus, the SurroundPanner appears in the channel’s panning area, replacing the pan position value display, offering you control over more than the typical left and right channels in a stereo mix.
You can also choose to route an audio channel (disk-based, VSTi, ReWire, or FX channel) to a specific set of outputs within the surround bus channels. In that case, the pan control would remain the same, as if you were routing the signal through a mono or stereo output bus. Figure 37.1 shows how an audio channel displays the pan control when it is assigned to a surround output bus on the left and to a stereo output bus on the right.

Mixing in surround requires multiple-output audio hardware to monitor the signal sent to these additional outputs. It also requires an external multichannel monitoring system to support surround mixes.
To work with surround configurations, you need to create surround output busses. These are created in the VST Connections panel by selecting one of the multichannel configurations in the Add Output Bus dialog box.
After you have created a surround bus (input or output), you can associate each channel in the bus with an ASIO device port (that is, an individual input or output on your audio interface). How many ASIO device ports you need depends on the surround configuration you choose. For example, a 5.1 configuration will create a six-channel configuration, whereas an LCRS configuration uses only four channels.
When you want to assign an audio channel to a surround bus, you can decide to route the output directly through one of the individual channels in the surround bus, or to all the channels at once, where its exact location will be determined by the position of the SurroundPanner. When a channel is routed directly to a single channel within the surround bus, the pan area of the channel does not offer a surround panning option.
After a surround bus is created, you can also create child busses. A child bus offers a convenient way of routing an audio channel through a specific set of outputs that forms part of a surround bus. For example, you can create a stereo child bus within a 5.1 surround configuration, where the left and right channels are grouped within the surround bus.
Routing an audio channel through a stereo child bus (consisting of two audio outputs on your audio interface) allows you to control where the sound will occur in that child bus, so you will have a stereo Pan control rather than a surround Pan control. In other words, creating a child bus can make it easier to route audio through a surround bus, yet keep a stereo control (affecting both channels) when adjusting the pan and volume for this channel. For example, if you are creating a surround input bus to capture a multichannel performance or surround atmosphere, you can create child busses to represent the left/right pair and then a left surround/right surround pair. When adjusting the level of the inputs, changing the volume for the left side will also affect the right side as they are being grouped inside the surround bus configuration.
When working with surround busses, both as input and output, many routing options are available.
Depending on which routing option you choose, several pan control options are available. Table 37.2 offers a quick look at the surround signal routing options and the types of pan control offered by each.
Table 37.2. Surround Signal Routing Options
Source | Destination | Pan Control |
|---|---|---|
Mono | To single channel inside the surround bus | None. The output channel is mono and is heard through the associated ASIO device port. |
Mono | To child bus inside the surround bus | It is handled as a standard stereo or multichannel, depending on the child bus configuration. The pan might affect the surround position or any other location, depending on the current parent bus configuration. For example, if the bus is in 5.1 (six channels) and the child bus set as an LCR subset (three channels), the channel will display the SurroundPanner to control the location. On the other hand, if your child bus is stereo (left/right), the mono channel will be panned between left and right (not surround panned, even though it is part of the surround configuration). |
To a surround bus | The SurroundPanner positions the signal anywhere within the current surround bus configuration. | |
Stereo | To stereo child bus inside the surround bus | See above—this is the same as with a mono signal sent to a stereo child bus. |
Stereo | To a surround bus | The SurroundPanner positions the signal anywhere within the current surround bus configuration. |
Surround | Surround | No pan control; all channels play in the same channel as they came in from. You should avoid sending a multichannel input signal configuration into another multi-input signal configuration or into a mono or stereo output bus. For example, avoid sending a 5.1 multichannel input signal to an LCRS output bus. Doing so results in loss of sound positioning precision. |
SurroundPanner V5, updated for Cubase 6, is automatically available in a channel’s pan control area in the Mixer window (and optionally in the Inspector) when mono or stereo audio channels are routed through a surround output bus or a multichannel child bus (but not a stereo child bus). You can position and automate the position of the sound within the surround configuration by dragging the small dot inside the surround pan display.
To open the full SurroundPanner V5 window for a track, as shown in Figure 37.2, double-click the pan control area for that track in the Mixer or Inspector. This full display offers more precision and greater control over the setup and behavior of the panner.
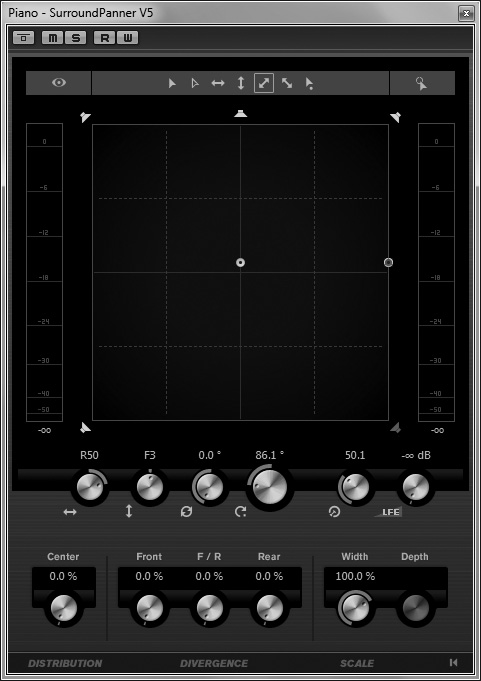
The upper part of the SurroundPanner V5 window offers a representation of the speaker placements and the position of this channel’s sound in relation to the speakers. The lower part offers a variety of controls over the behavior of the SurroundPanner itself. Note that the actual number of speakers and how they appear in the upper part depends on the current surround output bus configuration.
To roughly position this instrument in the surround field, use your mouse to drag the sound source to a new position within the SurroundPanner display. To fine-tune the position, use the positioning controls (knobs) underneath the visual display. And, in configurations with a low frequency effects (subwoofer) channel, use the LFE Level control to set the volume level of the subwoofer channel.
You can automate the SurroundPanner as you would any other channel automation described in Chapter 36, “Writing and Reading Automation.”
As you might have anticipated, using effects in Surround mode is a slightly more complex issue because most effects are designed to work on two channels rather than four, five, or six channels. To that end, Cubase offers some surround plug-ins and support for surround-compatible plug-ins from third parties through a special signal path diagram, which is accessible in the Channel Settings panel for the surround output bus.
This routing also is available for any stereo or mono channels; however, the surround configuration only shows up when you are editing a multichannel track (recorded from a multichannel input) through a multichannel output bus.
By default, the Insert Routing panel is not visible; to display it, right-click (PC)/Control-click (Mac) anywhere in the window and select Customize View > Insert Routing.
Each vertical line in this display corresponds to a channel (ASIO device port) in the multichannel track, routed to its corresponding output bus channel. By assigning multiple instances of the same effect to different channels in the bus, you can use effects on all channels in the bus. Lines that are interrupted by handles before and after the insert effect indicate that the signal will be processed by this effect on this channel inside the bus.
To change the routing of an effect in a multichannel setup, double-click on the routing lines next to the effect you want to route. The Routing Editor dialog box, displayed in Figure 37.3, opens and displays three types of paths: broken lines with boxes (L, R), broken lines without boxes (C, LFE), and passing lines (Ls, Rs). The connector at the top represents the input of the insert, and the connector at the bottom represents its output. If a line is broken with a box on each side of the connector, it means that the signal is routed through the effect. If a line is broken without boxes, the signal is muted from this point on in the signal path. In the same figure, this is the case for the two center lines (channels).
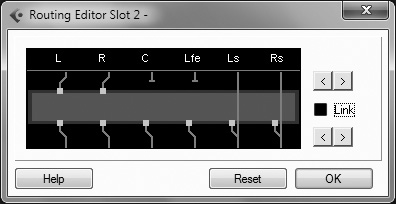
If the line passes through without breaking, it means that the signal bypasses the effect altogether. You might decide to process a channel with a plug-in, yet send the output of this plug-in to another channel. For example, you could process the left and right surround channels with a reverb and send the output of this reverb effect into the left and right channels instead; in this example, the left and right channels will contain both the source signal bypassing the reverb and the reverb’s processed output, which contains the signal originally found on the left and right surround channels.
The set of arrows separated by the Link check box moves the input channels or the output channels left or right to modify the routing. When the Link check box is active, both the input and output channels will move together.
After you have completed your surround mix, you can export it as you would export a normal final stereo mix. The only difference with a surround mix is that you can choose an additional number of output file formats in the File > Export > Audio Mixdown dialog box. Make sure you select the appropriate multichannel bus output in the Channel Selection pane; this is necessary for Cubase to create the proper surround mix.