
Practical Example: Building and Animating a Simple Eye Rig
In this quick example, you build a simple rig for controlling eyes and ultimately animating them.
 Before getting started, I should note that while the eye rig you have at the end of this section works well, I don't recommend that you use this exact rig in a full character without some modifications. The modifications aren't too drastic; mostly you need to replace the Empties in this rig with bones in an armature. I go over using bones in more detail in Chapter 11. In the meantime, work your way through this example, and you'll be much better prepared when you get into more complex rigs.
Creating your rig
If you worked through the practical examples in previous chapters of this book, you should have a nice, textured eyeball. If you haven't worked through those examples, that's okay, too. I provide an eye model for you to work with on this book's companion DVD and Web site.
Appending an eye
This practical example starts off a bit differently from the previous ones in this book. Instead of opening the existing model .blend and working directly in that file, you start this project from the default startup scene (Ctrl+N) and append your eye model. To do so, use the following steps:
- Open Blender or load Blender's default scene (Ctrl+N) and delete the default cube (X or Delete).
All that's left in your scene now is the camera and a Point light.
- Append the eye object from the .blend file where it lives (Shift+F1).
Blender's File Browser appears. When you left-click the .blend file, the File Browser allows you to drill down into the file. You're looking at the innards of your .blend file.
- Left-click the Object folder.
You see an object named eye. If you're working on a file from the practical examples in Chapters 5, 7, and 8, I'm assuming that you named your model. If you're using the model provided on the DVD or Web site, the eye object is definitely named.
- Double-click the eye object.
Blender brings up your eye in the 3D View.
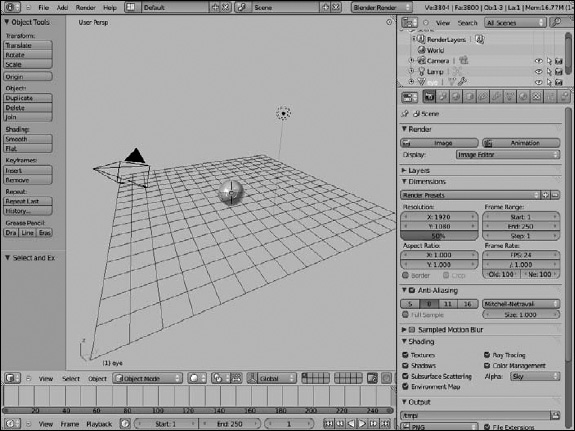
At this point, your Blender screen should look like the screenshot in Figure 10-12.
Setting up your rig
After you have your eye model in-scene (see preceding section), you can set up the rig. I recommend that you do the next steps from the front orthographic view (Numpad 1, Numpad 5). First things first: Most characters have two eyes, so you're going to need two eyes:
- Select the eye object and grab it along the X-axis 1.5 units (G
 X1.5).
If you're using a different custom eye model, the number of units you move it may be different. The idea here is to offset the eye to the right of the Z-axis.
Figure 10-12: Append your eye model into a default Blender scene.
- Create a linked duplicate of the eye and move it along the X-axis -3.0 units (Alt+DX-3).
Again, your move in the X-axis may not be exactly -3.0. Just double the value you used in Step 1 and negate it.
- Select the left eye (on your right if you're looking at it from the front) and name it eye.L .
You can name it from the Item panel in the 3D View's Properties region or from Object Properties in the Properties editor.
- Select the right eye and name it eye.R .
Adding .L and .R as a suffix for left and right parts of a character is a good practice to get into.
Now you have a disembodied binocular character. Sweet! For the next step, you need to add the controls for your new eyes. For this step, you're going to use Empties — three of them, to be exact: one for each eye and one for overall control:
- Select eye.L and snap the 3D cursor to its origin (right-click, Shift+SCursor to Selected).
- Add an Empty and name it eye_control.L (Shift+AEmpty).
- Select eye.R and snap the 3D cursor to its origin (right-click, Shift+SCursor to Selected).
- Add an Empty and name it eye_control.R (Shift+AEmpty).
- Select your new Empties.
The Empties may be obscured by your eye models, so you may find it easier to select them using the Outliner or by quickly toggling wireframe viewport shading (Z).
- Grab these Empties and move them forward along the Y-axis (GY).
Moving them about 6 units forward (G
Y-6) should be enough. - With the two Empties still selected, snap the 3D cursor to the location between them (Shift+SCursor to Selected).
Because both Empties are selected, the 3D cursor should snap right to the Y-axis.
- Add a new Empty and name it eye_control (Shift+AEmpty).
- Scale the eye_control Empty to be twice the size of the other two Empties (S2).
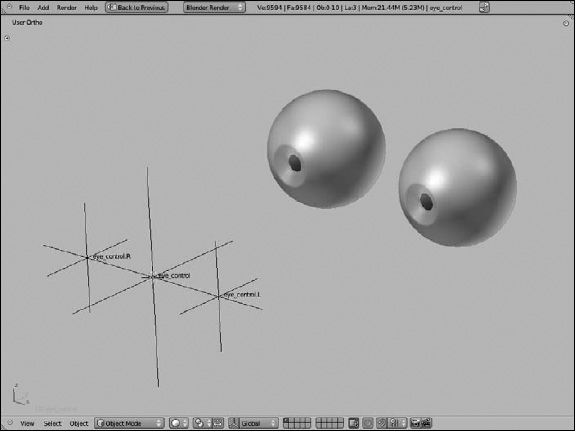
At this point, all the elements for your simple rig are in place. Your setup should look like the screenshot in Figure 10-13.
Figure 10-13: All the elements for a simple eye rig are in place.
Applying constraints
All your pieces and parts are in place; the actors are all on stage, if you will. The next step is getting your Empties to control your eyes. To do this step, you need to set up a couple constraints. Specifically speaking, the workhorse of this rig is the Track To constraint. Use the following steps to apply that constraint to the left eye:
- Select the eye_control.L Empty and then add eye.L to your selection (right-click, Shift+right-click).
Remember: Prisoners last.
- Add a Track To constraint to eye.L (Shift+Ctrl+CTrack To).
Your eye flips around and faces away from the Empty. The next step fixes that issue.
- In Constraints Properties, left-click the -Y button next to the To label in the Track To constraint.
Your eye flips back to pointing in the correct direction.
The control for your left eye is now ready to go. Go ahead and play with it. Select eye_control.L and grab (G) it around your scene. Your eye should follow it around. Right-click or press Esc to stop grabbing the Empty and it should go back to its original position. From here, you have two options. You can either repeat the preceding steps used on eye.L and apply them to eye.R, or you can take advantage of a handy Blender add-on: the Copy Attributes Menu. This menu was a built-in feature in previous versions of Blender, brought into the current version of Blender as an add-on.
To enable the Copy Attributes Menu add-on, bring up the User Preferences editor (Ctrl+Alt+U) and go to the Add-Ons section. Left-click the check box to enable the add-on labeled 3D View: Copy Attributes Menu. After you enable this add-on, close the User Preferences editor and go back to the 3D View. Now you can use the following steps to copy the Track To constraint from eye.L to eye.R:
- Select eye.R and add eye.L to your selection (right-click, Shift+right-click).
Remember: Children first.
- Copy the Track To constraint from eye.L to eye.R (Ctrl+CCopy Selected Constraints).
When you choose Copy Selected Constraints, Blender provides a menu.
- Left-click the TrackTo option and then left-click OK.
POW! Your eye.R object now has a Track To constraint with the exact same settings as eye.L.
Of course, a small problem is that eye.R is pointing to the wrong control Empty. Fortunately, this fix is easy. Select eye.R, go to its Track To constraint, left-click the Target field, and choose eye_control.R from the menu that appears. eye.R should now point to the proper control Empty.
Making it easier to control both eye targets at once
At this point, you're basically done with your rig. The only downside is that you have to select both eye_control.L and eye_control.R to control the direction of both eyes simultaneously. You can parent each of the Empties to the large eye_control Empty between them to solve this issue:
- Select eye_control.L and eye_control.R (right-click eye_control.L , Shift+right-click eye_control.R).
- Add eye_control to your selection, making it the active object (Shift+right-click eye_control).
- Make eye_control the parent of the other two Empties (Ctrl+PObject).
- Select eye_control.L and eye_control.R and hide them from view (H).
This step isn't critical, but it does help prevent you from selecting those empties and moving them accidentally.
Your simple eye rig is now complete, and you can start animating your eyes. You can control regular eye movement by grabbing (G) the eye_control Empty and moving it around your scene. If you want to cross your character's eyes, you can scale (S) the control down. And if you want your character to look like a crazy person, try rotating (R) the eye_control Empty.
If you'd like, you can set up basic three-point lighting (see Chapter 9) and set your 3D View to use Textured viewport shading (Alt+Z) and GLSL display shading (N![]() Display
Display![]() GLSL). And if having two disembodied eyes floating in the scene makes you too uncomfortable, you may want to add a sphere as a simple stand-in head.
GLSL). And if having two disembodied eyes floating in the scene makes you too uncomfortable, you may want to add a sphere as a simple stand-in head.
Animating your eyes
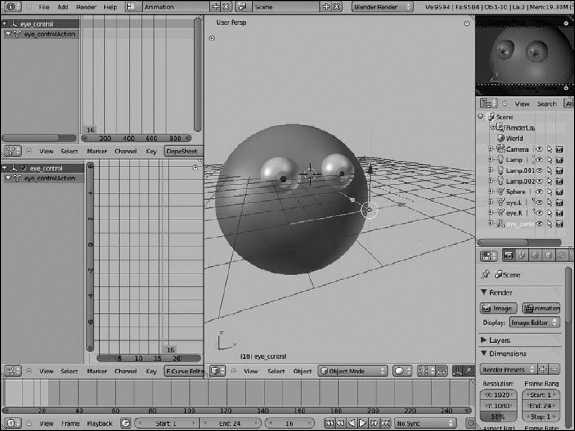
After you have a basic rig created, you can start animating your eyes. Start by switching to the Animation screen layout (Ctrl+←![]() Ctrl+←) and make the modifications described earlier in the section “Customizing your screen layout for animation.” You may also want to increase the size of the Graph Editor on the left of the screen as well. Then select the camera in the 3D View and adjust its location and orientation to frame your eyes to your taste. Your screen should look like Figure 10-14.
Ctrl+←) and make the modifications described earlier in the section “Customizing your screen layout for animation.” You may also want to increase the size of the Graph Editor on the left of the screen as well. Then select the camera in the 3D View and adjust its location and orientation to frame your eyes to your taste. Your screen should look like Figure 10-14.
Figure 10-14: Now you're ready to animate.
This specific example is a simple animation of a character rolling its eyes. As a quick test, roll your own eyes and try to figure out how long that action takes. Trying for myself, to get the right feel of the action, it feels like the action takes a full second. I've also noticed that my eyes seem to move faster at the end of the motion than at the beginning. Bearing all this information in mind, you can start animating:
- Select eye_control and grab it to the left of your character (right-click, G).
- Insert a location keyframe (ILocation).
This keyframe is the starting point for your animation.
- Move forward in time to frame 24.
You can move forward by scrubbing in the Timeline or Graph Editor or by changing the Current Frame field in the Timeline's header. Blender's default behavior is to have motion happen at 24 frames per second (fps). This action takes 1 second to complete, which is why you go to frame 24.
- Move the eye_control Empty to the right of your character (G).
- Insert another location keyframe (ILocation).
You've now animated your character's eyes looking from left to right.
- Set the current frame as the end frame of your animation by hovering your mouse over the Timeline and pressing E or by using the FrameSet End Frame menu item.
You can test the timing of your animation by pressing Alt+A or left-clicking the play button in the Timeline. Press Esc or left-click the pause button to stop playback.
- Move to frame 16.
Because I noticed that my eyes move faster at the end of the motion, I want this keyframe to be closer to the end of the action.
- Grab the eye_control Empty and move it up in the Z-axis so that it's above your character's head (G).
- Insert another location keyframe (ILocation).
When you play back your animation, your character should now be successfully rolling its eyes.
- Tweak your animation to taste using more keyframes or by editing the f-curves in the Graph Editor.
See? Animation can be easy!