
Adding to a Scene
There's got to be more to life than that plain default cube, right? Indeed, there is. Blender offers a whole slew of primitives, or basic objects, to build from.
 Anytime you add a new object in Blender, the origin of that object is located wherever you placed the 3D cursor.
![]() You may notice that for pop-up menus like the Dynamic Spacebar Menu (see sidebar), Blender places the last menu option you choose directly under your mouse cursor. This workflow feature helps increase your speed. The idea is that you often want to do the same task multiple times in a row. Blender makes repetitive tasks easier by shortening the distance you have to move your mouse with each function.
You may notice that for pop-up menus like the Dynamic Spacebar Menu (see sidebar), Blender places the last menu option you choose directly under your mouse cursor. This workflow feature helps increase your speed. The idea is that you often want to do the same task multiple times in a row. Blender makes repetitive tasks easier by shortening the distance you have to move your mouse with each function.
Adding objects
To add a new object to your scene, use the Shift+A hotkey and choose the type of primitive you want to put into the scene. You have the following choices:
- Mesh: Meshes are polygon-based objects made up of vertices, edges, and faces. They're the most common type of modeling object used in Blender.
- Curve: Curves are objects made up of curved or straight lines that you manipulate with a set of control points. Control points are similar to vertices, but you can edit them in a couple of ways that vertices can't. Blender has two basic forms of curves, Bézier curves and NURBS (Non-Uniform Relational B-Spline) curves. You can also use curves as paths to control other objects.
- Surface: A surface is similar to a mesh, but instead of being made up of vertices, edges, and faces, surfaces in Blender are defined by a set of NURBS curves and their control points.
- Meta ball: Meta objects are unique primitives with the cool ability to melt into one another and create a larger structure. They're handy for a variety of effects that involve blobby masses, such as clouds or water, as well as quick, rough, claylike models.
- Text: The text object allows you to bring type into your 3D scene and manipulate it like other 3D objects.
- Armature: Armature objects are skeleton-like structures that consist of linked bones. You can use the bones in an armature to deform other objects. The bones are particularly useful for creating the puppetlike controls necessary for character animation.
Getting to know the toolbox menu
In previous versions of Blender, one of the quickest ways to access any feature in the 3D View is with a toolbox that was activated when pressing spacebar. To access the toolbox, you only had to hover your mouse in the 3D View and press spacebar. Sadly, this feature is no longer a default. Pressing spacebar now only pops up Blender's integrated search menu.
Fortunately, all is not lost! You can still have your good old toolbox back, thanks to Blender's Add-Ons system (see Chapter 2). Simply go to the Add-Ons section of User Preferences (Ctrl+Alt+U) and enable the Dynamic Spacebar Menu Add-On (it's in the 3D View category). With this Add-On enabled, when you go back to the 3D View and press spacebar, a menu pops up with a variety of options beneath your mouse cursor.
The actual content of the menu changes, depending on context like what type of object you have selected or if you're in Edit mode or Object mode, but it's mostly a condensed form of what you find in Blender's Add and Object menus. If you want to use the integrated search feature that is normally bound to spacebar, that option is still there at the top of the Dynamic Spacebar Menu. Click that first option, and the familiar search menu appears.
- Lattice: Like armature objects, you can use lattices to deform other objects. They're often used in modeling and animation to squash, stretch, and twist models in a nonpermanent way. Lately, lattices are used less and less in Blender because users have gained the ability to deform objects with curves and meshes, but they're still very useful.
- Empty: The unsung hero of Blender objects, Empties don't show up in finished renders. Their primary purpose is merely to serve as a reference position, size, and orientation in 3D space. This basic purpose, however, allows them to work as very powerful controls.
- Camera: Like real-world cameras, camera objects define the location and perspective from which you're rendering your scene.
- Lamp: Lamp objects are necessary for lighting your scene. Just like in the physical world, if you don't have any light, you don't see anything.
- Force Field: In the simplest terms, a force field is an Empty that acts like the source of some physical force such as wind or magnetism. Force fields are used primarily with Blender's integrated physics simulation. I briefly touch upon force fields in Chapter 13.
- Group Instance: A group is a set of objects you define as being related to each other in some way. The objects in a group don't have to be the same type and are handy for organization as well as appending sets of objects from external files.
 When adding new objects, be aware of whether you're in Object mode or Edit mode. If you add while in Edit mode, then your addition options are limited to the type of object you're editing. Also, your new object's data is joined with the object you're editing. If you don't want the object data to join, then make sure that you tab back to Object mode before adding anything new.
Meet Suzanne, the Blender monkey
Many 3D modeling and animation suites have a generic semicomplex primitive that is used for test renders, benchmarks, and examples that necessitate something a little more complex than a cube or sphere. Most of these other programs use the famous Utah teapot as their test model.
Blender has something a little more interesting and unique. Blender has a monkey head that's affectionately referred to as Suzanne, a reference to the ape in two of Kevin Smith's films: Jay and Silent Bob Strike Back and Mallrats (close to the end). You can add Suzanne to your scene by pressing Shift+A![]() Mesh
Mesh![]() Monkey. If you look through the Blender community's forums and much of Blender's release documentation, you see Suzanne and references to her all over the place. In fact, the annual awards festival at the Blender Conference in Amsterdam is called the Suzanne Awards. Figure 4-6 shows a test render featuring Suzanne.
Monkey. If you look through the Blender community's forums and much of Blender's release documentation, you see Suzanne and references to her all over the place. In fact, the annual awards festival at the Blender Conference in Amsterdam is called the Suzanne Awards. Figure 4-6 shows a test render featuring Suzanne.

Joining and separating objects
In the course of creating models for your scenes, you may need to join or separate objects — for example, if you accidentally add a new primitive while you're still in Edit mode. Of course, you can simply undo, tab into Object mode, and re-add your primitive, but why act like you made a mistake and go through all those extra steps?
There's another way. When you add a new primitive while in Edit mode, all the elements of your new primitive are selected, and nothing from your original object is selected. If only there were a command that would let you break this primitive away from this object and into an object of its own. Fortunately, there is. Press P![]() Selection, and your new primitive is separated into its own object. You can also access this function in the 3D View's header menu (Mesh
Selection, and your new primitive is separated into its own object. You can also access this function in the 3D View's header menu (Mesh![]() Vertices
Vertices![]() Separate).
Separate).
Tab back into Object mode and select (right-click) your new object. Its origin is located in the same place as its original object's origin. To put the origin of your new object at its actual center, press Shift+Ctrl+Alt+C![]() Origin to Geometry or click Object
Origin to Geometry or click Object![]() Transform
Transform![]() Origin to Geometry in the 3D View's header. This Origin to Geometry operation checks the size of your object and calculates where its true center is. Then Blender places the object's origin at that location.
Origin to Geometry in the 3D View's header. This Origin to Geometry operation checks the size of your object and calculates where its true center is. Then Blender places the object's origin at that location.
You can also specify that the object's origin be placed wherever your 3D cursor is located by pressing Shift+Ctrl+Alt+C![]() Origin to 3D Cursor or clicking Object
Origin to 3D Cursor or clicking Object![]() Transform
Transform![]() Origin to 3D Cursor.
Origin to 3D Cursor.
A third option is similar to Origin to Geometry, but it moves the object's content rather than the origin itself. Do this operation by clicking Object![]() Transform
Transform![]() Geometry to Origin (Shift+Ctrl+Alt+C
Geometry to Origin (Shift+Ctrl+Alt+C![]() Geometry to Origin).
Geometry to Origin).
As expected, you can also join two objects of the same type into a single object. To do so, select multiple objects. In Object mode, you can use the Border Select or Lasso Select tools, or you can simply Shift+right-click objects to add them to your selection. The last object you select is considered your active object and is the object that the others join into. With your objects selected, join them by pressing Ctrl+J or clicking Object![]() Join from the 3D View's header.
Join from the 3D View's header.
You can join objects of the same type only. That is, you can join two mesh objects, but you can't join a mesh object with a curve object. Using parenting or groups (discussed later in this chapter in the section “Discovering parents, children, and groups”) may be more appropriate.
Creating duplicates and links
In the section “Working with linked vertices,” earlier in this chapter, an example involved duplicating your selected vertices by using Shift+D (or Mesh![]() Add Duplicate). As you may expect, this operation also works in Object mode. This duplication method is great if you intend on taking an existing object and using it as a starting point to model another, more individualized object by tweaking it in Edit mode. However, suppose that you want your duplicated object to be identical to the original in Edit mode. And wouldn't it be nice if, when you do go into Edit mode, your changes happen to the original as well as to all the duplicates? For duplicated objects that you have to edit only once, you want to use the power of linked duplicates. Linked duplicates are objects that share the same internal datablocks.
Add Duplicate). As you may expect, this operation also works in Object mode. This duplication method is great if you intend on taking an existing object and using it as a starting point to model another, more individualized object by tweaking it in Edit mode. However, suppose that you want your duplicated object to be identical to the original in Edit mode. And wouldn't it be nice if, when you do go into Edit mode, your changes happen to the original as well as to all the duplicates? For duplicated objects that you have to edit only once, you want to use the power of linked duplicates. Linked duplicates are objects that share the same internal datablocks.
Linking data between objects
Linked duplicates are similar to what other programs call instance copies. The process to create a linked duplicate is pretty straightforward:
- Select the object you want to duplicate by right-clicking it.
- With the object selected, press Alt+D or Object
 Duplicate Linked from the 3D View's header.
From here, the behavior is just like regular duplication.
The object is automatically in grab mode.
- Place the object with your mouse and confirm its new location by left-clicking or by pressing Enter.
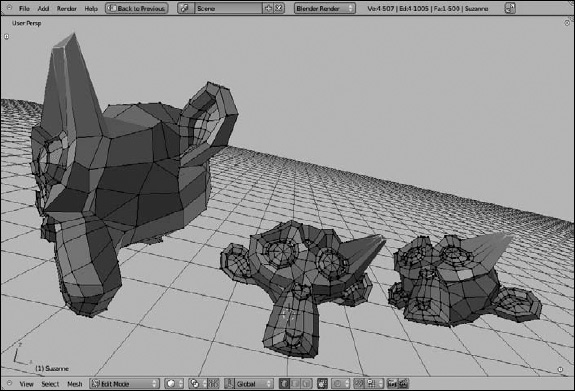
You can use a few other methods to verify that this duplicated object is, in fact, a linked duplicate. The easiest way is to tab into Edit mode on the original object or on any of the duplicates. When you do, all the linked objects appear to go into Edit mode, and any changes you make here automatically update all the other objects immediately. Figure 4-7 shows three linked duplicates of Suzanne being simultaneously modified in Edit mode.
Figure 4-7: Editing duplicated Suzannes!
A second way to verify the linked status of duplicates is to look in the Object Data section of the Properties editor. At the top of this panel, look at the top datablock field, which is the Datablock Name field. If a number appears to the right of the name, it is the number of objects linked to this datablock. In other words, this number is the count of your linked duplicates. Figure 4-8 shows how this panel looks when one of the Suzannes in the previous figure is selected.
Figure 4-8: Three objects are sharing this datablock.

 Another way to visualize linked data in Blender is to consider that Blender treats the internal structure of its .blend files like a database. As I cover in Chapter 2, all datablocks in your scene — including objects, materials, and mesh data — can be linked and shared between one another. The real power comes in allowing multiple objects to share with each other. For example, you can have objects share materials, mesh data, actions, and even particle systems. And different scenes can even share objects! Taking advantage of this feature not only reduces the size of your .blend files, but it can also seriously reduce the amount of redundant work you have to do. Figure 4-9 shows a data schematic for the previous scene involving the three linked duplicates of Suzanne. You can see how the datablocks in that scene relate to one another.
Figure 4-9: A data schematic of linked Suzannes.

So say that you've been using Blender for a while without knowing about linked duplicates, and your .blend file is rife with redundant mesh data. Is there a way to get rid of those regular duplicates and make them linked duplicates? Of course! Follow these steps:
- Select all the objects that you want to share the same data.
Use any of the selection tools available to you (Border, Circle, Lasso, and Shift+right-click). All the objects must be of the same type, so you can't have a mesh object and a curve object share the same datablock.
- With each desired duplicate selected, select (Shift+right-click) the object with the datablock that you want to share with the others.
This step makes that last-selected object the active object.
- Press Ctrl+L or ObjectMake Links from the 3D View's header menu to bring up the Make Links menu.
- Choose the third option from the top, Object Data.
Kerplooie! All the selected objects now link to the same internal data.
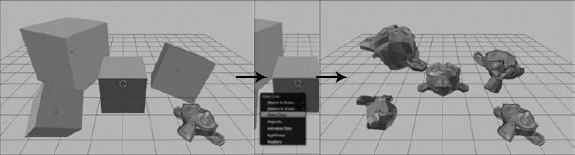
Figure 4-10 shows the preceding process, using a bunch of cubes and a Suzanne object.
Figure 4-10: Linking cubes to Suzanne.
You probably noticed that the Make Links menu had some other interesting options. Following is a description of what each one does:
- Objects to Scene: If you have multiple scenes in your .blend file, you can make those scenes share the same objects. This option reveals another menu with all the scenes in the file. By choosing a scene, the object or objects that you selected have linked duplicates created in that scene.
- Markers to Scene: When animating in Blender, it's common to use markers in the Timeline, Dopesheet, and Graph Editor to indicate important moments in the animation. This feature allows you to share markers between Blender scenes.
- Object Data: This option is the one you used in the preceding example. Object Data links the internal data — be it a mesh, a curve, a lamp, or nearly any other object — of the selected objects to the internal data of the active object. For this option to work, all the selected objects must be of the same type. This is the only option where having objects of the same type is important.
- Materials: Choosing this option causes all the selected objects to share the same material settings. For more information on materials, see Chapter 7.
- Animation Data: This option relates directly to animation. It's the set of keyframes that describe the motion of an animated object, called actions. (Chapter 12 has more information on actions.) Choosing this option causes all your selected objects to share the same actions as the active object.
- DupliGroup: In the “Discovering parents, children, and groups” section of this chapter, you see how Blender allows you to organize your objects into groups. One cool thing about groups is that you can generate them as duplicated instances in a few ways. One of those ways is as a dupligroup. Choosing this option allows multiple objects to share the same dupligroup.
- Modifiers: A modifier is an operation that Blender performs on your object's data without permanently changing that data (see Chapter 5). Modifiers allow you to have very complex models that are still manageable, while retaining the simple editability of the original data. Unlike the other options in the Make Links menu, this option doesn't link the same modifier to multiple objects. What it really does is copy the modifier and its settings from one object to another. In the future, you may be able to treat modifiers as linkable datablocks, but that is not currently the case.
Unlinking datablocks
Of course, if Blender has a way to create links and duplicates, you'd logically (and correctly) think that you can convert a linked duplicate into an object with its own, nonshared datablocks. In Blender, this process is called giving that datablock a single user.
The reason for the single user terminology goes back to how these datablocks are tied together. From the perspective of the datablock, each object that's connected to it is considered a user. Refer to Figure 4-9: Each Cube object is a user of the Suzanne datablock. By choosing to Make Single User, you're effectively telling Blender to duplicate that datablock and make sure that it connects to only a single object. To make an object have single user data, select the object you want and then press U. You see a menu with the following options:
- Object: Use this option when you have an object that is linked to multiple scenes, and you want to make changes to it that appear only in the specific scene that you're currently working on.
- Object & Data: For cases like the preceding example with the linked Suzanne meshes where you have a linked duplicate that you'd like to edit independently of the other meshes, choose this option. Doing so effectively converts a linked duplicate into a regular duplicate.
- Object & Data & Materials+Tex: If you have an object that is not only sharing internal object data with others, but also sharing material settings, choose this option, and both of those datablocks are duplicated and singly linked to your selected object. Using this option is a pretty good way to make sure that your selected object isn't sharing with any other objects at all.
- Materials+Tex: In cases where you no longer want to share materials between objects, choosing this option makes sure that your selected object has its own material settings independent of all the other objects.
- Object Animation: This option is the inverse of the Make LinksAnimation Data option. If your selected object is sharing actions with any other objects, choosing this option makes sure that it has actions of its own.
![]() There is one other way to make object data a single user. In Figure 4-8, the number 3 is highlighted, showing that three objects share that particular datablock. If you left-click that number, you make that a single user datablock. This little button shows up in many places throughout the Blender interface. The datablocks that it operates on vary with context (for example, seeing this button in Material Properties means that it's working on a material datablock; seeing it in the Dopesheet means that it's working on actions, and so on), but it always means the same thing: Create a datablock like this one that has only the selected object as its user.
There is one other way to make object data a single user. In Figure 4-8, the number 3 is highlighted, showing that three objects share that particular datablock. If you left-click that number, you make that a single user datablock. This little button shows up in many places throughout the Blender interface. The datablocks that it operates on vary with context (for example, seeing this button in Material Properties means that it's working on a material datablock; seeing it in the Dopesheet means that it's working on actions, and so on), but it always means the same thing: Create a datablock like this one that has only the selected object as its user.
Discovering parents, children, and groups
Working in 3D, you may encounter many situations where you'll want a set of objects to behave like a single organizational group. Now, if the objects are all the same type, you can join them into a single object, but even with the L and Shift+L linked selection operations in Edit mode, this approach can get unwieldy. And joining them into a single object requires you to tab into Edit mode each time you want to work with an individual item. That's not very efficient, and it doesn't give you the flexibility of working with different kinds of objects as a single unit. The better way to organize your objects is with parent-child relationships or with groups.
Establishing parent-child relationships between objects
Creating parent-child relationships between objects, or parenting in Blenderese, organizes the objects hierarchically. An object can have any number of children, but no object can have more than a single parent:
- To make an object a parent, first select the objects you want to be children.
They don't have to be of the same type.
- Make your last selection (the active object) the object that you want to become the parent.
- Press Ctrl+PObject or click ObjectParentSet in the 3D View's header menu.
After you confirm the operation by left-clicking or pressing Enter, Blender adds a dotted line from the origin of each child object to the origin of the parent. Now when you select just the parent object and perform a transform operation on it, it affects each of its children. However, if you select a child object and transform it, none of the other children or the parent object are influenced.
![]() A good mnemonic device for remembering the correct order for selecting objects when you want to create a parent-child relationship is to think of the order people get off of a boat when they're abandoning ship: “Children first!”
A good mnemonic device for remembering the correct order for selecting objects when you want to create a parent-child relationship is to think of the order people get off of a boat when they're abandoning ship: “Children first!”
Parenting is a great way to organize a set of objects that have a clear hierarchy. For example, say that you've modeled a dinner table and the chairs to go around it. Now you want to place that table and chairs in a room, but the room is scaled much smaller than the table and chairs. Rather than select, scale, grab, and move each object into place, you can parent each of the chairs to the table. Then you can just select and transform the table. When you do so, all the chairs transform right along with it, as if they were a single object! Woohoo! Figure 4-11 illustrates this example.
Figure 4-11: Parenting some chairs to a table and placing them in a room.

To clear a parent relationship, the process is only a click and a hotkey:
- Select the child object that you want to remove from the hierarchy.
- Press Alt+P or click ObjectParentClear in the 3D View's header to clear the parent relationship.
You see a pop-up menu with three options:
- Clear Parent: This option removes the parent-child relationship between your selected object and its parent. If the parent object was transformed after the parenting took place, the cleared child snaps back to the position, scale, and rotation that it was in before it was parented.
- Clear and Keep Transformation (Clear Track): This option behaves the same as Clear Parent, except any transformations that were made while the selected object was a child are applied. This means that the cleared child does not snap back to its original preparented state.
- Clear Parent Inverse: This option is a bit tricky to understand. It actually does not remove the link between the selected child object and its parent. Instead, it basically clears the parent's transformation from the child. Clear Parent Inverse is handy for situations where you've transformed an object before parenting it, and you want it to relate to the parent as if it had not been transformed prior to parenting. To be honest, I don't use this option very often, but it's certainly good to have around when you need it.
Creating groups
Of course, under some circumstances, parenting doesn't make sense for organizing a set of objects. A good example is a lighting setup that you want to adjust and reuse. Sure, you can rationalize that perhaps the key light is the most important light and therefore should be the parent, but that logic is a bit of a stretch and doesn't make much sense in more complex setups.
For these cases, Blender's grouping feature is ideal. To create a group, select all the objects you want to include in the group and press Ctrl+G or click Object![]() Group
Group![]() Create New Group. All the objects in the group share a green selection outline rather than the default orange, to indicate that the object is a member of at least one group. The notion of an object being a member of at least one group highlights another example of how grouping and parenting differ. Whereas an object can have only one parent, it can be a member of any number of groups. If you go to the Object
Create New Group. All the objects in the group share a green selection outline rather than the default orange, to indicate that the object is a member of at least one group. The notion of an object being a member of at least one group highlights another example of how grouping and parenting differ. Whereas an object can have only one parent, it can be a member of any number of groups. If you go to the Object![]() Group menu, you have a number of options:
Group menu, you have a number of options:
- Create New Group (Ctrl+G): This option is always available and creates a new group, adding your selected objects to it.
- Remove from Groups (Ctrl+Alt+G): This option is always available, and choosing it removes the selected objects from any groups they may be a member of. Removing all objects from all groups doesn't delete those groups while your Blender session is still active.
- Add Selected to Active Group (Shift+Ctrl+G): To use this feature, you need the active object to be the member of a group. Then any objects you have selected become members of all the groups your active object is a member of.
- Remove Selected from Active Group (Shift+Alt+G): Choose this option, and all your selected objects (including the active object) are removed from any groups in the active object.
Furthermore, it's worth knowing that groups have names. Check out the Object section of the Properties editor. This section contains a panel named Groups, listing the groups to which the selected object belongs. Left-click any group name to change it to something more relevant to that group's organization. Clicking the X next to the group name removes the selected object from that group. The set of layer buttons under the group name, labeled Dupli, have a special application for larger, more complex projects that involve linking groups between .blend files. Basically, if some objects in your group are on a layer that isn't enabled in these buttons, then those objects aren't visible when the group is linked to another file.
Selecting with parents and groups
When you're using parenting and groups, you gain the ability to rapidly select your objects according to their groupings. Press Shift+G, and you see a pop-up menu with a variety of options:
- Children: If you have a parent object selected, choosing this option adds all that object's children to the list of selected objects.
- Immediate Children: Similar to selecting all children, except this option traverses down the hierarchy by one step only. Children of children are not added to the selection.
- Parent: If the object you've selected has a parent object, that parent is added to the selection.
- Siblings: This option is useful for selecting all the children of a single parent. It does not select the parent object, nor does it select any children that these sibling objects may have.
- Type: This option is useful for making very broad selections. Use Type when you want to select all lamps or all meshes or armatures in a scene. This option bases its selection on the type of object you currently have selected.
- Layer: Use this option to select objects that live on the same layers. If an object is on multiple layers, any objects that share any layer with your selected object are added to the selection.
- Group: This option adds to the selection any object that is in the same group as your selected object. If the selected object belongs to more than one group, a secondary pop-up menu displays each of the group names for you to choose from.
- Hook: If you've added hooks, which are objects that control selected vertices or control points in an object, this option selects them. You can find more information on hooks in Chapter 11.
- Pass: Similar to layers, objects may have a PassIndex value that is useful for compositing and post-production work in Blender. Choosing this option selects any objects that share the active object's PassIndex value. You can find more information on passes and the PassIndex in Chapter 15.
- Color: This option allows you to select objects that have the same color, regardless of whether or not they link to the same material datablock
- Properties: If you use Blender's integrated game engine, it gives you the ability to add custom properties to objects that work in the game (like a Health property for characters). Choose this option, and all objects that have the same game properties are selected.
Saving, opening, and appending
Quite possibly the most important feature in any piece of software is the ability to save and open files. Having quick access to saving and opening files was especially useful for early versions of Blender, which lacked any sort of undo function. Blender users learned very quickly to save early, save often, and save multiple versions of their project files. One benefit is that Blender reads and writes its files very quickly, even for complex scenes, so you very rarely ever have to wait more than a second or two to get to work or save your project.
To save to a file, choose File![]() Save As from the main header or use the Shift+Ctrl+S hotkey. If you're used to older versions of Blender, you can still use the F2 hotkey to do the same thing. One strange thing that you may notice is that Blender doesn't bring up the familiar Save dialog box that Windows, Mac, or Linux uses. This is for three reasons. First and foremost, such a dialog box violates Blenders nonblocking interface concept (see Chapter 1). Not only that, but by Blender using its own File Browser interface, you can be guaranteed that no matter what kind of computer you use, Blender always looks and behaves the same on each platform. And as a third point, the Blender File Browser has some neat Blender-specific features that aren't available in the default OS save dialogs.
Save As from the main header or use the Shift+Ctrl+S hotkey. If you're used to older versions of Blender, you can still use the F2 hotkey to do the same thing. One strange thing that you may notice is that Blender doesn't bring up the familiar Save dialog box that Windows, Mac, or Linux uses. This is for three reasons. First and foremost, such a dialog box violates Blenders nonblocking interface concept (see Chapter 1). Not only that, but by Blender using its own File Browser interface, you can be guaranteed that no matter what kind of computer you use, Blender always looks and behaves the same on each platform. And as a third point, the Blender File Browser has some neat Blender-specific features that aren't available in the default OS save dialogs.
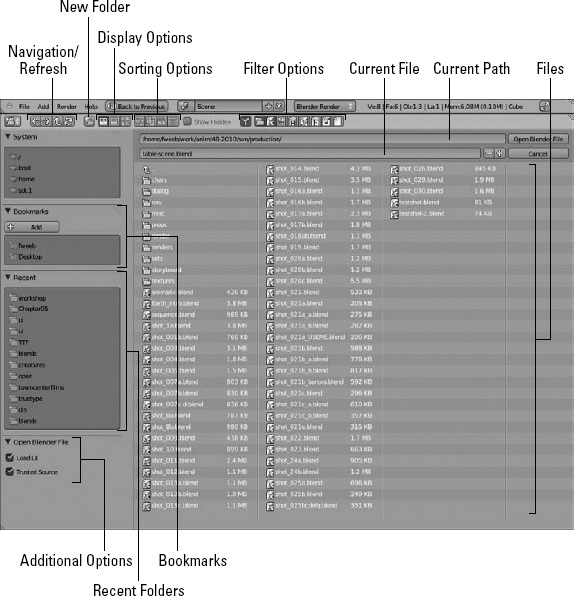
Take a look at the File Browser shown in Figure 4-12. The header for this editor features an assortment of buttons for navigating your hard drive's directory structure and filtering the files shown. If you've used the file browser that comes with your operating system, most of these buttons should be familiar to you. The majority of the options in the side region on the left of the File Browser are there to give you shortcuts to various locations on your computer's hard drive. However, at the bottom of the side region is a set of check boxes that change, depending on whether you're loading or saving your project.
The largest portion of the File Browser is devoted to actually showing files and folders. The topmost text field in this region is the current path on your hard drive to the folder/directory you're currently viewing. Below this text field is the text field for the actual name of your file. In this field, type your project's name. Pressing Enter or clicking the Save As Blender File button in the upper right corner saves the file for you. Below this button is a list of the files in the current folder. If you aren't familiar with Linux and Unix, the first item in this list might seem odd to you. This double-dot (..) is a shortcut for going up in the directory structure. Left-clicking it is just like clicking the Up button in the File Browser's header. It takes you to the parent directory of the one you're currently viewing. Figure 4-12 shows the Blender File Browser and labels the various buttons in it.
Saving after the first time
After you save your .blend file once, saving gets much quicker. To do a fast save while you're working, choose File![]() Save from the main header or, even faster, press Ctrl+S and confirm the overwrite by left-clicking or pressing Enter.
Save from the main header or, even faster, press Ctrl+S and confirm the overwrite by left-clicking or pressing Enter.
On larger projects, however, you may not want to continually overwrite the same file. In those cases, it's often more favorable to save progressive versions of your project as you work on it. You can open the File Browser and type a new name for each version — but it's slow. Often, when people save versions of a project file, they usually append a number to the end of the filename (for example, file1.blend, file2.blend, file3.blend, and so on). Blender knows this habit and aims to help you out.
![]() The ultra-fast way is with the following hotkey sequence: F2
The ultra-fast way is with the following hotkey sequence: F2![]() Plus (+)
Plus (+)![]() Enter. Pressing Plus (+) while in the File Browser automatically appends that number to your filename for you. And if the file already has a number, it increments it by one. For logical consistency, pressing Minus (–) decrements that value. How's that for speedy? If you prefer to use your mouse, you can also perform the same function in the File Browser by left-clicking the Plus (+) and Minus (–) buttons after the filename text field.
Enter. Pressing Plus (+) while in the File Browser automatically appends that number to your filename for you. And if the file already has a number, it increments it by one. For logical consistency, pressing Minus (–) decrements that value. How's that for speedy? If you prefer to use your mouse, you can also perform the same function in the File Browser by left-clicking the Plus (+) and Minus (–) buttons after the filename text field.
Figure 4-12: The Blender File Browser.
Opening a file
Opening a .blend file is a straightforward task. Choose File![]() Open from the main header or press Ctrl+O. If you've used older versions of Blender, the F1 hotkey still works, too. The File Browser loads again and allows you to choose which file you want to load. To load the file, left-click the filename and click the Open File button in the upper right corner. If you have a large monitor and you don't want to move your mouse that far or you're just interested in speedy shortcuts, you can quickly select and open a file by double-clicking it.
Open from the main header or press Ctrl+O. If you've used older versions of Blender, the F1 hotkey still works, too. The File Browser loads again and allows you to choose which file you want to load. To load the file, left-click the filename and click the Open File button in the upper right corner. If you have a large monitor and you don't want to move your mouse that far or you're just interested in speedy shortcuts, you can quickly select and open a file by double-clicking it.
Appending from an external file
Now, what if you have a model of a really excellent character saved in one .blend file, and you'd like to bring it into a scene that you've been working on in another .blend file? Wouldn't it be convenient if you could bring that character in and not have to remodel it from scratch? Of course, it would! This capability is precisely what Blender's Append feature is for.
To append an item from an external file, choose File![]() Append from the main header or press Shift+F1. The File Browser opens, but now when you click on a .blend file, you can actually drill down into its structure. You can select any datablock in the file and bring it — as well as anything it's linked to — into your project. So if you select an object, you append that object, its object data (mesh, curve, and so on), any materials and textures it may have, and any animation linked to it. If you want to append just a material or texture, you can do that, too!
Append from the main header or press Shift+F1. The File Browser opens, but now when you click on a .blend file, you can actually drill down into its structure. You can select any datablock in the file and bring it — as well as anything it's linked to — into your project. So if you select an object, you append that object, its object data (mesh, curve, and so on), any materials and textures it may have, and any animation linked to it. If you want to append just a material or texture, you can do that, too!
![]() When appending, pay attention to the Link check box in the File Browser's side region. The default behavior is for the Link check box to be disabled. When disabled, any datablock that you append from another .blend file is completely copied into your current .blend file. From here, you can make custom changes to either file, and neither has any influence on the other. However, if you enable the Link check box, the datablock isn't actually copied into the current .blend. Instead, a reference is made that points to the datablock in the original file. I like to call this reference a linked appendage. The advantage of a linked appendage is that any changes you make to the original file are automatically updated in the file that links to it. These updates are really quite handy in large projects where you have a variety of models, materials, and other resources that you'd like to use over and over again. One complication of linked appendages, however, is that the linking file can't make any changes to the object that it links to. The only exception to this rule is groups.
When appending, pay attention to the Link check box in the File Browser's side region. The default behavior is for the Link check box to be disabled. When disabled, any datablock that you append from another .blend file is completely copied into your current .blend file. From here, you can make custom changes to either file, and neither has any influence on the other. However, if you enable the Link check box, the datablock isn't actually copied into the current .blend. Instead, a reference is made that points to the datablock in the original file. I like to call this reference a linked appendage. The advantage of a linked appendage is that any changes you make to the original file are automatically updated in the file that links to it. These updates are really quite handy in large projects where you have a variety of models, materials, and other resources that you'd like to use over and over again. One complication of linked appendages, however, is that the linking file can't make any changes to the object that it links to. The only exception to this rule is groups.
When a group is made to a linked appendage, the linking file creates an Empty and binds the group reference to that as kind of a child, known as a dupligroup (I briefly touch on dupligroups earlier in this chapter in the “Creating duplicates and links” section). With this scheme, you can successfully transform and even animate your linked object. If you don't use groups and you want to modify an object appended with a link, your only option is to make that appended object local to the current file by selecting the appended object and pressing L![]() Selected Objects. You can also choose Selected Objects and Data or choose All to completely confirm that you're no longer linked to that other file. Of course, making the object local increases the size of your .blend file and removes the collaborative benefit of working with linked appendages.
Selected Objects. You can also choose Selected Objects and Data or choose All to completely confirm that you're no longer linked to that other file. Of course, making the object local increases the size of your .blend file and removes the collaborative benefit of working with linked appendages.
The moral of this story: If you're appending with links, it's probably in your best interest to create a group in the original file and create a linked appendage to that group from your new file. Using links to groups in external files is the primary way that artists use assets on medium-to-large animation projects.