
IN THIS CHAPTER
Setting fonts and color
Using AutoFormat
Creating lists with bullets and numbering
Modifying alignment, spacing, and margins
Word processing is more than simply typing words on a page. In the past, your only formatting options when creating a document were the margin settings and indenting. Word processing now affords desktop publishing options and control to even the simplest of documents. Your choice of font and color, application of bold and underscoring, and use of spacing often contribute as much to the message conveyed by your document as the text itself. Bulleted and numbered lists can be used to further highlight key points, and they automatically renumber and reformat themselves as you modify the document. Finally, borders and shading columns can provide a final, professional touch to your work.
In this chapter, you learn to use the Formatting Palette for quick changes to your fonts and paragraphs and various dialog boxes that provide even greater control over these options. You learn to control the alignment and spacing of your lines and paragraphs down to the very pixel. You also learn how to format your text with lists, borders, and shading to create the look you want.
In order to consistently format a document, it's important to know the difference between various elements of your document. Each Word document has three major elements, and different types of formatting can be applied to each:
Characters: A character is the smallest unit in a document. Character formatting includes font name and size, bold or italics, text color and highlighting, and superscripts or subscripts. Character formatting can be applied to a single character or a selection of characters.
Paragraphs: A paragraph in Word does not always have the same definition you learned in English 101. For Word's purposes, a paragraph is a group of text followed by a paragraph break (usually made with the Return key). In some cases, you want a soft return to apply a carriage return without starting a new paragraph in order to preserve formatting. Paragraph formatting includes styles, alignment, spacing, borders and shading, and bullets or numbering.
Sections: A section is used to single out portions of a document for special formatting. A section can be a single paragraph or several pages long. Section formatting includes columns, page numbering, headers and footers, margins, and gutters. Margins and gutters are covered later in this chapter, while columns were covered in Chapter 6 and page numbers and headers/footers are covered in Chapter 9.
In addition to these elements, you can apply formatting to the entire document. Margins and layouts are applied to the document as a whole, although they can be modified within each section. Borders and line numbers also can be applied to the entire document and modified or excluded within particular sections as needed.

Depending on which View you're using and the template that's attached to your document, the Formatting Palette contains up to nine panes. When editing text, the following panes are generally available:
Font: This pane contains the most commonly used options for adjusting the appearance of characters.
Styles: This pane allows you to create and apply styles based on the template upon which your document is based. Styles and templates are covered in Chapter 9.
Alignment and Spacing: If you want to center a paragraph or double-space your document (or a portion thereof), this is the pane to change those settings. You also can set the indentation for an entire paragraph or just the first line of same.
Bullets and Numbering: Think of this pane as a list organizer. You can add bullets or numbers to a series of items and format the indentation for those entries.
Borders and Shading: This grouping enables you to set borders of different styles and colors to distinguish tables and text boxes. You also can add shading to a selection.
Document Margins: This pane allows you to set margins for the entire document. You also can determine how much margin space is allocated for headers and footers.
Document Theme: Word comes with several preset combinations of fonts and colors that work well together. You can choose one of these themes from this pane or even create your own.
There are exceptions to this list. Some templates limit access to certain panes, particularly the Document Theme pane. Your options also may be limited when opening a document created in a different word processor or earlier version of Word.
Note
When you add a picture or text box, the panes available on the Formatting Palette change to include options to manipulate those objects. You can learn how to add pictures, clip art, and text boxes in Chapter 30.
You can toggle opening and closing the panes within the Formatting Palette by clicking the pane title. Although you can certainly open all the panes and jump between them at your leisure, this can take up lots of screen real estate. More likely, you'll want to open one or more panes that are specific to your current formatting intent. For example, if you've just created a new document, you may want to use the Alignment and Spacing pane along with the Document Margins pane to set up the overall structure of the document. After those are set, you can close those panes and open the Font and Style panes, where you can apply more specific character and paragraph formatting as you type.
One of the most common tasks in Word is controlling the appearance of text. Font changes include everything from the font itself to its size, color, background, and position within a line of text relative to the rest of the text (by way of superscripts and subscripts).
The simplest font change is simply adding bold, italics, and underlining to selected text. Even if you prefer to primarily use the palettes and toolbars for everything else, memorizing the keyboard shortcuts for these three font styles will save you considerable time:
Bold:

Italics:
Underline:
You also can use keyboard shortcuts to increase or decrease the font size, change the case of letters, and apply double-underlines and superscripts/subscripts. If you use these elements often, you will want to memorize those shortcuts, as well; you can find a list of them in the Help files by searching on Word keyboard shortcuts. If you don't frequently need these options, you can access them just as readily from the menu or Formatting Palette.
If you're in the habit of keeping the Toolbox open as you work, the Formatting Palette is the easiest place to make font changes. The Font pane, shown in Figure 7.2, contains all the basic commands to modify the font type, size, and formatting of your text. As you'll see later in this section, the tools here are just a subset of all your font formatting options, but nine times out of ten, these will do the job.
There are two approaches to setting fonts. If you've already typed a block of text, select the text and then click the Name: drop-down in the Fonts pane to select the font you want. If you haven't yet started typing, simply choose a font from the Name: drop-down; any text you type from that insertion point is in the new font.
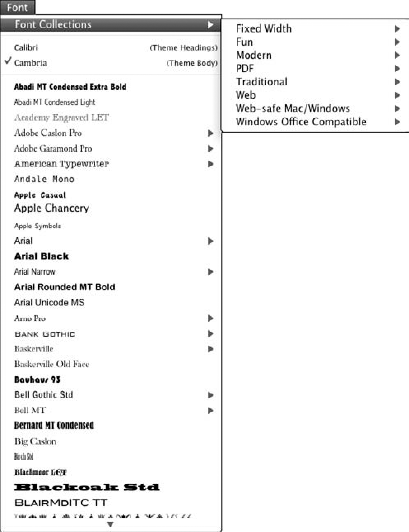
By default, the fonts appear in the style of the font itself, as shown in Figure 7.3. This can help you choose an attractive font, particularly if you have hundreds installed (and Office 2008 itself adds 125 fonts when you install the application, plus any fonts already installed on your Mac). If you're on a very slow computer, you can speed up the listing a bit by pressing Shift when opening the font list, but the change is generally negligible and makes it harder to browse the font options. To permanently turn off the WYSIWYG (what you see is what you get) display on the font list, go to Word

Tip
If you know the name of the font you seek, you can type the first couple of letters after you open the font list, and the list scrolls to those letters. This is especially helpful when you don't want to have to scroll through hundreds of fonts to get to Zapf Dingbats, for example.
When you're browsing your font options, be sure to look at the Font Collections option at the top of the list. The Font Collections are groupings of fonts organized by category. These groups are by no means exhaustive, but they can help you get off to a good start.
Below the list of Font Collections are the fonts that are preset for headings and body text in the current Document Theme. If you haven't selected a theme for the document, the defaults are Calibri for Theme Headings and Cambria for Theme Body.
Following the theme fonts is a list of the most recently applied fonts. This is quite convenient when you're creating a multi-font document because after you've applied each of the fonts once, they'll remain at the top of the font list to be readily accessed again, even in a different document.
Note
If you apply a new font using a Style, the font list does not update its recently used font settings. If you're wondering why a font you've been using throughout a document doesn't appear at the top of the font list, this could be why.
The size of a font determines how much space it takes up on the page or screen. It's important to note that different fonts may appear larger or smaller even if the font size is the same. Also, fonts that appear large onscreen may look smaller in print, and vice versa. For most reports, manuscripts, and letters, the commonly accepted font sizes are 10- or 12-point, with headings being slightly larger. If you're designing a brochure or business card, your size needs may vary much more widely.
You can use several methods for adjusting font size within the Font panel, and any of them can be applied either to a selection or by choosing an insertion point and making a size adjustment to be carried forward to any new text that's added beyond that point:
Select a point value from the Size drop-down menu.
Enter a point value into the Size box.
Use the slider to the right of the Size box. This option works best on a selection because you can see the difference even slight adjustments make to the flow of your text.
Note
With monitors capable of handling ever-higher resolutions, it can be difficult to accurately judge font size. Instead of adjusting your font size to make a document more legible onscreen, it's better to adjust your Zoom options.
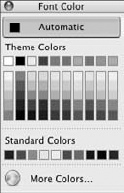
Unless you've applied a Document Theme or template, the default color for text is black. Adding color to your text can enhance your message considerably, both onscreen and in print. To change the font color, make a selection or set the insertion point, and then click the down arrow to the right of the Font Color swatch. As you can see in Figure 7.4, several color options are immediately available. To select a color, simply click a swatch.
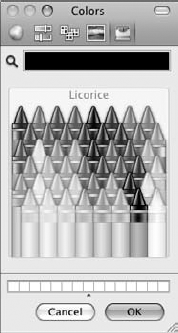
The colors that appear under the Theme Colors heading are variations on the colors for the current Document Theme. If you're using a theme, choosing from these options ensures consistency in your document. If none of these colors appeals to you, click the More Colors button to access the Color Picker. This is the standard Mac OS Color Picker, offering several options to choose additional colors, as shown in Figure 7.5.
Additionally, you can apply highlighting to the space behind your text. Again, simply make a selection or choose an insertion point, and then click the Highlight button. Unfortunately, you don't have as many color options here as you do when selecting a font color, so it's clearly not intended for extensive design use.
Tip
If you want more control over highlighting your text, use the Borders and Shading pane instead of the Highlight tool. Borders and Shading are covered later in this chapter.
Although the Font pane provides access to the most common options, if you want full control over your text, you should use the Font dialog box, as shown in Figure 7.6. To access it, choose Format
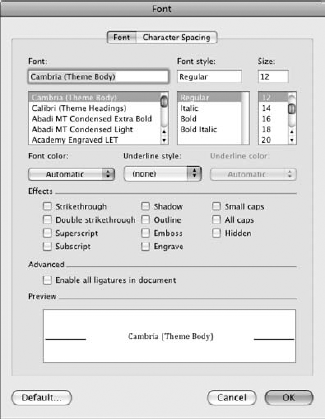
Changing fonts, sizes, and colors work in much the same way in the dialog box as in the palette. To add bold or italic effects, select them from the Font Style list. To add underlining, choose from the Underline Style drop-down list; you'll notice this list has far more options than the simple on/off available from the palette.
Note
The font list in the Font dialog box does not appear in WYSIWYG style. There are better ways to set the font than this, using either the Formatting Palette or the Font menu. The dialog box offers greater control than the Formatting Palette in other areas, however, so it's best to become familiar with both.
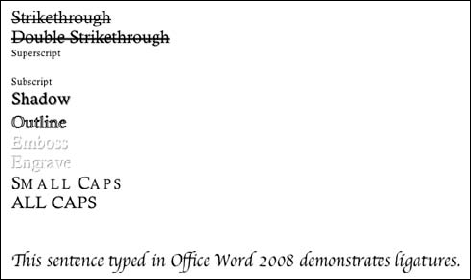
The Font panel contains options for adding superscripts and subscripts, strikethrough text, and changing the case of text. The dialog box contains all these options and more, as shown in Figure 7.7. These options can be used with even greater effect if you apply different font colors and shading to the text. Many of these font effects, particularly Shadow, Outline, Emboss, and Engrave, are used primarily in desktop publishing, so you will generally reserve those for brochures, calendars, and other documents you create in the Publishing Layout.
These are your Font Effect options:
Strikethrough and Double Strikethrough: These give words the appearance of having been crossed out. These effects are sometimes used in contracts when you want to retain the original language for the record while also reflecting the new wording. The single strikethrough effect is available on the Formatting palette, as well as from the dialog box.
Superscript and Subscript: These options shift the selected characters slightly higher or lower on the line. These also are available on the Formatting Palette.
Shadow: This adds a slight shadow below the text. When you're using a small font, this can create a blurred result. For larger font sizes, the effect is more pronounced.
Outline: This effect adds an outline tracing around each character and fills the center with the background color.
Emboss: This makes the letters appear slightly raised from the page. This is used to best effect on a colored background, where it's more noticeable.
Engrave: The opposite of Emboss, this effect makes the letters appear carved into the page. Again, this looks best against a colored background.
Small Caps: This effect converts the lowercase letters in the selection to smaller capital letters, much in the style of block print writing. This is available on the Formatting Palette, as well.
All Caps: This converts all letters in the selection to uppercase. You also can access this option from the Formatting Palette.
Hidden Text: This turns text invisible without deleting it. This feature is helpful to hide your notes or in-house information in a document while retaining them for your own use. Once hidden, you can view this text by choosing Word

The All Caps effect is deceptively useful. While it may seem that this option is identical to typing with Caps Lock or the Shift key pressed, this is not the case. When you use All Caps, Word recognizes the actual case of the letters. If you later change your mind and want to remove or change the font effect, the word is formatted in the original case in which it was typed.
Note
The superscript and subscript effects are intended for use in mathematical and scientific equations. If you are creating footnotes in your document, Word automatically formats those correctly without the use of the Font dialog box. See Chapter 9 to learn more about footnotes.
Several fonts contain ligatures—characters that appear joined when they're next to each other. These fonts evoke the style of the Middle Ages, when characters were connected to save space on the parchment that scribes used at the time. Apple Chancery is an example of a font that contains ligatures. To turn on ligatures, select the option in the Font dialog box. As shown in Figure 7.7, the first two letters in the example sentence are connected when Ligatures are selected. Note that this change is document-wide—you cannot add ligatures to only one selection of text.
The Font dialog box also contains less frequently used options to control character spacing, as shown in Figure 7.8. While ligatures are used to connect letters meant to be joined in certain fonts, character spacing allows you to control the scale and spacing, also called tracking, of the characters to contract or spread them out to fit the available space, as shown in Figure 7.9. Character spacing is commonly adjusted to minutely contract a verbose heading so it fits on one line. It also can be used in less subtle amounts, with varied results.
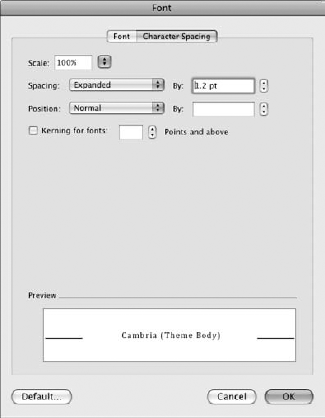
Figure 7.8. The character spacing options are not used often, but they can provide minute control over your text.

The Scale setting allows you to control the amount of space each character itself takes up. While changing a font's size increases or decreases its vertical height, changing the scale expands or contracts characters horizontally across the line.
The Spacing setting controls the space between characters. Set it to Expanded to increase the white space between characters or Condensed to squeeze the letters together. The By box determines the percentage by which to make the selected spacing change. To see the effect of even small changes, look at the Preview box at the bottom of the dialog box.
The Position options determine the vertical position of characters relative to the baseline. Position can be used to manually set superscripts and subscripts. You also can use this setting to adjust existing superscripts and subscripts if you want them to be higher or lower than the default (which is 3 points in either direction).
Kerning adjusts the spacing between letters in proportional fonts to make them more uniform. Kerning the word MAT, for example would minutely reduce the space between the A and T. Kerning is often used with Japanese characters to control the spacing of the kana or kanji. To use kerning, select the Kerning for fonts check box and set the Points and above box for the text size that should be affected by these adjustments. The final appearance of kerning adjustments can somewhat resemble ligatures, even in fonts that are not designed as such.
Lists are used for everything from the mundane, like to-do items and shopping lists, to the professional, such as talking points for a speech or an itemization of features for a book on Office for Mac. In Word, these lists are formatted using Bullets and Numbering.
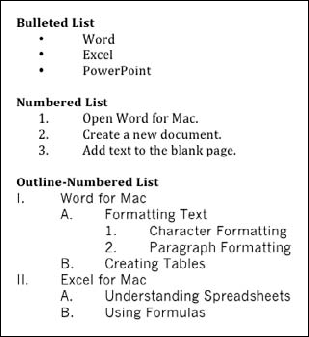
Bulleted lists are used to present unordered items, such as a team roster. Bullets are markers noting each entry on the list, usually an asterisk, dot, or arrow. Numbered lists are good for ordered, sequential items, such as a plan of action or a step-by-step tutorial on accomplishing a task. The numbers can be the standard 1, 2, 3, or Roman numerals (I, II, III), or even letters (A, B, C). A highly organized list can even combine both bullets and numbers of various formats, such as in a student's formal outline, as shown in Figure 7.10.
By default, lists are set to automatically format. If you type an asterisk followed by the Tab key followed by some text, Word recognizes this as the start of a bulleted list and formats it appropriately. Word also assumes that the next line is part of the same list, until you hit the Return key twice. Similarly, if you type a number followed by some text, Word assumes this is the beginning of a numbered list. Word is even smart enough to automatically renumber your list if you add items in the middle.
Word does a nice job handling lists, but you may want to modify some of the settings. To access the Bullets and Numbering pane, shown in Figure 7.11, click the Bullets and Numbering title bar in the Formatting Palette. If you want even more control over your lists, select Format

Tip
If you do not want Word to make such presumptions, you can deselect Automatic bulleted lists and Automatic numbered lists under Word
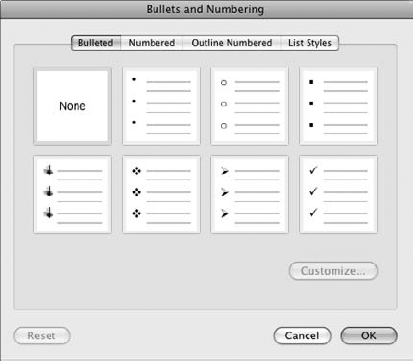
To change a bullet or number style from the Bullets and Numbering pane, click the Style button. For numbered lists, you can choose from Arabic or Roman numerals, letters, or uppercase and lowercase. For bullets, you can choose from filled and hollow circles, arrows, and so on.
In some cases, you'll start a numbered list and then switch to paragraphs that do not require numbers, only to return to the numbered list later on the page. If you type the next number and continue the list, Word picks up the numbering where you left off and continues to format the list. To change the numbering of a list using the Bullets and Numbering pane, follow these steps:
Place the insertion point somewhere in the first item you want to renumber.
Enter a number in the Start box in the Bullets and Numbering pane. Word automatically renumbers the rest of the list.
Use the Indent buttons to increase or decrease the indentation of the bullet or item number.
You also can change the numbering of a list or the bullet style using the Bullets and Numbering dialog box. This not only allows you to renumber the list, but you can change the style and spacing of the bullets or numbering.
To modify a list using the Bullets and Numbering dialog box:
Open the Bullets and Numbering dialog box using one of these methods:
Position the insertion point within the list, and choose Format
Double-click a list number or bullet.
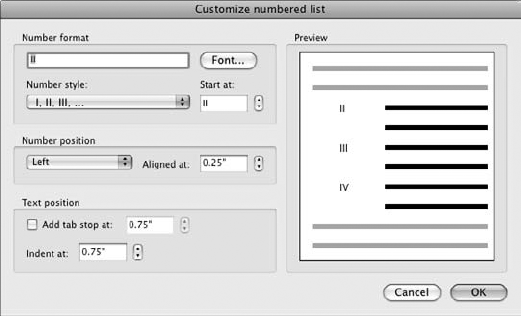
Choose one of the layouts from the available options (refer to Figure 7.12), or press Customize to access the Customize bulleted list dialog box shown in Figure 7.13 or the Customize numbered list dialog box shown in Figure 7.14.
To change the number style or bullet character, make your selection in the Bullet Character or Number Format box, depending on the type of list. In a numbered list, you also can use this area to change the start number.
Set the Bullet or Number Position, which is the indentation point from the left margin.
Set the Text Position, which is the text indentation from the left margin. It's usually indented farther than the bullet or number. If the Bullet or Number position is set to indent at 0.25", for example, and the Text Position is set to indent at 0.5", a quarter of an inch appears between the bullet/number and the text. As the text wraps, it automatically indents to the Text Position setting, leaving the bullet or number set apart.
Click OK to return to the Bullets and Numbering dialog box.
Click OK to apply the new style to the current list.

The most common bullets are dots and arrows, but you certainly are not limited to those choices. Some bullets can take on a different appearance just by changing the font. To do this, double-click a bullet in your list to bring up the Bullets and Numbering dialog box. Click Customize, and then click Font from the Bullet character options.
Any symbol can be used as a bullet. In the Customize bulleted list dialog box, click Bullet from the Bullet character options. Choose a symbol from the Symbol dialog box, shown in Figure 7.15. You can view the symbols in other fonts by selecting one from the Fonts drop-down menu. Webdings and the various Wingdings fonts offer interesting choices. After you've clicked a symbol, click OK to return to the Customize bulleted list box, and then click OK to return to the Bullets and Numbering dialog box; a last click of the OK button returns you to your document.

The third bullet customization option is to use a graphic image in place of a bullet. Unfortunately, as of this writing, this feature does not work even with the bullets supplied by Office for Mac, as evidenced in Figure 7.16.

Some lists are so complex that they take on the format of a multi-level outline. There are two ways to create an outline. One is to use Outline view to assign different levels (and related Heading styles) to each level of the outline. As explained in Chapter 6, this is commonly used to lay out the structure of a report with the intent of adding body text at some point. Another method is to use the Bullets and Numbering options to create a multi-level outline, such as a formal outline for a contract or school assignment. You can combine approaches by using the Outline view to format your document and then apply Bullets and Numbering to change the Heading styles. If you use this option frequently, you can save a Template that automatically applies these Heading styles. See Chapter 6 to learn how to create Templates. To learn more about Styles, see Chapter 9.
To create an outline-numbered list, begin with a numbered list: Enter a number, the punctuation you desire, a tab, and the item text, and then press Return. Unless you've turned off this AutoFormatting option, Word automatically begins a numbered list. To indent subheadings, click the Increase Indent button in the Bullets and Numbering pane. To return to a main heading, click the Decrease Indent button.
If you want more control over your list, double-click one of the numbers in the list to bring up the Bullets and Numbering dialog box. From here, you can choose a different list format or click the Customize button to gain even greater control. The Customize outline numbered list dialog box, shown in Figure 7.17, allows you to change the format, style, and position of each level of your outline. You can even set some levels as bullets and others as numbers.
Another approach to using an outline numbered list is to apply a List Style, as shown in Figure 7.18. A List Style is a preformatted series of styles for each level of an outline numbered list. The styles that are installed by Word include options that would apply to contracts or other legal documents. If you've taken the time to carefully customize an outline numbered list, you can preserve your efforts by adding a new List Style based on your outline. When you want to apply the same formatting to another document or list, all the styles will be preset.
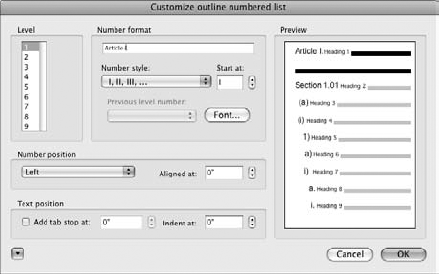

Figure 7.18. List Styles offer preformatted options for legal documents and contracts, among other uses.
Follow these steps to choose a List Style:
Double-click a number or bullet within your outline to open the Bullets and Numbering dialog box.
Select List Styles to open the List Styles dialog box.
Choose a style.
Click OK to return to the Bullets and Numbering dialog box.
Click OK to return to your document.
If you want to add your own list style, open the List Styles dialog box and choose Add. You are prompted to create a new style for the list. To learn more about creating and applying styles, see Chapter 9. After you've created a new list style, you can change it by selecting the style from the list and choosing Modify.
Tip
To quickly remove all list formatting, select the entire list and right-click to access the Bullets and Numbering dialog box from the context menu. Select List Styles, and choose No List. Click OK to save your changes. The style of the list items remains, but any bullets, numbering, and indentation are removed. This tip also can be applied to individual list items.
Note
Applying List Styles can modify the styles of your entire document. If you apply the Section/Article List Style, for example, all the Headings in your document assume this style, even those not part of the list. User beware!
Unlike Font formatting, which applies to characters (or groups of characters), Alignment and Spacing apply to paragraphs. Bullets and Numbering also apply to paragraphs, as you saw in the preceding section, but for a highly specialized purpose. Alignment and Spacing are used to control the general flow of your text across the page.
When modifying Alignment and Spacing formatting, you can either apply it to a selection or choose an insertion point, after which the formatting is applied. As with the other Formatting Palette panes, the Alignment and Spacing pane, shown in Figure 7.19, contains only a subset of a larger set of controls, in this case the Paragraph dialog box, shown in Figure 7.20. To access the Alignment and Spacing pane, click its title heading in the Formatting Palette. To open the Paragraph dialog box, choose Format


Figure 7.20. The Paragraph dialog box provides a greater degree of control over paragraph formatting.
Horizontal alignment controls how your paragraph is aligned relative to the horizontal space of the page.
Align Text Left: Aligns the first character of each line with the left margin. The keyboard shortcut is
Align Center: Centers the text evenly between the left and right margins. The keyboard shortcut is
Align Text Right: Aligns the last character of each line with the right margin. The keyboard shortcut is
Justify: Aligns the first character of each line with the left margin and the last character with the right margin, adjusting the spacing between words and characters as necessary to achieve a balanced appearance. The keyboard shortcut is
Horizontal spacing can be used in columns, as well. In this case, paragraphs are aligned with the column margins rather than the document margins.
Tip
For best results, turn on hyphenation when using the Justify setting. This allows Word to automatically hyphenate long words to improve the document's appearance.
Line spacing controls the white space between lines. Letters and other business communications are usually single-spaced. Manuscripts and legal briefs are generally double-spaced, as are most school reports. Brochures and other creative documents can have a wide array of custom spacing options.
The Alignment and Spacing pane offer three line spacing options: single, 1.5, and double. The Paragraph dialog box allows you to control line spacing down to the exact point size (or inch, centimeter, or even millimeter, if you specify in, cm, or mm after entering a number). Three additional options for line spacing are as follows:
At least: If you have text or graphics of different heights within the paragraph, setting this option puts "at least" the specified amount of space between the tallest element on the line and the lines before/after it.
Exactly: If you need to ensure specific line spacing in a document, you can enter it here. Be careful, however, to account for text or graphics that are taller than your specified spacing, as the spacing setting takes precedence over the content, and those tall elements are cut down to size.
Multiple: This option modifies your spacing relative to the standard single-spacing. Setting this for 2.5, for example, gives you results between double- and triple-spacing.
Tip
The Exactly setting can be used to subtly increase the number of lines you can fit on a page. When formatting a manuscript, for example, some editors specify 25 lines per double-spaced page. If you can't quite seem to make it fit, set the line spacing to Exactly 25 pt to provide the appearance of double-spacing, but ensuring everything fits just right.
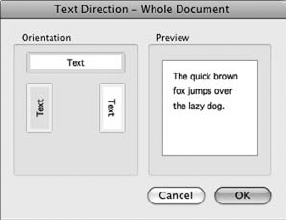
Text orientation, which is available on the Alignment and Spacing pane as well as the Text Direction dialog box, controls the direction in which the text flows. Generally, English text flows horizontally from left to right. In Word, you can change text to flow vertically, as well, either from top to bottom or bottom to top. This is helpful in Publishing Layout view, where you might have both portrait and landscape elements in the same document or even on the same page, such as a newsletter with an address area that appears on the back cover when the page is folded. These settings also can be used in conjunction with section breaks to change a page to landscape orientation within a document containing other pages in the standard portrait orientation in order to preserve pagination and other formatting. To access the Text Direction dialog box, shown in Figure 7.12, choose Format
While line spacing controls the space between lines, many people are still in the old typewriter habit of hitting Return twice at the end of paragraphs to leave additional space between paragraphs. This is "old school." A 21st-century solution is to use Paragraph Spacing to tell Word how much white space to leave between paragraphs. You can set this space to be added before the paragraph, after, or both. Headings and other preformatted styles often make use of paragraph spacing to set those elements apart from body text. You can suppress the addition of paragraph spacing between paragraphs of the same Style by choosing "Don't add space between paragraphs of the same style" in the Paragraph dialog box.
Another remnant from an earlier time is the use of the Tab key to indent the first line of a new paragraph. The default tab stops in Word are not optimized for this use. Besides, there's no need to go to the extra trouble of using the Tab key when you can set indentation automatically. After you've set the indentation for one paragraph, Word automatically formats subsequent paragraphs with the same settings. Additionally, you can modify the Normal style or any other style to your indentation settings.
Most people think of indentation as something that only applies to the first line of a paragraph, either indenting it inward to specify a new paragraph or moving it negatively to allow the first line to stand out from the lines below (called a hanging indent). In Word, you also can use indentation to adjust an entire paragraph inward from either the left or right margins (or both). This is useful when creating a block quote or formatting poetry.
As paragraphs flow from page to page, they're sometimes broken up in odd places as the text reaches the bottom margin. The first line of a paragraph left alone at the bottom of a page is called an orphan. The last line of a paragraph that flows alone onto a new page is called a widow. To reunite these widows and orphans with the rest of their paragraphs, choose Format
The Line and Page Breaks dialog box, shown in Figure 7.22, also allows you to specify paragraphs that should be kept on the page with those that follow it, to keep all the lines of a paragraph together without any page breaks separating them, and to precede some paragraphs by an automatic page break.

Borders and shading can liven up dull text, emphasize key blocks of text, or provide organization by color-coding information. Even if your final document is going to be printed in black and white, borders and shading can add a professional touch to your piece. If you're working in color, the possibilities are endless.
As with the other formatting options, you can apply borders and shading from within the Formatting Palette, as shown in Figure 7.23, or from the Borders and Shading dialog box, as shown in Figure 7.24. If you're applying shading at various points around your document, you can also use the Tables and Borders toolbar (
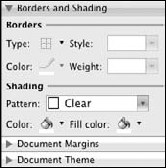
Figure 7.23. The Borders and Shading pane of the Formatting Palette can add blocks of color to your document.

To add a border, first select a block of text. If you want to put a border or shading around an entire paragraph, you can simply click within the paragraph. If you want to put multiple paragraphs into the same block, select all the included paragraphs. If you want to put a border around only certain characters within a paragraph, make that selection. Add the border by choosing a Type from the Borders and Shading pane or a Setting in the Borders and Shading dialog box. If you are adding a border to a table, you can choose to apply the border around the entire table, to the cell divisions within the table, or both.
You can customize borders in several ways:
Style: You can apply a variety of solid and dashed lines to the border, as well as multiple line styles.
Color: You can choose from Word's options or click More Colors to choose from the Mac OS Color Picker. If you have a Document Theme applied, Word's choices reflect different shades of the theme colors, which can help with consistency.
Weight: Border lines can vary in thickness from 1/4 point to 6 points.
You also can customize a border by applying different combinations of style, color, and weight, to each side. To control the distance between the border and the text within it, choose Options from within the Borders and Shading dialog box.
Tip
Borders can easily be stylized by opting to apply border lines to only one or two sides rather than boxing in an entire block of text.
Another option in the dialog box is Horizontal Line setting. When you apply this feature, Word adds a graphic horizontal line below the selected paragraph. Horizontal lines used to be important elements in Web design to separate blocks of information, but Web designers more commonly use other formatting options such as Cascading Style Sheets (CSS) these days.
Shading adds a pattern or color to the white space of a selected area. It can be applied to the area within borders, a text box, or table cells, as well as to any text selection. To add shading, open the Borders and Shading pane in the Formatting Palette and then follow these steps:
Select the area to be shaded.
Choose a pattern by clicking the arrow next to the Pattern box. Choosing Solid fills the entire area. Choosing a percentage generates halftones, using the Fill Color for the background and the Pattern Color to modify the fill. Below the percentage options, you can find several patterns, some of which are more subtle than others.
Choose a Fill Color. This is the color of the background.
Choose a Color (also known as the Pattern Color). This is the color of the pattern or halftone color. Choosing the Solid pattern is still considered a "pattern" for Word purposes.
Note
The Pattern and Fill Colors can be tricky. All text has a Clear shading automatically attached to it, transparent by default. When you choose a Pattern and colors, the Fill Color changes this transparent "color." In general, the Pattern Color takes priority, putting down an overlay on top of the fill color. If you change the Fill Color after setting the Pattern Color, however, Word seems to lose track of this precedence and puts a new overlay on top of your Pattern Color, essentially reversing the order of colors in the pattern. It's best to set the Fill Color first and then the Pattern Color. Alternatively, use the Borders and Shading dialog box, where this doesn't seem to be an issue.
If you are using the Borders and Shading dialog box, you can find these options on the Shading tab, as seen in Figure 7.26. The Fill is the color of the background. The Color drop-down below the Shading setting is the color of the pattern. Unlike when you use the Formatting Palette, the dialog box offers a Preview of your changes, allowing you to see how your selection will look before committing to it.
As mentioned earlier in this chapter, Shading can be used in place of the Highlighting Font option to give you more color and formatting choices. Simply select the text to highlight, and choose a Pattern, Color, and Fill Color from the Formatting Palette.

Page borders provide exactly what the name implies, a border around the margins of the entire page. Page borders are commonly used to create certificates of achievement and similar items. The options on the Page Borders tab are very similar to those of the Borders tab, with a few extras:
Art: Word offers many graphic borders, many of them around holiday and other themes.
Apply To: This setting determines if the border should be applied to an entire page or just a section.
The Options button at the bottom of the Borders and Page Borders tabs opens the Borders and Shading Options dialog box, shown in Figure 7.27. From here, you can control how far away from the text the selection or page borders are applied.
Tip
Many people seem to think about word processing from a portrait-only mindset. For documents with little text, you can often get more eye-catching results by taking a different view. Change the orientation of your paper (File

Although they appear toward the bottom of the Formatting Palette, Document Margins are often one of the first options you modify when creating a new document. Word's default margins are 1 inch at the top and bottom and 1.25 inches on the left and right sides. These settings are fine for business letters, but are far too generous for newsletters, where every bit of space counts.
There are three ways to set margins in a Word document. The Document Margins pane of the Formatting Palette, shown in Figure 7.28, allows you to adjust the four margins as well as the header and footer settings. Headers and footers appear within the top and bottom margin. The setting for headers and footers measures the distance from the edge of the page. Thus, if your top margin is set for 1.25" and your header for 0.5", the header appears 0.5" from the top of the page and 0.75" from the first line of document text.

Figure 7.28. The Document Margins pane provides quick access to the document and header/footer margin settings.
If you're a visual person, you can adjust margins directly within the document window. Switch to Print Layout view (click the Print Layout button at the bottom of the document window, or choose View
As with all the Formatting Palette panes, the Document Margins pane is a subset of a more powerful dialog box. Choose Format

Figure 7.29. The Document dialog box allows you to set gutters and mirrors and constrain margin changes to sections.
In addition to the general margin settings, the Document dialog box provides access to gutters. The gutter is the inner margin where the page attaches to the spine of a book when it is bound. If you are planning to bind your finished document, you will want to consider how much gutter space you need to allow for binding, because it varies by type.
If you are using gutters, it is quite likely that you also want to mirror your pages. Bound books are usually printed two-sided. Thus, the odd pages often need a wider left gutter for binding purposes, while their even counterparts need a wider right gutter because they are on the reverse side of the page. To set mirrors, select the Mirror margins box.
In Chapter 6, you learned how to use Columns. When you set a portion of a document in column form, Word adds Section Breaks above and below the columnar text. You also can manually insert sections for other purposes, such to format a single page in a different orientation or to customize headers and footers for particular portions of a long document. To add a section break, position the insertion point where you want to place the break and choose Insert
Next Page: Adds a section break and moves the text following it to a new page. This type of break is useful when changing orientation of a single page (or more).
Continuous: Adds a section break, but keeps the text on the same page. These breaks are commonly used with columns.
Odd Page: Adds a section break and formats the following text as an odd page. This is convenient when using gutters and mirror margins, because you can force new chapters to start on an odd page.
Even Page: Adds a section break and formats the following text as an even page.
If your document contains section breaks, you can set document margins to apply to specific sections. To do this, position the insertion point anywhere within a section. Go to Format
The final pane of the Formatting Palette is Document Theme, as shown in Figure 7.30. Themes are combinations of color schemes and fonts that work well together. These themes are the same as those found in PowerPoint and Excel, making it easy to coordinate your presentations and support documents to present a consistent image. If you choose a theme from the Document Theme pane, Word modifies the styles of your document to automatically apply the colors and fonts of that theme. Word also moves the fonts used for headings and body text to the top of the Font list for easy access.

Office provides 50 themes, but you are not limited to these. You can create your own themes by modifying the colors and fonts to suit your needs and clicking Save Theme from the Document Theme pane.
Another way to copy formatting across selections—and especially across documents—is to create a style. Styles are covered in Chapter 9, but in short, they allow you to group several formatting elements into one customizable command.
Tip
If you ever feel lost when making font, paragraph, or section changes, you can get your bearings by turning on the formatting codes. Choose View
Earlier in this chapter, you read about how Word can automatically format lists. Bullets and Numbering are just one (or is that two?) of the options that can be automatically applied using AutoFormatting and AutoCorrect options. AutoFormatting also converts a URL into a hyperlink without your lifting your hands from the keyboard. AutoFormatting can even correct your most common typos, change your quotation marks into "smart quotation marks" (curly quotes), and convert an approximation of a copyright symbol—(c)—into the real thing ©.
To access the AutoCorrect Options, choose Tools
If you are annoyed by Word taking control out of your hands, you can turn off AutoFormatting options. Here's how:
Choose Tools
Click the tab to switch to the AutoFormat as You Type panel.
Deselect options you do not need in the panel.
Click OK.
Close the AutoCorrect panel.
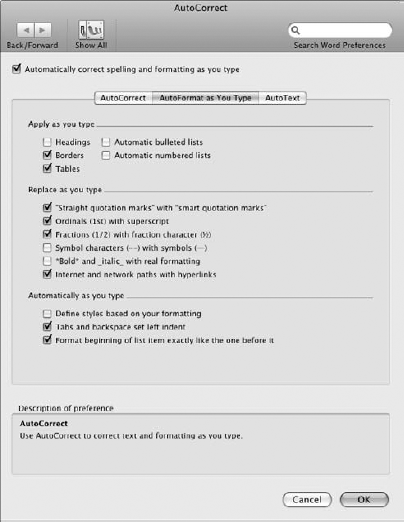
You also can disable AutoFormatting completely by clicking the "Automatically correct spelling and formatting as you type" check box at the top of the AutoFormat as You Type panel. You may be tempted to eliminate the feeling of Big Brother watching over your document, but some of the AutoCorrect features can be helpful if configured correctly. Smart quotation marks do look much more polished than their plain alternatives. Other options may be well-suited for some projects, but not for others. If you're a writer using standard manuscript formatting, you won't want Word to automatically convert your double hyphens (--) into an em dash. You may, however, want to use that em dash conversion on the cover letter that accompanies your submission.
Many options are available in the AutoFormatting panel, as shown in Table 7.1.
Table 7.1. AutoFormatting as You Type Options
Option | Purpose |
|---|---|
Apply as you type: | |
Headings | When you type a few words and press Return twice, this formats the text as a heading. |
Borders | If you type three hyphens or underlines in a row and press Return, Word draws a horizontal line across the page. You can change the appearance of this line by using equal signs, tildes, asterisks, or number signs in place of the hyphens or underlines. |
Tables | This little-known feature automatically creates a table when you type a plus sign (+) followed by a row of hyphens (---), followed by additional plus signs and hyphens across the page, ending with a final plus sign. Each series of plus signs and hyphens indicates the start of a new column. This is most commonly used by those who create tables in this way on Internet forums and newsgroups. |
Automatic bulleted lists | As explained earlier in this chapter, typing a common bullet character (*, -, or >) followed by a space or Tab and then some text informs Word that you're starting an unordered (bulleted) list. |
Automatic numbered lists | Typing a number followed by a Tab (with or without a period or other punctuation following the number) tells Word you're starting an ordered (numbered) list. |
Replace as you type: | |
"Straight quotation marks" with "smart quotation marks" | Typing quotation marks automatically converts the standard marks to curly quotes. |
Ordinals (1st) with superscript | When you type an ordinal number, Word automatically raises the letters of the ordinal into a superscript (1st rather than 1st). |
Fractions (1/2) with fraction character (½) | If you type a common fraction, the type is automatically replaced with the symbol representing the number. |
Symbol characters (--) with symbols (—) | Typing two hyphens automatically replaces them with an em dash. |
*Bold* and _italic_ with real formatting | Using asterisks and underlines is a common way of indicating emphasis in newsgroup posts and forums. This option replaces them with actual bold and italic styles. |
Internet and network paths with hyperlinks | Word automatically converts URLs to active hyperlinks. |
Automatically as you type: | |
Define styles based on your formatting | If you override the style for a selection once, Word redefines the style based on those new settings. This is usually a good option to disable even if you're using all the others, because it's easy to inadvertently lose your style settings this way. |
Tabs and backspaces set left indent | If you start a line with the Tab key, Word assumes you want to begin paragraphs to follow with this same indentation. |
Format beginning of list item exactly like the one before it | If you want to format a list using letters or Roman numerals, Word uses the first item as an example when formatting those that follow. |
In addition to applying AutoFormatting as you create a document, you also can disable these options and instead choose to AutoFormat in one fell swoop on your command:
Follow the instructions above for disabling AutoFormatting as You Type.
Begin typing your document.
When you're ready to apply your choice of AutoFormatting options, choose Format
AutoFormatOptions.Select which options you want Word to automatically format.
Click OK to accept your settings.
In the AutoFormat dialog box, choose your method of AutoFormatting:
AutoFormat now: Word applies all AutoFormatting options without any further input from you.
AutoFormat and review each change: Word opens a dialog box displaying each change in succession, giving you the option of accepting or rejecting those changes.
Click OK to format your document.
The Formatting toolbar contains a subset of elements from the Formatting Palette. To access the Formatting toolbar, choose View
With all the formatting options at your disposal, Word can help you create documents perfect for any objective. You can control the font and its appearance. You can organize lists. Borders and shading highlight key points. The alignment and spacing options, coupled with the margin settings, give you control over how your text flows over the page. Finally, you can use themes to guide you to pleasing color palettes and fonts that work well together.
In the next chapter, you learn how to add tables to organize columns and rows of information.