Windows Server 2003 systems are the heart of the IT infrastructure that supports businesses. These servers need to be managed and maintained to keep the businesses running optimally. Server management and maintenance help maximize investment in infrastructure and productivity. They also keep the IT infrastructure running effectively and efficiently to boost availability and reliability.
Server management entails many different tasks; they include, but are not limited to, administering and supervising servers based on functional roles, proactively monitoring the network environment, keeping track of activity, and implementing solid change control practices. These management functions for Windows Server 2003 can be performed both locally and remotely.
As systems’ workloads, capacities, and usage change in the environment, the systems need to be maintained so that they operate as efficiently as possible. Without such maintenance, systems become more susceptible to causing slower response times and decreased reliability. Efforts to maintain those systems should be made periodically to avoid any inefficiency. This chapter covers best practices on ways an organization can maintain and manage its Windows Server 2003 environment.
Many aspects of an IT infrastructure need to be managed. They can include managing servers based on their functional roles in the network environment, auditing network activity and usage, and monitoring the environment.
Microsoft has come a long way with how servers can be managed. Windows Server 2003 management can be handled locally or remotely. Although local and remote management was possible in previous Windows versions, Windows Server 2003 supersedes that functionality with new and improved processes and tools that assist administrators in their management.
Windows Server 2003 systems can participate in various responsibilities in a given network environment. Some of these responsibilities may be intertwined due to budget constraints, business requirements, or technical justifications. No matter how the roles and responsibilities play out in the environment, it’s important to manage them appropriately based on the roles of the server. The management aspects for some of the roles that Windows Server 2003 can undertake are examined in the following sections.
File servers are primarily responsible for keeping data. This data must be available and quickly accessed. As such, management of these servers can entail using the Disk Defragmenter utility, shown in Figure 22.1, to keep file access optimized. This helps keep reading and writing to disk more efficient than if files and the disk were fragmented.

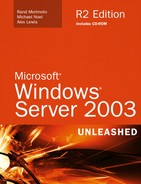
Disk capacity must also be managed so that there is always ample space available for additional data. Quota management can also be an integral part of file server management. Disk quotas are used to control the amount of disk space that is available to the end users. When a disk quota is set, a specified amount of space on a volume can be set aside for a user. Warning messages can be sent to the user as the quota approaches the limit. This is illustrated in Figure 22.2. If an attempt to save data exceeds the limit, the user can be prevented from saving the file.
Managing print servers is an important but often overlooked aspect of managing Windows Server 2003. This is true mostly because printers on Windows Server 2003 are simple to manage. Although there is less management required for a print server, printing should still be audited and monitored.
Auditing and monitoring printing ensures that users can print successfully and that the server and printers are fully operational. Print jobs on the server can be managed and viewed through either the printer queue or properties window. If the print server also has Internet printing enabled, print job information can be viewed using the print server’s Web pages. The type of information that can be viewed and managed includes
Print job name
Print job status
Print job owner
Number of pages to print
Print job size
Submission time
In addition to the preceding information, the System Monitor can be used to provide a plethora of information about print usage on the system, such as
Bytes printed/sec
Job errors
Jobs
Job spooling
Maximum jobs spooling
Maximum references
Not-ready errors
Out-of-paper errors
References
Total jobs printed
Total pages printed
The information obtained from the print server listing can assist an administrator in proactively managing the printers and print devices. For instance, if it is determined that large print jobs performed at certain times of the day affect other print jobs, a print queue for large print jobs can be created to offload those jobs to after-hours printing only.
Windows Server 2003 Web servers offer an assortment of Internet-related functionalities, such as HTTP, FTP, SMTP, and more. Each of the services employed on the server must be managed to keep content and services up to date. The following are some areas to consider managing:
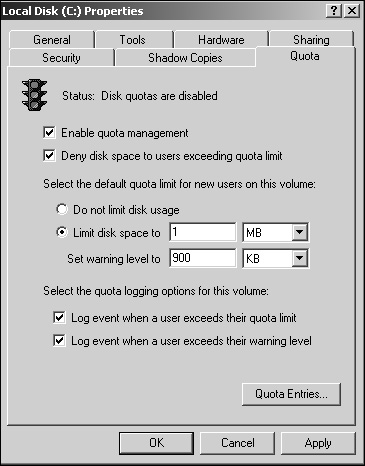
IIS metabase—. The IIS metabase holds IIS-related configuration information. As changes occur to an IIS system, you can verify that the IIS metabase has been backed up (see Figure 22.3). You can do so by selecting Action, All Tasks, Backup/Restore Configuration within the IIS Manager.
Web applications and content—. The installed Web-based applications most likely require additional management that is separate from IIS. The content that is to be displayed such as ASP, static, and dynamic content should be periodically managed as well.
IIS logging—. IIS logging allows administrators to monitor activity on the Web server. It also allows the administrator to manage the Web server’s security.
Messaging servers require special attention so that services run efficiently and effectively. In particular, Exchange servers require attention to the messaging databases, auditing, security, and user management. Exchange systems can be monitored using the System Monitor. Specific Exchange-related objects are installed so that administrators can easily pinpoint Exchange performance indicators.
Exchange services are managed by the Exchange management snap-in as well as the Active Directory Users and Computers MMC snap-in. For instance, user accounts are mail-enabled in the Active Directory Users and Computers snap-in, while other configurations are managed through the Exchange management snap-in.
Windows Server 2003 Terminal Servers provide a thin-client approach to computing in which all the processing is done at the server. Only screen images, keystrokes, and mouse movements are sent to the client. Managing Terminal Servers can involve many aspects, including the following:
Applications—. Applications must be installed through the Add or Remove Programs applet so that multiple users can run them. These applications should also be monitored to ensure that they are adequately servicing the end users.
User sessions—. User sessions, including remote control of those sessions, should be managed to properly accommodate the users. For example, enabling the use of roaming profiles gives the users their desktop settings even though they’re logging on to another system. Equally important is monitoring those user sessions. This will give administrators information on the resource requirements per user. This information can be used to more appropriately size the system to accommodate various usage scenarios.
Domain controllers (DCs) host Active Directory (AD), which contains most, if not all, objects in the Windows Server 2003 environment. AD has many functional roles in a Windows Server 2003 environment, including object management (additions, modifications, or deletions), authentication, replication, security, and more.
Managing these AD roles can be intimidating, especially in larger environments, but AD has many useful utilities to help manage the directory. They include, but are not limited to, Active Directory Domains and Trusts, Active Directory Sites and Services, and Active Directory Users and Computers. Some of the areas that these tools can manage include
Users
Groups
Domains
Sites
Organizational units (OUs)
Computers
There are many other tools to manage that are included in Windows Server 2003 as command-line tools, Windows Server 2003 Support Tools, and the Windows Server 2003 Resource Kit. Also, countless third-party management utilities are developed specifically for AD.
Auditing is a way to gather and keep track of activity on the network, devices, and entire systems. By default, Windows Server 2003 enables some auditing, whereas many other auditing functions must be manually turned on. This allows for easy customization of the features the system should have monitored.
Auditing is typically used for identifying security breaches or suspicious activity. However, auditing is also important to gain insight into how the network, network devices, and systems are accessed. As it pertains to Windows Server 2003, auditing can be used to monitor successful and unsuccessful events on the system. Windows Server 2003’s auditing policies must first be enabled before activity can be monitored.
Audit policies are the basis for auditing events on a Windows Server 2003 system. Depending on the policies set, auditing may require a substantial amount of server resources in addition to those resources supporting the server’s functionality. Otherwise, it could potentially slow server performance. Also, collecting lots of information is only as good as the evaluation of the audit logs. In other words, if a lot of information is captured and a significant amount of effort is required to evaluate those audit logs, the whole purpose of auditing is not as effective. As a result, it’s important to take the time to properly plan how the system will be audited. This allows the administrator to determine what needs to be audited, and why, without creating an abundance of overhead.
Audit policies can track successful or unsuccessful event activity in a Windows Server 2003 environment. These policies can audit the success and failure of events. The types of events that can be monitored include
Account logon events—. Each time a user attempts to log on, the successful or unsuccessful event can be recorded. Failed logon attempts can include logon failures for unknown user accounts, time restriction violations, expired user accounts, insufficient rights for the user to log on locally, expired account passwords, and locked-out accounts.
Account management—. When an account is changed, an event can be logged and later examined.
Directory service access—. Any time a user attempts to access an Active Directory object that has its own system access control list (SACL), the event is logged.
Logon events—. Logons over the network or by services are logged.
Object access—. The object access policy logs an event when a user attempts to access a resource (for example, a printer or shared folder).
Policy change—. Each time an attempt to change a policy (user rights, account audit policies, trust policies) is made, the event is recorded.
Privileged use—. Privileged use is a security setting and can include a user employing a user right, changing the system time, and more. Successful or unsuccessful attempts can be logged.
Process tracking—. An event can be logged for each program or process that a user launches while accessing a system. This information can be very detailed and take a significant amount of resources.
System events—. The system events policy logs specific system events such as a computer restart or shutdown.
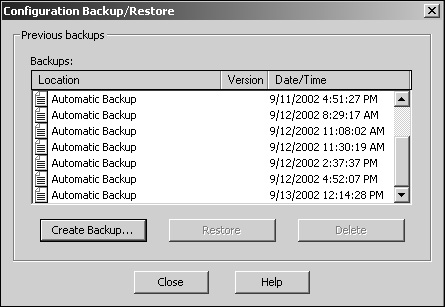
The audit policies can be enabled or disabled through either the local system policy, domain controller security policy, or Group Policy Objects. Audit policies are located within the Computer ConfigurationWindows SettingsSecurity SettingsLocal PoliciesAudit Policy folder, as shown in Figure 22.4.
As mentioned earlier, both successful and unsuccessful account logon and logoff events can be audited. By default, Windows Server 2003 audits successful account logon and logoff events. When the audit policy is enabled, events are cataloged in the Event Viewer’s Security log.
After enabling the object access policy, the administrator can make auditing changes through the property pages of a file, folder, or the Registry. If the object access policy is enabled for both success and failure, the administrator will be able to audit both successes and failures for a file, folder, or the Registry.
Note
Monitoring both success and failure resource access can place additional strain on the system. It is therefore recommended to test this in a segmented lab environment prior to implementing this level of auditing in the production environment.
The network administrator can tailor the way Windows Server 2003 audits files and folders through the property pages for those files or folders. Keep in mind that the more files and folders that are audited, the more events that can be generated, which can increase administrative overhead. Therefore, choose wisely which files and folders to audit. To audit a file or folder, do the following:
In Windows Explorer, right-click the file or folder to audit and select Properties.
Select the Security tab and then click the Advanced button.
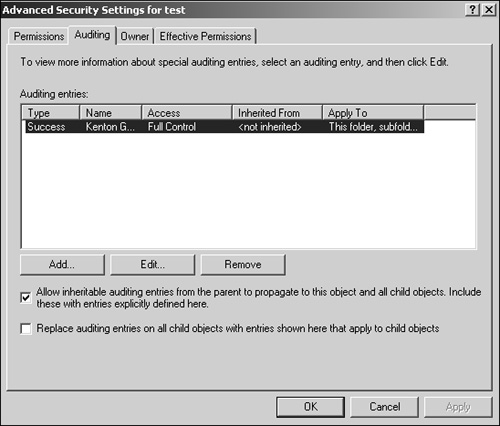
In the Advanced Security Settings window, as shown in Figure 22.5, select the Auditing tab.
Click the Add button to display the Select User or Group window.
Enter the name of the user or group to audit when accessing the file or folder. Click the Check Names button to verify the name.
Click OK to open the Auditing Entries window.
In the Auditing Entries window, shown in Figure 22.6, select which events to audit for successes or failures.
Click OK three times to exit.

When the file or folder is accessed, an event is written to the Event Viewer’s Security log. The category for the event is Object Access. An Object Access event is shown in Figure 22.7.

Printer auditing operates on the same basic principles as file and folder auditing. In fact, the same step-by-step procedures for configuring file and folder auditing apply to printers. The difference lies in what successes and failures can be audited. These events include
Print
Manage printers
Manage documents
Read permissions
Change permissions
Take ownership
These events are stored in the Event Viewer’s Security log.
Windows Server 2003’s built-in feature set allows it to be easily managed remotely. This capability eases administration time, expenses, and energy by allowing administrators to manage systems from remote locations rather than having to be physically at the system.
Many tools are available to remotely manage a system. They include, but aren’t limited to, the following:
Microsoft Management Console (MMC)—. The MMC not only provides a unified interface for most, if not all, graphical interface utilities, but it also can be used to connect and manage remote systems. For example, administrators can use the Event Viewer to examine event logs on the local machine as well as a remote system.
Remote Desktop for Administration—. This tool empowers administrators to log on to a remote system as if they were logging on to the system locally. The desktop and all functions are at the administrators’ disposal.
Scripting with Windows Scripting Host (WSH)—. Scripting on Windows Server 2003 can permit administrators to automate tasks locally or remotely. These scripts can be written using common scripting languages.
Command-line utilities—. Many command-line utilities are capable of managing systems remotely.
Many of the administrative tools that are familiar from previous versions of Windows are present in Windows Server 2003. Keeping much of the toolset the same reduces the learning curve associated with learning new utilities.
Windows Server 2003 also includes some new administrative tools and some familiar tools that were provided in earlier Support Tools and Resource Kit versions all built into the operating system. These tools, which help with system management, include the following:
PowerCfg.exe—. This tool enables administrators to configure the power settings such as ACPI/hibernate state settings.
WHOAMI.EXE—. WHOAMI is a classic logon script tool that returns a domain name, computer name, username, group names, logon identifier, and privileges for the user who is currently logged on.
WHERE.EXE—. This tool locates and displays all the files that match the given parameter. The WHERE tool displays the current directory if no parameters are given.
FORFILES.EXE—. FORFILES can be used to enhance batch file control by selecting a file or group of files and executing a command on the file.
FREEDISK.EXE—. This utility displays the amount of free space on a disk. This information can be very useful for checking space before launching scripts.
GETTYPE.EXE—. This tool determines the Windows SKU type and sets the system environment variable
%ERRORLEVEL%to the value associated with the specified Windows operating system.INUSE.EXE—. INUSE is used to replace files on the next reboot.
SETX.EXE—. This tool sets environment variables.
TIMEOUT.EXE—. This tool allows an idle or timeout period, and it can be used in scripts.
CHOICE.EXE—. CHOICE enhances batch file control by allowing a choice to be made from a menu item.
TAKEOWN.EXE—. This tool sets ownership ACL on files.
Note
Visual Basic script tools can now be digitally signed to foster safer administration and management. Organizations that want to enhance security by preventing just any VB script from being run on a system can digitally sign the script. When a script is executed, a policy can be set to validate that the script has been signed by the organization and is valid for use.
Remote Desktop for Administration, formerly known as Terminal Services Remote Administration mode, allows administrators to log on to a Windows Server 2003 system remotely as if they were logging on locally. This facilitates the remote administration of the entire server and reduces the amount of local administration required.
An administrator logging in to a server through Remote Administration mode can view a graphical interface just as she would if she were logging in at the local server. Therefore, administrators can use all the available tools and access all aspects of the server from a Terminal Services client session.
Note
The Remote Desktop snap-in can be used to connect to multiple Terminal Services servers or computers with the Remote Desktop for Administration enabled.
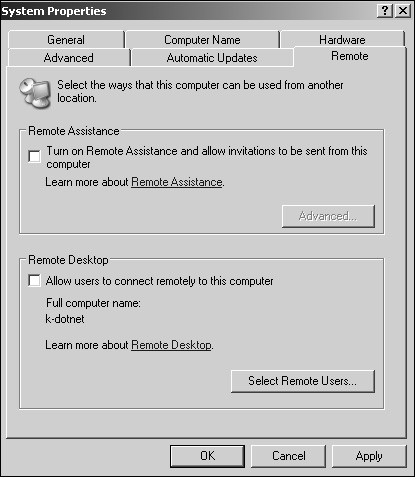
Remote Desktop for Administration is disabled by default, but it can be enabled by doing the following:
Double-click the System applet located in the Control Panel.
Select the Remote tab, as illustrated in Figure 22.8.
Select Allow Users to Connect Remotely to This Computer under the Remote Desktop area.
Administrators can now connect remotely to the server. You can optionally add other users by clicking the Select Remote Users button to display the Remote Desktop Users window.
Click Add to display the Select Users window.
Add the appropriate users to log on to the server.
Click OK three times to exit.
A significant add-on to Windows 2003 for network administrators is the Remote Control Add-on for Active Directory Users and Computers. This tool provides an administrator with the ability to right-click on a computer account in the Active Directory MMC and choose to remotely administer the system. The tool effectively launches a Terminal Services/Remote Desktop connection to the system.
The Remote Control Add-on for Active Directory Users and Computers is freely downloadable to all network administrators that have legal licenses to Windows 2003. The add-on is available at http://www.microsoft.com/windowsserver2003/downloads/featurepacks/default.mspx.
Another remote access management mechanism is Telnet. Telnet is a gateway type of service through which an administrator or client can connect and log on to a server running the Telnet Server service. Although this is a viable service for administering the system, other remote management mechanisms such as Remote Desktop for Administration allow for greater flexibility and control.
Windows Remote Management (WinRM) is new to Windows 2003 R2. It is the Microsoft implementation of WS-Management. WS-Management is a protocol that allows for hardware and software from diverse vendors to communicate. What differentiates WinRM from previous implementations is that it is SOAP-based and doesn’t use DCOM for remote connections. This makes this implementation of the WS-Management protocol very firewall friendly and scalable in a mixed operating system environment. Data is stored in an extensible XML format, not in objects, so it can be accessed by many common system and network management platforms. It can also be accessed by the new WinRM API, WMI scripting, or through a COM application. WinRM is available via the command line as well as through the Winrm.cmd tool. This can be integrated to batch files or integrated into Visual Basic scripts and applications through Winrm.vbs. More information on the command-line tool and its syntax can be found at the dedicated WinRM web page on Microsoft TechNet.
A network’s security is only as good as the security mechanisms put into place—and the review and identification process. Strong security entails employing Windows Server 2003 security measures such as authentication, auditing, and authorization controls, but it also means that security information is properly and promptly reviewed. Information that can be reviewed includes, but isn’t limited to, Event Viewer logs, service-specific logs, application logs, and performance data.
All the security information for Windows Server 2003 can be logged, but without a formal review and identification process, the information is useless. Also, security-related information can be complex and unwieldy depending on what information is being recorded. For this reason, manually reviewing the security information may be tedious but can prevent system or network compromise.
The formal review and identification process should be performed daily. Any identified activity that is suspicious or could be potentially risky should be reported and dealt with appropriately. For instance, an administrator reviewing a particular security log may run across some data that may alert him of suspicious activity. This incident would then be reported to the security administrator to take the appropriate action. Whatever the course of action may be in the organization, there should be points of escalation and remediation.
Licensing is typically one of the management areas that administrators would like to opt out of managing. It is often perceived as a tedious and time-consuming task. Windows Server 2003 provides two tools designed to help minimize the burdens of license tracking and management: the Licensing applet in the Control Panel and the Licensing snap-in located in the Start, Programs, Administrative Tools menu.
The Licensing applet in the Control Panel manages Microsoft BackOffice products on the local system. As one might expect, an administrator can add, remove, or change licensing options. However, the administrator can also configure the interval for licensing information to be replicated to the site license server.
The Licensing snap-in in the Administrative Tools menu is the site license server managing licensing for the enterprise. In addition to adding, deleting, or changing licensing, many useful tasks can be accomplished with licensing using this tool, including
Managing licensing for other servers in the environment
Reviewing licensing usage
Managing licensing replication throughout the network
Microsoft Operations Manager (MOM) is an enterprise-class monitoring and management solution for Windows environments. It is designed to simplify Windows management by consolidating events, performance data, alerts, and more into a centralized repository. Reports on this information can then be tailored depending on the environment and on the level of detail that is needed and extrapolated. This information can assist administrators and decision makers in proactively addressing Windows Server 2003 operation and any problems that exist or may occur. For more information on using MOM, refer to Chapter 25, “Integrating Microsoft Operations Manager with Windows Server 2003.”
Many other intrinsic benefits are gained by using MOM, including but not limited to
Event log monitoring and consolidation
Monitoring of various applications, including those provided by third parties
Enhanced alerting capabilities
Assistance with capacity-planning efforts
A customizable knowledge base of Microsoft product knowledge and best practices
Web-based interface for reporting and monitoring
Administrators face the often-daunting task of maintaining the Windows Server 2003 environment in the midst of daily administration and firefighting. Little time is spent identifying and then organizing maintenance processes and procedures.
To decrease the number of administrative inefficiencies and the amount of firefighting an administrator must go through, it’s important to identify those tasks that are important to the system’s overall health and security. After they’ve been identified, routines should be set to ensure that the Windows Server 2003 environment is stable and reliable. Many of the maintenance processes and procedures described in the following sections are the most opportune areas to maintain.
DHCP and WINS are low-maintenance services in Windows Server 2003, but as with any other database, it’s important to regularly check these databases to keep them running as efficiently as possible.
WINS provides NetBIOS name resolution and uses the Extensible Storage Engine (ESE) to store system entries. The WINS database continuously updates itself by adding or deleting entries. Over time, the WINS database can contain a lot of unused space due to the changes. As a result, the database should be compacted to regain the unused space and service the environment faster and more efficiently. Windows Server 2003 dynamically compacts the database, but offline compaction is required periodically as well. Before proceeding with compaction, make sure that WINS has been successfully backed up.
With the exception of the first backup, WINS backups happen automatically in Windows Server 2003. To back up the WINS database, follow these steps:
Select Mappings, Back Up Database within the WINS Manager.
Specify a location for the backup files and click OK. WINS will then automatically back up its database every 24 hours.
If the WINS database ever becomes corrupted, simply stop and restart the WINS service. If WINS detects corruption, it will automatically restore the most recent backup. If WINS does not detect the corruption, the administrator can force a restore by selecting Mappings, Restore Database from the WINS Manager.
WINS is also designed to compact its databases automatically when they become too large. However, the administrator should compact them manually periodically. For large Windows Server 2003 environments with 1,000 systems, Microsoft recommends manually compacting the database once a month. To manually compact the WINS database, follow these steps:
DHCP maintenance is less complex than WINS maintenance. The DHCP database and related Registry entries, as listed here, are automatically backed up every 15 minutes by default. Also, the DHCP database is automatically compacted at specific intervals.
DHCP.mdb—. The DHCP server database file.
DHCP.tmp—. This temporary file is used by the database as a swap file during database indexing maintenance operations.
J50.log and J50#####.log—. These database transaction log files can be used to recover DHCP if necessary.
J50.chk—. A checkpoint file.
Note
Specific backup and maintenance instructions are covered in detail in Chapter 10, “DHCP/WINS/Domain Controllers.”
Similar to WINS and DHCP, DNS operates efficiently on its own and requires very little intervention or maintenance. However, one way to maintain DNS is to set aging and scavenging.
Depending on the number of updates and the number of records, DNS can potentially experience problems with removing stale records. Although this doesn’t necessarily cause performance degradation or resolution problems in smaller networks, it may affect larger ones. As such, it’s important to periodically scavenge the DNS database. Aging and scavenging are not enabled by default, so they must manually be enabled by selecting Action, Set Aging/Scavenging within the DNS snap-in. (Make sure the appropriate server is highlighted first.) Then check the box within the Server Aging/Scavenging Properties window and set the appropriate intervals, as shown in Figure 22.9.

Service packs (SPs) and updates for both the operating system and applications are vital parts to maintaining availability, reliability, performance, and security. Microsoft packages these updates into SPs or individually.
There are several ways an administrator can update a system with the latest SP or update: CD-ROM, manually entered commands (see Table 22.1 and Table 22.2), Windows Update, or Microsoft Software Update Server (SUS).
Table 22.1. SP Command-Line Parameters
Service Pack (Update.exe) Parameters | Description |
|---|---|
| Forces applications to close at shutdown. |
| Prevents the system files from being backed up. This keeps SPs from being uninstalled. |
| Overwrites OEM files. |
| Indicates Quiet mode; no user interaction is required. |
| Integrates the SP in a Windows Server 2003 share. |
| Installs SP in unattended mode. |
|
Table 22.2. Update Command-Line Parameters
Description | |
|---|---|
| Forces applications to close at shutdown. |
| Lists installed updates. |
| Indicates Unattended mode. |
| Prevents the system files from being backed up. This keeps updates from being uninstalled. |
| Indicates Quiet mode; no interaction is required. |
| Uninstalls the update. |
|
Note
Thoroughly test and evaluate SPs and updates in a lab environment before installing them on production servers and client machines. Also, install the appropriate SPs and updates on each production server and client machine to keep all systems consistent.
Windows Update, shown in Figure 22.10, is a Web site that scans a local system and determines whether there are updates to apply to that system. Windows Update is a great way to update individual systems, but this method is sufficient for only a small number of systems. If administrators choose this method to update an entire organization, there would be an unnecessary amount of administration.

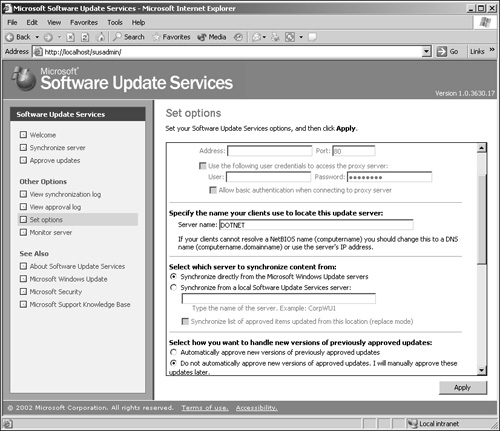
Realizing the increased administration and management efforts administrators must face when using Windows Update to keep up with SPs and updates for anything other than small environments, Microsoft has created the Software Update Services (SUS) client and server versions to minimize administration, management, and maintenance of mid- to large-sized organizations. Figure 22.11 illustrates the SUS interface. SUS communicates directly and securely with Microsoft to gather the latest SPs and updates.
The SPs and updates downloaded onto SUS can then be distributed to either a lab server for testing (recommended) or to a production server for distribution. After these updates are tested, SUS can automatically update systems inside the network.
Note
You can find more information on SUS and download the product from http://www.microsoft.com/windows2000/windowsupdate/sus/.
Maintaining a consistent level of patches and security fixes across an organization is a challenge. These challenges can be minimized if you’re using SUS. If you’re not using SUS, Microsoft provides other utilities to make maintenance and management of SPs and updates easier. They include but aren’t limited to the following:
QChain—. This utility safely chains updates together to allow multiple updates to be installed with only one reboot.
Microsoft Security Notification Service—. Subscribing to this service ensures that administrators will be notified as security-related updates become available.
Microsoft Baseline Security Advisor (MBSA)—. MBSA is both a graphical and command line–driven tool that improves upon the capabilities of the HFNetCHK tool. It scans for common system security misconfigurations (in products such as Windows, IIS, SQL Server, Internet Explorer [IE], and Office) and missing security updates for other products as well.
Maintaining Windows Server 2003 systems isn’t an easy task for administrators. They must find time in their firefighting efforts to focus and plan for maintenance on the server systems. When maintenance tasks are commonplace in an environment, they can alleviate many of the common firefighting tasks.
The processes and procedures for maintaining Windows Server 2003 systems can be separated based on the appropriate time to maintain a particular aspect of Windows Server 2003. Some maintenance procedures require daily attention, whereas others may require only yearly checkups. The maintenance processes and procedures that an organization follows depend strictly on the organization; however, the categories described in the following sections and their corresponding procedures are best practices for organizations of all sizes and varying IT infrastructures.
Certain maintenance procedures require more attention than others. The procedures that require the most attention are categorized into the daily procedures. Therefore, it is recommended that an administrator take on these procedures each day to ensure system reliability, availability, performance, and security. These procedures are examined in the following three sections.
Although checking the overall server health and functionality may seem redundant or elementary, this procedure is critical to keeping the system environment and users working productively.
Some questions that should be addressed during the checking and verification process are the following:
Can users access data on file servers?
Are printers printing properly? Are there long queues for certain printers?
Is there an exceptionally long wait to log on (that is, longer than normal)?
Can users access messaging systems?
Can users access external resources?
To provide a secure and fault-tolerant organization, it is imperative that a successful backup to tape be performed each night. In the event of a server failure, the administrator may be required to perform a restoration from tape. Without a backup each night, the IT organization will be forced to rely on rebuilding the server without the data. Therefore, the administrator should always back up servers so that the IT organization can restore them with minimum downtime in the event of a disaster. Because of the importance of the tape backups, the first priority of the administrator each day needs to be verifying and maintaining the backup sets.
If disaster ever strikes, the administrators want to be confident that a system or entire site can be recovered as quickly as possible. Successful backup mechanisms are imperative to the recovery operation; recoveries are only as good as the most recent backups.
Although Windows Server 2003’s backup program does not offer alerting mechanisms for bringing attention to unsuccessful backups, many third-party programs do. In addition, many of these third-party backup programs can send emails or pages if backups are successful or unsuccessful.
The Event Viewer, shown in Figure 22.12, is used to check the System, Security, Application, and other logs on a local or remote system. These logs are an invaluable source of information regarding the system. The following event logs are present for Windows Server 2003 systems:

Security log—. The Security log captures all security-related events that are being audited on a system. Auditing is turned on by default to record success and failure of security events.
Application log—. Specific application information is stored in the Application log. This information includes services and any applications that are running on the server.
System log—. Windows Server 2003–specific information is stored in the System log.
Domain controllers also have these additional logs:
File Replication Service—. Any events relating to the File Replication Service are captured in this log.
Directory Service—. Events regarding Active Directory, such as connection problems with a global catalog server or replication problems, are recorded here.
DNS Server—. Anything having to do with the DNS service is cataloged in the DNS Server log.
All Event Viewer events are categorized either as informational, warning, or error. Logs show events of the types shown in Figure 22.13.

Note
Checking these logs often will help your understanding of them. There are some events that constantly appear but aren’t significant. Events will begin to look familiar, so you will notice when something is new or amiss in your event logs.
Some best practices for monitoring event logs include
Understanding the events that are being reported
Setting up a database for archived event logs
Archiving event logs frequently
To simplify monitoring hundreds or thousands of generated events each day, the administrator should use the filtering mechanism provided in the Event Viewer. Although warnings and errors should take priority, the informational events should be reviewed to track what was happening before the problem occurred. After the administrator reviews the informational events, she can filter out the informational events and view only the warnings and errors.
To filter events, do the following:
Start the Event Viewer by choosing Start, Programs, Administrative Tools.
Select the log from which you want to filter events.
Right-click the log and select View, Filter.
In the log properties window, as shown in Figure 22.13, select the types of events to filter.
Optionally, select the time frame in which the events occurred. Click OK when you’re done.
Some warnings and errors are normal because of bandwidth constraints or other environmental issues. The more you monitor the logs, the more familiar you will become with the messages and therefore will be able to spot a problem before it affects the user community.
Maintenance procedures that require slightly less attention than daily checking are categorized in a weekly routine and are examined in the following sections.
Disk space is a precious commodity. Although the disk capacity of a Windows Server 2003 system can be virtually endless, the amount of free space on all drives should be checked daily. Serious problems can occur if there isn’t enough disk space.
One of the most common disk space problems occurs on data drives where end users save and modify information. Other volumes such as the system drive and partitions with logging data can also quickly fill up.
As mentioned earlier, lack of free disk space can cause a multitude of problems including, but not limited to, the following:
Application failures
System crashes
Unsuccessful backup jobs
Service failures
The inability to audit
Degradation in performance
To prevent these problems from occurring, administrators should keep the amount of free space to at least 25%.
Hardware components supported by Windows Server 2003 are reliable, but this doesn’t mean that they’ll always run continuously without failure. Hardware availability is measured in terms of mean time between failures (MTBF) and mean time to repair (MTTR). This includes downtime for both planned and unplanned events. These measurements provided by the manufacturer are good guidelines to follow; however, mechanical parts are bound to fail at one time or another. As a result, hardware should be monitored weekly to ensure efficient operation.
Hardware can be monitored in many different ways. For example, server systems may have internal checks and logging functionality to warn against possible failure, Windows Server 2003’s System Monitor may bring light to a hardware failure, and a physical hardware check can help to determine whether the system is about to experience a problem with the hardware.
If a failure has occurred or is about to occur, having an inventory of spare hardware can significantly improve the chances and timing of recoverability. Checking system hardware on a weekly basis provides the opportunity to correct the issue before it becomes a problem.
The three event logs on all servers and the three extra logs on a DC can be archived manually, or a script can be written to automate the task. You should archive the event logs to a central location for ease of management and retrieval.
The specific amount of time to keep archived log files varies on a per-organization basis. For example, banks or other high-security organizations may be required to keep event logs up to a few years. As a best practice, organizations should keep event logs for at least three months.
The following script, named Logarchive.vbs, can retrieve event logs and store them in a central location. The process may take a long time (up to a few hours) depending on the size of the log files as well as how many servers you’re pulling from. Avoid running this script over slow WAN connections so that bandwidth is conserved.
Set WS = CreateObject("Wscript.Shell")
Set FSO = CreateObject("Scripting.FileSystemObject")

DateString = CurrentDate()
ServerName = "HOFS01"
Purge = True
on error resume next
StartTime = Now
Output "---------------------------------"
OutPut "Started at:  " + CStr(Now)
Output ""
Set System = GetObject("winmgmts:{(Backup,Security)}\" + ServerName +
"
ootCIMV2")
If Err.Number = 0 Then
    Set colLogs = System.ExecQuery("select * from Win32_NTEventLogFile",,&H30)
For Each refLog In colLogs
            LogName = ServerName+ "_" + LogFileName(refLog.LogFileName) +
 "_" + DateString

    If FSO.FileExists("C:Logs" + LogName + ".evt") Then
 FSO.DeleteFile("C:Logs" + LogName + ".evt")
    If Purge Then
          RetVal = reflog.ClearEventlog("C:Logs" + LogName + ".evt")
          Else
              RetVal = reflog.BackupEventlog("C:Logs" + LogName + ".evt")
          End If
          If RetVal = 0 Then
              Output vbTab + "Log was archived in .evt format: " + LogName +
 ".evt"
              If Purge Then Output vbTab + "All events were cleared from
 the log"

          Else
                Output vbTab + "Error while archiving in .evt format."
          End If
    Next
Else
    Output vbTab + "Failed connect to the server"
End If
Set colLogs = Nothing
Set refLogs = Nothing
Set System = Nothing
Output "----------------------------------------"
OutPut "Finished at:  " + CStr(Now)
Output ""
Output ""
Set WS = Nothing
FullLog.Close
Set FullLog = Nothing
Set FSO = Nothing
Function CurrentDate
    Today = Date
    If Month(Today) < 10 Then
        CurrentDate = "0" + CStr(Month(Today))
    Else
        CurrentDate = CStr(Month(Today))
    End If
    If Day(Today) < 10 Then
        CurrentDate = CurrentDate + "0" + CStr(Day(Today))
    Else
        CurrentDate = CurrentDate + CStr(Day(Today))
    End If
    CurrentDate = CurrentDate + CStr(Year(Today))
    If Hour(Time) < 10 Then
        CurrentDate = CurrentDate + "0" + CStr(Hour(Time))
    Else
        CurrentDate = CurrentDate + CStr(Hour(Time))
    End If
End Function
Function LogFileName(LogName)
    Select Case LogName
        Case "Application"
            LogFileName = "app"
        Case "Directory Service"
            LogFileName = "dir"
        Case "DNS Server"
            LogFileName = "dns"
        Case "File Replication Service"
            LogFileName = "rep"
        Case "Security"
            LogFileName = "sec"
        Case "System"
            LogFileName = "sys"
    End Select
End Function
Sub Output(Text)
    wscript.echo text
    FullLog.writeline text
End Sub
Another file, logarchive.ini, is required when using logarchive.vbs. This file, shown next, contains a list of servers and the following archiving modes:
T means purge after archiving.
F means archive only.
servername,T
servername,F
servername,F
To use logarchive.vbs, do the following:
The command in step 4 archives all the event logs for the servers that were specified in the logarchive.ini file. The log files are stored in the directory specified in the script. Logs will be labeled in the following format:
servername_logname_date.log
For example, sfdc01_sec_02202003.log is the name for the SFDC01 server’s Security log, archived on February 20, 2004.
It is recommended that you label log files in the following manner:
Whenever files are created, deleted, or modified, Windows Server 2003 assigns a group of clusters depending on the size of the file. As file size requirements fluctuate over time, so does the number of groups of clusters assigned to the file. Even though this process is efficient when using NTFS, the files and volumes become fragmented because the file doesn’t reside in a contiguous location on the disk.
As fragmentation levels increase, as illustrated in Figure 22.14, disk access slows. The system must take additional resources and time to find all the cluster groups in order to use the file. To minimize the amount of fragmentation and give performance a boost, the administrator should use Disk Defragmenter to defragment all volumes. As mentioned earlier in the chapter, Disk Defragmenter is a built-in utility that can analyze and defragment volume fragmentation. Fragmentation negatively affects performance because files aren’t efficiently read from disk.

To use Disk Defragmenter, do the following:
Start Disk Defragmenter by choosing Start, Programs, Accessories, System Tools.
Select the drive to either analyze or defragment.
Click either the Analyze or Defragment button to begin the defragmentation process. Note that simply selecting the Defragment button will automatically analyze the drive before proceeding with the defragmentation process.
Tip
Disk Defragmenter included in Windows Server 2003 is a scaled-down version of Diskeeper. Using a third-party defragmentation product, such as Diskeeper, enables you to schedule defragmentation during nonpeak hours. Many other features of third-party products, such as defragmenting servers remotely, would greatly benefit a company.
The Domain Controller Diagnostic (DCDIAG) utility provided in the Windows Server 2003 Support Tools is used to analyze the state of a domain controller (DC). It runs a series of tests, analyzes the state of the DC, and verifies different areas of the system, such as
Connectivity
Replication
Topology integrity
Security descriptors
Netlogon rights
Intersite health
Roles
Trust verification
DCDIAG should be run on each DC on a weekly basis or as problems arise. DCDIAG’s syntax is as follows:
dcdiag.exe /s:<Domain Controller> [/u:<Domain><Username> /p:*|<Password>|""] [/h:{parameter}] [/q:{parameter}] [/v:{parameter}] [/n:<Naming Context>] [/f:<Log>] [/ferr:<Errlog>][/skip:<Test>] [/test:<Test>]
Parameters for this utility are
/h—. Display this help screen./s—. Use<Domain Controller>as the home server. This is ignored for DCPromo and RegisterInDns tests, which can only be run locally./n—. Use<Naming Context>as the naming context to test. Domains may be specified in NetBIOS, DNS, or distinguished name (DN) format./u—. Use domainusername credentials for binding with a password. Must also use the/poption./p—. Use<Password>as the password. Must also use the/uoption./e—. Test all the servers in the entire enterprise. This parameter overrides the/aparameter./i—. Ignore; ignore superfluous error messages./f—. Redirect all output to a file<Log>;/ferrwill redirect error output separately./ferr:<ErrLog>—. Redirect fatal error output to a separate file<ErrLog>./c—. Comprehensive; run all tests, including nondefault tests but excluding DCPromo and RegisterInDNS. Can use with/skip./skip:<Test>—. Skip the named test. Do not use in a command with/test./test:<Test>—. Test only the specified test. Required tests will still be run. Do not use with the/skipparameter.
Valid tests that can be run include the following:
Connectivity—. Tests whether DCs are DNS registered, pingable, and have LDAP/RPC connectivity.
Replications—. Checks for timely replication between domain controllers.
Topology—. Checks that the generated topology is fully connected for all DCs.
CutoffServers—. Checks for servers that won’t receive replications because their partners are down.
NCSecDesc—. Checks that the security descriptors on the naming context heads have appropriate permissions for replication.
NetLogons—. Checks that the appropriate logon privileges allow replication to proceed.
Advertising—. Checks whether each DC is advertising itself and whether it is advertising itself as having the capabilities of a DC.
KnowsOfRoleHolders—. Checks whether the DC thinks it knows the role holders of the five FSMO roles.
Intersite—. Checks for failures that would prevent or temporarily hold up intersite replication.
FsmoCheck—. Checks that global roles are known, can be located, and are responding.
RidManager—. Checks to see whether RID master is accessible and whether it contains the proper information.
MachineAccount—. Checks to see whether the machine account has the proper information. Use the
/RecreateMachineAccountparameter to attempt a repair if the local machine account is missing. Use/FixMachineAccountif the machine’s account flags are incorrect.Services—. Checks to see whether DC services are running on a system.
OutboundSecureChannels—. Verifies that secure channels exist from all the DCs in the domain to the domains specified by
/testdomain. The/nositerestrictionparameter will prevent the test from being limited to the DCs in the site.ObjectsReplicated—. Checks that machine account and DSA objects have replicated. You can use
/objectdn:<dn>with/n:<nc>to specify an additional object to check.frssysvol—. Checks that the file replication system (FRS) SYSVOL is ready.
kccevent—. Checks that the Knowledge Consistency Checker is completing without errors.
systemlog—. Checks that the system is running without errors.
DCPromo—. Tests the existing DNS infrastructure for promotion to the domain controller.
RegisterInDNS—. Tests whether this domain controller can register the Domain Controller Locator DNS records. These records must be present in DNS for other computers to locate this domain controller for the
<Active_Directory_Domain_DNS_Name>domain. Reports whether any modifications to the existing DNS infrastructure are required. Requires the/DnsDomain:<Active_Directory_Domain_DNS_Name>argument.CheckSDRefDom—. Checks that all application directory partitions have appropriate security descriptor reference domains.
It is recommended that you perform the tasks examined in the following sections on a monthly basis.
CHKDSK scans for file system integrity and can check for lost clusters, cross-linked files, and more. If Windows Server 2003 senses a problem, it will run CHKDSK automatically at startup.
Administrators can maintain FAT, FAT32, and NTFS file system integrity by running CHKDSK once a month. To run CHKDSK, do the following:
An uninterruptible power supply (UPS) can be used to protect the system or group of systems from power failures (such as spikes and surges) and keep the system running long enough after a power outage so that an administrator can gracefully shut down the system. It is recommended that an administrator follow the UPS guidelines provided by the manufacturer at least once a month. Also, monthly scheduled battery tests should be performed.
Once a month, an administrator should validate backups by restoring the backups to a server located in a lab environment. This is in addition to verifying that backups were successful from log files or the backup program’s management interface. A restore gives the administrator the opportunity to verify the backups and to practice the restore procedures that would be used when recovering the server during a real disaster. In addition, this procedure tests the state of the backup media to ensure that they are in working order and builds administrator confidence for recovering from a true disaster.
Automated System Recovery (ASR) is a recovery tool that should be implemented in all Windows Server 2003 environments. It backs up the system state data, system services, and all volumes containing Windows Server 2003 system components. ASR, shown in Figure 22.15, replaces the Emergency Repair Disks (ERDs) used to recover systems in earlier versions of Windows.

After building a server and any time a major system change occurs, the ASR sets (that is, the backup and floppy disk) should be updated. Another best practice is to update ASR sets at least once a month. This keeps content in the ASR sets consistent with the current state of the system. Otherwise, valuable system configuration information may be lost if a system experiences a problem or failure.
To create an ASR set, do the following:
Open Windows Server 2003’s Backup utility by choosing Start, Programs, Accessories, System Tools.
Click Advanced Mode from the first screen in the Backup or Restore Wizard.
Click the Automated System Recovery Wizard button.
Click Next in the Automated System Recovery Preparation Wizard window.
Select the backup destination and then click Next to continue.
Click Finish when you’re done.
An integral part of managing and maintaining any IT environment is to document the network infrastructure and procedures. The following are just a few of the documents you should consider having on hand:
Server build guides
Disaster recovery guides and procedures
Checklists
Configuration settings
Change configuration logs
Historical performance data
Special user rights assignments
Special application settings
As systems and services are built and procedures are ascertained, document these facts to reduce learning curves, administration, and maintenance.
It is not only important to adequately document the IT environment, but it’s often even more important to keep those documents up to date. Otherwise, documents can quickly become outdated as the environment, processes, and procedures change as the business changes.
As the name implies, quarterly maintenance is performed four times a year. Areas to maintain and manage on a quarterly basis are typically fairly self-sufficient and self-sustaining. Infrequent maintenance is required to keep the system healthy. This doesn’t mean, however, that the tasks are simple or that they aren’t as critical as those tasks that require more frequent maintenance.
Storage capacity on all volumes should be checked to ensure that all volumes have ample free space. Keep approximately 25% free space on all volumes.
Running low or completely out of disk space creates unnecessary risk for any system. Services can fail, applications can stop responding, and systems can even crash if there isn’t plenty of disk space.
Administrator passwords should, at a minimum, be changed every quarter (90 days). Changing these passwords strengthens security measures so that systems can’t easily be compromised. In addition to changing passwords, other password requirements such as password age, history, length, and strength should be reviewed.
AD is the heart of the Windows Server 2003 environment. Objects such as users, groups, OUs, and more can be added, modified, or deleted from the AD database. This interaction with the database can cause fragmentation. Windows Server 2003 performs online defragmentation nightly to reclaim space in the AD database; however, the database size doesn’t shrink unless offline defragmentation is performed. Figure 22.16 shows the differences in fragmented versus defragmented AD databases.

NTDSUTIL is the tool for maintaining AD databases. It is used to defragment the AD database, but it also performs other routines such as cleaning up metadata left behind by abandoned domain controllers and managing Flexible Single Master Operations (FSMO).
To use NTDSUTIL to defragment the AD database, do the following:
Restart the DC.
When the initial screen appears, press the F8 key.
From the Windows Advanced Options menu, select Directory Services Restore Mode (Windows domain controllers only).
In the next screen, select the Windows Server 2003 operating system being used.
Log on to the Windows Server 2003 system.
Click OK when the informational message appears.
At a command prompt, type
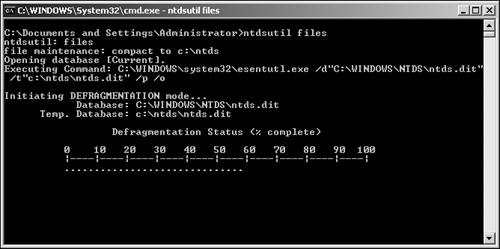
NTDSUTIL files.At the File Maintenance prompt, type
compact to %s, where%sidentifies an empty target directory. This invokes Esentutl.exe to compact the existing database and write to the specified directory. The compaction process is illustrated in Figure 22.17.If compaction was successful, copy the new ntds.dit file to %systemroot%NTDS and delete the old log files found in %systemroot%NTDS.
Type
quittwice to exit the utility.Restart the computer.
Other uses for the NTDSUTIL include, but aren’t limited to, the following:
Info—. Analyzes and reports the free space, reads the Registry, and then reports the sizes of the database and log files.
Integrity—. Performs an integrity check on the database, which detects any kind of low-level database corruption. This can take a long time to process if the AD database is large. It’s important to note that you should always run Recover prior to running an integrity check.
Recover—. Attempts to perform a soft recovery of the database. This task scans the log files and ensures all committed transactions therein are also reflected in the data file.
MMC 3.0 is a natural evolution in the Microsoft Management Console line. It integrates seamlessly with the new WinRM toolset to provide powerful tools for system management. MMC 3.0 offers a similar look and feel with some additional features. The first is the Action Pane. It appears on the ride side of the frame and lists all actions that are possible for the selected item. This is a much appreciated feature and decreases down time looking for functions. There is also a new Add or Remove Snap-in Wizard that gives options for MMC 3.0 snap-ins and allows nested display. Finally, this new version adds improved error correction for faults in snap-ins that can cause the MMC to fail.
MMC 3.0 works in conjunction with .Net 2.0 and allows C# developers much freedom in creating their own snap-ins for Microsoft, and even for custom applications. This piece finally closes the loop between developers and the operational staff who support an application once it moves to the production stage.
Microsoft plans a roadmap for migrating current snap-ins to the MMC 3.0 structure and adding additional functionality to current tools.
Table 22.3 summarizes some of the maintenance tasks and recommendations examined in this chapter.
Table 22.3. Windows Server 2003 Maintenance Tasks
Daily | Weekly | Monthly | Quarterly | Tasks and Servers Accessed for Task Completion | Requires Server Downtime? |
|---|---|---|---|---|---|
X | Check overall server functionality (login, access services, and so on) | No | |||
X | Verify that backups are successful | No | |||
X | Monitor Event Viewer | No | |||
X | Check disk space | No | |||
X | Verify hardware | No | |||
X | Archive event logs | No | |||
X | Run Disk Defragmenter | No | |||
X | Run the Domain Controller | No | |||
Diagnostic Tool (DCDIAG.exe) | |||||
X | Test the UPS | ||||
X | Run CHKDSK | Yes, if errors are found | |||
X | Validate backups and restores | No | |||
X | Update documents | No | |||
X | Check disk space | No | |||
X | Change administrator passwords | No | |||
X | Run offline defrag of NTDS.DIT | Yes |
Although administrators can easily get caught up in daily administration and firefighting, it’s important to structure system management and maintenance to help prevent unnecessary amounts of effort. Following a management and maintenance regimen reduces administration, maintenance, and business expenses while at the same time increasing reliability, stability, and security.
Try to maintain the network environment’s systems periodically to avoid any inefficiency.
Manage servers based on their roles and responsibilities.
Audit not only to identify security breaches or suspicious activity, but also to gain insight into how the network, network devices, and systems are accessed.
Enable audit policies through the local system policy or Group Policy Objects.
Remotely manage a system using Microsoft Management Console (MMC), Remote Desktop for Administration, scripting, and command-line utilities.
Use MOM to proactively manage Windows Server 2003.
Identify tasks that are important to the system’s overall health and security.
Perform the first WINS backup to initiate automatic WINS backups.
Thoroughly test and evaluate service packs and updates in a lab environment before installing them on production servers and client machines.
Install the appropriate service packs and updates on each production server and client machine to keep all systems consistent.
Use Software Update Services to minimize administration, management, and maintenance associated with keeping up with the latest service packs and updates.
Distribute the service packs and hotfixes downloaded from SUS to a lab server for testing.
Categorize and document daily maintenance activities such as checking server functionality, verifying that backups were successful, and monitoring Event Viewer events.
Categorize and document weekly maintenance processes and procedures such as checking disk space, verifying hardware operation, archiving event logs, defragmenting volumes, and diagnosing domain controllers with DCDIAG.
Categorize and document monthly maintenance processes and procedures such as maintaining file system integrity, testing UPS functionality, validating backups, updating ASR sets, and updating documentation.
Categorize and document quarterly maintenance processes and procedures such as checking storage limits, changing administrative passwords, and maintaining the AD database.