Enhancing Manageability with Group Policy Management Console
</objective> <objective> </objective> <objective> </objective> <objective> </objective> <objective> </objective> <objective> </objective> <objective> </objective> <objective> </objective> <objective> </objective> <objective> </objective> </feature>Policies, historically known as “system policies,” have existed in Windows products for many server versions. However, with Windows Server 2000 and now Windows Server 2003, group policies have become an integral part of the operating system. Group policies are used to deliver a standard set of security, controls, rules, and options to a user. In addition, they can be used to configure everything from login scripts and folder redirection to disabling Active Desktop and preventing users from installing software on their workstations.
Group policies only apply to Windows 2000 Professional, Windows XP, Windows 2000 Server, and Windows Server 2003 server machines. Any machines running earlier versions of Windows, Unix, or other operating systems will not receive a group policy from Windows Server 2003. Machines receiving group policy settings also must be members of the domain. There are two areas to which group policies can be applied. One is applied to computers and the other is applied to users.
Computer policies are applied upon boot of the machine, are in place before logon, and are independent of the user login credentials. They apply to the computer only, regardless of who will be logging in. Types of group policies that are best applied in the computer policies include things like:
Startup scripts
Security settings
Permission configuration on local files, Registry hives, or services on a workstation
Software installation can be pushed if they are in an MSI format using either the user or computer policies. However, it is suggested that it be pushed via computer policies.
User policies are applied when the user logs in and occur after boot and during login. They apply to the user regardless of what computer or server the user is logging into. They follow the user wherever the user goes in the domain.
Types of group policies that are best applied in the computer policies are as follows (also not a complete list):
Login scripts
Restrictions on user rights
Folder redirection
Group policies are refreshed at regularly scheduled intervals after a computer has been booted and a user has logged in. By default, group policies are refreshed every 90 minutes on non-domain controllers (with a stagger interval of 30 minutes) and every five minutes on domain controllers.
Refresh intervals are configurable via Group Policy by going to the following areas in Group Policy and changing the refresh interval times:
To change the interval for computer policies and DCs, choose Computer Configuration, Administrative Templates, System, Group Policy.
To change the interval for user policies, choose User Configuration, Administrative Templates, System, Group Policy.
Most changes made to existing Group Policy Objects (or GPOs) or new GPOs will be enforced when the refresh cycle runs. However, the following settings will be enforced only at login or upon boot, depending on the GPO configuration settings:
Group Policy usage and configuration can vary greatly with each individual implementation. How GP is implemented can depend on the organization’s users, sites, corporate culture, and a myriad of other factors. However, there are basic best practices that apply no matter what the Group Policy implementation. The following sections describe the basic best practices and lessons that have been learned through multiple GP implementations in many different organizations.
The primary thing to remember with Group Policy is that less is more. Group Policy is very useful and administrators new to it frequently apply a great many group policies, using Group Policy as the elixir for all administrative issues. However, it’s important to remember that with each Group Policy Object that is implemented and with each new layer of Group Policy, a fraction of a second is added onto computer boot time and user login time. Additionally, the GPOs take up space in SYSVOL on domain controllers, causing replication traffic as well as adding complexity that can make troubleshooting more difficult.
The new Group Policy Management Console (GPMC) provides you with a handy tool for planning and testing Group Policy implementations prior to implementing them. Because Group Policy can cause tremendous impact on users, any Group Policy implementation should be tested using the RSoP tool in planning mode. See the sections titled “Using Resultant Set of Policies in GPMC” and “Group Policy Modeling Using Resultant Set of Policy” for more information.
Group Policy can be configured on many different levels and, by default, is implemented in a particular order. However, by using the Block Policy Inheritance, Enforcement, and Link Enabled conditions, the default order of application can be changed. It’s a good idea to use these conditions sparingly because they can add a great deal of complexity to troubleshooting problems with the Group Policy application. See the sections titled “Understanding GP Inheritance and Application Order” and “Modifying Group Policy Inheritance” later in this chapter for more information.
Slow link detection can change the group policy that a user receives, which can be a difficult thing to troubleshoot as an administrator. Understanding the importance of slow links can make troubleshooting a great deal easier for you if you have WAN links that may go up and down or work in an environment with bandwidth issues. See the section in this chapter titled “Understanding the Effects of Slow Links on Group Policy” for more information.
It is important to delegate the proper rights for administrators to manipulate Group Policy. For example, a very small group of users should be able to edit policies on the domain level, but it might be necessary to allow diverse groups of administrators to configure group policies lower down the AD tree in areas in which they administer. An administrator can delegate the following rights to other administrators:
Using the Group Policy Delegation Wizard makes it easy to give the right groups of administrators the rights they need to do their job, and continue to administer Windows Server 2003 in the most secure ways possible.
Avoiding cross-domain policy assignments is a recommended best practice. The more local the policies are, the more quickly the computers boot up and the users can log on, as the users or machines don’t have to go across domain lines to receive group policies from other domains. This is especially pertinent for remote users.
The impact of using Group Policy naming conventions cannot be overstated. Naming conventions allow for easier troubleshooting and identification of policies and simplify managing group policies, especially in a large environment.
Using a Proper Naming Convention
Use common naming conventions for similar policies (“Site Name Software Policy,” or “OU Name Default Policy”) rather than a different naming convention for similar policies. For example, begin Group Policy names with the name of the OU or site to which it applies.
Use descriptive naming for Group Policy Objects. Don’t use the default “New Group Policy” for any policy. If it’s a software push policy, label it as such.
Use unique names. It is not recommended to name two group policies the same name—especially in different domains or forests.
The default domain policy is the domain-level policy that is installed (but not configured) when Windows 2003 is installed. It should not be renamed, removed, deleted, or moved up or down in the list of group policies that exist on the top level of the domain. Certain security settings will only function properly when implemented in the Default Domain Policy (see the following Warning). It’s also a good idea to lock down the capability to edit the Default Domain Policy to a small number of administrators because security settings and other domainwide policies are set at that level.
Warning
Account Policy settings applied at the OU level affect the local SAM database, not Active Directory accounts. The Account Policy settings must be applied on the Default Domain Policy to affect Active Directory accounts.
By understanding and using these generic best practices, you can provide users with a more secure, faster running, and uniform application of group policies.
Understanding the order in which Group Policy is applied is essential to administering it successfully. Without a clear understanding, Group Policy implementation and troubleshooting can be very difficult, even with the tools provided by Microsoft to help out with those very things.
To maximize the inheritance feature of Group Policy, keep the following in mind:
Isolate the servers in their own OU. Create descriptive Server OUs and place all the non–domain-controller servers in those OUs under a common Server OU. If software pushes are applied through Group Policy on the domain level or on a level above the server’s OU and do not have the Enforcement option checked, the server’s OU can be configured with Block Policy Inheritance checked. As a result, the servers won’t receive software pushes applied at levels above their OU.
Use Block Policy Inheritance and Enforcement sparingly to make troubleshooting Group Policy less complex.
As stated previously, Group Policy Objects are applied in a specific order. Computers and users whose accounts are lower in the Directory tree can inherit policies applied at different levels within the Active Directory tree. Group Policy Objects are applied in the following order throughout the AD tree:
Local Security Policy
Site GPOs
Domain GPOs
OU GPOs
Nested OU GPOs
Nested OU GPOs and on down are applied until the OU at which the computer or user is a member is reached.
If a setting in a Group Policy Object is set to Not Configured in a policy higher up, the existing setting remains. However, if there are conflicts in configuration, the last Group Policy Object to be applied prevails. For example, if a conflict exists in a Site GPO and in an OU GPO, the settings configured in the OU GPO will “win.”
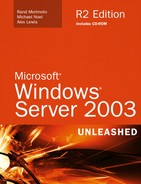
If multiple GPOs are applied to a specific AD Object such as a site or OU, they are applied in reverse of the order they are listed. The last GPO is applied first, and therefore if conflicts exist, settings in higher GPOs override those in lower ones. For example, if a Contacts OU has the following three group policies applied to it and they appear in this order (as shown in Figure 21.1), the policies will be applied from the bottom up:
Contacts Default Group Policy
Contacts Software Policy
Contacts Temporary Policy
The Contacts Temporary Policy will be applied first, the Contacts Software Policy will be applied next, and finally the Contacts Default Group Policy will be applied. Any settings in the Contacts Default Group Policy will override the settings configured in the two policies below, and the settings in the Contacts Software Policy will override any settings in the Contacts Temporary Policy.
The Block Inheritance and Enforcement and Link Enabled features allow control over the default inheritance rules. GPOs can be configured to use the Enforcement feature. This setting does not allow the parent organizational unit to be overridden by the settings of the child OU if conflicts exist. Additionally, it nullified the effects of Block Policy Inheritance if that functionality is applied on sub-GPOs.
GPOs can also be set to Block Policy Inheritance. This feature prevents the AD object that has the GPO applied to it from inheriting GPOs from its parent organizational unit, site, or domain (unless the parent GPO had Enforcement enabled as described previously).
Finally, the option exists that allows for the disabling of a Group Policy Object, also known as the GPO’s Link Enabled status. By right-clicking on the group policy in the Group Policy Management Console and unchecking Link Enabled, you can disable the policy and render it unused until the time it is re-enabled. In Figure 21.2 the Contacts Temporary Policy Link Enabled state is disabled.

Loopback allows Group Policy to be applied to the user logging in based on the location of the computer object, not the location of the user object in AD. Loopback applies a group policy based on the computer the user is using, not the user who is logging into the computer. An example of a good use of the loopback option concerns Terminal Services. If you need to apply specific permissions to everyone who logs into a particular Terminal Server, regardless of their user group policies, loopback in replace mode will accomplish this objective by ignoring all user GPOs. Loopback also provides a merge mode that merges the GPOs that apply to the user and computer, but gives precedence to the computer GPOs, overriding any conflicting user GPOs.
A slow link is the speed it takes for a packet to get from one site to another. If the time the packet takes to reach the other site exceeds Microsoft’s preconfigured slow link threshold, the link is determined to be slow.
Microsoft Windows Server 2003 has a default determination of what constitutes a slow link between sites and automatically changes what group policies are provided to a user on the receiving end of a slow link. Security policies and administrative templates are always loaded, no matter what the link speed. However, group policies such as login scripts, software pushes, and folder redirection are not pushed to the user who is accessing GP via a slow link. This can be problematic for sites that don’t have local domain controllers and receive authentication across a slow WAN link.
If you have unreliable or saturated bandwidth, you might want to change the configuration of what is considered a slow link in the site or disable slow link detection completely.
By default, a slow link has an average ping time of greater than 32ms using 2,048 byte packets, or a time greater than 500Kbps. Microsoft uses the following formula to convert ping times to Kbps. The formula is as follows:
16,000/ping = Kbps
Therefore, the default value of a 32ms ping times equals the following when the formula is applied:
16,000/32ms = 500Kbps
To determine whether a site has a slow link, perform a ping from that location to the nearest DC it would use to authenticate and obtain its group policy. Use the following format for the ping command to make sure the test packed is a 2,048Kb packet:
where servername is the closest domain controller.
The time it takes to return the ping will show if the link is more than 500Kpbs and thus a slow link subject to the slow link restrictions.
To override Microsoft’s default definition of a slow link, change slow link behavior, or otherwise change slow link configuration, go to the following areas in Group Policy:
Computer Configuration, Administrative Templates, System, Group Policy, Group Policy Slow Link Detection Properties. (Set to 0 to disable slow link detection or set a unique slow link time period.)
User Configuration, Administrative Templates, System, Group Policy, Group Policy Slow Link Detection. (Set to 0 to disable slow link detection or set a unique slow link time period.)
Group Policy also allows for changing the behavior of processes such as scripts, folder redirection, software installation, and security when slow links are in effect. These can be changed by choosing Computer Configuration, Administrative Templates, System, Group Policy, and editing the Policy Processing group policies.
You can take specific steps to make group policy application faster for users as well as make it easier on system administrators to administer the group policies.
If a group policy will be applied to many different locations, you should create the policy once and assign the permissions, and then link the policy to the other locations rather than creating the policy multiple times. Linking the policies achieves the following objectives:
Creates fewer group policies in SYSVOL. This allows for quicker domain controller promotion and less replication traffic.
A single point of change for the GPO. If the GPO is changed, the change is applied to all the locations where the GPO is linked.
A single point of change for permissions. When permissions are configured or changed in one location on a linked GPO, the permissions are applied universally to each place where the GPO is linked.
When a site administrator opens the GPMC or the group policy through ADUC, the domain controller that is used to make group policy changes and process the changes is, by default, the only one that holds the FSMO role of PDC Emulator Operations Master. Although this was configured to help eliminate replication problems, this can cause frustration and delays for remote administrators making changes to a group policy under their control by having to wait for the changes to replicate from the remote PDC Emulator DC. To force the GPMC and Group Policy snap-in to use the most available domain controller, enable the following group policy: User Configuration, Administrative Templates, System, Group Policy, Group Policy Domain Controller Selection.
Choose Use Any Available Domain Controller or Inherit From Active Directory Snap-ins to use the DC to which the open snap-in is connected. The default that points to the PDC Emulator is the choice to Use the Primary Domain Controller. Figure 21.3 shows the domain controller selection of Inherit From Active Directory Snap-ins.

To speed up login and boot times for users, it is recommended that if the entire User Configuration or Computer Configuration section is not being used in a GPO, the unused section should be disabled for the GPO. This expedites the user login time or the computer boot time, as the disabled sections aren’t parsed upon boot or login.
To disable configuration settings using Active Directory Users and Computers:
Click on a group policy.
Click Properties.
Go to the General tab.
Click on either Disable Computer Configuration Settings or Disable User Configuration Settings—whichever section is not being utilized.
To disable configuration settings using the GPMC:
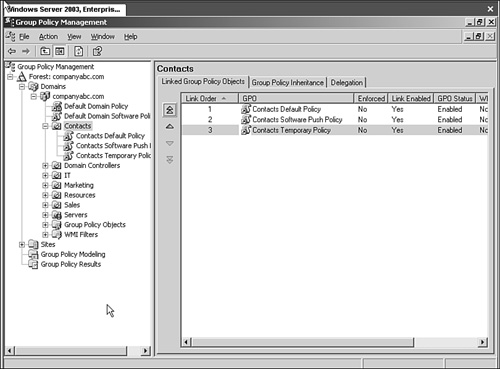
Searching through Administrative Templates for a particular group policy that is configured can be very time consuming. However, ADUC and the GPMC can be configured easily to show only the Administrative Templates objects that are configured. It removes from the view any policies or policy folders that don’t have policies configured within them, making it much easier and faster to find a specific configured policy. Figure 21.4 shows what a GPO looks like when viewed using the Show Configured Policies Only.

To view only the configured policies while using ADUC or the GMPC:
Open ADUC or GPMC.
Edit a group policy to view.
Click on Computer Configuration/Administrative Template or User Configuration/Administrative Template.
Right-click on the Administrative Templates section and choose View, Filtering.
Select the Only Show Configured Policy Settings option, as shown in Figure 21.5.
When a GPO is deleted, you have two choices: Delete the link or delete the entire policy. Each option carries certain consequences.
If the Group Policy Object should be removed from being applied at that location but it is or will still be applied elsewhere, choose to remove just the link. This leaves it in the available group policy list for future use. If the GPO will not be used elsewhere or ever again, delete the object permanently. This removes the policy from SYSVOL permanently and removes it from Active Directory.
If the policy won’t ever be used again and the policy isn’t fully deleted, this results in the Group Policy being left unused in the SYSVOL area on each domain controller. This adds unnecessarily to the time it takes to create a new domain controller, and increases replication time and storage space on the domain controller.
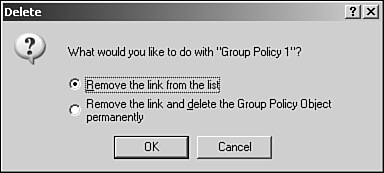
If you are using ADUC to access Group Policy, Windows 2003 presents you with two choices when trying to delete a group policy: Remove the Link From the List or Remove the Link and Delete the Group Policy Object Permanently.
If you are using the GPMC, delete the link by right-clicking on the Group Policy Object under the object to which it is applied. A pop-up box appears that asks, “Do you want to delete this link? This will not delete the GPO itself,” thereby leaving the GPO available for linking elsewhere. To delete the link, click OK in the box.
To fully delete the GPO, click on the folder in GPMC titled Group Policy Objects. Right-click the GPO and choose Delete. A pop-up box appears asking “Do you want to delete this GPO and all links to it in the domain? This will not delete links in other domains.” To complete the deletion, click OK.
A major benefit of Group Policy is the capability to push software packages to computers and users. Although other applications (such as SMS) might provide a better method for distributing software (because they are probably more sophisticated and have better reporting capabilities), Group Policy can be used to push software. An added bonus is that it comes free with the default installation of Windows Server 2003.
Without additional software, it is not possible to determine whether a software package was pushed successfully from a single centralized location. All evidence of software pushes is seen locally on the client machines. On the local machines, there are three areas to check to determine whether a software installation was successful:
MSI Installer events and Application Management events are written into the Application event logs
While the machine is booting, the Installing Managed Software dialog box will appear while the software is installing and before the user is presented with the login screen. Upon subsequent reboots, the message does not appear.
On the local machine, view Add/Remove Programs to see whether the software package is listed.
GPMC is the new tool used for configuring and using Group Policy with Windows 2003. After it is installed, the choice to use AD Users and Computers to access and configure Group Policy is removed from the local computer.
Note
If the Group Policy tab is accessed via ADUC, you are presented with a tab that says, “You have installed the Group Policy Snap-in so this tab is no longer used” and an Open button that opens the GPMC directly.
The GPMC must be installed on Windows Server 2003 or Windows XP. The GPMC.msi package can be downloaded from the http://www.microsoft.com/windowsserver2003/downloads/featurepacks/default.mspx Web site. Once installed, it can be found by choosing Start, All Programs, Administrative Tools, Group Policy Management.
Tip
The GPMC can be used to manage Windows 2000 Group Policy as well, but must be run on a Windows XP machine. The GPMC provides many useful features; some of the most useful will be covered in the following section.
A crucial improvement in Group Policy is the ability to back up (or export) the data to a file. Then you can restore the Group Policy data into the same location. Note that the backup only backs up data specific to that GP itself. Other Active Directory Objects that can be linked to GPOs such as individual WMI filters (although the WMI links are backed up and restored) and IP Security policies are not backed up, because of complications with restores. Note also that performing a restore actually restores the original GUID of the GPO. This is useful when replacing a misconfigured GPO, or especially one that was deleted.
The importing functionality allows for the importation of exported GPO data into a different location than the one from which it was exported, even to one with which no trust exists. Imports can be done in different domains, across forests, or within the same domain. This is most useful to move a GPO from a test lab into production without having to manually create what was done in the test lab, or, conversely, to update a test lab with the most current GPOs in production.
Copying GPOs is a very useful tool, as well. If you have configured a complex GP on a certain OU and want to duplicate the GPO(s) on other OUs, you need only copy the GPO and a new GPO is automatically created with the copy process. This new GPO can then be placed in the new location. You don’t need to re-create the GPOs manually. This is quicker and also eliminates the possibilities of mistakes. Note however, that the data isn’t saved to a file as it is in the backup or export of the GPO data. Trusts must be in effect for cross-domain or forest copies, or the Stored User Names and Passwords utility can be used if no trust exists. Note that copying a GPO requires creation of GPO rights in the target area as well as read access to the source GPO.
During a cross-domain or forest restore or copy operation, it might not be the best method to import all the exact configuration settings that exist in the backed-up GPO to the new area. For this purpose, migration tables are useful. A migration table can be used to convert values from a source to values that apply in the new target location or destination. The source and destination mappings can be changed to accommodate any differences in configuration between the two.
The GPMC enables you to easily view and configure Group Policy in multiple forests and domains. The default view shows multiple forests, and you can configure which forests and domains to view and administer from the GPMC. It is not possible to link a GPO from a domain in a forest to another domain in another forest. However, it is possible to configure group policies to reference servers in another forest.
By default, a forest can only be managed if a two-way trust exists between it and the forest of the administrator. You can configure it to work with only a one-way trust or no trust at all by choosing View, Options, clicking the General tab, and unchecking Enable Trust Delegation.
If you are supporting Group Policy in a forest with which you don’t have a trust, you will need to use the Stored User Names and Password tool to access the other forest. Find the Stored User Names and Password tool by choosing Start, Control Panel, User Accounts, Advanced, Manage Passwords in Windows XP or Start, Control Panel, Stored User Names & Passwords in Windows Server 2003. When the Stored User Names and Password tool appears, you will see a screen similar to Figure 21.6.

The Settings tab is a very useful area in the GPMC. You can use it to view the HTML reports on the GPO. These HTML reports state what is configured in the individual GPO. It provides an area to see all the settings, allows for looking easily at the descriptions (the “explain” sections) of the selected objects, and lets you condense and expand the details of the report by clicking on Show All. Additionally, the reports can be saved or printed.
Linking WMI filters enables you to apply group policies and establish their scopes based on attributes of target computers. You can do this by using the WMI filters to query the WMI settings of the target computers for true/false, and then applying group policies based on the true/false WMI queries. A “false” on the target computer results in the GPO not being applied. Conversely, a “true” results in the application of the GPO.
Because WMI filters are separate from GPOs, they must be linked to GPOs in the GPO Scope tab to function properly. Only one WMI filter can be applied to each GPO. Additionally, WMI filters will only work on Windows XP and later workstations, not on pre-Windows 2000 or non–Microsoft operating systems.
The GPMC enables you to search for specific group policies or data within the GPOs. Data such as permissions, GPO name, linked WMI filters, user configuration contents (what is configured), computer configuration contents, and GPO GUID can be searched for using the granular searching functionality in the GPMC.
Resultant Set of Policies (RSoP) is part of the GPMC that provides a GUI interface that enables you to test a policy implementation prior to rolling it out in production and also enables you to view what policies a user or computer is actually receiving.
RSoP planning mode enables you to simulate the deployment of a specified group policy, check the results, change, and then test the deployment again. This is very helpful in a lab environment where you can create and test a new set of policies. After RSoP shows that the GPO is correct, you can then use the backup functionality to back up the GPO configuration and import it into production.
To run RSoP in simulation mode, right-click on Group Policy Modeling in the forest that will be simulated, and choose Group Policy Modeling Wizard. The wizard allows for inputting the possibility of slow links, Loopback configuration, and WMI filters as well as other configuration choices. Each modeling is presented in its own report as a subnode under the Group Policy Modeling node.
RSoP in logging mode enables you to view what exact policies a user or computer might be receiving. It shows in a readable format what polices are enforced, where conflicts exist, and what different policies are being applied to the user/computer. It can be run either on the local computer or on a remote computer by choosing the proper options in the wizard. To run RSoP in logging mode, right-click on Group Policy Results in the GPMC, and then click on the Group Policy Modeling Wizard selection and follow the wizard that appears.
Windows Management Instrumentation (WMI) is Microsoft’s implementation of Webbased Enterprise Management (WBEM) that is intended to create a standard for the management of the Windows networking environment. Although Microsoft has various initiatives relative to enterprise network management, WMI in the context of group policies typically refers to two things: one is the use of WMI scripts, and the other is the use of WMI filtering.
Although Group Policy can automate a number of tasks in a Windows networking environment, there are many things that it cannot do. When a group policy cannot be used, typically a WMI script can be used to complete the task. Such tasks include the following:
Typically, when a network administrator hears the term scripting, he immediately begins to think about Visual Basic programming and application coding. However, if you can cut, paste, copy, and edit text information, you can effectively use WMI scripts for group policies.
Microsoft provides hundreds of predefined scripts that can be copied and pasted into a group policy. In the Windows Script Development Center at http://msdn.microsoft.com/library/default.asp?url=/nhp/Default.asp?contentid=28001169, there are samples of scripts that can be copied, pasted, and then edited to create fully functional scripts. As an example, the following script adds domain users into groups. By simply editing “fabrikam” with the name of your domain, and editing the cn (common names) and ou (organization units) names and OUs in your organization, you can use this script to automate a process that might otherwise take you a few seconds to do manually. A few seconds multiplied by hundreds of adds, moves, and changes to a network can add up to significant time savings over the course of a month or year.
Const ADS_PROPERTY_APPEND = 3
Set objGroup = GetObject _
  ("LDAP://cn=Sea-Users,cn=Users,dc=NA,dc=fabrikam,dc=com")
objGroup.PutEx ADS_PROPERTY_APPEND, "member", _
    Array("cn=Scientists,ou=R&D,dc=NA,dc=fabrikam,dc=com", _
      "cn=Executives,ou=Management,dc=NA,dc=fabrikam,dc=com", _
      "cn=MyerKen,ou=Management,dc=NA,dc=fabrikam,dc=com")
objGroup.SetInfo
Some organizations have extended scripting to automate an employee account creation process. Rather than manually creating a user, manually adding the user into groups, manually creating an email address, a phone number, and other user information, a script can be linked to an OU such that every time a user is created in an OU, the properties for that user are automatically created and associated to the user.
WMI filters allow an administrator to specify a WMI-based query to filter the effect of a Group Policy Object in the WMI object database. As an example, a WMI filter can look for certain group membership assignments for a user, and based on the user’s group membership, apply a script as appropriate.
To add or delete a new WMI filter to a Group Policy Object, perform the following steps:
Open Active Directory Users and Computers.
Right-click the domain or OU for which you want to set a group policy.
Click Properties and then click the Group Policy tab.
Click an entry in the Group Policy Object links and then click Properties.
Click the WMI Filter tab.
Click This Filter and then click Browse/Manage.
Click Advanced.
Click on New to add information about any new filters or click Delete to remove a filter. Then click OK.
To import to or export from a Group Policy Object, perform these steps:
Open Active Directory Users and Computers.
Right-click the domain or OU for which you want to set a group policy.
Click Properties and then click the Group Policy tab.
Click an entry in the Group Policy Object links and then click Properties.
Click the WMI Filter tab.
Click This Filter and then click Browse/Manage.
Click Advanced. Then click Import to import, or click the filter in the list you want to export and click Export. Finally, click OK.
When you’re importing, select an MOF file that contains the WMI filter or filters you want to import.
Using Group Policy is an excellent method to increase security in an organization. It can be used for everything from setting domain-level security policies that apply to every user and computer (such as password length, complexity, and lockout values) to applying security measures to specific groups of specialized users with specific needs.
For example, you might be managing a group of users who need to be highly managed. They need to have a very secure environment implemented on their workstations and logins, an environment that they cannot get around—environments where they cannot edit the Registry, add software, change permissions, stop or start services, or view the event logs. Applying a specific, highly secure Group Policy Object to that group would accomplish this.
Additionally, the same policy could be applied easily using a template across various OUs and groups of users. If you are managing a group whose members need a great many rights and the capability to manipulate their workstations—such as the ability to install software, change settings, edit the Registry, and change drivers—applying more permissive group policies to that group could accomplish that as well.
Microsoft provides predefined security templates for Group Policy, based on the type of users and environment needed (highly secure workstations and servers, secure workstations and servers). These templates can be imported into Group Policy Objects, where they can then either be implemented as is, or changed as the environment requires. However they are used, they are a great security starting point with which to obtain a base level of security. The templates can be used to configure settings such as account policies, event log settings, local policies, system service settings, Registry permissions, and file and folder permissions.
The following list describes the security templates that can be added after installation:
Secure—. There are two secure templates, one for workstations and one for domain controllers. The workstation is called Securews.inf and the domain controller is called Securedc.inf.
Highly secure—. The highly secure template (hisecws.inf and hisecdc.inf) goes beyond the secure template and applies even more restrictive and secure policy configurations. It is also available for both domain controllers and workstations.
System Root Security—. This template (Rootsec.inf) provides a default set of secure root permissions for a root C drive. It is useful if the permissions have been changed and need to be returned to a secure default setting. With regard to child objects, it only propagates the security changes to child objects that inherit permissions; it does not overwrite explicit permissions on child objects.
Compatible—. This template (Compatws.inf) should only be applied to workstations. It changes the security settings for members of the users group by configuring a basic set of Registry and file permissions that allows most Microsoft software to function properly but securely. It also removes any members of the Power Users group.
As stated earlier, Account Policy settings applied at the OU level affect the local SAM database, not Active Directory accounts. The Account Policy settings must be applied on the Default Domain Policy to affect Active Directory accounts. The Account Policy settings that must be configured in the Default Domain Policy to affect the accounts in AD are located in the following areas in Group Policy:
Password Policy
Account Lockout Policy
Kerberos Policy
Restricted groups can be used to set the membership of local groups such as Administrators and Power Users on servers and workstations. However, this cannot be applied to domain controllers because they don’t have local groups. Restricted groups can be useful in extremely secure environments where the addition of users to local groups on workstations or servers would be problematic, or if group membership were accidentally changed. Assigning local groups would automatically remove the incorrect group membership and replace it with the membership specified in Group Policy.
For example, you can create an OU that is used only to replace local workstation administrative group membership that was changed. You would create a local group, and if the workstation were discovered to have incorrect group membership, the workstation would be moved to the OU. The next time the workstation was rebooted, the incorrect group membership would be removed and the proper group added. The computer could then be moved back to the proper location.
To create a restricted group:
Edit Group Policy.
Choose Computer Configuration, Windows Settings, Security Settings, Restricted Groups.
Right-click on Restricted Groups and select Add Group.
Click Browse.
Type the name of the group and click OK.
Click OK again on the Add Group dialog box.
On the top section labeled Members Of This Group, click the Add button.
Click Browse.
Type in or browse for the desired users or groups that should be members of the new local restricted group. After adding members to the group, the dialog box will look similar to Figure 21.7.
Click OK to finish and close the dialog box.

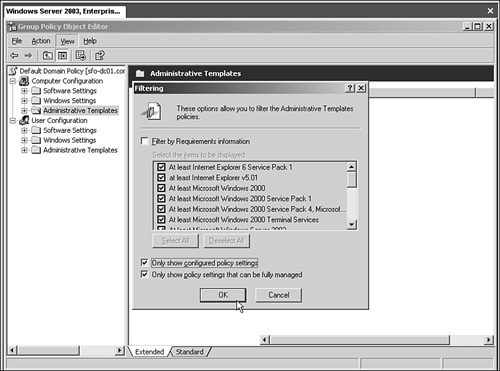
In the Group Policy Object Editor, you can use Folder Redirection to redirect certain special folders to network locations. Special folders are those folders, such as My Documents, that are located under Documents and Settings. Folder Redirection is located under User Configuration in the console tree of the Group Policy Object Editor. Several basic options for Folder Redirection will be discussed in this section. For each basic option, an advanced version of that option is available. The advanced version provides for finer control by allowing redirection that is based on security group membership.
Rather than having to type a Universal Naming Convention (UNC) path, such as \servershare\%username%MyDocuments, you can simply type the path to the share, such as \servershare, and Folder Redirection automatically appends the username and folder name when the policy is applied. With Folder Redirection in place, you can minimize errors and spelling mistakes from constantly retyping environment variables and share names.
To redirect special folders to the root directory, perform the following steps:
Open a Group Policy Object that is linked to the site, domain, or organizational unit that contains the users whose special folders you want to redirect.
In the console tree, double-click Folder Redirection to display the special folder that you want to redirect.
Right-click the special folder that you want to redirect (for example, Desktop or My Documents) and then click Properties.
On the Target tab, in Settings, click Basic - Redirect Everyone’s Folder to the Same Location.
Under Target Folder Location, click Create a Folder for Each User Under the Root Path.
In Root Path, type a Universal Naming Convention path (for example,
\servernamesharename) and then click OK.In the Properties page for the special folder, click OK.
A new feature provided with Windows Server 2003, the redirect option allows you to redirect a user’s My Documents folder to the user’s home directory. This option is intended only for organizations that have an existing deployment of home directories and that want to maintain compatibility with their existing home directory environment. Use this option only if you have already deployed home directories in your organization.
To redirect My Documents to the home directory, follow these steps:
Open a Group Policy Object that is linked to the site, domain, or organizational unit that contains the users whose My Documents folders you want to redirect.
In the console tree, double-click Folder Redirection to display My Documents.
Right-click My Documents and then click Properties.
On the Target tab, in Settings, click Basic - Redirect Everyone’s Folder to the Same Location.
Under Target Folder Location, click Redirect to the User’s Home Directory and then click OK.
Note
Users must have the home directory property set correctly on their user object in Active Directory. The client computer finds the path for the user’s home directory from the user object in Active Directory at login time. Users who are affected by Folder Redirection policy must have this path set correctly; otherwise, folder redirection will fail.
With the option to redirect folders to a special path, you can redirect users’ folders to an alternative local drive or partition, or they can enter unusual configurations that are not anticipated by the new Folder Redirection user interface. Functionally, this works in exactly the same way as the Windows 2000 Folder Redirection user interface.
To redirect special folders to a specific path, follow these steps:
Open a Group Policy Object that is linked to the site, domain, or organizational unit that contains the users whose special folders you want to redirect.
In the console tree, double-click Folder Redirection to display the special folder that you want to redirect.
Right-click the special folder that you want to redirect (for example, Desktop or My Documents) and then click Properties.
On the Target tab, in Settings, click Basic - Redirect Everyone’s Folder to the Same Location.
Under Target Folder Location, click Redirect to the Following Location.
In Root Path, type a UNC path (for example,
\servershare). You can also use a locally valid path (for example,C:somefolder). Then click OK to continue.
With the option to redirect to the local user profile, you can redirect the selected folder back to the default location in the local user profile—for example, %userprofile% <Folder Name>.
To redirect special folders to the local profile location, follow these steps:
Open a Group Policy Object that is linked to the site, domain, or organizational unit that contains the users whose special folders you want to redirect.
In the console tree, double-click Folder Redirection to display the special folder that you want to redirect.
Right-click the special folder that you want to redirect (for example, Desktop or My Documents) and then click Properties.
On the Target tab, in Settings, click Basic - Redirect Everyone’s Folder to the Same Location, similar to what is shown in Figure 21.8.
Under Target Folder Location, click Redirect to the Local User Profile Location and then click OK.
Roaming profiles enable users to access their data, including redirected folders, wherever they log in. Items such as data on their desktop, application configuration, printers, and display options follow the users wherever they log in. The roaming profiles are stored on the local workstation(s) where the user logs in and also in a central repository on a server that can be accessed from any location from which the user might log in. This increases user productivity by giving users the tools and data they need, no matter where they are logging in. However, it does leave a copy of the user data, including offline files if configured, in every location where the user has logged in.
Warning
Although the leftover roaming profiles left on the workstations and offline files are protected by ACLs, local administrators can gain access to the files on the local workstation. This should be a consideration when deciding whether to use the roaming profiles and offline files/folder redirection.
Microsoft provides additional tools for managing group policies and the File Replication Service, above and beyond ADUC and GPMC. Some are loaded automatically with Windows 2003 Server and others can be found on the Microsoft Web site or with the Windows 2003 Resource Kit.
The gpupdate.exe utility comes with Windows 2003 and replaces the Windows 2000 Server secedit/refreshpolicy command-line utility. When run, it refreshes the computer policy or user policy, both locally and AD-based, including security settings. This eliminates the need to have the user reboot or log out/in to receive the new policy changes immediately. The syntax is as follows:
Gpupdate [/target:{computer | user}] [/force] [/wait:Value] [/logoff] [/boot]
For more information on the syntax commands, type the following at the command prompt to access help:
gpresult.exe is a free utility from Microsoft that comes with the Server Resource Kit. It’s a small program that has to be installed before use. It must be run via a command line on the machine that is being investigated. The gpresult.exe tool will discover where the computer and the logged-in user are receiving their Group Policy and what policies are applied to them. Although a great deal of the information output by the gpresult.exe tool is available in other areas and using other tools, it is convenient to have it all displayed in one place.
gpmonitor.exe is the Group Policy Monitor tool. It is used to gather information collected during GP refresh intervals and send the data to a specified central location. There, the tool can be used to analyze the data, as well. gpmonitor.exe is available in the Windows Server 2003 Deployment Kit.
GPOTool.exe should be used for troubleshooting Group Policy issues in domains with more than one domain controller or across domains. The tool scours all the domain controllers in a domain or across domains and checks for consistency between the group policies located in the SYSVOL share on each domain controller and reports on what it finds. It also checks the validity of the group policies on all domain controllers, checks on object replication, and displays detailed information about the GPOs. GPOTool.exe is available with the Microsoft Windows 2000 Server Resource Kit and is also available for downloading on Microsoft’s Web site.
FRS replication is the replication service that is used to replicate Group Policy Objects between domain controllers. It can be very difficult to troubleshoot, due in no small part to the troubleshooting tools that were available for use up to that time. However, Microsoft now has an excellent new tool called FRSDiag that provides a GUI interface through which you can run tests easily to analyze FRS replication. You can choose to look at single or multiple domain controllers at a time, check their event logs for errors, run NTFRSUTL options, run REPADMIN /showreps and REPADMIN /showconn, and run many of the previously available FRS tools. However, the results are much clearer and easier to understand when output to the GUI interface. When the tool is configured to output the results to a screen, it lists any DCs with failures in red and any successes in green. The output can also be put into cab files. FRSDiag.exe can be downloaded from http://www.microsoft.com/windowsserver2003/downloads/featurepacks/default.mspx.
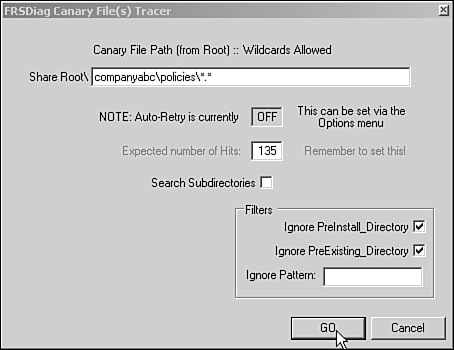
A highly useful test available within FRSDiag is the Canary File Tracer. The Canary File Tracer can be configured to check the SYSVOLdomain namepolicies directory (or any directory specified in the Share Root text area) for the correct number of folders or files. For example, if domain controllers cannot replicate group policies successfully and have a different number of policy folders present in their SYSVOLdomain_namepolicies folder, this tool will, in minutes, check the number of folders on each domain controller across the domain to see whether they match across the domain controllers and output this data to the screen. It even tells how many policies above or below the target number the domain controller is off by. To do this, follow these steps:
On the main screen, in the Target Server area, choose all the domain controllers in the domain.
In File Output, choose None.
Choose Tools, Canary File Tracer.
In the share root area, type the following:
domain_namepolicies*.*In the Expected Number of Hits box, type the number of folders in the policies container (for example,
135).Click the Go button.
The Canary File Tracer will then output the data to the screen, showing the results of the tests. Obviously, the Canary File Tracer can be used to troubleshoot other issues and search for other files and folders as well. It’s not just limited to the search capabilities listed previously.
Figure 21.9 shows the configuration options for the Canary File Tracer.
Sonar.exe can be downloaded from http://www.microsoft.com/windowsserver2003/downloads/featurepacks/default.mspx. It provides a GUI interface that enables you to check the FRS replication health of all domain controllers in the domain, which can help with troubleshooting Group Policy replication problems. Sonar can be configured to poll the domain controllers at different intervals for FRS health and will output the results, such as backlogged files waiting to be replicated, downed FRS services, and other error states to the GUI screen. Sonar is also a useful tool for monitoring DFS health because it uses FRS as well.
Administrative templates are installed by default in Group Policy. They are changes to the Registry of Windows 2000 and XP machines. In the Registry, the changes are stored in the HKEY_LOCAL_MACHINE (HKLM) hive for computer policies and HKEY_CURRENT_USER (HKCU) hive for user policies and then in the following hives under HKLM or HKCU:
SOFTWAREPOLICIES SOFTWAREMICROSOFTWINDOWSCURRENTVERSIONPOLICIES
By default, standard users do not have the right to change Registry entries in these keys and change the Group Policy behavior because the keys are protected by ACLs.
You don’t have to be limited by the default installed Administrative Templates. Microsoft provides additional templates to enhance the choices available for use with Group Policy, and custom Administration Templates can be written and imported to add custom keys and Group Policy options.
Both preferences and policies are controlled through the Registry. Preferences are changes to the Registry that the user has control over and are not found in the Registry keys listed previously. These are options, such as wallpaper or screensavers. Policies are changes to the Registry in the keys listed previously, which are protected by ACLs. Although Group Policy can overrule preferences, the basic user would normally have access to change the Registry settings through the operating system or an application. The policy does not overwrite the preference keys, and if the policy is removed, the preferences will return. The preference settings remain in effect until they are removed or changed via the Registry.
It is a good idea to use policies rather than preferences when you want to control a certain aspect of an application or want something the user accesses to remain static. You can disable users from being able to change the appearance, configuration, or functionality of the item. For those items, using administrative templates is your best answer.
With a baseline understanding of how Group Policy functions in a Windows Active Directory Domain environment, Microsoft Exchange 2003 administrators can look at how Group Policy, GPOs, and templates can be leveraged to enhance the ability to manage applications like Microsoft Outlook 2003 in the enterprise. Working with predefined Group Policy templates available from Microsoft, administrators can now manage areas and control access and changes, ranging from restrictions and preventing configuration modifications to controlling the look and feel that affects the overall user experience when working with application software.
In this section, we will review the tools and options for managing an application such as the Microsoft Outlook 2003 client software, specifically using Group Policy and predefined templates. We will also explore the options available with Group Policy when deploying and working with the Outlook client, Outlook Group Policy templates, and the steps for configuring administration privileges for managing the Exchange client through Group Policy.
To further enhance the management functionality when working with an application like the Outlook 2003 software, the Office Resource Kit (ORK) provides a predefined template for managing Outlook clients using the Group Policy functionality of Windows domains.
Called Outlk11.adm, this template enables administrators to centrally manage and configure many of the preferences and security functions normally required to be configured at each individual Outlook client. Using Outlk11.adm, administrators can fully manage and configure the following areas:
Outlook preferences—. The preferences options available with the security templates can be defined in the same manner as using the Options tab available in the Tools menu of the Outlook client. When defining preferences, administrators can control the standard look and feel of each component available with Outlook. Options include areas for enforcing items such as spell-check and email format, calendar views, and contact options.
Exchange settings—. Configuration items, such as profile configurations and auto archiving, can now be centrally configured.
SharePoint Portal Server settings—. In addition to the Outlook client settings, using the templates enables administrators to configure access to SharePoint Portal Server resources through the Outlook client.
Because the additional administrative templates are not installed by default when Windows Server 2003 is installed, administrators must download or install the Outlook administrative template manually. Available on the ORK, Outlk11.adm is placed on the local drive of the systems where the ORK is installed.
To begin setting up the Outlook administrative template, start by installing the GPMC on the domain controller where the policy will be administered. Next, install the Microsoft ORK on a system where the template can be accessed from a domain controller for import into the Domain Group Policy.
Tip
The Office 2003 Resource Kit can be downloaded from the Microsoft Office Web site at http://www.microsoft.com/downloads.
After the ORK is installed, the Outlk11.adm file is automatically extracted and placed in the C:WindowsInf directory (where C: represents the drive where the Windows installation resides) on the local system drive where the ORK was installed.
To import the Outlook security template Outlk11.adm into the Domain Group Policy using the Group Policy Management Tool, use the following steps:
Tip
When importing the Outlk11.adm security template, it is best to import the template to the Default Domain Group Policy.
From a domain controller in the domain where the policy will be applied, open the Group Policy snap-in by selecting Start, All Programs, Administrative Tools, Group Policy Management.
Select the Default Domain Policy where
Outlk11.admwill be imported to, as shown in Figure 21.10.From the Action menu select Edit; this opens the Group Policy Object Editor window.
On the Group Policy Object Editor, select Administrative Templates under the User Configuration option and right-click to choose Add/Remove Templates, as shown in Figure 21.11.
From the Add/Remove Templates dialog box, click the Add button.
Navigate to the location where
Outlk11.admwas placed, as noted in step 2. Select the template to import OUTLK11.ADM and click the Open button.Ensure that the OUTLK11 template has added the Add/Remove Templates dialog box, and click Close to continue.


You should now see the Microsoft Outlook 2003 template under the Administrative Templates folder in the Group Policy Editor.
Although Group Policy has traditionally been the management task of Windows domain administrators, with delegation, permissions can be assigned to additional resources and accounts to manage Microsoft Outlook clients. Using the Delegation Wizard of the GPMC, accounts can assign and delegate rights to add, modify, and delete Group Policy Objects.
It is important to delegate the proper rights for administrators to manipulate Outlook 2003 group policies. Using the delegation option of the GPMC, administrators can assign a very small group of users permission to edit Outlook policies at the domain level. To enhance this functionality, it is also possible to allow diverse groups of administrators to configure group policies at lower levels of the Active Directory domain tree.
When assigning permissions, administrators can delegate the following rights:
Create GPO
Create WMI filters
Permissions on WMI filters
Permissions to read, edit, and so forth an individual GPO
Permissions on individual locations to which the GPO is linked (SOM)
To understand the steps required to assign rights over GPOs, let’s look at the following scenario to assign one Active Directory account permission at the domain level. The rights that will be assigned to the account will be the Edit Group Policy Objects Only permissions.
To begin, open the GPMC by selecting Start, All Programs, Administrative Tool, Group Policy Management. Then follow these steps:
On the GPMC, select Domain Folder, Your Domain, Group Policy Objects, Default Domain Policy.
Select the Delegation tab in the right pane of the Domain Group Policy Object.
To add an account, select the Add button, enter the name of the account to be added, and click the OK button.
Select the rights to be assigned to the account by selecting the permission Edit in the drop-down box, as shown in Figure 21.12; select OK to continue.

The account has now been assigned rights to edit the domain-level GPO. Review the information and test settings to ensure that the permissions have been applied correctly.
Through Group Policy, Outlook configuration settings can be configured and applied differently depending on how the GPO is applied.
Exchange administrators can not only centrally manage one group of Outlook clients, but they can configure and apply a completely different set of options enforced on a different group or OU in the domain by following these steps:
One option that group policies enable organizations to accomplish when managing an application like the Outlook client is the ability to design, develop, and implement a baseline configuration for every client configuration in use. Often, this was not an option because of the exhaustive amount of administration involved, along with the inability to secure configurations from modification.
With the option of standardizing configuration for all Outlook client systems, administrators must wonder which options can be configured to improve the productivity and functionality of the network client for every user. Using the Group Policy Object settings to define simple Outlook configuration settings—such as Saving Sent Items, Spell Checking Messages Before Sending, and Auto Archive Settings—can not only improve the functionality of the Outlook client, but can also reduce administrative management overhead when supporting workstations and users.
Some of the most useful email options available when configuring settings using Group Policy include the following:
HTML/Microsoft Word message format—. The most enhanced of all Outlook email options is the HTML/Microsoft Word format. This option can be enabled to provide a robust email editor.
Junk Email Filtering—. Enabling the Junk Email Filtering option allows the configuration of filtering email at the client level.
OST/PST Creation—. Disabling or enabling the OST and PST Creation options can provide control of network traffic and local system disk space utilization.
Empty Deleted Items Folder—. Controls the total amount of space each user mailbox can have, helping control storage limits; administrators can enable this option.
Auto Archive—. One area often requiring administrative overhead, the Auto Archive option can now be toggled via GPO settings.
Email Accounts—. Using this option, users can be prevented from adding additional account types.
In addition to the email options available, the following calendar options can be defined to establish a base functionality for all Domain Outlook users:
One interesting setting is the option in the Outlook security template for contacts. Administrators can define how each contact will be filed and displayed. For example, the Display Name can be set as First, [Middle], Last Name, and the File As option for the contact as Last, First.
There are many options available when configuring the Outlook client. Review the options and descriptions for each before applying settings and changes to the Outlook Group Policy Objects.
Another powerful function of using group policies is the ability for an administrator to define the look and feel of the Outlook client. Administrators can now configure options to create a specific look and feel when using Outlook.
Group Policy preferences can be defined to customize the look of the Outlook client. Options can be set to allow users access to information Web sites and SharePoint Portal Server sites, providing an enhanced user’s experience and data access option not previously available.
Using the Preferences options of the GPO, settings can be defined to integrate and redirect Outlook users to valuable Web data using technologies such as Microsoft SharePoint Portal and Internet Information Services:
Custom Outlook Today—. Administrators can use the URL for Custom Outlook Today Properties settings to define a Web page that will be viewed when users access the Outlook Today home page.
Folder Home Pages Settings—. Each Outlook folder can now be redirected to a predefined Web page.
SharePoint Portal Server—. With Outlook 2003 and Group Policy preferences, support to integrate SharePoint with Outlook can easily be enabled and disabled.
With all the information gathered in the previous sections, administrators can now apply settings and configuration options using the GPMC and Outlook 2003 security template. To better understand the settings for applying a group policy, review the following mock installation scenario.
In this scenario, you create and apply a standard set of preferences to create an Outlook client baseline configuration for one OU in the Active Directory domain. As described earlier, one additional setting is applied to redirect the client’s Outlook Today setting and direct users to a company Internet home page.
To begin, open the GPMC by selecting Start, All Programs, Administrative Tools, Group Policy Management and then follow these steps:
Select the Default Domain Policy by selecting Forest, Domains, YourCompanydomain, Group Policy Objects.
Select the Default Domain Policy, click Action from the GPMC menu, and click Edit. This opens the Group Policy Editor.
Select Administrative Templates under the User Configuration and select the Microsoft Outlook 2003 folder.
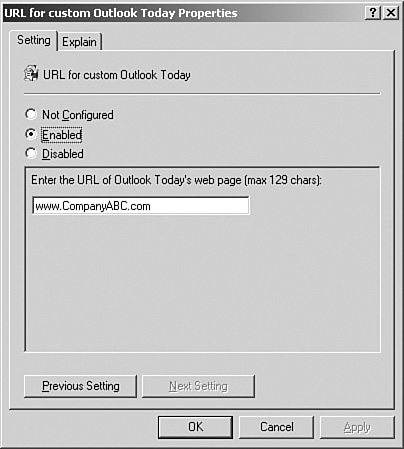
From this point, you can begin to enable options and apply preferences to the GPO. After options are enabled, they appear in the GPMC to be tested through RSoP and applied to the OU. In this scenario, you apply the HTML/Microsoft Word Email Editor options and redirect the Outlook Today page to point to a Web page called www.CompanyABC.com. To apply these settings, complete these steps:
Select the Microsoft Outlook 2003 folder and select Tools, Options, Mail Format, Message Format.
Double-click Message Format Editor in the right pane to open and configure the Message Format Policy settings.
As shown in Figure 21.13, select Enabled Option and click HTML/Microsoft Word in the drop-down box. Select OK to continue.
Next, select the Outlook Today folder by selecting Microsoft Outlook 2003, Outlook Today.
Double-click URL for Custom Outlook Today Properties in the right pane.
To enable the redirection of the Outlook Today home page, click the Enable button and enter the URL to be displayed, as shown in Figure 21.14. Click OK when finished.
Open the GPMC and confirm that the settings are ready to be applied. From the GPMC, select Default Domain Policy and ensure that the Outlook settings appear as shown in Figure 21.15.
Now that the Group Policy options have been configured, you apply the settings to a group of users in the domain by following these steps:
To apply the settings to a group, click the Add button under Security Filtering in the right pane of the Default Domain Policy.
From the Select Users, Computers, or Groups search page, enter the name of the group to which the settings will be applied and click OK.
Check to see whether the group has been added to the Security Filtering pane.


When the configuration is completed, it is good practice to back up the configuration and ensure that all the settings are enabled on the GPO by selecting Action/GPO Status.
Beyond using the custom and default templates, it is possible for you to create your own customized Administrative template to enforce a Registry change. The changes appear in the Group Policy GUI format and can be configured through the GPMC or ADUC the way normal Group Policy would be configured. Customized templates can be very useful in a highly customized environment or one where the default choices are not sufficient.
To best determine how to write a custom template, you must first consider what you are trying to control or change. You must also discover whether the Registry change is in the User or Computer hive area and then also note the actual Registry path and Registry value. After you have determined these items, coding a new basic administrative template is not too complex.
Administrative templates vary from the very basic to the extremely complex (look at the common.adm that is installed with Windows 2003). However, they can be extremely useful tools with which to customize any environment using Group Policy.
This section provides you with a simple list of “how to” items to get you started using Group Policy. If you are already comfortable working with Windows 2000 Group Policy Objects, this section will be review.
There are a variety of ways to open the Group Policy snap-in, from which you can edit, create, and delete Group Policy Objects.
You can open the Group Policy Object Editor in several ways, depending on the action that you want to perform and the object to which you want to apply Group Policy. The preferred method is to use the Group Policy snap-in as an extension to an Active Directory snap-in. This way, you can browse the Active Directory for the correct Active Directory container and then define Group Policy Objects based on the selected scope.
To open the Group Policy Object Editor from Active Directory Users and Computers, perform the following steps:
Open Active Directory Users and Computers.
In the console tree, right-click the domain or organizational unit for which you want to set Group Policy Objects.
Click Properties and then click the Group Policy tab.
Edit or create a new Group Policy Object for the domain or OU you selected.
To open the Group Policy Object Editor as a Microsoft Management Console (MMC) snap-in, follow these steps:
Open the Microsoft Management Console by typing
mmcon the Run line.From the File menu, select Add/Remove Snap-in.
On the Standalone tab, click Add.
In the Available Standalone Snap-ins list, click Group Policy Object Editor and then click Add.
In the Select Group Policy Object properties page, click Local Computer to edit the local Group Policy Object, or click Browse to find the Group Policy Object that you want to edit.
Click Finish, click Close, and then click OK. The Group Policy Object Editor opens the Group Policy Object for you to edit.
After you open the Group Policy Object Editor, as shown in Figure 21.16, you can edit existing Group Policy Objects. It is important to note that you must have read and write permissions on a GPO to be able to edit it.

To edit a Group Policy Object, follow these steps:
If you want to create a new Group Policy Object, follow these steps:
Open the Group Policy Object Editor from one of the ways documented in the previous sections.
In the console tree, right-click the site, domain, or organizational unit to which you want the newly created Group Policy Object to be linked. The Group Policy Object will be stored in the current domain—that is, the domain that contains the domain controller being used by Active Directory Users and Computers or Active Directory Sites and Services.
Click Properties and then click the Group Policy tab.
Click New, type a name for the Group Policy Object, and then click Close.
The newly created Group Policy Object is linked by default to the site, domain, or organizational unit that you select when you create the Group Policy Object, and its settings apply to that site, domain, or organizational unit. If you want to delete the Group Policy Object from that site, domain, or organizational unit, do the following:
Open Active Directory Users and Computers or Active Directory Sites and Services.
In the console tree, right-click the site or domain, or right-click any organizational unit in the domain.
Click Properties and then click the Group Policy tab.
To find all the Group Policy Objects that are stored in the domain, click Add to open the Add a Group Policy Object Link properties page.
Click the All tab, right-click the Group Policy Object that you want to delete, and then click Delete.
Click Yes, click Cancel, and then click Close.
You might want to preserve a Group Policy Object that you have created but that you no longer want to affect the domain, OU, or site on which you created it. In this case, unlinking or disabling the GPO is your best practice.
To unlink a Group Policy Object from a domain, OU, or site, follow these steps:
Open either Active Directory Users and Computers or Active Directory Sites and Services.
In the console tree, right-click the site, domain, or organizational unit from which you want to unlink the Group Policy Object. Unlinking prevents the Group Policy Object from affecting that site, domain, or organizational unit.
Click Properties and then click the Group Policy tab.
Click the Group Policy Object that you want to unlink and then click Delete.
In the Delete dialog box, click the Remove The Link From The List box, as shown in Figure 21.17. Next, click OK and then Close.
Note
If you click the Remove The Link And Delete The Group Policy Object Permanently box in the Delete dialog box, all sites, domains, and organizational units to which the Group Policy Object is linked will no longer have those Group Policy settings applied to them, and the Group Policy Object itself will be deleted.
When you disable a Group Policy Object link, the settings in the Group Policy Object no longer apply to users or computers in the site, domain, or organizational unit to which the Group Policy Object was linked; and they no longer apply to users and computers in child containers that inherit those Group Policy settings. However, you can easily reenable the policy at a later time.
To disable a Group Policy Object, perform the following steps:
Open Active Directory Users and Computers or Active Directory Sites and Services.
In the console tree, right-click the site, domain, or organizational unit to which the Group Policy Object is linked.
Click Properties and then click the Group Policy tab.
Right-click the Group Policy Object link that you want to disable, click Disabled on the context menu, and then click Yes. This switches the Disabled state to Active, and a check appears in the Disabled column.
Note
When you are working with Group Policy Objects, it is recommended that you disable unused parts of the object. Under User Configuration or Computer Configuration in the console tree, if a GPO contains only settings that are not configured, you can avoid processing these settings by disabling User Configuration or Computer Configuration. This expedites the startup and logon process for those users and computers that are subject to the policy.
The nodes of the Group Policy MMC snap-in are themselves MMC snap-in extensions. These extensions include Administrative Templates, Scripts, Security Settings, Software Installation, Folder Redirection, Remote Installation Services, and Internet Explorer maintenance. Extension snap-ins may, in turn, be extended. For example, the Security Settings snap-in includes several extension snap-ins. You can also create your own MMC extensions to the Group Policy snap-in to provide additional policies. The root node of the Group Policy snap-in is displayed as the name of the GPO and the domain to which it belongs.
Below the root node, the namespace is divided into two parent nodes: Computer Configuration and User Configuration. They are the parent folders that you use to configure Group Policy settings. Computer-related Group Policy is applied when the operating system boots. User-related Group Policy is applied when users log on to the computer.
Three nodes exist under the Computer Configuration and User Configuration parent nodes: Software Settings, Windows Settings, and Administrative Templates. The Software Settings and Windows Settings nodes contain extension snap-ins that extend either or both of the Computer Configuration or User Configuration nodes.
Computer ConfigurationSoftware Settings is for software settings that apply to all users who log on to the computer. This folder contains the Software Installation node, and it might contain other nodes that are placed there by independent software vendors.
User ConfigurationSoftware Settings is for software settings that apply to users regardless of which computer they log on to. This folder also contains the Software Installation node. Deploying software will be discussed later in this section.
Windows Settings are available under both User Configuration and Computer Configuration in the console tree. Computer ConfigurationWindows Settings is for Windows settings that apply to all users who log on to the computer. It includes two nodes: Security Settings and Scripts. User ConfigurationWindows Settings is for Windows settings that apply to users regardless of which computer they log on to. It includes three core nodes: Folder Redirection, Security Settings, and Scripts.
The Security Settings node allows a security administrator to configure security levels assigned to a Group Policy Object or local computer policy. This can be done after or instead of importing or applying a security template.
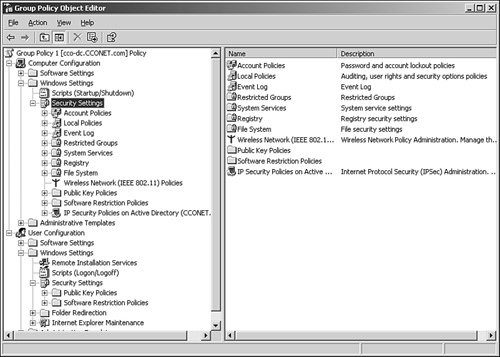
The Security Settings extension of the Group Policy snap-in, shown in Figure 21.18, complements existing system security tools such as the Security tab on the properties page (of an object, file, folder, and so on), and Local Users and Groups in Computer Management. You can continue to use existing tools to change specific settings, whenever necessary.
The security areas that can be configured for computers include the following:
Account Policies—. These computer security settings control password policy, lockout policy, and Kerberos policy in Windows Server 2003 and Windows 2000 domains.
Local Policies—. These security settings control audit policy, user rights assignment, and security options. Local policies allow you to configure who has local or network access to the computer and whether or how local events are audited.
Event Log—. This controls security settings for the Application, Security, and System event logs. You can access these logs using the Event Viewer.
Restricted Groups—. These settings allow you to control who should and should not belong to a restricted group, as well as which groups a restricted group should belong to. This capability allows you to enforce security policies regarding sensitive groups, such as Enterprise Administrators or Payroll. For example, an organization might decide that only Joe and Mary should be members of the Enterprise Administrators group. Restricted groups can be used to enforce that policy. If a third user is added to the group (for example, to accomplish some task in an emergency situation), the next time policy is enforced, that third user will be automatically removed from the Enterprise Administrators group.
System Services—. These settings control startup mode and security options (security descriptors) for system services such as network services, file and print services, telephone and fax services, Internet and intranet services, and so on.
Registry—. This is used to configure security settings for Registry keys, including access control, audit, and ownership. When you apply security policies on Registry keys, the Security Settings extension follows the same inheritance model as that used for all tree-structured hierarchies in Windows Server 2003 and 2000 (such as the Active Directory and NTFS). You should use the inheritance capabilities to specify security only at top-level objects, and redefine security only for those child objects that require it. This approach greatly simplifies your security structure and reduces the administrative overhead that results from a needlessly complex access-control structure.
File System—. This is used to configure security settings for filesystem objects, including access control, audit, and ownership.
Wireless Network Policies—. These policies help you to configure settings for a wide range of devices that access the network over wireless technologies.
Public Key Policies—. You use these settings to specify that computers automatically submit a certificate request to an enterprise certification authority and install the issued certificate. You also use public key policies to create and distribute a certificate trust list. public key policies can establish common trusted root certification authorities. You can also add encrypted data recovery agents and change the encrypted data recovery policy settings.
Software Restriction Policies—. These policies enable an administrator to set policies that restrict access and/or execution of application software.
IP Security Policies on Active Directory—. IP Security (IPSec) policy can be applied to the GPO of an Active Directory object. This propagates that IPSec policy to any computer accounts affected by that Group Policy Object.
In Windows Server 2003, the Administrative Templates node of the Group Policy snap-in uses Administrative Template (.adm) files to specify the Registry settings that can be modified through the Group Policy snap-in user interface.
The Administrative Templates node includes all Registry-based Group Policy information. This includes Group Policy for the Windows 2000 and Windows Server 2003 operating systems, its components, and for applications. Policy settings pertaining to a user who logs on to a given workstation or server are written to the User portion of the Registry database under HKEY_CURRENT_USER (HKCU). Computer-specific settings are written to the Local Machine portion of the Registry under HKEY_LOCAL_MACHINE (HKLM).
A new Administrative Templates Web view in Windows Server 2003 uses the supported keyword to show you which operating systems are supported clients for individual settings. The Extended tab feature is new. It displays the text that explains the policy setting, as Windows 2000 did, and also indicates which versions of Windows are supported as clients for the setting. This enhancement is very helpful considering Windows Server 2003 adds more than 220 new administrative templates to the Group Policy arsenal. If you prefer a view of the policy setting without the explanatory text, click the Standard tab.
To use the view provided by administrative templates, follow these steps:
Open the Group Policy Object Editor.
In the console tree, click the folder under Administrative Templates that contains the policy settings you want to set.
At the bottom of the Details pane, click the Extended tab. You’ll see a screen similar to the one in Figure 21.19.
In the Settings column, click the name or icon for a setting to read a description of the setting.
To change that setting from its default (not configured) state, double-click the name or icon for the setting.
On the Settings tab, click one of these buttons:
Not Configured—. The Registry is not modified.
Enabled—. The Registry reflects that the policy setting is selected.
Disabled—. The Registry reflects that the policy setting is not selected.
Select any other available options that you want on the Settings tab and then click OK.
To view and set other settings in the current folder, click Previous Setting or Next Setting.

The Software Installation snap-in can be used to centrally manage software distribution in your organization. You can assign and publish software for groups of users and computers.
When applications are assigned to groups of users, all users who require the applications automatically have the application on their desktops—without requiring the administrator or technical personnel to set up the application on each desktop. When an application is assigned to a group of users, the application is actually advertised on all the users’ desktops. The next time a user logs on to her workstation, the application is advertised. This means that the application shortcut appears on the Start menu, and the Registry is updated with information about the application, including the location of the application package and the location of the source files for the installation. With this advertisement information on the user’s computer, the application is installed the first time the user activates the application. When the user selects the application from the Start menu the first time, it sets up automatically and then opens.
Applications can also be published to groups of users, making the application available for users to install, should they choose to do so. When an application is published, no shortcuts to the application appear on users’ desktops, and no local Registry entries are made. That is, the application has no presence on users’ desktops. Published applications store their advertisement information in the Active Directory.
To install a published application, users can use the Add/Remove Programs applet in the Control Panel, which includes a list of all published applications that are available for them to use. Alternatively, if the administrator has configured this feature, users can open a document file associated with a published application (for example, an .xls file to install Microsoft Excel).
With the scripts extensions, you can assign scripts to run when the computer starts or shuts down or when users log on or off their computers. For this purpose, you can use Windows Scripting Host to include both Visual Basic Scripting Edition (VBScript) and JScript development software script types.
Group Policy Object Editor includes two extensions for script deployment:
Scripts (Startup/Shutdown)—. You can use this extension, located under the Computer ConfigurationWindows Settings in the console tree, to specify scripts that are to run when the computer starts up or shuts down. These scripts run as Local System, which means they have the full rights that are associated with the System account.
Scripts (Logon/Logoff)—. You can use this extension, located in the User ConfigurationWindows Settings in the console tree, to specify scripts when the user logs on or off the computer. These scripts run as User, not as Administrator.
This means that the user must have rights to perform the functions of your logon/logoff script.
Whether it’s a startup/shutdown or a logon/logoff script, the procedure for assigning the script to a computer is the same. To assign computer startup scripts, perform the following steps:
In the Script Name box, type the path and name to the script, as shown in Figure 21.20, or click Browse to search for the script file in the Netlogon share of the domain controller.

In the Script Parameters box, type any parameters you want, the same way as you would type them on the command line.
Windows Server 2003 builds on the functionality of group policy management technologies developed in Windows 2000. Window Server 2003 introduces powerful new change and configuration management features that provide greater flexibility and precision for managing users and computers in increasingly complex enterprise environments. While it is common that organizations deploying Active Directory do not immediately leverage the full capabilities of group policies in their environment, they can provide significant savings in effort, administration, and management time and should be leveraged as much as possible in an organization.
Use common sense naming conventions for GPOs. Don’t use the same name for two different GPOs.
When you are working with Group Policy Objects, disable unused parts of the object.
When you delegate creation of GPOs to non-administrators, also consider delegating the capability to manage the links for a specific OU.
Use the No Override and Block settings in GPOs sparingly.
Do not redirect My Documents to the home directory unless you have already deployed home directories in your organization.
Enable client-side caching, especially for users with portable computers.
Always enable the Synchronize All Offline Files Before Logging Group Policy setting to ensure that offline files are fully synchronized and available to users working offline.
Use fully qualified (UNC) paths—for example,
\servershare.Avoid applying group policies to sites; instead, apply them to domains and organizational units.
Use RSoP to help you determine a set of applied policies and their precedence.
Software packages must be in the format of an .msi package; otherwise, the package cannot be pushed using Group Policy.
Configure software pushes at the highest levels possible so that the push goes out to a broader group of OUs. However, if the push is going out to only a few OUs, the software should be pushed from the OU level.
Configure software pushes to the Computer Configuration rather than the User Configuration.
Use DFS for multiple-site software installation MSI locations. Using DFS ensures that software installations are installed at the closest source for installation.
Force after-hours automatic reboots if possible. Use a remote shutdown command (such as the DOS shutdown command or VBScript) to force computers that are to receive a software push to install software after the users have left for the day.
Know the implications of using the Authenticated Users group to push software. Despite its name, Authenticated Users actually includes both users and computers.