The term Microsoft security was long considered, whether fairly or unfairly, to be an oxymoron. High-profile vulnerabilities and viruses that were exploited in Windows NT and Windows 2000 often made organizations wary of the security, or lack of security, that was built into Microsoft technologies. In direct response to this criticism, security in Windows Server 2003 became the major, if not the most important, priority for the development team. Subsequent revisions of Windows Server 2003, such as Service Pack 1 and R2, have taken security even further as well.
Security on the server level is one of the most important considerations for a network environment. Servers in an infrastructure not only handle critical network services, such as DNS, DHCP, directory lookups, and authentication, but they also serve as a central location for most, if not all, critical files in an organization’s network. Subsequently, it is important to establish a server-level security plan and to gain a full understanding of the security capabilities of Windows Server 2003.
This chapter focuses on the server-side security mechanisms in Windows Server 2003. Particular emphasis is placed on the importance of keeping servers up to date with security patches through such enhancements as Software Update Services, a major improvement to Windows security. In addition, file-level security, physical security, and other critical server security considerations are presented.
On the heels of several high-profile viruses and security holes, Bill Gates developed what became known as the “Trustworthy Computing” initiative. The basics of the initiative boiled down to an increased emphasis on security in all Microsoft technologies. Every line of code in Windows Server 2003 was combed for potential vulnerabilities, and the emphasis was shifted from new functionality to security. What the initiative means to users of Microsoft technology is the fact that security has become a major priority for Microsoft, and Windows Server 2003 is the first major release that takes advantage of this increased security emphasis.
All Microsoft code is verified through a process called common language runtime. It processes application code and automatically checks for security holes that can be caused by mistakes in programming. In addition, it scrutinizes security credentials that are used by specific pieces of code, making sure that they perform only those actions that they are supposed to. Through these techniques, the common language runtime effectively reduces the overall threat posed to Windows Server 2003 by limiting the potential for exploitations and vulnerabilities.
Security works best when it is applied in layers. It is much more difficult to rob a house, for example, if a thief not only has to break through the front door, but also has to fend off an attack dog and disable a home security system. The same concept applies to server security: Multiple layers of security should be applied so that the difficulty in hacking into a system becomes exponentially greater.
Windows Server 2003 seamlessly handles many of the security layers that are required, utilizing Kerberos authentication, NTFS file security, and built-in security tools to provide for a great deal of security right out of the box. Additional security components require that you understand their functionality and install and configure their components. Windows Server 2003 makes the addition of extra layers of security a possibility, and positions organizations for increased security without sacrificing functionality.
One of the most overlooked but perhaps most critical components of server security is the actual physical security of the server itself. The most secure, unbreakable Web server is powerless if a malicious user can simply unplug it. Worse yet, someone logging into a critical file server could potentially copy critical data or sabotage the machine directly.
Physical security is a must for any organization because it is the most common cause of security breaches. Despite this fact, many organizations have loose levels, or no levels, of physical security for their mission-critical servers. An understanding of what is required to secure the physical and login access to a server is consequently a must.
Servers should be physically secured behind locked doors, in a controlled-access environment. It is unwise to place mission-critical servers at the feet of administrators or in similar, unsecure locations. Rather, a dedicated server room or server closet that is locked at all times is the most ideal environment for the purposes of server security.
Most hardware manufacturers also include mechanisms for locking out some or all of the components of a server. Depending on the other layers of security deployed, it may be wise to utilize these mechanisms to secure a server environment.
All servers should be configured to allow only administrators to physically log in to the console. By default, such use is restricted on domain controllers, but other servers such as file servers, utility servers, and the like must specifically forbid these types of logins. To restrict login access, follow these steps:
Choose Start, All Programs, Administrative Tools, Local Security Policy.
In the left pane, navigate to Security SettingsLocal PoliciesUser Rights Assignment.
Double-click Allow Log On Locally.
Remove any users or groups that do not need access to the server, as illustrated in Figure 12.1. (Keep in mind that, on Web servers, the IUSR_SERVERNAME account will need to have log on locally access to properly display Web pages.) Click OK when finished.

Note
If you replace Local Security Policy in the restriction lockdown instructions in step 1 with Domain Security Policy, you will be able to carry out these same instructions on a Windows Server 2003 domain controller.
Note
A Group Policy set on an OU level can be applied to all servers, simplifying this task and negating the need to perform it manually on every server. For more information on setting up these types of Group Policies, refer to Chapter 21, “Windows Server 2003 Group Policies.”
Logging off administrators after using any and all workstations and servers on a network is often the most difficult and tedious security precaution. If an administrator forgets, or simply steps away from a workstation temporarily without logging out, any persons passing by can muck around with the network infrastructure as they please.
For this reason, it is wise to consider a login strategy that incorporates the Run As command that is embedded in Windows Server 2003. Essentially, this means that all users, including IT staff, log in with restricted, standard User accounts. When administrative functionality is required, IT support personnel can invoke the tool or executable by using the Run As command, which effectively gives that tool the administrative capabilities of the account that were designated by Run As. If an administrator leaves a workstation console without logging out, the situation is not critical because the console will not grant a passerby full administrator access to the network.
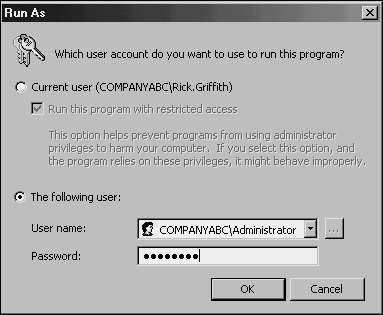
The following example illustrates how to invoke the Computer Management MMC snap-in using the Run As command from the GUI interface:
Navigate to (but do not select) Start, All Programs, Administrative Tools, Computer Management.
Right-click Computer Management in the program list and then choose Run As.
In the Run As dialog box, shown in Figure 12.2, choose the credentials under which you want to run the program and click OK.
Note
A command-line version of the Run As tool allows for the same type of functionality. For example, the following syntax opens the command-prompt window with administrator access:
runas /user:DOMAINNAMEadministrator cmd
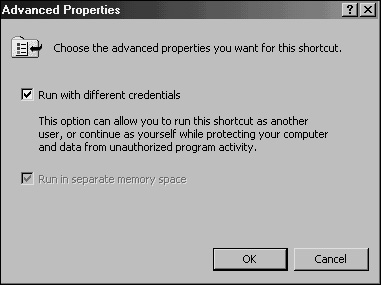
In addition to the manual method of using Run As, an administrator’s desktop can be configured to have each shortcut automatically prompt for the proper credentials upon entering an administrative tool. For example, the Active Directory Users and Computers MMC snap-in can be set to permanently prompt for alternate credentials by following these steps:
Choose Start, All Programs, Administrative Tools.
Right-click Computer Management and choose Properties.
Click the Advanced button.
Check the Run with Different Credentials box, as shown in Figure 12.3, and click OK twice to save the settings.
The ultimate in secured infrastructures utilize so-called smartcards for login access; these smartcards are fully supported in Windows Server 2003. A smartcard is a credit card–sized piece of plastic with an encrypted microchip embedded within. Each user is assigned a unique smartcard and an associated PIN. Logging in to a workstation is as straightforward as inserting the smartcard into a smartcard reader and entering in the PIN, which can be a combination of numbers and letters, similar to a password.
Security can be raised even higher by stipulating that each smartcard be removed after logging in to a console. In this scenario, users insert into the smartcard reader a smartcard that is physically attached to their person via a chain or string. After entering their PIN, they log in and perform all necessary functions. Upon leaving, they simply remove the smartcard from the reader, which automatically logs them off the workstation. In this scenario, it is nearly impossible for users to forget to log out because they must physically detach themselves from the computer to leave.
Wire security has always been an issue, but recent trends toward wireless networks have made it even more so. Most organizations are shocked to see what kind of damage can be done to a network simply by a person being able to connect via a network port. The addition of wireless networks makes access even easier; for example, an unsavory individual can simply pull up in the parking lot and access an organization’s LAN via a laptop computer and a standard 8s02.11b wireless card. The standard security employed by wireless networks, WEP, is effectively worthless because it can be cracked in several minutes.
Controlling the network ports and securing network switches are part of the securing strategy. For organizations with wireless networks, more stringent precautions must be taken. Deployment of wireless networks using the 802.1x protocol vastly increases the security of the mechanism. Microsoft uses 802.1x to secure its vast wireless network, and Windows Server 2003 fully supports the protocol.
For those organizations without the time or resources to deploy 802.1x, the simple step of placing wireless access points outside the firewall and requiring VPN access through the firewall can effectively secure the wireless network. Even if trespassers were to break the WEP key, they would be connected only to an orphaned network, with no place to go.
Deployment of an enterprise firewall configuration is a must in any environment that is connected to the Internet. Servers or workstations directly connected to the Internet are prime candidates for hacking. Modern firewall implementations such as Microsoft’s Internet Security and Acceleration (ISA) 2000/2004 offer advanced configurations, such as Web proxying and DMZ configuration, as well. Proper setup and configuration of a firewall in between a Windows Server 2003 network and the Internet are a must.
Note
Installing ISA Server 2000 on Windows Server 2003 is technically possible but can be difficult. The installation will complete (with several error messages), but it is important to apply ISA Service Pack 1 immediately after installation on a Windows Server 2003 system. On the other hand, the newest version, ISA Server 2004, natively supports installation on Windows Server 2003.
Previous versions of Windows Server 2003, such as Windows NT 4.0 and Windows 2000, often required a great deal of configuration after installation to “harden” the security of the server and ensure that viruses and exploits would not overwhelm or disable the server. The good news with Windows Server 2003 is that, by default, many less commonly used services are turned off. In fact, the entire Internet Information Services (IIS) 6.0 implementation on every server is turned off by default, making the actual server itself much less vulnerable to attack.
Subsequently, in Windows Server 2003, it is important to first define which roles a server will utilize and then to turn on only those services as necessary, and preferably with the use of the Configure Your Server Wizard, which will be explained in depth in the “Securing a Server Using the Configure Your Server Wizard” section in this chapter.
Depending on the size of an organization, a server may be designated for one or multiple network roles. In an ideal world, a separate server or servers would be designated to handle a single role, such as DHCP server or DNS server. This scenario is not feasible for smaller organizations, however, and multiple roles can be placed on a single server, as defined by the needs of the organization.
Because any service that is activated increases the overall risk, it is important to fully define which roles a server will take on so that those services can be properly configured. Although these components can be set up manually, the process of turning on these services is streamlined through the use of the Configure Your Server Wizard.
With the list of roles that a server will perform in hand, the ideal utility for turning on these roles and securing them is the newly renovated Configure Your Server (CYS) Wizard in Windows Server 2003. Vastly improved over the Windows 2000 version, the new CYS Wizard turns on only those services that are necessary. If a server is a DNS server but does not do File and Print, the CYS Wizard will automatically configure the server specifically for DNS access, limiting its vulnerability.
The Configure Your Server Wizard is straightforward to use, and can be invoked at any time. In addition to installing future services, the CYS Wizard will also display the current roles of an operating server. The CYS Wizard is used to establish a server as a dedicated WINS server, thus limiting its security exposure by shutting off all other unnecessary roles. The following steps detail the process:
Open the CYS Wizard (Start, All Programs, Administrative Tools, Configure Your Server Wizard).
Click Next twice at the Welcome and Preliminary screens. CYS will then detect the current network settings.
On the subsequent screen, select the WINS server role, as illustrated in Figure 12.4, and click Next.
At the Summary screen, click Next to continue. Setup may ask for the Windows Server 2003 CD at this point. Insert the CD as prompted.
Click Finish at the Success screen.
Repeat steps 1–5, except instead of adding a role, select the file server role to remove it. Click Next to continue.

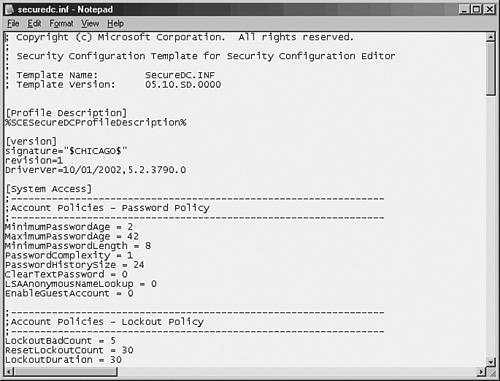
Windows Server 2003 contains built-in support for security templates, which can help to standardize security settings across servers and aid in their deployment. A security template is simply a text file that is formatted in such a way that specific security settings are applied uniformly. For example, the security template could force a server to use only Kerberos authentication and not attempt to use downlevel (and less secure) methods of authentication. Figure 12.5 illustrates one of the default templates included in Windows Server 2003, the securedc.inf template file.
The application of a security template is a straightforward act and can be accomplished by applying a template directly to an OU, a site, or a domain via a Group Policy Object (GPO). Security templates can be enormously useful in making sure that all servers have the proper security applied, but they come with a very large caveat. Often, the settings defined in a template can be made too strict, and application or network functionality can be broken by security templates that are too strong for a server. It is therefore critical to test all security template settings before deploying them to production.
Each service that runs, especially those that use elevated system privileges, poses a particular security risk to a server. Although the security emphasis in Windows Server 2003 reduces the overall threat, there is still a chance that one of these services will provide entry for a specialized virus or determined hacker. Subsequently, a great deal of effort has been put into the science of determining which services are necessary and which can be disabled. Windows Server 2003 simplifies this guessing game with an enhanced Services MMC snap-in. To access the Services console, choose Start, All Programs, Administrative Tools, Services.
As evident in Figure 12.6, the Services console not only shows which services are installed and running, but also gives a reasonably thorough description of what each service does and the effect of turning it off. It is wise to audit the Services log on each deployed server and determine which services are necessary and which can be disabled. Finding the happy medium is the goal because too many running services could potentially provide security holes, whereas shutting off too many services could cripple the functionality of a server.

Note
Windows Server 2003 Service Pack 1 introduced the Security Configuration Wizard, which streamlines the ability of administrators to intelligently disable unneeded services and apply security settings to a server. Although it doesn’t replace traditional securing techniques, it increases the amount of securing methods available.
Files secured on Windows Server 2003 are only as secure as the permissions that are set on them. Subsequently, it is good to know that Windows Server 2003, for the first time in a Microsoft operating system, does not grant the Everyone group full control over share-level and NTFS-level permissions. In addition, critical operating system files and directories are secured to disallow their unauthorized use.
Despite the overall improvements made, a complete understanding of file-level security is recommended to ensure that the file-level security of a server is not neglected.
The latest revision of the NT File System (NTFS) is used in Windows Server 2003 to provide for file-level security in the operating system. Each object that is referenced in NTFS, which includes files and folders, is marked by an Access Control Entry (ACE) that physically limits who can and cannot access a resource. NTFS permissions utilize this concept to strictly control read, write, and other types of access on files.
File servers should make judicious use of NTFS-level permissions, and all directories should have the file-level permissions audited to determine if there are any holes in the NTFS permission-set. Changing NTFS permissions in Windows Server 2003 is a straightforward process; simply follow these steps:
Right-click the folder or file onto which the security will be applied and choose Sharing and Security.
Select the Security tab.
Click the Advanced button.
Uncheck the Allow Inheritable Permissions from the Parent to Propagate box.
Click Remove when prompted about the application of parent permissions.
While you’re in the Advanced dialog box, use the Add buttons to give access to the groups and/or users who need access to the files or folders.
Check the Replace Permission Entries on All Child Objects box, as illustrated in Figure 12.7, and click OK.
When prompted about replacing security on child objects, click Yes to replace child object security and continue.
Click OK to close the property page.

Previous Windows security used share-level permissions, which were independently set. A share is a file server entry point, such as \sfofs01marketing, that allows users access to a specific directory on a file server. Older file systems such as FAT, HPFS, and FAT32 did not include file-level security, so the security was set instead on the share level. While sharelevel security can still be set on files, it is preferable to use NTFS-level security, where possible. Share-level security is not very secure because it cannot secure the contents of subdirectories easily.
Note
A common best practice for file servers in Windows Server 2003 is to configure share-level security to be wide open for all domain users but then to set stricter security on the NTFS level. This allows for security to be administered on the NTFS level only, without the fear of share-level restrictions interfering.
A good practice for file-level security is to set up auditing on a particular server, directory, or file. Auditing on NTFS volumes allows administrators to be notified of who is accessing, or attempting to access, a particular directory. For example, it may be wise to audit access to a critical network share, such as a finance folder, to determine whether anyone is attempting to access restricted information.
Note
Audit Entries are another example of security settings that can be automatically set via security templates in Windows Server 2003. It is wise to consider the use of security templates to more effectively control audit settings.
The following steps illustrate how to set up simple auditing on a folder in Windows Server 2003:
Right-click the folder or file onto which the auditing will be applied and choose Properties.
Click the Advanced button.
Select the Auditing tab.
Uncheck the Allow Inheritable Auditing Entries from the Parent to Propagate box and click Apply.
Using the Add button, enter all users and groups that will be audited. If you’re auditing all users, enter the Everyone group.
In the Auditing property page, select all types of access that will be audited. If you’re auditing for all success and failure attempts, select all the options, as indicated in Figure 12.8.
Click the OK button to apply the settings.
Check the Replace Auditing Entries on All Child Objects box and click OK twice to save the settings.

Note
An effective way of catching “snoops” in the act is to create serious-looking shares on the network, such as Financial Statements, Root Info, or similar such shares, and audit access to those folders. This technique has been successfully used to identify internal (or external) saboteurs before they could do some serious damage.
Windows Server 2003 continues support for the Encrypting File System (EFS), a method of scrambling the contents of files to make them unintelligible to unauthorized users. EFS has proven to be valuable for organizations that desire to keep proprietary data, especially those stored on laptops, out of the wrong hands.
Windows 2000 supports EFS, but it was not until the release of Windows XP that EFS saw strong use as it became accessible through the Windows Explorer menus. From the server side, however, EFS was limited because offline files stored on file servers could not be encrypted. Windows Server 2003 improves upon this design, offering support for offline files to be encrypted via EFS. This added functionality makes EFS a valuable addition to the server-side security available in Windows Server 2003.
In an insecure world, a server is only as secure as the software that runs on it. Windows Server 2003 is the most secure Windows yet, and includes many built-in mechanisms to keep a server secure. Additional security considerations such as antivirus options and backup should be taken into account, however, as they directly affect the overall security of the operating system itself.
Viruses may be one of the most dangerous threats faced by servers. Many viruses are written to specifically exploit key vulnerabilities that are present in server infrastructure. Others infect files that may be held on a server, spreading the infection to clients who download files. Consequently, it is extremely important to consider the use of an enterprise antivirus solution on all file servers in a network. All the major antivirus manufacturers include robust file-level scanners, and file servers should consider using them.
An aggressive plan should be in place to keep antivirus patterns and engines up to date. Because virus outbreaks can wreak havoc worldwide in a matter of hours, rather than days, it is wise to have servers check for updates daily.
Note
It is not necessary or wise to enable an always-on antivirus scanner on non-file servers. These types of scanners continually scan all open files that are in use and are best used only on file servers or workstations. Although including periodic scans of system components on other servers is not a bad idea, the fact that utility servers or domain controllers do not physically store user data keeps them relatively free from the effect of file-level viruses. In addition, the processor utilization of these always-on virus scanners can affect the performance of these servers.
Although the need for a backup strategy may seem obvious to most people, it is often surprising to find out how inadequately prepared many organizations are in regard to their backups. All too often, a company will discover that it is very easy to back up a server but often more difficult to restore. In addition to disaster recovery issues, the issue of backup security is often neglected.
File server backups require that an authenticated user account with the proper privileges copy data to a storage mechanism. This requirement ensures that not just anyone can back up an environment and run off with the tape. Keeping this point in mind, the tapes that contain server backups should be protected with the same caution given to the server itself. All too often, a big pile of server backup tapes is left out on unsecured desks, and there is often no mechanism in place to account for how many tapes are in which location. Implementing a strict tape retention and verification procedure is subsequently a must.
One of the main drawbacks to Windows security has been the difficulty in keeping servers and workstations up to date with the latest security fixes. For example, the security fix for the Index Server component of IIS was available for more than a month before the Code Red and Nimbda viruses erupted onto the scene. If the deployed Web servers had downloaded the patch, they would not have been affected. The main reason that the vast majority of the deployed servers were not updated was that keeping servers and workstations up to date with the latest security patches was an extremely manual and time-consuming process. For this reason, a streamlined approach to security patch application was required and realized with the release of Software Update Services (SUS) and its subsequent and newer iterations, Windows Server Update Services (WSUS).
In response to the original concerns regarding the difficulty in keeping computers properly patched, Microsoft made available a centralized Web site called Windows Update to which clients could connect, download security patches, and install them. Invoking the Windows Update Web page remotely installed an executable, which ran a test to see which hotfixes had been applied. Those that were not applied were offered up for download, and users could easily install these patches.
Windows Update streamlined the security patch verification and installation process, but the major drawback was that it required a manual effort to go up to the server every few days or weeks and check for updates. A more efficient, automated process was required.
The Automatic Updates Client was developed to automate the installation of security fixes and patches and to give users the option to automatically “drizzle” patches across the Internet to the local computer for installation. Drizzling, also known as Background Intelligent Transfer Service (BITS), is a process in which a computer intelligently utilizes unused network bandwidth to download files to the machine. Because only unused bandwidth is used, there is no perceived effect on the network client itself.
The Automatic Updates Client was included as a standard feature that is installed with Windows 2000 Service Pack 3 and Windows XP Service Pack 1. It is also available for download as a separate component.
The Windows Update Web site and the associated client provided for the needs of most home users and some small offices. However, large organizations, concerned about the bandwidth effects of downloading large numbers of updates over the Internet, often disabled this service or discouraged its use. These organizations often had a serious need for Windows Update’s capabilities. This fact led to the development of Software Update Services, which was later improved into the new product, Windows Server Update Services.
WSUS is a free download from Microsoft that effectively gives organizations their own, independent version of the Windows Update server. WSUS runs on a Windows Server 2003 machine that is running Internet Information Services. Clients connect to a central intranet WSUS server for all their security patches and updates.
WSUS is not considered to be a replacement technology for existing software deployment solutions such as Systems Management Server (SMS), but rather it is envisioned as a solution for mid- to large-size businesses to take control over the fast deployment of security patches as they become available. Current SMS customers may decide instead to use the SMS 2.0 Value Pack, which includes security-patch functionality similar to that offered by WSUS.
Deploying WSUS on a dedicated server is preferable, but it can also be deployed on a Windows Server 2003 member server, as long as that server is running Internet Information Services. The following list details the minimum levels of hardware on which WSUS will operate:
700MHz x86-compatible processor
512MB RAM
6GB available disk space
In essence, a WSUS server can easily be set up on a workstation-class machine, although more enterprise-level organizations might desire to build more redundancy in to a WSUS environment.
In addition to these hardware requirements, WSUS also requires the installation of IIS 5.0 or greater and Background Internet Transfer Service (BITS) 2.0 or greater.
The installation of WSUS is straightforward, assuming that IIS has been installed and configured ahead of time (for more information on installing IIS, refer to Chapter 11, “Internet Information Services v6”). The executable for WSUS can be downloaded from the WSUS Web site at Microsoft, currently located at the following URL:
http://www.microsoft.com/wsus
To complete the initial installation of WSUS, follow these steps:
Run the WSUS Setup from the CD or the download executable.
Click Next at the Welcome screen.
Review and accept the license agreement to continue. Click Next to continue.
Select to store updates locally and accept the default location. Click Next to continue.
Select to install the SQL Desktop engine on the computer, and click Next.
Select to use the existing IIS Web site, as shown in Figure 12.9. Click Next to continue.
Do not check to inherit settings from a different server, as shown in Figure 12.10. Check this only if an existing WSUS server exists from which settings should be copied. Click Next to continue.
Click Next after reviewing the settings on the Ready to Install dialog box.
The installation will complete and the admin Web site URL will be displayed after you click Finish.


The administration Web page (http://servername/WSUSAdmin) will be automatically displayed after installation. This page is the main location for all configuration settings for WSUS and is the sole administrative console. By default, it can be accessed from any Web browser on the local network. All further configuration will take place from the Admin console, as illustrated in Figure 12.11.
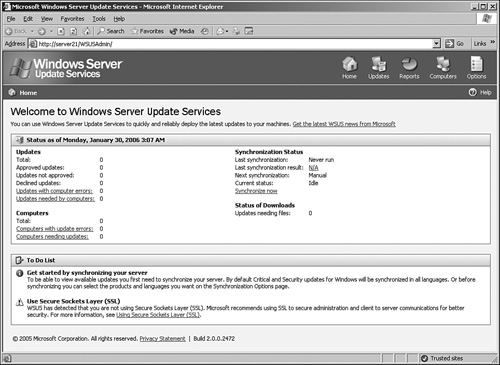
After installation, WSUS will not physically contain any security patches. The first task after installation should be configuring all the options available to the server. You can invoke the option page by clicking Options in the upper pane of the WSUS Admin page.
The Options page in WSUS allows you to set specific settings such as Synchronization Options, Automatic Approval Options, and Computer Options (refer to Figure 12.11). These options provide for critical information such as how often the server will synchronize itself, whether a proxy server will be used, and how to manage computer groups.
After configuring all the options in WSUS, particularly the options regarding which security patch languages will be supported, the initial synchronization of the WSUS server can take place. To perform the synchronization, follow these steps:
Open the WSUS Admin Web page by launching Internet Explorer on the WSUS server and going to
http://localhost/WSUSAdmin.Click the Synchronize Now link in the main pane.
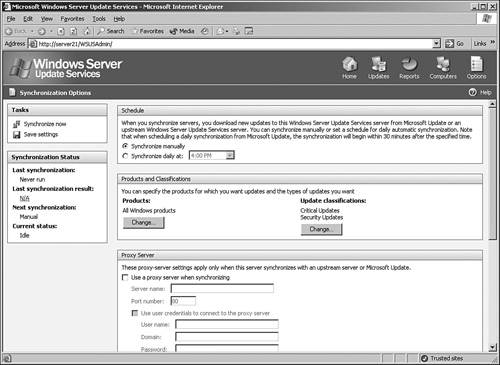
The next screen to be displayed, shown in Figure 12.12, gives you the option of synchronizing with the WSUS site now or setting up a synchronization schedule. It is advised to do a full WSUS synchronization first and to schedule subsequent downloads on a daily basis thereafter. So, in this example, click the Synchronize Now button.
An updated WSUS catalog will then be downloaded in addition to all the security patches that exist on the corporate WSUS server. Downloading may take a significant amount of time, depending on the Internet connection in use.
Note
Plan to run the initial synchronization of WSUS over a weekend, beginning the download on Friday evening. Given the number of security patches that you will need to download and the overall Internet connection bandwidth consumption used, it is wise to limit the impact that this procedure will have on the user population.
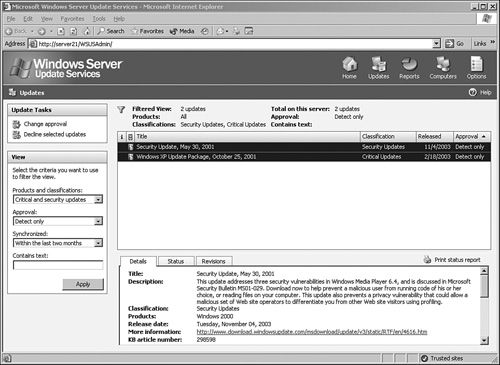
After the initial synchronization has taken place, all the relevant security patches will be downloaded and ready for approval. Even though the files are now physically downloaded and in the IIS metadirectory, they cannot be downloaded by the client until the approval process has been run on each update. This allows administrators to thoroughly test each update before it is approved for distribution to corporate servers and workstations. To run the approval process, follow these steps:
Open the WSUS Admin Web page by launching Internet Explorer on the WSUS server and going to
http://localhost/WSUSAdmin.Select all updates that will be approved (you can select multiple ones and click the Change Approval link, as shown in Figure 12.13).
Depending on the number of updates downloaded, the preceding steps may need to be repeated several times before all updates are approved.
From the drop-down box, select Install and click OK.
Select to replace any existing approvals, and click OK.
The updates will then be approved.
Note
A good approach to testing updates is to download them first on a client with direct access to Windows Update on the Internet. After the test server or workstation has successfully downloaded and all functionality has been verified, that particular security patch can be approved in WSUS for the rest of the corporate clients.
As previously mentioned, the Automatic Updates client can be downloaded from Microsoft and deployed on managed nodes in an environment, either manually or through automated measures. Service Pack 3 for Windows 2000 includes the client by default, as well as Service Pack 1 for Windows XP. After the client is installed, it can be configured to point to a WSUS server, rather than the default Internet Windows Update location.
The configuration of each client can be streamlined by using a Group Policy in an Active Directory environment. Windows Server 2003 domain controllers automatically contain the proper Windows Update Group Policy extension, and a Group Policy can be defined by following these steps:
Open Active Directory Users and Computers (Start, All Programs, Administrative Tools, Active Directory Users and Computers).
Right-click the organizational unit that will have the Group Policy applied and click Properties.
Select the Group Policy tab.
Click the New button and name the Group Policy.
Click the Edit button to invoke the Group Policy Object Editor.
Expand the Group Policy Object Editor to Computer ConfigurationAdministrative TemplatesWindows ComponentsWindows Update, as illustrated in Figure 12.14.
Double-click the Configure Automatic Updates setting.
Set the Group Policy to be enabled, and configure the automatic updating sequence as desired. The three options given—2, 3, and 4—allow for specific degrees of client intervention. For seamless, client-independent installation, choose option 4.
Schedule the interval that updates will be installed, bearing in mind that some updates require reboots.
Click Next Setting to configure more options.
Click Enabled to specify the Web location of the WSUS server. Entering the fully qualified domain name is recommended, as indicated in Figure 12.15. Enter both settings (usually the same server) and click OK to save the Group Policy settings.
Repeat the procedure for any additional organizational units. (The same Group Policy can be used more than once.)


Note
Organizations that do not use Active Directory or Group Policies have to manually configure each client’s settings to include the location of the WSUS server. This can be done through a local policy or manually through Registry settings, as defined in the WSUS Help.
Tip
A useful trick for automating the testing of new WSUS patches is to deploy two WSUS servers and two sets of Group Policies. The first WSUS server serves as a pilot WSUS server, and all updates are approved as soon as they become available. A subset of the client population then points to this server through a GPO and installs the patches immediately. After the patch has been validated on this pilot group, the real WSUS server can then be set to approve the patch, deploying the update to the rest of the user population. This model requires more hardware resources but streamlines the WSUS update process.
Depending on the settings chosen by the Group Policy or the Registry, the clients that are managed by WSUS will automatically download updates and install them on clients at a specified time. Some computers may be configured to allow for local interaction, scheduling proper times for the installation to take place and prompting for “drizzle” downloading.
Clients that are configured to use WSUS will not be prompted to configure their Automatic Update settings, and they will be grayed out to prevent any changes from occurring. Users without local administrative access will not be able to make any changes to the installation schedule, although local admin users will be able to postpone forced installs.
Out of the box, Windows Server 2003 is by far the most secure Windows yet. Increased security emphasis through the Trustworthy Computing initiative helps to increase overall server security by disabling unnecessary services and locking out file-level permissions by default. In addition to the standard features, advanced options in Windows Server 2003 allow administrators to add multiple layers of security to servers, further protecting them from attacks and vulnerabilities. In addition, the automatic updating capabilities of tools such as Software Update Services give organizations an edge in protecting servers and workstations from constantly changing security threats.
Physically secure servers behind locked doors, in a controlled-access environment.
Apply security in layers.
Use Configure Your Server Wizard (CYS) for turning on server roles and securing them.
Use the Security Configuration Wizard included in Windows Server 2003 SP1 and R2 to reduce a server’s attack surface.
Use the Run As command when administrative access is required instead of logging in as an Administrator.
Identify internal (or external) saboteurs before they can do some serious damage by creating serious-looking shares on the network, such as Financial Statements, Root Info, or similar such shares, and audit access to those folders.
Don’t enable always-on antivirus scanning on non-file servers. Instead, run periodic scans.
Plan to run the initial synchronization of WSUS over a weekend, beginning the download on Friday evening.
Test and approve WSUS patches before deploying them to production, either manually or through a process of setting up a pilot WSUS server and a production WSUS server.