
Internet Explorer Enhanced Security Configuration for Servers
</objective> </feature>It’s hard to comprehend that with each successor of Internet Information Services (IIS) has come a vast improvement over previous versions of IIS. IIS 6 is no different. It has been reconstructed to increase security safeguards, improve administration and manageability, and incorporate features for the .NET initiative set forth by Microsoft.
Improving upon previous versions and providing the most robust and secure Web services environment have been among the most daunting tasks Microsoft has faced with IIS. However, Microsoft has learned from its own experiences and customers what improvements need to be made. Microsoft has literally gone through each line of IIS code and made appropriate changes to make IIS as secure and robust as possible.
Several key enhancements have been made to IIS. These enhancements are designed not only to build upon .NET, but also to increase reliability, performance, and security.
Whereas IIS 5 was designed as a single process, inetinfo.exe, IIS 6 has been redesigned to use four core processes:
Http.sys—. Http.sys is a kernel-mode HTTP listener. Every Web site on the server is registered with Http.sys so that the Web site can receive HTTP requests. Http.sys then is responsible for sending these requests to IIS user-mode processes and requests back to the client. Http.sys has other responsibilities such as managing TCP connections, caching responses, ensuring Quality of Service (QoS), and handling IIS text-based logging.
Web Administration Services (WAS)—. This service is a user-mode configuration and process manager. It is a new component of the World Wide Web Publishing Service (W3SVC). In user-mode configuration, WAS interacts with the IIS metabase to retrieve configuration data. As a process manager, WAS is responsible for starting and managing worker processes.
Application handlers/worker processes—. Worker processes are user-mode applications that process requests such as returning Web pages. These worker processes, controlled by WAS, then service requests for application pools in Http.sys. IIS can have many worker processes, depending on the IIS configuration.
IIS Admin Service—. This service manages non-Web related functions such as File Transfer Protocol (FTP), Simple Mail Transfer Protocol (SMTP), Network News Transfer Protocol (NNTP), and the IIS metabase.
These three processes segment IIS from the rest of the Web services to maximize reliability of the Web services’ infrastructure.
Many other improvements to IIS are listed here and are categorized in three sections:
Enhancements to IIS performance, including reduced resource requirements and streamlined processes, allow for faster response times and increased Web server capacity.
Native support for 64-bit Web servers allows for increased memory support and processing capabilities. The 64-bit platform can handle greater workloads.
Tens of thousands of sites can reside on a single box. This improvement is especially useful for Internet service providers (ISPs) and application service providers (ASPs).
Remote server support has been improved for greater administration efficiency.
IIS 6 has a reduced default attack surface for hackers and processes to try to gain unauthorized access.
Administrators can tighten security using the IIS Lockdown Wizard. This tool allows administrators to enable or disable IIS functionality.
IIS defaults to a locked-down state. Only static information (
.htm,.jpg, and so on) is served, and additional functionality such as Active Server Pages must be manually enabled.The IIS service account runs with only low privileges.
Worker processes are specific to applications and Web sites. Organizations running multiple applications and multiple Web sites on a single Web server benefit from this separation because the worker processes are independent from one another.
IIS isolates FTP users. Users can be directed, based on their usernames, to a specific directory to upload and download. Users cannot use or view other directories.
Secure Sockets Layer (SSL) implementation has been dramatically improved to increase performance, manageability, and scalability.
IIS has built-in support for Kerberos and related standards.
IIS now has code access security, which is the complete separation of user-mode code from kernel-mode code. This minimizes security violations from user-mode processes but doesn’t negatively affect performance.
IIS can support trusted subsystems and other entities such as Passport.
Manageability
Process recycling based on time, schedule, hits, and memory consumption can refresh the Web server without stopping service to end users.
IIS 6 removes the proprietary IIS metabase found in earlier versions with an Extensible Markup Language (XML) text metabase. The XML metabase can be directly accessed and edited, even when online.
Both Web site and application configurations can be quickly and easily imported and exported.
Increased support for Windows Management Interface (WMI) scripting allows for greater functionality using scripts.
More command-line tools are available, so IIS can be managed through the command line or scripts.
Two of the most important tasks to accomplish before implementing IIS are thorough planning and designing. Planning and designing are the beginning phases to properly implementing IIS, and they may consist of the following:
Defining goals and objectives of the project
Identifying and reviewing IIS application types and requirements
Designing the IIS infrastructure to support the goals and objectives
Designing the back-end infrastructure such as the database or application tier
Defining security requirements to meet the goals and objectives and balancing the security methodologies between risks and end-user experience
Examining and designing disaster recovery plans, and monitoring requirements and maintenance practices
Documenting the current IIS infrastructure and the IIS design decisions
Hardware and software requirements are based on the information gathered and the requirements set forth in the design and planning stages. The necessary hardware and software requirements should match the goals and objectives of the project. These details are very specific and describe all the resources needed for hardware and software. For example, four IIS servers will each require dual processors, 1GB RAM, triple-channel RAID controllers, and 15K rpm disk drives.
Fault tolerance is a key aspect of any Web infrastructure and should be addressed during the planning and designing phases. Although some Web sites can afford to have downtime, others may require 99.999% uptime. Service Level Agreements (SLAs) should be determined from the operational goals. When an SLA is in place, such as a minimum of two hours of downtime at any one time, the appropriate fault tolerance can be applied to the Web infrastructure.
Various technologies can be applied to a Windows Server 2003 Web infrastructure to support even the most demanding SLAs. For example, Windows Server 2003 Web servers can use network load balancing (NLB) to distribute the load among multiple Web servers and also provide fault tolerance. NLB is more suited and less costly than using Microsoft Cluster Service to provide fault tolerance. Another way to promote fault tolerance is to tier the environment so that various services are segmented (for example, IIS tier, application tier, database tier, messaging tier), as shown in Figure 11.1.
For the first time, Microsoft has rightfully opted not to include IIS as a default installation option. This way, a file and print server, a domain controller, or any other type of server that isn’t supposed to be a Web server won’t have IIS installed by default and potentially increase security vulnerabilities.
You must have administrator privileges to be able to install IIS. There are two ways to begin installation: through Add or Remove Programs in the Control Panel or through the Manage Your Server Wizard that is automatically displayed after Windows Server 2003 installation.
To install IIS using Add or Remove Programs in the Control Panel, follow these steps:
Select Add or Remove Programs from the Start, Control Panel menu.
Click Add/Remove Windows Components in the Add or Remove Programs dialog box.
In the Windows Components Wizard, scroll down until you see Application Server. Highlight this entry, click the check box, and then click the Details button.
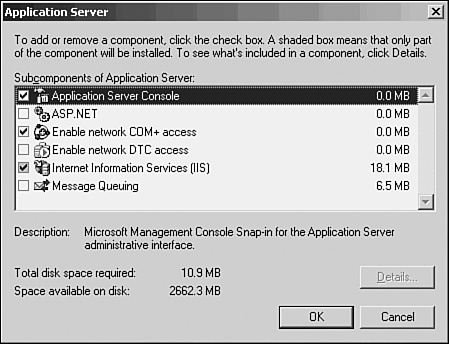
In the Application Server dialog box, illustrated in Figure 11.2, you can see the list of components (for example, ASP.NET, COM+ access, Internet Information Services, and more) that you can install. If you plan on using any of these services, select them by clicking the check box. For now, highlight Internet Information Services (IIS) and click Details.
Select the components that you want to install. If you don’t click to install a required component, the required components are automatically selected. Click OK twice when you’re done.
Click Next in the Windows Components Wizard to begin installing IIS.
Click Finish when installation is complete.
To install IIS using the Manage Your Server Wizard, do the following:
In the Manage Your Server Wizard, click Add or Remove a Role.
When the Configure Your Server Wizard window appears, click Next to continue. Windows Server 2003 will analyze your network configuration.
Click on Web Application Server (IIS, ASP.NET) and then click Next.
Select any of the two options (FrontPage Server Extensions, or Enable ASP.NET) and click Next to continue.
After reviewing the summary of information, click Next again to begin IIS installation.
Click Finish when the installation is complete.
Although using the Manage Your Server Wizard is easier than using Add or Remove Programs, your ability to control what gets installed is minimal.
As a previous version of Windows is upgraded to Windows Server 2003, IIS is also automatically upgraded. During Windows Server 2003 setup, all IIS-related services running on the previous Windows version are disabled during the upgrade. These services and more are enabled after the upgrade is complete.
Windows Server 2003’s IIS is inherently more secure than any other versions. As a result, all Web sites currently upgraded to IIS 6 are stopped after the upgrade. The primary reason for stopping all Web sites is to help prevent IIS security vulnerabilities because of previous Windows defaults. Therefore, if a previous Windows server has IIS installed but isn’t supposed to be serving as a Web server, the servers will be more secure than before by default. In this scenario, Web sites aren’t enabled.
Another key point to upgrading from previous versions of IIS is that all applications are configured in the IIS 5 isolation mode. This configuration preserves the applications and provides compatibility.
After you have installed or upgraded IIS, you’ll have a Web server. At this point, it’s important to configure your Web server even if you’ve upgraded. Windows Server 2003’s IIS has many new features that you’ll want to take advantage of.
IIS can be configured through the Internet Information Services snap-in, which you can access in Start, Administrative Tools.
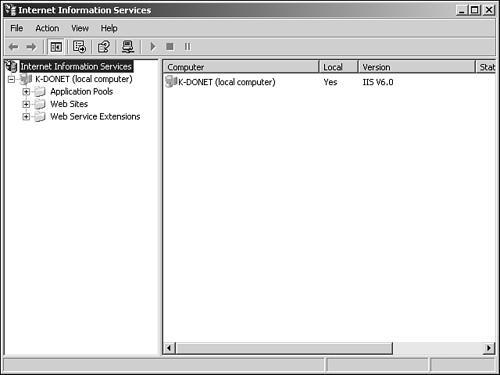
There are many Web services components that need to be configured to optimize IIS for security, functionality, and redundancy. The IIS snap-in, shown in Figure 11.3, is the interface in which you administer the IIS services. In the left pane of the snap-in, you can find the following folders:
Application Pools—. Application pools are sections of physical memory that are dedicated to the applications that run within a pool. Application pools segment applications from the rest of the memory resources used by other IIS services. This promotes higher reliability and security, but it also requires more memory configured on the Web server. As the name implies, the
DefaultAppPoolis created by default.Web Sites—. This folder contains all the Web sites that are being hosted on the Web server. The Default Web Site is created by default.
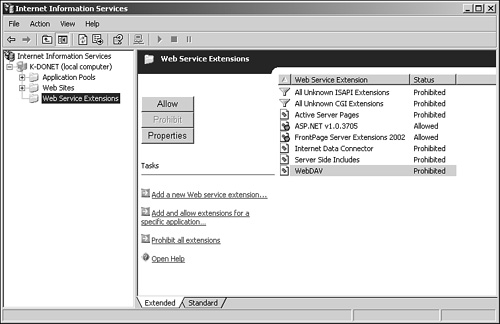
Web Service Extensions—. Web Service extensions are services that comprise the IIS Web server. For instance, depending on your installation method and choices, you may have FrontPage Server Extensions and ASP.NET services loaded. Each of the services that you see listed can either be allowed or prohibited to run on the Web server. This is illustrated in Figure 11.4.
As mentioned earlier, IIS can support up to 10,000 Web sites on a single Web server. The number of Web sites that you have depends on the way the system is configured, including the number of processors, the amount of RAM, bandwidth, and more. For every Web site that the system supports for the Internet, there must be a public IP address and registered domain name. However, if you have only one public IP address and you want to support other Web sites, you can also create virtual directories to have those sites serving users on the Internet.
Using virtual directories is a sound option to support more than one Web site on a single IP address, but keep in mind that users from the Internet will use a subdirectory from your Web site to reach a separate Web site. For instance, a company hosting http://www.companyabc.com decides to host another Web site using a virtual directory; in this case, users would connect to http://www.companyabc.com/NewWebSite/ to be able to connect to the second Web site.
The Default Web Site is located within the Web Sites folder in the IIS snap-in. You can use the default Web site for your own Web site, but it is best that you create and configure a separate Web site.
To begin creating a new Web site, do the following:
Right-click Web Sites. Then select New, Web Site, or if you have the new Web site already created and located in an XML file, you can select Web Site (From File). This second option prompts you to locate an XML file to load.
If you choose the latter approach, the Web Site Creation Wizard starts. Click Next to continue.
Type in the description of the Web site and click Next to continue.
The following screen presents network-related choices such as the IP address to use for this site, the TCP port, and the Host Header for the Web site. Complete this information and click Next to continue.
Enter the home directory to use (or click the Browse button) and allow or deny anonymous access to this site. Click Next to continue.
At this point, set the permissions on the home directory. Select from read, run scripts, execute, write, and browse permissions. Click Next to continue.
Click Finish.
Right-clicking Web Sites or the Default Web Site in the snap-in and then selecting Properties gives you options for globally modifying the default settings for a Web site. However, right-clicking a specific Web site gives more options for configuring only that Web site. For simplicity, this section will describe the default Web site settings.
The Default Web Site Properties page, shown in Figure 11.5, has some of the tabs for configuring a Web site. From here, you can control everything from identification to specific filtering. These options are as follows:
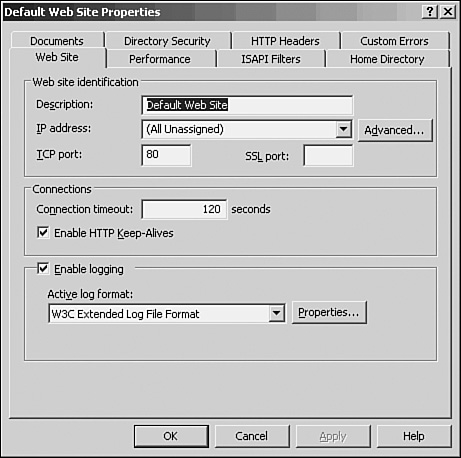
Web Site tab—. This tab has three characteristics including identification, connections, and logging. Here, you can identify the Web site with a name, IP address, and TCP and SSL ports. Also, you can set timeout values for connections as well as logging options. Logging is enabled by default using the W3C Extended Log File Format.
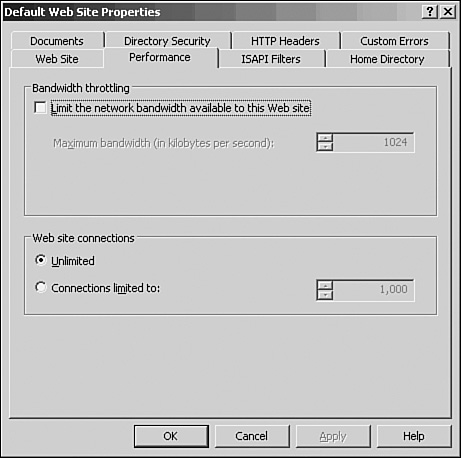
Performance tab—. This tab, shown in Figure 11.6, has two options that allow you to control bandwidth to this site in terms of kilobytes per second (KBps) and limiting the number of simultaneous connections. The first option is used to control bandwidth so that one Web site doesn’t consume all the bandwidth that may negatively affect other Web sites. Limiting the number of connections allows the Web site to keep response times within acceptable values.
ISAPI Filters tab—. ISAPI filters are programs that respond to certain events during HTTP request processing. You can add, enable, and disable filters for a Web site on this tab.
Home Directory tab—. A home directory is the top-level directory for a Web site. It is created for the Default Web Site and you must specify one for each additional Web site. This tab, shown in Figure 11.7, also has configuration settings for Web site applications, such as read, write, browsing, script source access, indexing, and application logging. In addition, you can assign other application settings, including execute permissions and application pool membership.
Documents tab—. Within the Documents tab, you can define the Web site’s default Web page as well as enable document footers. Document footers can be appended to each Web page in the Web site.
Directory Security tab—. The Directory Security tab, shown in Figure 11.8, offers anonymous access and authentication control, IP address and domain name restrictions, and secure communications configuration options. From here, you can define who has access, how they get authenticated, and whether communications must be secure. These options are examined in the “Securing IIS” section later in this chapter.
HTTP Headers tab—. This tab manages the Web site’s content. Although you can’t create content for the Web site, you can define content expiration, customize HTTP headers, edit content ratings, and configure additional multipurpose Internet mail extensions (MIME) types.
Custom Errors tab—. Within the Custom Errors tab, there are numerous HTTP error messages. You can create or edit any of these messages to provide customization for your Web site.


One other tab, called Service, appears only after you right-click the Web Sites folder and select Properties. On this tab, you can set IIS isolation mode to run as an IIS 5 isolation mode server. Also, you can set HTTP compression on application files as well as static files to save bandwidth. This tab is shown in Figure 11.9.

Virtual directories extend the home directory of your Web site by providing an alias linking another directory not contained within the home directory. This alias will appear to users as simply a subfolder to the Web site even though it may be located on an entirely different server.
The virtual directory can contain documents and other information for the Web site as well as a new Web site. For example, if CompanyABC’s Web site (http://www.companyabc.com) wants to host a temporary Web site for another organization, it could use a virtual directory to contain the Web site. In this scenario, CompanyXYZ would have its own Web site located at http://www.companyabc.com/companyxyz/.
To create a virtual directory using the IIS Manager, do the following:
Right-click the Web site that you want to create a virtual directory for and select New, Virtual Directory. After the Virtual Directory Creation Wizard appears, click Next to continue.
Enter the virtual directory’s alias and click Next.
Specify the path containing the information or Web site and click Next.
Choose the access privileges (read, run scripts, execute, write, or browse) for the virtual directory and click Next.
Click Finish.
Similar to Web site properties, a virtual directory has properties pages that allow you to set specific options. Figure 11.10 illustrates the virtual directory properties pages. You’ll notice that there is a smaller subset of configuration options for a virtual directory in comparison to a Web site.

There are five configuration tabs including Virtual Directory, Documents, Directory Security, HTTP Headers, and Custom Errors. The tabs represent and are applied to the virtual directory but are similar to the configuration tabs for the Web site.
Web sites can operate only as well as the Web applications installed on the systems. Therefore, IIS’s many improvements have been to support those applications to run as efficiently as possible. Improving how Web applications can interact with IIS also improves Web server reliability and availability.
IIS supports two modes of application isolation: worker process isolation mode and IIS 5 isolation mode. Both modes of operation use Http.sys and application pooling. Application pools are queues for requests within Http.sys and one or more worker processes. Applications are assigned to an application pool based on their URL, and many pools can run at the same time. For example, by default, DefaultAppPool is located within the Application Pools folder.
On a given Web site there may be only one mode of operation working to support the Web applications. It is recommended to use worker process isolation mode exclusively unless there is a specific compatibility issue with a particular application. Using worker process mode gives the greatest boost to reliability and availability. Another reason to use worker process isolation mode is that the type of application isolation that is in use causes IIS to dynamically adjust internal architecture parameters to accommodate the fundamental differences between the two isolation modes.
The IIS 5 isolation mode is used primarily to support applications that may depend on features in earlier versions (mainly IIS 5) of IIS. It’s important to use this isolation mode only when the application cannot work properly under the worker process isolation mode. Otherwise, this mode can increase the resource requirements needed to run such applications when compared to worker process mode. This could, in turn, affect performance and reliability of the system.
Generally speaking, Web sites are expected to be up and running without little interruption. Moreover, these Web sites must adequately service user requests. Sites that require this level of service must incorporate fault tolerance into the infrastructure’s design. For example, many Web servers must be linked together by some form of network load balancing to ensure minimal downtime.
Even the most reliable Web sites must have the servers refreshed at some point so that the applications can be recycled or other maintenance can occur. Another solution that can work in conjunction with infrastructure fault tolerance is using IIS 6 process recycling. Using IIS 6 minimizes the number of server refreshes that may be required because of its capability to automatically refresh Web applications without affecting the rest of the system or stopping service to that Web application. Process recycling is also extremely useful for those Web applications that can be problematic because the server must be restarted. Often it is difficult to rewrite an application to work better because of budgetary reasons, technical limitations, or extensive effort required to make the changes.
Within the Properties Recycling tab of an application pool such as the one shown in Figure 11.11, applications can be recycled every so many minutes (the default is 1,740 minutes or 29 hours), after a set number of requests to that application, at a specified time, or when a certain amount of physical or virtual memory is used.

When one of these events occurs, one of two procedures can happen:
Another worker process will be created by Web Administration Services and the old process terminates. This process, called overlapping recycling, ensures that requests aren’t dropped even though a process is being recycled.
The current process terminates, and WAS creates a new process immediately thereafter.
Process recycling is a welcomed feature; however, it doesn’t apply to every situation. For obvious reasons, process recycling doesn’t work on static content, but it also doesn’t work if the Web site uses custom-built ISAPI applications. Also, if session state data is required on the Web site, it’s important to be aware that session state data may be lost during process recycling.
Using IIS to monitor applications is now feasible with IIS 6. More specifically, WAS can perform the following health-monitoring procedures:
When a worker process doesn’t respond to a ping, WAS can terminate the worker process and create another one so that the application can keep servicing requests.
There are many variables with how applications perform. They include, but aren’t limited to, the server resources, the way the application is written, and the way the environment is structured.
Process recycling and health detection help ensure that applications are running efficiently and effectively. Another set of features is located under the Performance tab of the application pool properties page. Within the Performance tab are options specifically geared toward optimizing performance, including the following:
Idle Timeout—. Applications can be shut down after being idle for a specified period of time. A timeout value of 20 minutes is enabled by default.
Kernel Requests Queues—. Kernel Requests queues can be limited to a certain number of requests. This option is enabled with a default value of 1,000 outstanding requests.
CPU Utilization—. CPU utilization for an application pool can be limited so that the pool doesn’t consume CPU time unnecessarily. This option is disabled by default. If it is enabled, an action can be performed after CPU utilization is exceeded.
Web Gardens—. Under the Web Gardens option, a maximum number of worker processes can be set.
Numerous application types are supported on IIS, including, but not limited to, Active Server Pages, ASP.NET, COM+, Java, Common Gateway Interface (CGI), and FastCGI. No matter what types of applications the server will host, it’s imperative to adequately test them. You should test the applications under various workloads and consider using those that are specifically designed to run on the IIS platform. For instance, ASP and ASP.NET were developed solely for IIS and can therefore perform much better than other technologies that weren’t built for a specific platform.
FTP is one of several utilities bundled within TCP/IP, and it is an accepted means to transfer files to and from remote computers. Unlike previous IIS versions of FTP, the service includes FTP user isolation and isn’t installed by default with IIS.
To install FTP, perform the following steps:
Double-click Add or Remove Programs within the Control Panel.
In the Add or Remove Programs dialog box, click Add/Remove Windows Components.
Within the Windows Components Wizard, scroll down and then highlight Application Server.
Click Details, and then in the Application Server window, shown in Figure 11.12, highlight IIS.
Click Details again and then select File Transfer Protocol (FTP) Service.
Click OK twice.
Click Next and wait for Windows Server 2003 to install FTP.
Click Finish when you’re done.

IIS now can isolate FTP users so that FTP content is protected. This is an especially useful feature for ISPs and ASPs servicing a large number of users. Each FTP user can have his own separate directory in which to upload and download files to the Web or FTP server. As users connect, they see only their directory as the top-level directory and can’t browse other FTP directories. Permissions can be set on the FTP home directory to allow create, modify, or delete operations.
FTP user isolation is based on an FTP site rather than at the server level and is either enabled or disabled. However, sites that need to enable FTP user isolation aren’t forced to strictly use this feature. You can enable anonymous access in conjunction with FTP user isolation by creating a virtual directory within the FTP site and allowing read-only access. The only limitation to mixing the FTP user isolation and anonymous access is that information can be downloaded only from the public or read-only virtual directory.
Note
FTP user isolation and Active Directory can be used together where an AD container (not the entire AD) can be used to authenticate users and isolate them from other FTP directories. In this scenario, it is extremely important to thoroughly lock down the FTP server and communications. For example, it is recommended to use either IPSec or SSL to secure communications when using AD and FTP user isolation.
FTP user isolation is enabled during the creation of the FTP site. When you reach the user isolation page, select Isolate Users and follow the remaining prompts. You’ll notice a warning message stating that after isolation is enabled, you can’t switch the site to non-isolation.
By default, the Default FTP Site is created and enabled. However, to create a new FTP site (in addition to the Default FTP Site), do the following:
Right-click on the FTP Sites folder and select New, FTP Site. You can also select FTP Site (From File) if you have an XML file for an FTP site creation.
In the FTP Site Creation Wizard, click Next and then provide a description for the FTP site. Click Next to continue.
Set the IP address and port for FTP to use. By default, FTP uses port 21. Click Next to continue.
In the next window, select the appropriate FTP user isolation setting. You can choose from not isolating users, isolating users with local accounts on the Web server, or isolating users using Active Directory. Click Next to continue.
Specify the path to the FTP home directory and then click Next.
Set permissions to the FTP site (read or write access) and click Next to continue.
Click Finish.
As you can see in Figure 11.13 and Figure 11.14, you can access two separate properties pages for FTP. The first properties page appears after you right-click the FTP Sites folder. The second properties page is for a specific FTP site.


The FTP Sites folder properties page is used to configure global properties for FTP sites. If multiple FTP sites are created, these settings will be the default configurations for the sites.
Within the FTP Sites folder properties are the following configuration tabs:
FTP Site tab—. This configuration tab has limited functionality. FTP site connections and logging configuration parameters can be set here.
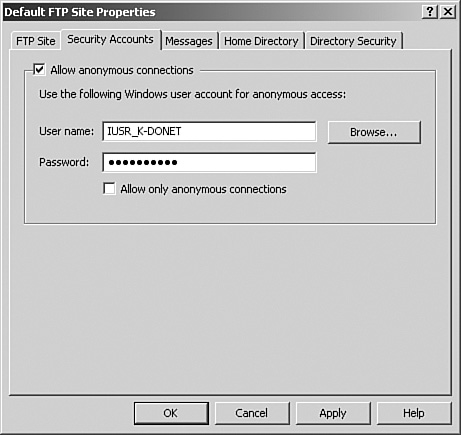
Security Accounts tab—. This tab allows you to configure authentication with anonymous accounts and user accounts. Unchecking the default Allow Anonymous Connections option, as shown in Figure 11.15, brings up a warning window stating that passwords may be vulnerable while transmitting across a network unless encryption or SSL is used. Selecting Yes allows you to continue. However, you can’t set up the accounts, encryption, or SSL from this tab.
Messages tab—. FTP messages can be displayed as users connect or disconnect from the FTP site. From a security perspective, your organization may require a warning message such as
Use of this FTP Site is by permission only. All uploads and downloads must adhere
to the data transmission policies of Company ABC.
In addition, messages can be displayed when a user can’t connect because of a maximum user limitation such as
You have been disconnected because a maximum user limit has been reached. Please
try again later.
Messages are not required; they are intended to help the users of the FTP site.
Home Directory tab—. Similar to the Web Site Home Directory tab, the FTP Home Directory tab can be used to set permissions on the FTP site directory. The style of the directory listing (either Unix or MS-DOS) can be set. The MS-DOS setting is the default.
Directory Security tab—. Under this tab, TCP/IP access restrictions can be set based on the IP address. IP addresses or groups of IP addresses can be granted or denied access to the FTP directories.
The differences between the FTP Sites folder properties and a specific Web site are minimal. The following tabs in the FTP site properties are different:
IIS now forces the administrator to consider each and every option before installing a component. This way, the administrator can avoid unnecessary security risks by not installing unnecessary components or services that might lead to vulnerabilities if not kept in close watch. With regard to optional IIS components, most components are optional. However, several services are considered separate entities although they are a part of IIS. These services are SMTP Service, NNTP Service, and Indexing.
The Simple Mail Transport Protocol Service is a messaging service that allows email messages to be sent from the Web server. In essence, the IIS Web server can also be an email server. To install the SMTP Service, do the following:
Double-click Add or Remove Programs within the Control Panel.
In the Add or Remove Programs dialog box, click Add/Remove Windows Components.
Within the Windows Components Wizard, scroll down and then highlight Application Server.
Click Details, and then in the Application Server window, highlight IIS.
Click Details again and then select SMTP Service, as shown in Figure 11.16.
Click OK twice.
Click Next and wait for Windows Server 2003 to install the SMTP Service.
Click Finish when you’re done.

IIS can host internal or external newsgroups through the use of the NNTP Service. Newsgroups are still a popular way to extend communications to a large audience. The newsgroups can be used for a variety of tasks, including sharing information and data.
The News Service provides newsgroups using the Network News Transport Protocol, which is the protocol responsible for managing the messages for each newsgroup. It’s unlike mass emailing, though, because the messages are exchanged either server-to-server or client-to-server, never server-to-client. In the first scenario (server-to-server), messages can be exchanged between two NNTP servers. A common example is an internal NNTP server requesting messages from an external server from an ISP. Clients can subscribe (and unsubscribe) to newsgroups to read and post messages.
An NNTP server requires additional disk and network capacity due to the high disk space utilization and potentially high bandwidth requirements. To install a news server, you can follow the same procedures as you did installing the SMTP server, except you need to select the NNTP Service rather than the SMTP Service.
Indexing is a Windows Server 2003 component that has been separated from IIS. If this service is installed on the Web server, all content can be indexed to provide faster search results of Web-based information.
Tip
Many people wonder how to search for content in Adobe Acrobat PDF files located on a Web site. The Indexing Service provided with Windows Server 2003 doesn’t provide this functionality, but a driver located on Adobe’s support site provides this functionality for free. Visit http://support.adobe.com and search for iFilter.
There shouldn’t be any question that IIS is significantly more secure than its predecessors. Several key enhancements such as a reduced attack surface and enhanced application isolation deliver a robust and secure Web platform. IIS also is enabled by default to present only static information (that is, to use applications or other dynamic content, you must manually enable them).
However, Microsoft products are also the most popular products to try to hack. For this reason, it’s important to secure the Web server as much as possible. The more barriers there are, the less inclined a hacker would be to try to gain unauthorized access. Each component on the Web server must be secure; the server is as secure as its weakest point.
Windows Server 2003 security actually begins during the planning and designing phases so that every conceivable security aspect is addressed. This can entail physical, logical (Windows Server 2003, applications, and so on), and communications security.
When you’re securing the Windows Server 2003 Web server, it’s important to use NTFS on the disk subsystem and apply the latest service pack and security patches. Using NTFS is critical because it can have appropriate permissions set on files, folders, and shares. Also, keeping up to date with service packs and patches ensures that Windows Server 2003 is operating with the greatest amount of protection.
Application security on the Windows Server 2003 Web server should be carefully reviewed, especially if it’s a custom-built application. If the application is developed by a vendor, make sure that you have an application that is certified to run on Windows Server 2003 and that the latest service packs and patches have been applied and tested.
Note
For more information on securing Windows Server 2003, refer to Part IV, “Security.”
As mentioned earlier, IIS can display only static content (.htm, image files, and so on) by default until you manually enable dynamic content. IIS gives granular control over the dynamic content. For example, you can enable Active Server Pages but disable ASP.NET applications.
To enable or disable dynamic information, do the following:
In the IIS Manager, expand the Web server name and select Web Service Extensions.
In the Web Service Extensions window on the right, select the extensions you want to configure and click on either Allow or Prohibit.
Using the Web Service Extensions interface, you can also add and allow extensions for specific applications that may not be already listed.
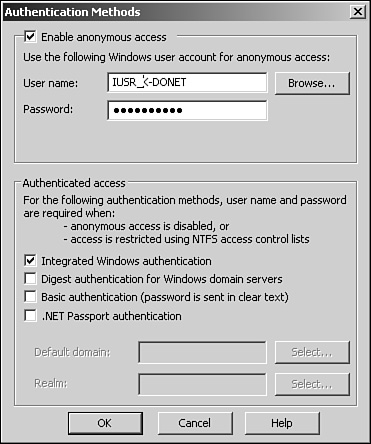
Authentication is a process that verifies that users are who they say they are. IIS supports a multitude of authentication methods, including the following:
Anonymous—. Users can establish a connection to the Web site without providing credentials.
Integrated Windows authentication—. This authentication method can be integrated with Active Directory. As users log on, the hash value of the password is sent across the wire instead of the actual password.
Digest authentication—. Similar to Integrated Windows authentication, a hash value of the password is transmitted. Digest authentication requires a Windows Server 2003 domain controller to validate the hash value.
Basic authentication—. Basic authentication sends the username and password over the wire in clear text format. This authentication method offers little security to protect against unauthorized access.
.NET Passport authentication—. .NET Passport is a Web authentication service developed by Microsoft. It doesn’t reside on the hosting Web server but rather is a central repository contained and secured by Microsoft that allows users to create a .NET Passport account once. This username and password can be used at any .NET Passport–enabled site. For more information on .NET Passport, refer to Chapter 14, “Windows Server 2003 Passports.”
These authentication methods can be enabled under the Authentication Methods dialog box, as illustrated in Figure 11.17. You can view this window by clicking the Edit button located on the Directory Security tab of a Web site properties page.
Windows Server 2003 auditing can be applied to Web and FTP sites to document attempts to log on (successful and unsuccessful), to gain unauthorized access to service accounts, to modify or delete files, and to execute restricted commands. These events can be viewed through the Event Viewer. It’s also important to monitor IIS logs in conjunction with audited events to determine how, when, and if external users were trying to gain unauthorized access.
Secure Sockets Layer preserves user and content integrity as well as confidentiality so that communications from a client and the Web server, containing sensitive data such as passwords or credit card information, are protected. SSL is based on the public key security protocol that protects communication by encrypting data before being transmitted.
Previous versions of IIS could use SSL, and IIS 6 is no different. The exception to this, though, is how SSL is implemented within IIS. The version implemented within Windows Server 2003’s IIS has the following improvements:
SSL’s performance is up to 50% faster than previous implementations. SSL has been streamlined so that resource requirements aren’t as high.
SSL can now be remotely managed from a centralized location.
A greater number of SSL hardware devices is now supported in Windows Server 2003. These hardware devices (such as smart cards, bio-informatic controllers, and so on) offload some of the resource requirements from Windows Server 2003.
SSL certificates serve three primary purposes, although they are typically used to encrypt connections. These purposes include the following:
SSL server authentication—. This allows a client to validate a server’s identity. SSL-enabled client software can use a public key infrastructure (PKI) to check whether a server’s certificate is valid. It can also check whether the certificate has been issued by a trusted certificate authority (CA).
SSL client authentication—. This allows a server to validate a client’s identity. SSL can validate that a client’s certificate is valid as well as check whether the certificate is from a trusted CA.
Encrypting SSL connections—. The most common application of SSL is encrypting all traffic on a given connection. This provides a high degree of confidentiality and security.
Note
SSL puts little strain on bandwidth but can significantly increase processor utilization. To minimize the performance impact that SSL can have on a given system, consider using a hardware-based SSL adapter to offload the workload from the computer’s processors.
From an IIS perspective, SSL can be applied to an entire Web site, directories, or specific files within the Web site. SSL configuration can be done through the IIS snap-in located on the Start, Administrative Tools menu.
To use SSL on a Web site, it must first be requested and then installed. The request can be created to obtain a certificate either from an external, trusted CA or from an internal PKI. To request a SSL certificate for a Web site, do the following:
Open the Internet Information Services (IIS) Manager snap-in and expand the desired computer, Web sites folder, and the Web site to assign the certificate.
Right-click on the Web site and select Properties.
On the Directory Security tab, select Server Certificate.
Click Next on the Web Server Certificate Wizard Welcome screen.
Click the Create a New Certificate button and click Next.
Select the Prepare the Request Now, But Send It Later option and then click Next.
Enter the new certificate name and choose the desired bit length for the encryption key. It is recommended to use 1024 (the default) or higher as the bit length. Keep in mind that higher bit lengths can decrease performance. Click Next when done.
Type in the company and organization unit name and then click Next.
Type the name of the IIS computer hosting the Web site in the Common Name box. If the site will be accessed from the Internet, enter in the fully qualified domain name such as
server.domain.com. The common name should match the URL users will use to connect to the Web site. Click Next to continue.Select a Country/Region from the first pull-down menu and then type in the State/Province and City/Locality that will be embedded in the certificate. Click Next to continue.
Provide a path and filename for the certificate request and then click Next.
Review the Request File Summary to ensure that all information is accurate. Click Next and then click Finish to complete the request.
After the certificate has been requested, it must be submitted to a trusted CA to process. To submit the newly created certificate request to an internal CA, do the following:
Open a browser and enter the following URL of the server that is hosting Certificate Services (for example,
http://servername/certsrv).If a sign-in dialog box appears, enter a username and password with sufficient privileges to generate the certificate and click OK.
Select Request a Certificate.
Select Submit a Certificate Request by using a base-64-encoded CMC or PKCS #10 file, or submit a renewal request by using a base-64-encoded PKCS #7 file.
On the Submit a Certificate Request or Renewal Request page, click the Browse for a File to Insert link or manually enter the text within the certificate request file you just created.
Within the Certificate Template section, use the pull-down menu to select Web Server as shown in Figure 11.18. Click the Submit button when done.
On the Certificate Issued page, select the Download Certificate link and when prompted click Save to then be able to specify a path and filename for the certificate.

To apply the SSL certificate, do the following:
Open the IIS Manager snap-in and navigate to the Web site for which the certificate was created.
Right-click on the Web site and select Properties.
Click on the Directory Security tab and click the Server Certificate button.
Click Next on the initial Server Certificate Wizard window, and then select Process the Pending Request and Install the Certificate. Click Next to continue.
Locate the certificate file that was created in the previous steps and then click Next.
On the SSL Port window, type in the listening port for SSL (443 is the default) and then click Next.
Review the summary information and then click Next. Click Finish if the information is correct; otherwise, click the Back button or submit a new request.
FTP is, by default, an unsecured protocol. It’s unsecured due to the method of user authentication and the transfer of the data. For example, if users need to supply a username and password, the information can be captured and easily read because the information is transmitted in clear text.
Many organizations have abandoned using FTP for supplying read-only downloads to external users. In this scenario, organizations are using HTTP instead to provide downloads. Securing HTTP is much simpler than FTP and doesn’t require as much administration.
FTP transfer can be secured using encryption via a VPN connection (such as IPSec and L2TP). Typically, this presents unnecessary obstacles and burdens to end users. Users would have to establish a VPN connection before they could download files, which may become a technical challenge for many users.
Without a secure connection between the end user supplying a username and password and the FTP server, it is impossible to adequately secure FTP. Usernames and passwords could potentially be compromised if a hacker were to capture FTP traffic to the server. As a result, FTP security would be more protected if the FTP server allows only anonymous connections. This way, users won’t have to supply usernames and passwords.
Some other possible ways to minimize FTP security risks are the following:
Use local folders to share downloads and secure them with NTFS. The folder should be located on a separate partition from Windows Server 2003 system files.
Offer read-only content to users.
Monitor disk space and IIS logs to ensure that a hacker isn’t attempting to gain unauthorized access.
The IIS metabase is an information store that contains all IIS configurations. As such, it’s important to maintain the IIS metabase to ensure the utmost reliability of the IIS server. Otherwise, a disaster could potentially cause unnecessary downtime or the inability to fully recover IIS and corresponding configurations.
The IIS metabase is no longer a proprietary information store. It is now an XML-based hierarchical store that contains configuration and schema information. As a result, the IIS metabase can be modified while it is running (that is, IIS services do not necessarily have to be stopped and restarted for changes to take effect). This feature is very useful to promote reliability and availability, but this functionality must be used with care; otherwise, a configuration change may cause failures. As a result, it’s important to keep backups up to date.
Note
The ability to edit the metabase while running is not turned on by default. To enable this feature in the IIS Manager, right-click on server, select Properties, and then select Enable Direct Metabase Edit.
Windows Server 2003 automatically backs up the IIS metabase. However, you can back up the IIS metabase by using the IIS Manager as well as by using a backup product such as Windows Server 2003’s Backup utility. To perform a manual backup using the IIS Manager, perform the following steps:
Click Start, Programs, Administrative Tools, Internet Information Services (IIS) to start the IIS Manager.
Select the Web server in the left pane.
Select Backup/Restore Configuration from the Action, All Tasks menu.
In the Configuration Backup/Restore window, you can see a listing of automatic backups that IIS has already performed. Click the Create Backup button to perform a manual backup.
Specify the name of the backup in the dialog box and check the check box if this backup will be encrypted using a password, as illustrated in Figure 11.19.
Click OK and then Close.

Backups are stored in the %SystemRoot%System32InetsrvMetaBack folder by default. It is also important to note that the IIS metabase can be imported and exported to an XML file.
IIS logging should be viewed as a necessity rather than an optional feature of IIS. Logging helps to ensure IIS security and is also a great maintenance and troubleshooting function. Reviewing logs gives you intimate details of what is going on in the system. This information can then be used to review maintenance procedures and identify problems in the system.
IIS text-based logging, such as the W3C Extended Log File Format, Microsoft IIS Log File Format, and NCSA Common Log File Format, is controlled by Http.sys, a kernelmode process. This is a change from previous versions in which logging was a user-mode process. The other log file format, ODBC, is implemented using a user-mode worker process.
It goes without saying that the Internet Explorer (IE) browser complements the capabilities of IIS. These feature sets, and the system it runs on, however, are what needs to be protected. As part of Microsoft’s security initiative, IE on the Windows Server 2003 platforms are now more secure.
The IE Enhanced Security Configuration is set on all server-based Windows Server 2003 editions. The first screen you notice after starting IE is an informational page about the security configuration as shown in Figure 11.20.

IE Enhanced Security Configuration protects the system by using IE’s security zones. The Internet zone is set to high, trusted zones are set to medium-level security, and any local intranet zone remains at a medium-low setting. These settings restrict which Web sites can be browsed. When trying to visit a non-trusted site, a window pops up warning you that the Web site is not on the trusted list of sites (see Figure 11.21). However, you can grant access to any site by adding the site to the list of trusted sites. To add the site from the window illustrated in Figure 11.21, click the Add button. You will be prompted to then add the URL to the list of trusted sites. Alternatively, you can also add sites manually from a list, apply them to specific users or groups of users, or lower the security zone settings within IE’s options.

Although the warning pop-up windows can get annoying, it does help serve the purpose of protecting the server system. As Microsoft states in the IE Enhanced Security Configuration documentation, it is important to keep Web browsing on a server system to a minimum and when you do visit Web sites be sure that they can be trusted. Using IE on servers to visit Web sites should be used to obtain information for troubleshooting, downloading the latest update, and the like.
IIS 6 is a major improvement over previous versions in terms of security, reliability, availability, and performance. These facets have been a top priority for Microsoft. Microsoft has incorporated both internal and customer-based feedback to provide a robust platform for providing Web services.
Use IIS 6 to improve performance and strengthen security.
Thoroughly design and plan the IIS 6 environment.
Define the goals and objectives of the IIS 6 project.
Identify and review IIS application types and requirements.
Define security requirements to meet the goals and objectives.
Balance the security methodologies to be used with the associated risks and end user experience.
Examine and design disaster recovery plans, and monitor requirements and maintenance practices.
Document the current IIS infrastructure and the IIS design decisions.
Build fault tolerance into the Web infrastructure based on how much downtime can be afforded and existing SLAs.
Use IIS 5 isolation mode only to provide compatibility for applications that rely on features in earlier versions of IIS that cannot work in IIS 6 isolation mode.
Use IIS 6 process recycling to provide additional fault tolerance and minimize the number of server refreshes.
Use IIS to monitor applications such as pinging worker processes after a specified period of time, monitoring for failed applications, and disabling the application pool after a certain number of failures or a set number of failures within a given time frame.
Isolate FTP users so that FTP content is protected.
Provide search capabilities for Adobe Acrobat PDF file content on a Web site by using the iFilter driver.
Use NTFS on the disk subsystem, and apply the latest service pack and security patches to begin securing the IIS system.
Carefully review application security on the Windows Server 2003 Web server, especially if using a custom-built application.
Choose an authentication method carefully depending on business and technical requirements.
Apply auditing to Web and FTP sites to document attempts to log on (successful and unsuccessful), to gain unauthorized access to service accounts, to modify or delete files, and to execute restricted commands.
Use SSL to ensure confidentiality.
Use IPSec and L2TP to secure FTP.
Use local folders to share downloads, and secure them with NTFS. The folder should be located on a separate partition from Windows Server 2003 system files.
Monitor disk space and IIS logs to ensure that a hacker isn’t attempting to gain unauthorized access.
Turn on the ability to edit the metabase while running.
Use logging not only to review IIS security but also to assist with maintenance and troubleshooting.