
Quite often, some of the more important components of a network are overlooked because they consistently do their job and keep a low profile. It’s only when a problem erupts with one of these components that their true value arises and attention is paid to them. The Dynamic Host Configuration Protocol (DHCP) and the Windows Internet Naming Service (WINS) are two such services, faithfully performing their functions day in and day out, while often delegated to a beat-up old server under someone’s desk.
Although not glamorous, the functionality in DHCP and WINS is critical in a network environment, and a good deal of thought should be put into their design, administration, and functional requirements. This chapter explores these oft-forgotten services and provides best practice design and configuration information for utilizing them.
In addition to information on DHCP and WINS, this chapter explores the functionality of global catalog domain controller servers in Windows Server 2003, specifically focusing on server placement issues. Finally, this chapter explores step by step specific installation requirements for these services and best practice migration scenarios.
Although an enterprise network has many functional layers, this chapter focuses on three key components that are critical to the functionality of a Windows Server 2003 environment. These three aspects—network addressing, name resolution, and directory integration—provide for the base-level functionality expected of any modern enterprise network and provide the backbone for the Windows Server 2003 infrastructure.
The first critical component of a network is addressing, or allowing clients to assume a logical place in a network so that packets of information can be forwarded to and from the clients. This component was historically accomplished by proprietary network protocols, one for each network operating system (NOS). This gave NOS designers a great deal of flexibility in tailoring the communications components of their network to their specific design needs but made it difficult to exchange information between networks.
The Transmission Control Protocol/Internet Protocol (TCP/IP) was designed to interoperate between different varieties of networks, allowing them to speak a common language. The rise of this protocol coincided with the widespread adoption of the Internet itself, and it was this popularity and ubiquitous use of this protocol that led Microsoft to choose it as the standard protocol for Windows 2000. Windows Server 2003 continues to use TCP/IP as the default network protocol, expanding its place within the Microsoft NOS world.
TCP/IP requires that each node on a network be addressed by a unique IP address, such as 10.23.151.20. Each IP address must be assigned to every node on a network, either manually or by automatic methods. The automatic addressing component is the place where the DHCP service comes in with Windows Server 2003.
DHCP provides the automation of the critical TCP/IP addressing in Windows Server 2003 and makes administration of a network more palatable. You can find more details on DHCP in the “Dynamic Host Configuration Protocol (DHCP)” section later in this chapter.
The second critical aspect in networks is name resolution. Because humans understand the concept of names better than they do IP addresses, the need arises to translate those sets of numbers into common names.
Windows Server 2003 supports two types of name resolution. The first type, the Domain Name System (DNS), translates IP addresses into fully qualified domain name (FQDN) addresses, which allows them to be addressed in an Active Directory or Internet DNS structure. This type of name resolution, the default (and required) type in Windows Server 2003, is covered in more detail in Chapter 9, “The Domain Name System.”
The second type of name resolution, mapping legacy Microsoft NetBIOS names into IP addresses, is provided by WINS. Although it is technically possible (and ideal) to create a Windows Server 2003 environment free of NetBIOS name resolution, the truth is that divorcing a network from WINS dependency is very difficult, so it will remain an active part of network services in most organizations, at least for a few more years. You can find more information on WINS in the “Windows Internet Naming Service” section later in this chapter.
The final important service that is supplied by a functional enterprise network is directory placement and lookup capability. Having a centralized directory that controls access to resources and provides for centralized administration is a vital function in modern networks.
Active Directory is the directory service that is provided with Windows Server 2003 and is built into many of the operating system components. The servers that handle the login requests and password changes and contain directory information are the domain controllers and global catalog domain controllers, which will be explained in more detail in the “Understanding the Role of the Active Directory Global Catalog” section later in this chapter.
Subsequently, domain controller and global catalog placement is a critical piece of a Windows Server 2003 environment. Special considerations must be made regarding this concept because access to directory lookup and registration is key for client functionality on a network.
Windows Server 2003 introduces several functional improvements to network services. These improvements allow for increased administrative functionality, greater reliability, and an overall increase in value for an organization’s network infrastructure.
DHCP improvements such as DHCP Backup and Restore, migration improvements, and WINS advanced database search and filtering enhance the basic capabilities of these networking services and provide for a richer set of tools in configuring a network environment. You can find more information about these capabilities later in the “Automating DHCP Database Backup and Restore” section of this chapter.
Amazingly little is known about the DHCP service, although it is used in virtually all organizations. The service itself has simple beginnings but has evolved to become an important component in a network environment. Further study into the background and functionality of DHCP is warranted.
The day-to-day operations of TCP/IP can be complex, as clients must be able to receive and update their network information on a regular basis to keep in step with changes to a network. Each object in a TCP/IP environment requires a unique address that defines its location and provides for a means of routing network packets from place to place. This address, or IP address, must be assigned to each client in a network to allow the clients to communicate using TCP/IP. In the past, many IP addresses were manually distributed as new clients were added to a network. This required a large amount of administrative overhead to maintain, and often resulted in problems in configuration caused by simple typographical errors and basic human error.
An automatic method for distributing IP addresses to clients was subsequently sought as the administrative advantages of such a system were obvious. The search for such a system led to the predecessors of DHCP: RARP and BOOTP.
The need for dynamic allocation of IP addresses to clients was first addressed by the Reverse Address Resolution Protocol (RARP). RARP simply allocated an IP address to a client after that client requested it through a network broadcast. This protocol was quickly discovered to be ineffective, however, because it did not route beyond a single network and could assign only IP addresses, and not subnet masks, gateways, or other important information for TCP/IP.
The successor to RARP was the Bootstrap Protocol (BOOTP), which improved the dynamic assignment of IP addresses by allowing for routing through different networks and used a concept called a magic cookie, a 64-byte portion of the BOOTP packet that contained configuration information such as subnet mask, DNS server designations, and so on. This protocol was a drastic improvement over RARP but was still limited in a few functional areas—namely, in the fact that the database was not dynamic and was stored in a static text file, which limited its usability.
The Dynamic Host Configuration Protocol (DHCP) was developed as an improvement to BOOTP. In fact, a DHCP packet is almost identical to a BOOTP packet, except for the modification of the magic cookie portion of a packet, which was expanded in size to accommodate additional options such as DNS server, WINS server, and so on.
The DHCP process in itself is straightforward. A client boots up, and a broadcast request is sent out to all nodes on a subnet for which a dynamic IP address is required. The server, which is listening to these broadcasts on UDP port 67, responds to the client request by issuing an IP address in a predefined range, as illustrated in Figure 10.1.

In addition to an IP address, all options that are defined on the server scope are issued to a client. This includes DNS servers, WINS servers, gateways, subnet masks, and many other possibilities. If these options are issued automatically, the chance for errors is lessened and the entire IP address assignment becomes automated, decreasing administrative overhead.
The server portion of DHCP is only half of the equation in a DHCP transaction. The request for an IP address comes from a specific interface known as the DHCP client. The client is installed with TCP/IP in Windows 2000 and higher clients and can be installed as an additional component in down-level clients.
The DHCP client, as previously mentioned, handles the communications with the DHCP Server service, in terms of handling IP requests and updates. Each iteration of the Windows client includes a different DHCP client, and there are slight variations in the functionality of each client; however, the overall function—to apply for and receive an IP address from a DHCP server—remains the same in each Windows client.
The Client/Server service has been updated in Windows 2000 clients and higher, enabling it to automatically assign itself an IP address if no server is available; it does so through a process called Automatic Private IP Addressing (APIPA). APIPA clients automatically assign themselves an IP address in the 169.254.0.0/16 range in this situation, which allows them to have basic TCP/IP connectivity in small networks.
APIPA may be problematic in larger networks because it forces clients to assign themselves addresses in a range that is normally not part of a local company subnet. If a DHCP server is down, clients that are attempting to renew a lease with the server will fail and automatically assign themselves an APIPA address. When the server comes back online, they will not immediately re-register themselves and will effectively be cut off from the network. Subsequently, Microsoft supplies a Registry key that will disable APIPA in this situation. The key to be created is
HKLMSYSTEMCurrentControlSetServicesTcpipParametersInterfaces<AdapterName>
_IPAutoconfigurationEnabled:REG_DWORD=0
You can create this key by following these steps on the client:
Open Registry Editor (choose Start, Run and then enter regedit).
Navigate to
HKEY_LOCAL_MACHINESYSTEMCurrentControlSetServicesTcpipParameters\_Interfaces<AdapterName>(whereAdapterNameis the hexadecimal representation of the network adapter in question).Right-click on the
<AdapterName>key and choose New, DWORD Value.Double-click the new value and ensure that
0is entered as the value data.Click OK and close the Registry Editor.
Because DHCP clients use network broadcasts to seek out DHCP servers, it is important that this traffic is routed properly on a network with multiple subnets. Effectively, this means that there must be some type of agent to detect DHCP broadcast packets and forward them to the appropriate DHCP server, if it is located on another network. For Cisco routers, for example, this takes the form of an ip-helper entry in the router configuration that designates the destination IP address for broadcast packets to be forwarded to. If this type of router configuration is not utilized, a Windows server running the Routing and Remote Access service must be configured as a DHCP relay agent, as illustrated in Figure 10.2.

Using the DNS Service in Windows Server 2003, clients can automatically register themselves in the DNS database through a mechanism called Dynamic DNS (DDNS). For more information on this concept, refer to Chapter 9.
DHCP in Windows Server 2003 integrates directly with DDNS to provide for automatic registration of clients into DNS. By default, all Windows 2000 or higher clients will perform this function by themselves, but DHCP can be configured to allow for the Server service to update the Dynamic DNS record for the client if that client is unable to perform the update itself. This option can be turned on and off at the server level, through the DHCP Manager MMC.
DHCP installation has always been a straightforward process. In Windows Server 2003, installation has been even more streamlined through the use of the Configure Your Server Wizard. This wizard installs the DHCP Server service and automatically invokes the New Scope Wizard, which can be used to establish and configure DHCP scopes. To establish a Windows Server 2003 system as a DHCP server, follow these steps:
Choose Start, All Programs, Administrative Tools, Configure Your Server Wizard.
Click Next at the Welcome screen.
Verify the preliminary steps and click Next to continue. A network test will be completed at this point.
Select DHCP Server and click Next.
Verify the options on the next screen, as illustrated in Figure 10.3, and click Next.
At this point, the New Scope Wizard will be invoked and the process of configuring a scope will begin. Click Next to continue.
Type a name for the scope and enter a description. The names should be descriptive, such as
10.1.1.0/24 Scope. Click Next to continue.Enter the range in which the scope will distribute IP addresses. In addition, type in a subnet mask for the subnet in question, as illustrated in Figure 10.4. Click Next to continue.
Enter any exclusion ranges, if necessary. This range will identify any addresses that fall in the scope range that will not be utilized for the client leases. Click Next when finished.
Enter a duration time for the lease. This information will indicate how often clients must renew their DHCP leases. Click Next to continue.
At the next screen, you can add DHCP options to the scope. In this example, configure a gateway, a WINS server, and a DNS server as options for the scope, so choose Yes, I Want to Configure These Options Now and click Next.
Enter the IP address of the default gateway to be used on this subnet and click Next.
Enter the necessary information into the DNS server information fields and click Next when finished.
Enter the WINS server information on the next screen and click Next when finished.
Select whether the scope will be activated immediately or later. In this case, because the server has not been authorized, choose to activate later. After the change, click Next to continue.
Click Finish to close the wizard.
The Configure Your Server Wizard then indicates that the server has successfully become a DHCP server, as indicated in Figure 10.5. Click Finish to close the wizard.


Note
Because DHCP can potentially “steal” valid clients from a production network, it is recommended that all tests utilizing DHCP be conducted in a lab environment. In addition, testing in production will be difficult because the Authorization component of DHCP will also make it impossible to enable scopes on a Windows Server 2003 DHCP server, as described in the “DHCP Authorization” section later in this chapter.
As previously discussed, two improvements have been made to the functionality of DHCP in Windows Server 2003. These improvements allow for an increased level of functionality beyond the major improvements made in Windows 2000, but do not significantly change any design decisions that may have been made in Windows 2000 DHCP.
The process of backing up all DHCP settings and restoring them onto the same (or a different) server has been streamlined in Windows Server 2003. No longer do you need to export Registry keys and manually move databases between servers to migrate DHCP as the Backup and Restore process can be accomplished directly from the MMC. The process for backing up and restoring a DHCP database is as follows:
Open the DHCP Manager (Start, All Programs, Administrative Tools, DHCP).
Right-click the server name and choose Backup, as illustrated in Figure 10.6.
Specify a location for the backup file and click OK. The backup files will then be saved into the location you chose.
Open the DHCP Manager again (Start, All Programs, Administrative Tools, DHCP).
Right-click the server name and choose Restore.
When you see a dialog box asking whether the service can be stopped and restarted, click Yes to continue. The service will be restarted, and the entire database and Registry will be restored.

Note
The DHCP Backup and Restore process is extremely useful in migrating existing DHCP server configurations, scopes, and up-to-date lease information to new DHCP servers. However, because down-level (pre–Windows Server 2003) DHCP servers do not support automatic Backup and Restore, you will need to migrate from these servers by exporting and re-importing the DHCP Registry and manually moving the database files.
The DHCP client that is included in the Windows Server 2003 client equivalent, Windows XP, can have a static IP address assigned to clients when a DHCP server is unavailable. This static IP address takes the place of the APIPA address that would normally be configured in these cases.
This type of functionality would normally be used on mobile laptop computers that connect to different networks. When a user is at work, for example, his laptop would receive a DHCP address. When the user is at home, however, his laptop would use the backup static IP address defined in the network settings. To configure this functionality on a Windows XP client, perform the following steps:
The importance of DHCP cannot be understated. Downtime for DHCP translates into hordes of angry users who can no longer access the network. Consequently, it is extremely important to build redundancy into the DHCP environment and provide for disaster recovery procedures in the event of total DHCP failure.
Unfortunately, the DHCP service has no method of dynamically working in tandem with another DHCP server to synchronize client leases and scope information. However, using a few tricks, you can configure a failover DHCP environment that will provide for redundancy in the case of server failure or outage. Three specific options will provide for redundancy, and the pros and cons of each should be matched to the requirements of your organization.
The 50/50 failover approach effectively uses two DHCP servers that each handle an equal amount of client traffic on a subnet. Each DHCP server is configured with similar scope, but each must have a different IP range to avoid IP addressing conflicts.
Figure 10.7 illustrates the 50/50 failover approach. As indicated in the diagram, the network has 200 clients defined by 192.168.1.0/24. Each DHCP server contains a scope to cover the entire specific client subnet. Server1’s scope is configured with exclusions for all IPs except for the range of 192.168.1.1–192.168.1.125. Server2’s scope is configured with exclusions for the first half and a client lease range of 192.168.1.126–192.168.1.254.
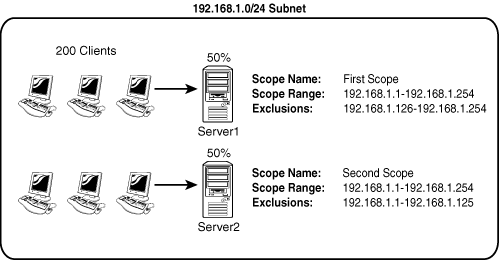
Upon requesting a client IP address, the first server to respond to a request will be accepted, thus roughly balancing the load between the two servers.
The advantage to this approach is that a degree of redundancy is built into the DHCP environment without the need for extra IP address ranges reserved for clients. However, several caveats must be considered before implementing this approach.
First and foremost, it is theoretically possible that one server is located closer to the majority of the clients, and therefore more clients would be directed to that particular server. This could theoretically cause the DHCP server to run out of client leases, making it ineffectual for redundancy. For this reason, it is preferable to consider other methods of failover for DHCP, if sufficient lease ranges are available.
Another important consideration whenever configuring DHCP servers in this method is that an exclusion range must be established for the range that exists on the other server so that when a client from the other server attempts to renew the lease, it is not refused a new lease. This situation could potentially occur if the exclusion is not established because the client and server would have trouble negotiating if the client was using an IP address out of the range that exists in the scope. Consequently, if the range exists, but an exclusion is established, the server will simply assign a new address in the backup range.
The 80/20 failover approach is similar to the 50/50 approach, except that the effective scope range on the server designated as the backup DHCP server contains only 20% of the available client IP range. In most cases, this server that holds 20% would be located across the network on a remote subnet, so it would not primarily be responsible for client leases. The server with 80% of the range would be physically located closer to the actual server, thus accepting the majority of the clients by responding to their requests faster, as illustrated in Figure 10.8.

In the event of Server1’s failure, Server2 would respond to client requests until Server1 could be re-established in the network.
The downside to this approach is that if Server1 is down for too long a period of time, it would eventually run out of potential leases for clients, and client renewal would fail. It is therefore important to establish a disaster recovery plan for the server with 80% of the scopes so that downtime is minimized.
Just as with the 50/50 approach, it is important to establish exclusion ranges for the other DHCP server’s range, as described in the previous sections.
The 100/100 failover approach in Windows Server 2003 DHCP is the most effective means of achieving high availability out of a DHCP environment. However, several big “gotchas” must be worked out before this type of redundancy can be implemented.
The 100/100 failover approach in its simplest form consists of two servers running DHCP, with each servicing the same subnets in an organization. The scopes on each server, however, contain different, equivalent size ranges for clients that are each large enough to handle all clients in a specific subnet.
In Figure 10.9, the 10.2.0.0/16 subnet has a total of 750 clients. This subnet is serviced by two DHCP servers, each of which has a scope for the subnet. Each server has a scope with addresses from 10.2.1.1 through 10.2.8.254. The scope on Server1 excludes all IP addresses except those in the range of 10.2.1.1 through 10.2.4.254. The scope on Server2 excludes all IP addresses except those in the range from 10.2.5.1 through 10.2.8.254. Each effective range is subsequently large enough to handle 1,000 clients, more than enough for every machine on the network.

If one of the DHCP servers experiences an interruption in service, and it no longer responds, the second server will take over, responding to clients and allowing them to change their IP addresses to the IPs available in the separate range.
The advantages to this design are obvious. In the event of a single server failure, the second server will immediately issue new IP addresses for clients that previously used the failed server. Because both servers run constantly, the failover is instantaneous. In addition, the failed DHCP server could theoretically remain out of service for the entire lease duration because the second server will be able to pick up all the slack from the failed server.
The main caveat to this approach is that a large number of IP addresses must be available for clients, more than twice the number that would normally be available. This may prove difficult, if not impossible, in many networks that have a limited IP range to work with. However, in organizations with a larger IP range, such as those offered by private network configurations (10.x.x.x and so on), this type of configuration is ideal.
As you can see in Figure 10.9, both ranges must include the scopes from the other servers to prevent the types of problems described in the preceding examples.
Note
If your organization uses a private IP addressing scheme such as 10.x.x.x or 192.168.x.x, it is wise to segment available IP addresses on specific subnets to include several times more potential IP addresses than are currently required in a network. This not only ensures effective DHCP failover strategies, but it also allows for robust network growth without the need for an IP addressing overhaul.
A standby DHCP server is simply a server with DHCP installed, configured with scopes, but not turned on. The scopes must be configured in different ranges, as in the previous examples, but they normally lie dormant until they are needed. The advantage to this approach lies in the fact that the DHCP service can be installed on a server that will not normally be using additional resources for DHCP. In the case of a problem, you simply need to activate the dormant scopes. An automated tool or script can be used to perform this function, if desired.
The final redundancy option with DHCP is to deploy a clustered server set to run DHCP. In this option, if a single server goes down, the second server in a cluster will take over DHCP operations. This option requires a greater investment in hardware and should be considered only in specific cases in which it is necessary. For more information on clustering servers, see Chapter 31, “System-Level Fault Tolerance (Clustering/Network Load Balancing).”
DHCP has been an unassuming network service as of late. The simplicity of the protocol is another reason for its success because it is not cursed by a high degree of administrative complexity. However, greater control over a DHCP environment can be achieved through the understanding of some advanced concepts regarding its use. Some of these concepts are new to Windows Server 2003, and some were introduced in Windows 2000. These improvements can help you to gain control over a DHCP environment, and provide for more security and ease of use.
A DHCP Superscope is used for environments in which multiple network subnets encompass a single scope environment. In these cases, a Superscope can be created to contain multiple scopes. The individual scopes are subsequently dependent on the master Superscope. If it is turned off, they will also be deactivated. Figure 10.10 illustrates a sample DHCP Superscope.

A Multicast scope is created to allow clients to be assigned multicast IP addresses. A multicast IP address is one in which destination hosts can each have the same IP address, which is useful in one-to-many forms of communications such as Webcasts and videoconferencing sessions.
It is never wise to hand over full administrative privileges to individuals who need to perform only a specific network function. If a small group of administrators needs control over the DHCP environment, Windows Server 2003 makes it easy to delegate administrative capabilities to them through the inclusion of a group called DHCP Administrators. Adding users or, preferably, groups to this Security Group will enable those users to administer the DHCP servers in an environment.
Windows Server 2003 has made great strides in allowing virtually all administrative functions to be performed through the command line. This not only helps those users who are used to command-line administration, such as that in Unix operating systems, but also allows for the execution of scripts and batch files, which can automate administrative processes.
The Netsh command-line utility is one such utility that effectively allows administrators to accomplish virtually all DHCP tasks that can be run through the MMC GUI interface. For a full listing of potential functions with Netsh, run netsh /? from the command line, as illustrated in Figure 10.11.

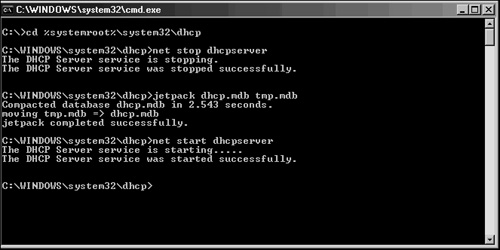
The DHCP database is stored in the dhcp.mdb file, located in \%systemroot%system32dhcp. This database is structured using Microsoft JET database technology, the same technology used for Exchange Server, Active Directory, and many other databases in the Microsoft world.
As any administrator who has worked with JET databases will attest, frequent maintenance of the DHCP database is required to keep it functioning properly and to groom it for defragmentation and recovery of whitespace. By default, DHCP is configured to perform online maintenance to the database, but only during intervals in which it is not being used for client requests. For busy, large DHCP servers, there may never be downtime, so it is therefore important to run offline maintenance against the dhcp.mdb file on a quarterly to semi-annual basis.
You can run maintenance against the dhcp.mdb DHCP database file by using the jetpack utility in Windows Server 2003. From the command line, enter the following commands, illustrated in Figure 10.12, to stop the DHCP Server service, compact the database, and restart the service:
Note
A maintenance schedule for DHCP and all other Microsoft JET-based databases should be established, in addition to any other maintenance schedules that may be in effect. Such a schedule will help to keep these network services environments in top shape. Using redundant servers that will take over while the database is down can also minimize downtime from this maintenance.
The DHCP protocol is effectively insecure. There is no way to determine if a request from a client is legitimate or is malicious. Users who have evil intentions can conduct denial-of-service attacks against the DHCP server by simply requesting all available IP addresses in a range, effectively disallowing legitimate users from being granted IP addresses. For this and other reasons, it is important to keep wire security as a high priority. Although this point may seem obvious, keeping potential intruders physically off a network is a must, not only for DHCP but for other network services prone to denial-of-service attacks. This includes auditing the security of wireless networks, such as 802.11b, which can (and often do) provide unrestricted access to malicious users.
In addition to physical and wire security, several security considerations and mechanisms should be examined to provide for a better understanding of the vulnerabilities and capabilities of DHCP.
DHCP in and of itself is an unauthenticated service, which means that anyone can establish a DHCP server on a network and start to accept clients and assign them erroneous addresses or redirect them for malicious purposes. Consequently, since Windows 2000, it has become necessary to authorize a DHCP server that is running in an Active Directory domain. After the DHCP server is authorized by the proper domain administrative authority, that server can then accept client leases.
The downside to this approach is that a Windows NT 4.0 or Linux server could still be added, unauthenticated, to a network. In this situation, it would become necessary to pull out a network analyzer to determine the location of rogue DHCP servers.
Authorization of a Windows Server 2003 DHCP server is straightforward, as long as the server is a member of an AD domain and the user logged in has proper DHCP privilege in the domain. Authorization can be accomplished by following these steps:
Open the DHCP Manager (Start, All Programs, Administrative Tools, DHCP).
Right-click the server name and choose Authorize, as illustrated in Figure 10.13.
In a few minutes, the DHCP should be authorized, and the scopes can be activated.

If at all possible, the DHCP service should not be run on an Active Directory domain controller because the security of the SRV records generated is lost. The reasons for this are as follows.
DNS entries in an Active Directory–integrated DNS zone are “secure,” which means that only the client that originally created the record can subsequently update that same record. This can cause problems if the DHCP server is automatically updating client records, however, as the client no longer performs this function and cannot have security applied to a record.
DHCP in Windows Server 2003 overcomes this limitation by placing all DHCP servers in a special group in Active Directory, called DNSUpdateProxy. Members of this group do not have any security applied to objects that they create in the DNS database. The theory is that the first client to “touch” the record will then take over security for that record.
The problem with this concept is that the records created by DHCP servers possess no immediate security and are consequently subject to takeover by hostile clients. Because domain controllers are responsible for publishing SRV DNS records, which indicate the location of domain controllers, Kerberos servers, and the like, this leaves a gaping security hole that users could exploit. Consequently, it is preferable to keep DHCP off domain controllers. If this cannot be avoided, it is recommended to not place the DHCP server into the DNSUpdateProxy group so as to avoid the security problems associated with it.
The Windows Internet Naming Service (WINS) has a long and sordid history in Microsoft networks. In the beginning, Microsoft networks were primarily broadcast-based, using protocols such as NetBEUI to identify local computers. The problem with this type of name resolution was that it did not scale beyond multiple subnets, which were fast becoming the norm in modern networks. With the adoption of TCP/IP as an easily routable protocol, the need to translate NetBIOS computer names with IP addresses became a reality. This need gave rise to the development of WINS.
WINS is effectively a simple database of NetBIOS names and their corresponding IP addresses. Some additional information, such as domain name, server type, and so on, can be determined as well, from the 16th byte in a NetBIOS name stored in WINS.
WINS is considered legacy in the Microsoft world because NetBIOS resolution is being phased out in favor of the Domain Name System (DNS) form of name resolution. However, it is difficult to divorce WINS from modern networks because of the reliance on WINS by down-level (pre-Windows 2000) clients, legacy applications, and even some Microsoft services such as DFS that utilize NetBIOS resolution by default. Consequently, it is often necessary to keep using WINS in Windows networks, unless it can be definitively proven that it is no longer necessary.
DNS can use the WINS database to provide for quasi-DNS resolution of WINS clients. This means that if a request is sent to a DNS server to resolve client1.companyabc.com, for example, it is possible for that DNS server to use the WINS database to resolve requests for any zones where the WINS forward lookup is configured. If Client1 does not exist in the DNS database but exists in the WINS database instead, the DNS server will return the IP address that it obtained from WINS and attach the companyabc.com suffix to the record, as illustrated in Figure 10.14.

This functionality must be enabled on the DNS server because it is not configured by default. To enable WINS resolution on a DNS server, follow these steps:
On a server running DNS, open the DNS MMC snap-in (Start, Administrative Tools, DNS).
Check the Use WINS Forward Lookup box.
Enter the IP address of the WINS server(s) and click OK to save the changes, as illustrated in Figure 10.15.

For more information on DNS configuration, refer to Chapter 9.
Although the overall function of WINS has not changed significantly in Windows Server 2003, some additions to the management tools allow for increased functionality and capabilities:
Advanced search capabilities for WINS databases—. Previous implementations of WINS had simplistic search capabilities that were limited to simple keyword searches of NetBIOS records in the database. The search engine for WINS has been updated in Windows Server 2003 to support more advanced search parameters, thus giving administrators more flexibility in searching for specific records.
WINS pull record filtering and replication partner acceptance—. Instead of entire transfers of all records on other servers, replication can be limited to only those records owned by a specific server, thus excluding extraneous records from littering a WINS database.
In addition to these advances in Windows Server 2003, Windows 2000 introduced enhancements to WINS, such as an updated database engine, persistent connections, manual tombstoning, and other improvements.
As with many services in Windows Server 2003, the installation and configuration process of a WINS server is streamlined through the Configure Your Server Wizard. This wizard automatically installs all necessary services and databases and configures other settings pertinent to a particular service. Although other methods of installation still exist, this method is the preferred approach in Windows Server 2003.
To install WINS on a server using the Configure Your Server Wizard, follow these steps:
Choose Start, All Programs, Administrative Tools, Configure Your Server Wizard.
Click Next at the Welcome screen.
Verify the preliminary steps and click Next to continue. A network test will then be performed.
Select WINS Server from the list of Server Roles and click Next to continue.
On the Summary page, click Next to continue.
If you are prompted for the Windows Server 2003 Media, insert it and click Next to continue.
Click Finish on the final wizard page to finish setup, as illustrated in Figure 10.16.

If a WINS server in an environment is the sole WINS server for that network, no additional configuration is required other than ensuring that clients will be pointing to the WINS server in their IP configuration. However, if additional WINS servers are established in an environment, exchanging database information between the multiple servers will become necessary. This type of replication topology is established through the designation of push/pull partners.
A push partner for a particular WINS server is another WINS server that serves as the destination for WINS changes to be “pushed” to. A pull partner is a WINS server from which changes are “pulled.” In a nutshell, if Server1 has Server2 configured as a push partner, Server2 must have Server1 configured as a pull partner, and vice versa.
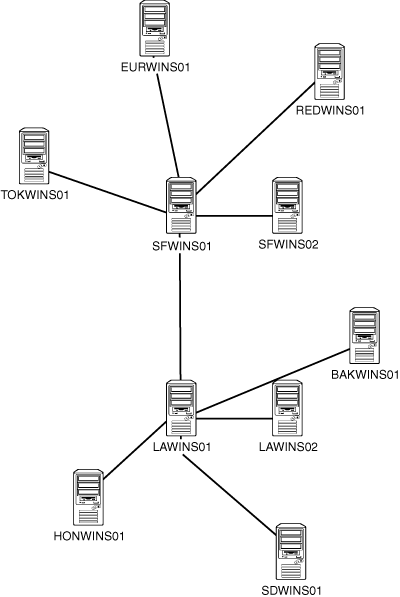
A WINS push/pull topology should roughly map to an organization’s network topology. For example, if an organization is composed of two main offices that serve as network hubs, and several branch offices, each with its own WINS servers, the WINS push/pull topology could look something like Figure 10.17.
WINS replicates database changes on a set schedule, which can be modified on a perconnection basis. Just as with any network communications, the replication schedule should be modified to fit the particular needs of an organization. If a WAN link is saturated with traffic, it may be wise to throttle back the WINS replication schedule. However, if a link between push/pull partners is robust, a shorter schedule can be established. To change the default schedule of 30 minutes, follow these steps:
Open the WINS Manager (Start, All Programs, Administrative Tools, WINS).
Choose the Replication Partners folder.
Right-click Push/Pull Partner (if one does not exist, it will have to be created) and choose Properties.
Change the Replication Interval time to the desired length, as indicated in Figure 10.18, and click OK to save the settings.
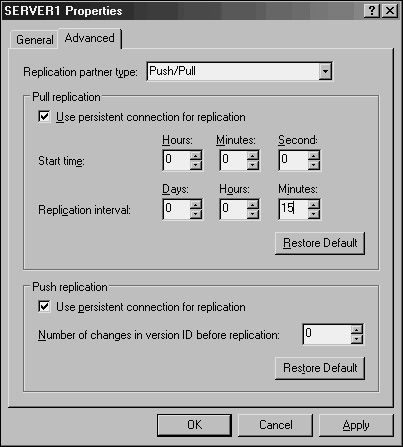
The page shown in Figure 10.18 can also be used to change other push/pull partner settings, such as replication partner types, persistent connections, and other pertinent replication information.
A Windows client does not immediately resort to a WINS server to determine the IP address of a NetBIOS name. This knowledge is essential in the troubleshooting of name resolution on a Windows client. Instead, a client first contacts a local NetBIOS cache for resolution. If an IP address changes, this cache may report the old address, impeding troubleshooting. To flush this cache, run nbtstat-R (with uppercase R) at the command line.
In addition to the local cache, clients always parse an LMHOSTS file, if one exists, before contacting a WINS server. If the LMHOSTS file contains erroneous information, it will impede proper name resolution. Always check to see whether this file is populated (it is usually located in \%systemroot%system32driversetc on clients) before beginning to troubleshoot the WINS server.
As previously mentioned, WINS is necessary in most production environments because the overriding dependencies on NetBIOS that were built into Windows have not entirely been shaken out. In fresh installations of Windows Server 2003, WINS might not be necessary, but for older, upgraded environments, plans should be made for WINS being around for a few years.
There are two key factors to consider when designing a WINS environment. The first factor is accessibility. Having a local, fast connection to a WINS server will aid in the processing of client requests. Because WINS has low overhead for servers, it is consequently a good idea to include at least one WINS server in all locations with more than 5–10 users. In smaller environments, WINS can be installed as part of a local file server; whereas in larger environments, dedicated multiple utility servers running WINS are recommended.
The replication topology to be established should normally follow the lines of a network infrastructure, as previously mentioned. If a network utilizes a hub-and-spoke design, WINS should follow the same basic topology.
The WINS service itself is one of the more straightforward services to migrate to a separate set of servers as part of an upgrade to Windows Server 2003. A simple upgrade of the existing WINS server will do the trick for many environments; however, migrating to a separate server or set of servers may be beneficial if changing topology or hardware.
Migration of an existing WINS environment is most easily accomplished through the procedure described in this section. This procedure allows for the migration of an entire WINS database to a new set of servers, but without affecting any clients or changing WINS server settings. Figure 10.19 illustrates a WINS migration using this procedure.

In Figure 10.19, the existing servers, OldServer1 and OldServer2, handle WINS traffic for the entire network of fictional CompanyABC. They are configured with IP addresses 10.1.1.11 and 10.1.1.12, which are configured in all clients’ IP settings as Primary and Secondary WINS, respectively. OldServer1 and OldServer2 are configured as push/pull partners.
The new servers, NewServer1 and NewServer2, are added to the network with the WINS service installed and configured as push/pull partners for each other. Their initial IP addresses are 10.1.1.21 and 10.1.1.22. OldServer1 and NewServer1 are then connected as push/pull partners for the network. Because the servers are connected this way, all database information from the old WINS database is replicated to the new servers, as illustrated in step 1 shown in Figure 10.19.
After the entire WINS database is replicated to the new servers, the old servers are shut down (on a weekend or evening to minimize impact), and NewServer1 and NewServer2 are immediately reconfigured to take the IP addresses of the old servers, as illustrated in step 2 shown in Figure 10.20.

The push/pull partner relationship between NewServer1 and NewServer2 is then reestablished because the IP addresses of the servers changed. The entire downtime of the WINS environment can be measured in mere minutes, and the old database is migrated intact. In addition, because the new servers assume the old IP addresses, no client settings need to be reconfigured.
There are a few caveats with this approach, however. If the IP addresses cannot be changed, WINS servers must be changed on the client side. If you’re using DHCP, you can do this by leaving all old and new servers up in an environment until the WINS change can be automatically updated through DHCP. Effectively, however, WINS migrations can be made very straightforward through this technique, and they can be modified to fit any WINS topology.
As with the DHCP database, the WINS database is based on the Microsoft JET database technology and subsequently requires regular maintenance. Scheduling maintenance for each WINS database is recommended on a quarterly or semi-annual basis at least. The WINS database file, wins.mdb, is stored in the %systemroot%system32wins directory. You can run maintenance against the database by entering the following commands at the command line:
cd %systemroot%system32winsnet stop winsjetpack wins.mdb tmp.mdbnet start wins
The placement of domain controllers in Windows Server 2003 is the critical factor to improve the communication response time from an Active Directory query. Without prompt response from a domain controller, a user may have to wait several seconds to several minutes to merely log on to the network, or it could take a similar length of time to even view the list of email recipients the user wants to send a message to.
This section deals with specific server placement issues for Active Directory domain controllers and global catalog servers. For more in-depth coverage of these concepts, refer to Chapter 4, “Active Directory Primer,” and Chapter 5, “Designing a Windows Server 2003 Active Directory.”
The global catalog in Active Directory is an index of all objects in an Active Directory forest. All domain controllers in Windows Server 2003’s Active Directory are not by default global catalog servers, so they must be established as such through the following procedure:
Open Active Directory Sites and Services.
Right-click NTDS Settings and select Properties.
Check the Global Catalog box, as indicated in Figure 10.21.

It is important to understand that global catalog objects must be physically located close to all objects in a network that require prompt login times and fast connectivity. Because a global catalog entry is parsed for universal group membership every time a user logs in, this effectively means that this information must be close at hand. This can be accomplished by placing GC/DCs on the same WAN site or by using a process new to Windows Server 2003 called universal group caching.
Universal group caching is a process by which an Active Directory site caches all universal group membership locally so that the next time clients log in, information is more quickly provided to the clients and they are able to log in faster.
Universal group caching is more effective than placing a GC/DC server locally because only those universal groups that are relevant to a local site’s members are replicated and are cached on the local domain controller. The downside to this approach, however, is that the first login for clients will still be longer than if a local GC/DC were provided, and the cache eventually expires, requiring another sync with a GC/DC.
You can set up universal group caching on a site level as follows:
Open Active Directory Sites and Services.
Navigate to
Sites<Site Name>.In the right-hand pane, right-click NTDS Site Settings and choose Properties.
Check the Enable Universal Group Membership Caching box, as illustrated in Figure 10.22.

As illustrated in the preceding sections, decisions must be made regarding the most efficient placement of DCs and GC/DCs in an environment. Determining the placement of GC/DCs and universal group caching sites must be done with an eye toward determining how important fast logins are for users in a site compared to higher replication throughput. For many Windows Server 2003 environments, the following rules apply:
Sites with fewer than 50 users—. Use a single DC configured with universal group caching.
Sites with 50–100 users—. Use two DCs configured for universal group caching.
Sites with 100–200 users—. Use a single GC server and single DC server.
Sites with 200+ users—. Alternate adding additional DCs and GC/DCs for every 100 users.
The recommendations listed here are generalized and should not be construed as relevant to every environment. Some scenarios might call for variations to these approaches, such as when using Microsoft Exchange in a site. However, these general guidelines can help to size an Active Directory environment for domain controller placement.
While often overlooked, the services of DHCP and WINS are some of the most critical components of a functional Windows Server 2003 environment. In addition, global catalog domain controller placement and related issues are integral to the functionality of an Active Directory environment. Consequently, it is important to have a strong understanding of these components and their related design, migration, and maintenance procedures to ensure the high availability, reliability, and resilience of a network infrastructure.
Perform all tests with DHCP in a lab environment.
Define a maintenance schedule for DHCP and all other Microsoft JET-based databases.
Implement redundancy in a DHCP and WINS infrastructure.
Dedicate multiple utility servers running WINS in large environments.
Schedule maintenance for each WINS database on a quarterly or semi-annual basis.
Properly plan the most efficient placement of DCs and GC/DCs in an environment.
Use a single DC configured with universal group caching for AD sites with fewer than 50 users who do not need a local GC for services such as Exchange.
Use at least two DCs in AD sites with between 50 and 100 users.