
Name resolution is a key component in any network operating system (NOS) implementation. The capability of any one resource to locate other resources is the centerpiece of a functional network. Consequently, the name-resolution strategy chosen for a particular NOS must be robust and reliable, and it ideally will conform to industry standards.
Windows Server 2003 utilizes the Domain Name System (DNS) as its primary method of name resolution, and DNS is a vital component of any Active Directory implementation. Windows Server 2003’s DNS implementation was designed to be compliant with the key Request for Comments (RFCs) that define the nature of how DNS should function. This makes it particularly beneficial for existing network implementations, as it allows Windows Server 2003 to interoperate with other types of RFC-compliant DNS implementations.
This chapter details the key components of DNS in general and provides an overview of Windows Server 2003’s specific implementation of DNS. A particular emphasis is placed on the role of DNS in Active Directory and the way it fits in standard and nonstandard configurations. Step-by-step instructions outline how to install and configure specific DNS components on Windows Server 2003. In addition, troubleshooting DNS issues and specific Active Directory design scenarios help to give a hands-on approach to your understanding of DNS.
Computers and humans conceptualize in drastically different ways. In terms of understanding locations, humans are much better at grasping the concept of names rather than numbers. For example, most people think of cities by their names, not by their ZIP Codes. Computers, however, work in binary, and subsequently prefer to work with numbers. For example, computers at the post office translate the city and address names into specific ZIP Codes for that region, helping each letter reach its destination.
Name resolution for computer systems works in a similar way. A user-friendly name is translated into a computer-identifiable number. TCP/IP uses a number scheme that uniquely identifies each computer interface on a network by a series of numbers, such as 10.1.2.145, known as an IP address. Because most humans are not interested in memorizing several of these types of numbers, they must be easily resolvable into user-friendly names such as www.microsoft.com.
DNS, in its simplest form, provides for name resolution in a distributed fashion, with each server or set of servers controlling a specified zone and with entries for each resource called resource records (RRs) that indicate the location of a particular object.
A good analogy for DNS can be found in telephone books. Each city or metropolitan area (namespace) publishes a separate phone book (zone) that contains many listings (resource records) that map people’s names to their phone numbers (IP addresses). This simple example illustrates the basic principle behind DNS. When you understand these basics, further drilling down into the specifics, especially with regard to Windows Server 2003’s DNS, is possible.
The Internet, as originally implemented, utilized a simple text file called a HOSTS file that contained a simple list of all servers on the Internet and their corresponding IP addresses. This file was copied manually from the master server to multiple secondary HOSTS servers. As more and more servers were added to the Internet, however, updating this file become unmanageable, and a new system became necessary.
In 1983, in direct response to this problem, the RFCs for the Domain Name System were drawn up, and this form of name resolution was implemented on a large scale across the Internet. Instead of a small number of static HOSTS files, DNS servers formed a hierarchical method of name resolution, in which servers resolved only a certain segment of hosts on the Internet and delegated requests that it did not manage. This allowed the number of records held in DNS to scale enormously, without a subsequent large performance decrease.
Microsoft developed its own implementation of DNS in Windows NT 4.0, which was based on the RFC standards on which DNS was founded. With the introduction of Windows 2000, Microsoft adopted DNS as the name-resolution strategy for Microsoft products. Older, legacy name-resolution systems such as WINS are slowly being phased out. Since that time, the DNS implementation used by Microsoft has evolved to include a number of key benefits that distinguish it from standard DNS implementations, such as those in other DNS implementations—for example, Unix BIND. To understand these improvements, however, you first need a basic understanding of DNS functionality.
DNS structure is closely tied to the structure of the Internet and often is confused with the Internet itself. The structure of DNS is highly useful, and the fact that it has thrived for so long is a tribute to its functionality. A closer examination of what constitutes DNS and how it is logically structured is important in understanding the bigger picture of how DNS fits in Windows Server 2003.
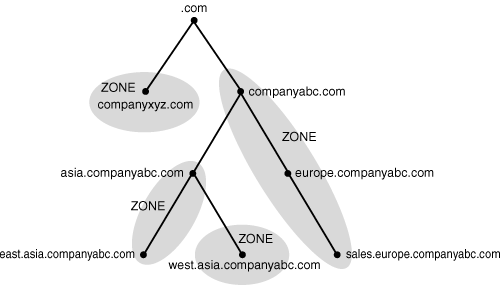
DNS uses a hierarchical approach to name resolution in which resolution is passed up and down a hierarchy of domain names until a particular computer is located. Each level of the hierarchy is divided by dots (.), which symbolize the division. A fully qualified domain name (FQDN) such as server1.sales.companyabc.com uniquely identifies a resource’s space in the DNS hierarchy. Figure 9.1 shows how the fictional CompanyABC fits into the DNS hierarchy.

The top of the hierarchy is known as the root, and is represented by a single . (dot) that is managed by the main Internet Registration Authority. Moving down the DNS hierarchy, the next layer in the model is made up of .com, .net, .gov, .fr, and similar domain namespaces that loosely define the particular category that a domain namespace fits into. For example, educational institutions are commonly given .edu extensions, and commercial businesses are given .com extensions. These extensions form the first set of branches to the DNS tree.
The second level in the DNS hierarchy commonly contains the business name of an organization, such as companyabc in Figure 9.1. This level is normally the first area in the DNS hierarchy where an organization has control over the records within the domain and where it can be authoritative.
Subdomains can easily be, and often are, created in the DNS hierarchy for various reasons. For example, sales.microsoft.com is a potential domain that could exist as a sublevel of the microsoft.com domain. The DNS hierarchy works in this way, with multiple levels possible.
The bounded area that is defined by the DNS name is known as the DNS namespace. Microsoft.com is a namespace, as is marketing.companyabc.com. Namespaces can be either public or private. Public namespaces are published on the Internet and are defined by a set of standards. All the .com, .net, .org, and similar namespaces are external, or public. An internal namespace is not published to the Internet, but is also not restricted by extension name. In other words, an internal, unpublished namespace can occupy any conceivable namespace, such as dnsname.local or companyabc.internal. Internal namespaces are most often used with Active Directory because they give increased security to a namespace. Because such namespaces are not published, they cannot be directly accessed from the Internet.
To fully understand the capabilities that Windows Server 2003 offers for DNS, the product should be installed in a lab environment. This helps to conceptualize the various components of DNS that are presented in this chapter.
Although there are various ways to install and configure DNS, the most straightforward and complete process involves invoking the Configure Your Server Wizard and the subsequent Configure a DNS Server Wizard. The process detailed in this section illustrates the installation of a standard zone. Multiple variations of the installation are possible, but this particular scenario is illustrated to show the basics of DNS installation.
Installation of DNS on Windows Server 2003 is straightforward, and no reboot is necessary. To install and configure the DNS service on a Windows Server 2003 computer, follow these steps. If DNS is already installed on a server but not configured, start the procedure from step 7.
Choose Start, All Programs, Administrative Tools, Configure Your Server Wizard.
Click Next on the Welcome screen.
Make sure that the listed prerequisites have been satisfied and click Next to continue. The Configure Your Server Wizard will then perform a network test.
Note
If running the Configure Your Server Wizard as noted in step 3 with the typical configuration selected, the networking components for DNS and Active Directory Domain Controller will be installed automatically at this point. If you select the custom configuration in the Configure Your Server Wizard, you need to follow steps 4 through 21.
Select the DNS Server Component and click Next.
Verify that the Install DNS Server and Run the Configure a DNS Server Wizard to Configure DNS options are selected and click Next.
After DNS is installed, you may be prompted for your Windows Server 2003 CD. If so, insert it and click OK when prompted.
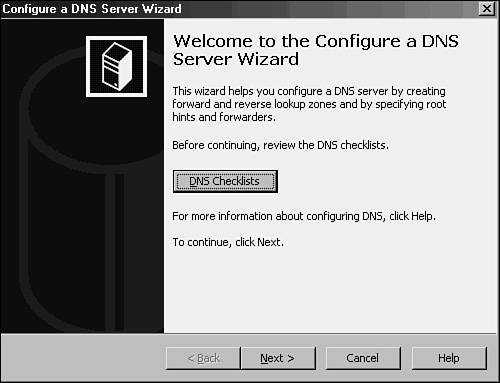
The Configure a DNS Server Wizard is then started automatically, as illustrated in Figure 9.2. (Or, if DNS is already installed, install it manually by choosing Start, Run, and then typing
dnswiz.exe.)On the Welcome screen for the Configure a DNS Server Wizard, click Next to continue.
Select Create Forward and Reverse Lookup Zones (Recommended for Large Networks) and click Next.
Select Yes, Create a Forward Lookup Zone Now (Recommended) and click Next.
Select the type of zone to be created—in this case, choose Primary Zone—and click Next. If the server is a domain controller, the Store the Zone in Active Directory check box is available.
Type the name of the zone in the Zone Name box and click Next.
At this point, you can create a new zone text file or import one from an existing zone file. In this case, choose Create a New File with This File Name and accept the default. Click Next to continue.
The subsequent screen allows a zone to either accept or decline dynamic updates. In this case, enable dynamic updates by selecting the Allow Both Nonsecure and Secure Dynamic Updates radio button and clicking Next.
The next screen allows for the creation of a reverse lookup zone. Here, select Yes, Create a Reverse Lookup Zone Now and click Next.
Select Primary Zone and click Next.
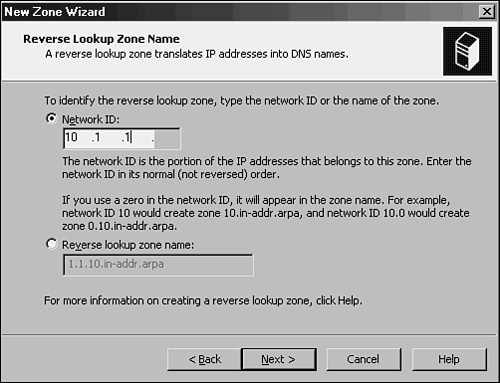
Type in the network ID of the reverse lookup zone and click Next. (The network ID is typically the first set of octets from an IP address in the zone. If a class C IP range of 10.1.1.0/24 is in use on a network, you would enter the values
10.1.1, as illustrated in Figure 9.3.)Again, you are offered the option to create a new zone file or to utilize an existing file. In this case, choose Create a New File with This File Name and click Next to continue.
Again, you are presented the option for dynamic updates. In this case, select Allow Both Nonsecure and Secure Dynamic Updates and click Next to continue.
The next screen deals with the setup of forwarders, which will be described in more detail in the “DNS Zones” section later in this chapter. In this example, choose No, It Should Not Forward Queries and click Next to continue.
The final window, shown in Figure 9.4, displays a summary of the changes that will be made and the zones that will be added to the DNS database. Click Finish twice to finalize the changes and create the zones.
Note
Depending on network connectivity, there may be a pop-up dialog box between the two clicks to finish the DNS changes in step 21. If you are not connected to a LAN, an error dialog box will be displayed regarding searching for root hints. Although the dialog box notes the root hint error, clicking OK will still configure DNS successfully.

DNS is installed immediately upon the closing of the Configure a DNS Server Wizard. One subtask that should be accomplished after the installation is configuring the DNS server in the TCP/IP settings to point to itself for DNS resolution, unless there is a specific reason not to do so. To accomplish this task, perform the following steps:
Choose Start, Control Panel, Network Connections.
While in Network Connections, right-click [Local Area Connection] (where Local Area Connection is the particular network adapter that is to be utilized on the network where DNS is implemented) and select Properties.
In the DNS Server boxes, make sure that Use the Following DNS Server Addresses is selected and then type the IP address of the DNS server into the Preferred DNS Server box.
If you have another DNS server, you can enter it into the Alternate DNS Server box.
Click OK twice to complete the changes.
Note
Previous recommendations for Windows 2000 stipulated that a root DNS server point to another DNS server as the primary name server. This recommendation was made in response to what is known as the “island” problem in Windows DNS. Administrators will take heart in the fact that Windows Server 2003 no longer is subject to this problem, and it is now recommended that you configure a DNS server to point to itself in most cases. You can find more information on this concept later in this chapter.
In the DNS hierarchy, objects are identified through the use of resource records (RRs). These records are used for basic lookups of users and resources within the specified domain and are unique for the domain in which they are located. Because DNS is not a flat namespace, however, multiple identical RRs can exist at different levels in a DNS hierarchy. The distributed nature of the DNS hierarchy allows such levels.
Several key resource records exist in most DNS implementations, especially in those associated with Windows Server 2003 Active Directory. A general familiarity with these specific types of RRs is required to gain a better understanding of DNS.
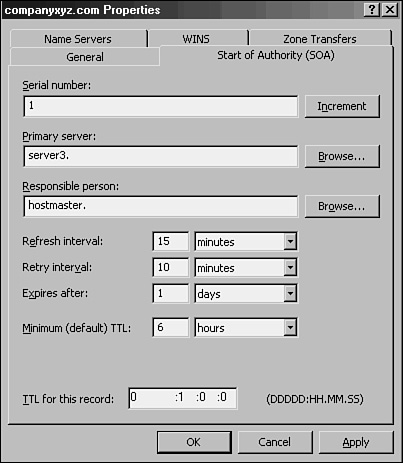
The Start of Authority (SOA) record in a DNS database indicates which server is authoritative for that particular zone. The server referenced by the SOA records is subsequently the server that is assumed to be the best source of information about a particular zone and is in charge of processing zone updates. The SOA record contains information such as the Time to Live (TTL) interval, the contact person responsible for DNS, and other critical information, as illustrated in Figure 9.5.

An SOA record is automatically created when DNS is installed for Active Directory in Windows Server 2003 and is populated with the default TTL, primary server, and other pertinent information for the zone. After installation, however, these values can be modified to fit the specific needs of an organization.
The most common type of RR in DNS is the host record, also known as an A record. This type of RR simply contains the name of the host and its corresponding IP address, as illustrated in Figure 9.6.

The vast majority of RRs in DNS are A records because they are used to identify the IP addresses of most resources within a domain.
Name Server (NS) records identify which computers in a DNS database are the name servers, essentially the DNS servers for a particular zone. Although there can be only one SOA record for a zone, there can be multiple NS records for the zone, which indicate to clients which machines are available to run DNS queries against.
Note
Name Server records, or NS records, do not actually contain the IP information of a particular resource. In fact, in most cases only A records contain this information. NS records and other similar records simply point to a server’s A record. For example, an NS record will simply point to server1.companyabc.com, which will then direct the query to the server1 A record in the companyabc.com zone.
Service (SRV) records are RRs that indicate which resources perform a particular service. Domain controllers in Active Directory are referenced by SRV records that define specific services, such as the global catalog, LDAP, and Kerberos. SRV records are a relatively new addition to DNS, and did not exist in the original implementation of the standard. Each SRV record contains information about a particular functionality that a resource provides. For example, an LDAP server can add an SRV record indicating that it can handle LDAP requests for a particular zone. SRV records can be very useful for Active Directory because domain controllers can advertise that they handle global catalog requests, as illustrated in Figure 9.7.

Note
Because SRV records are a relatively new addition to DNS, they are not supported by several down-level DNS implementations, such as Unix BIND 4.1.x and NT 4.0 DNS. It is therefore critical that the DNS environment that is used for Windows Server 2003’s Active Directory have the capability to create SRV records. For Unix BIND servers, version 8.1.2 or higher is required.
A Mail Exchanger (MX) record indicates which resources are available for SMTP mail reception. MX records can be set on a domain basis so that mail sent to a particular domain will be forwarded to the server or servers indicated by the MX record. For example, if an MX record is set for the domain companyabc.com, all mail sent to [email protected] will be automatically directed to the server indicated by the MX record.
Reverse queries to DNS are accomplished through the use of Pointer (PTR) records. In other words, if a user wants to look up the name of a resource that is associated with a specific IP address, he would do a reverse lookup using that IP address. A DNS server would reply using a PTR record that would indicate the name associated with that IP address. PTR records are most commonly found in reverse lookup zones.
A Canonical Name (CNAME) record represents a server alias, or essentially allows any one of a number of servers to be referred to by multiple names in DNS. The record essentially redirects queries made to it to the A record for that particular host. CNAME records are useful when migrating servers and for situations in which friendly names, such as mail.companyabc.com, are required to point to more complex server-naming conventions such as sfoexch01.companyabc.com.
Other, less common forms of records that may exist in DNS have specific purposes, and there may be cause to create them. The following is a sample list, but is by no means exhaustive:
AAAA—. Maps a standard IP address into a 128-bit IPv6 address, as indicated in Figure 9.8. This type of record will become more prevalent as IPv6 is adopted.
ISDN—. Maps a specific DNS name to an ISDN telephone number.
KEY—. Stores a public key used for encryption for a particular domain.

A zone in DNS is a portion of a DNS namespace that is controlled by a particular DNS server or group of servers. The zone is the primary delegation mechanism in DNS and is used to establish boundaries over which a particular server can resolve requests. Any server that hosts a particular zone is said to be authoritative for that zone, with the exception of stub zones, which are defined later in the chapter. Figure 9.9 illustrates how different portions of the DNS namespace can be divided into zones, each of which can be hosted on a DNS server or group of servers.
It is important to understand that any section or sub-section of DNS can exist within a single zone. For example, an organization may decide to place an entire namespace of a domain, subdomains, and sub-subdomains into a single zone. Or specific sections of that namespace can be divided up into separate zones. In fact, the entire Internet namespace can be envisioned as a single namespace with . as the root, which is divided into a multitude of different zones.
Note
A server that is installed with DNS but does not have any zones configured is known as a caching-only server. Establishing a caching-only server can be useful in some branch office situations because it can help to alleviate large amounts of client query traffic across the network and eliminate the need to replicate entire DNS zones to remote locations.
A forward lookup zone is created to, as the name suggests, forward lookups to the DNS database. In other words, this type of zone resolves names to IP addresses and resource information. For example, if a user wants to reach Server1 and queries for its IP address through a forward lookup zone, DNS returns 10.0.0.11, the IP address for that resource.
Note
There is nothing to stop the assignment of multiple RRs to a single resource. In fact, this practice is common and useful in many situations. It may be practical to have a server respond to more than one name in specific circumstances. This type of functionality is normally accomplished through the creation of CNAME records, which create aliases for a particular resource.
A reverse lookup zone performs the exact opposite operation as a forward lookup zone. IP addresses are matched up with a common name in a reverse lookup zone. This is similar to knowing a phone number but not knowing the name associated with it. Reverse lookup zones must be manually created, and do not always exist in every implementation. Reverse lookup zones are primarily populated with PTR records, which serve to point the reverse lookup query to the appropriate name.
In traditional (non-Active Directory–integrated) DNS, a single server serves as the master DNS server for a zone, and all changes made to that particular zone are done on that particular server. A single DNS server can host multiple zones, and can be primary for one and secondary for another. If a zone is primary, however, all requested changes for that particular zone must be done on the server that holds the master copy of the zone.
Creating a new primary zone manually is a fairly straightforward process. The following procedure outlines the creation of a standard zone for the companyabc.com DNS namespace:
Open the DNS MMC snap-in (Start, Administrative Tools, DNS).
Right-click Forward Lookup Zones and choose New Zone.
Click Next on the Welcome screen.
Select Primary Zone from the list of zone types available. Because this zone will not be AD integrated, uncheck Store the Zone in Active Directory if it is unchecked and then click Next to continue.
Type in the name of the primary zone to be created and click Next.
Because a new zone file will be created as opposed to importing an existing zone file, select Create a New File With This File Name and click Next.
Determine whether dynamic updates will be allowed in this zone. If not, select Do Not Allow Dynamic Updates and click Next to continue.
Click Finish on the Summary page to create the zone.
A secondary zone is established to provide redundancy and load balancing for the primary zone. Each copy of the DNS database is read-only, however, because all recordkeeping is done on the primary zone copy. A single DNS server can contain several zones that are primary and several that are secondary. The zone creation process is similar to the one outlined in the preceding section on primary zones, but with the difference being that the zone is transferred from an existing primary server.
The concept of stub zones is new in Microsoft DNS. A stub zone is essentially a zone that contains no information about the members in a domain but simply serves to forward queries to a list of designated name servers for different domains. A stub zone subsequently contains only NS, SOA, and glue records. Glue records are essentially A records that work in conjunction with a particular NS record to resolve the IP address of a particular name server. A server that hosts a stub zone for a namespace is not authoritative for that zone.
As illustrated in Figure 9.10, the stub zone effectively serves as a placeholder for a zone that is authoritative on another server. It allows a server to forward queries that are made to a specific zone to the list of name servers in that zone.

You can easily create a stub zone in Windows Server 2003 after the need has been established for this particular type of functionality. The following procedure details the steps involved with the creation of a stub zone:
Open the DNS MMC snap-in (Start, Administrative Tools, DNS).
Navigate to DNS<
Servername>Forward Lookup Zones.Right-click Forward Lookup Zones and choose New Zone.
Click Next on the Welcome screen.
Select Stub Zone from the list of zone types. Because this zone will not be AD integrated, uncheck Store The Zone In Active Directory if it is unchecked and then click Next to continue.
Type in the name of the zone that will be created and click Next to continue.
Select Create a New File With This File Name and accept the defaults, unless migrating from an existing zone file. Then click Next to continue.
Type in the IP address of the server or servers from which the zone records will be copied. Click Add for each server entered, as shown in Figure 9.11, and then click Next to continue.
Click Finish on the Summary page to create the zone.

The newly created stub zone will hold only the SOA, NS, and glue records for the domain at which it is pointed.
Copying the DNS database from one server to another is accomplished through a process known as a zone transfer. Zone transfers are required for any zone that has more than one name server responsible for the contents of that zone. The mechanism for zone transfers varies, however, depending on the version of DNS and whether the zone is Active Directory–integrated.
DNS servers can be configured to notify other DNS servers of changes to a zone and begin a zone transfer on a scheduled basis. To set up a server to send zone transfers to another server from a forward lookup zone, follow this procedure:
Open the DNS MMC snap-in (Start, Administrative Tools, DNS).
Navigate to DNS<
Servername>Forward Lookup Zones.Right-click the name of the zone and choose Properties.
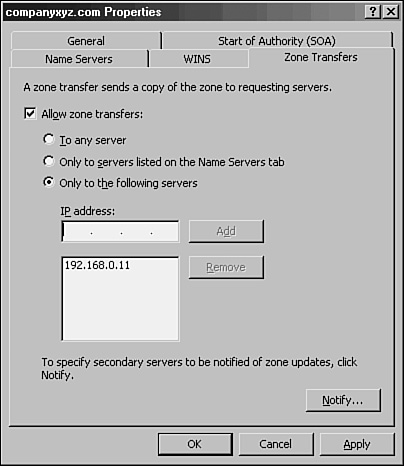
Choose the Zone Transfers tab.
Check Allow Zone Transfers and select Only To The Following Servers.
Type in the IP address of the server that will receive the update, as shown in Figure 9.12.
Click OK to save the changes.
Note
In addition to specifically defining recipients of zone transfers by IP address, you can select the Only To Servers Listed On The Name Servers Tab radio button as well, assuming that the recipient server or servers are listed under the Name Servers tab.
The standard method for zone transfers, which transfers the entire contents of a DNS zone to other servers, is known as asynchronous zone transfer (AXFR) or full zone transfer. This type of zone transfer copies every item in the DNS database to a separate server, regardless of whether the server already has some of the items in the database. Older implementations of DNS utilized AXFR exclusively, and it is still utilized for specific purposes today.
An incremental zone transfer (IXFR) is a process by which all incremental changes to a DNS database are replicated to another DNS server. This saves bandwidth over AXFR replication changes because only the delta, or changes made to the database since the last zone transfer, are replicated.
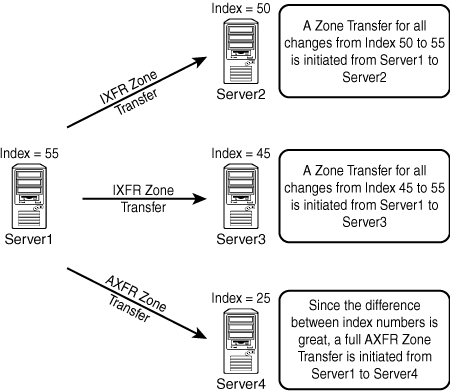
IXFR zone transfers are accomplished by referencing an index number that is referenced on the SOA of the DNS server that holds the primary zone. This number is incremented upon each change to a zone. If the server requesting the zone transfer has an index number of 45, for example, and the primary zone server has an index number of 55, only those changes made during the period of time between 45 and 55 will be incrementally sent to the requesting server via an IXFR transfer. However, if the difference in index numbers is too great, the information on the requesting server will be assumed stale, and a full AXFR transfer will be initiated. For example, if a requesting server has an index of 25, and the primary zone server’s index is 55, an AXFR zone transfer will be initiated, as illustrated in Figure 9.13.
The primary function of DNS is to provide name resolution for requesting clients, so the query mechanism is subsequently one of the most important elements in the system. Two types of queries are commonly made to a DNS database: recursive and iterative.
Recursive queries are most often performed by resolvers, or clients that need to have a specific name resolved by a DNS server. Recursive queries are also accomplished by a DNS server if forwarders are configured to be used on a particular name server. A recursive query essentially asks whether a particular record can be resolved by a particular name server. The response to a recursive query is either negative or positive. A common recursive query scenario is illustrated in Figure 9.14.
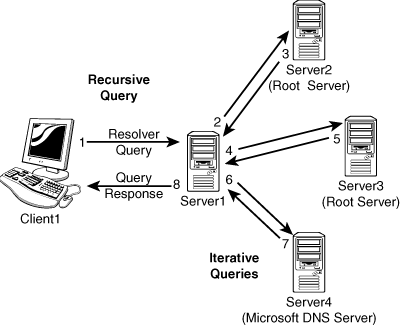
Iterative queries ask a DNS server to either resolve the query or make a best guess referral to a DNS server that may contain more accurate information about where the query can be resolved. Another iterative query is then performed to the referred server and so on until a result, positive or negative, is obtained.
In the example shown in Figure 9.14, Client1 in CompanyABC opens a Web browser and attempts to browse to the Web site for www.microsoft.com. A recursive query is initiated to the default name server; in this case, Server1 is contacted. Because Server1 is authoritative only for the companyabc.com namespace, and no entries exist for microsoft.com, the query is sent to an “upstream” DNS server that is listed in the root hints of the DNS server. That server, Server2, is not authoritative for microsoft.com but sends a referral back to Server1 for Server3, which is a name server for the .com namespace. Server3 knows that Server4 handles name-resolution requests for microsoft.com and sends that information back to Server1. A final iterative query is then sent from Server1 to Server4, and Server4 successfully resolves www to the proper IP address. Server1, with this information in hand, returns Client1’s original recursive query with the proper IP address and Client1’s browser successfully resolves www.microsoft.com.
This type of functionality lies at the heart of the distributed nature of DNS and allows DNS lookups to function as efficiently as they do.
Several other key components lie at the heart of DNS and are necessary for it to function properly. In addition, you need to fully understand the functionality of several key components of DNS that are utilized heavily by Microsoft DNS.
Older versions of DNS relied on administrators manually updating all the records within a DNS database. Every time a resource was added or information about a resource was changed, the DNS database was updated, normally via a simple text editor, to reflect the changes. Dynamic DNS was developed as a direct response to the increasing administrative overhead that was required to keep DNS databases functional and up to date. With Dynamic DNS, clients can automatically update their own records in DNS, depending on the security settings of the zone.
It is important to note that only Windows 2000/XP and higher clients support dynamic updates and that down-level (NT/9x) clients must have DHCP configured properly in order for them to be updated in DNS. There are, however, security issues associated with this functionality that will be detailed in subsequent sections of this chapter and will be described further in Chapter 10, “DHCP/WINS/Domain Controllers.”
The Time to Live (TTL) value for a server is the amount of time (in seconds) that a resolver or name server will keep a cached DNS request before requesting it again from the original name server. This value helps to keep the information in the DNS database relevant. Setting TTL levels is essentially a balancing act between the need for updated information and the need to reduce DNS query traffic across the network.
In the example from the “Iterative Queries” section, if Client1 already requested the IP of www.microsoft.com, and the information was returned to the DNS server that showed the IP address, it would make sense that that IP address would not change often and could therefore be cached for future queries. The next time another client requests the same information, the local DNS server will give that client the IP address it received from the original Client1 query as long as the TTL has not expired. This helps to reduce network traffic and improve DNS query response time.
The TTL for a response is set by the name server that successfully resolves a query. In other words, you may have different TTLs set for items in a cache, based on where they were resolved and the TTL for the particular zone they originated from.
The TTL setting for a zone is modified via the SOA record. The procedure for doing this in Windows Server 2003 is as follows:
Open the DNS MMC snap-in (Start, Administrative Tools, DNS).
Find the SOA record for the zone and double-click it.
Modify the Minimum (Default) TTL entry to match the TTL you want, as shown in Figure 9.15.
Click OK to accept the changes.
One of the main problems with a Dynamic DNS implementation lies with the security of the update mechanism. If no security is enforced, nothing will prevent malicious users from updating a record for a server, for example, to redirect it to their own IP address. For this reason, dynamic updates are, by default, turned off on new standard zones that are created in Windows Server 2003. However, with AD-integrated DNS zones, a mechanism exists that will allow clients to perform secure dynamic updates. Secure updates utilize Kerberos to authenticate users and ensure that only those clients that created a record can subsequently update the same record.
If you’re using DHCP to provide secure updates, one important caveat is that DHCP servers should not be located on the domain controller, if possible, because of specific issues in regard to secure updates. The reason for this recommendation is that all DHCP servers are placed in a group known as DNSUpdateProxy. Any members of this group do not take ownership of items that are published in DNS. This group was created because DHCP servers often dynamically publish updates for clients automatically, and the clients would need to modify their entries themselves. Subsequently, the first client to access a newly created entry would take ownership of that entry. Because domain controllers create sensitive SRV records and the like, it is not wise to use a domain controller as a member of this group, and it is subsequently not wise to have DHCP on domain controllers for this reason. If establishing DHCP on a domain controller is unavoidable, it is recommended to disable this functionality by not adding the server into this group.
DNS RRs often become stale, or no longer relevant, as computers are disconnected from the network or IP addresses are changed without first notifying the DNS server. The process of scavenging those records removes them from a database after their original owners do not update them. Scavenging is not turned on, by default, but this feature can be enabled in Windows Server 2003 by following these steps:
Open the DNS MMC snap-in (Start, Administrative Tools, DNS).
Right-click the server name and choose Properties.
Select the Advanced tab.
Check the Enable Automatic Scavenging of Stale Records box.
Select a scavenging period, as shown in Figure 9.16, and click OK to save your changes.

Scavenging makes a DNS database cleaner, but aggressive scavenging can also remove valid entries. It is therefore wise, if you’re using scavenging, to strike a balance between a clean database and a valid one.
By default, a DNS installation includes a listing of Internet-level name servers that can be used for name resolution of the .com, .net, .uk, and like domain names on the Internet. When a DNS server cannot resolve a query locally in its cache or in local zones, it consults the Root Hints list, which indicates which servers to begin iterative queries with.
The Hints file should be updated on a regular basis to ensure that the servers listed are still relevant. This file is located in \%systemroot%system32DNScache.dns and can be updated on the Internet at the following address:
ftp://ftp.rs.internic.net/domain/named.cache
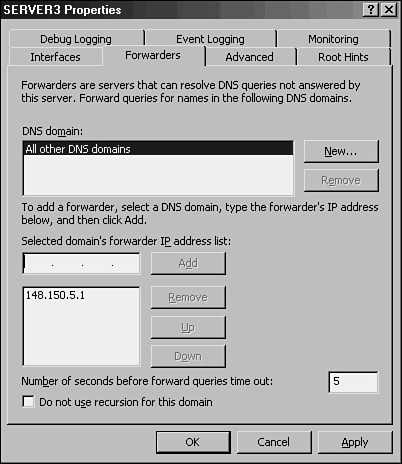
Forwarders are name servers that handle all iterative queries for a name server. In other words, if a server cannot answer a query from a client resolver, servers that have forwarders simply forward the request to an upstream forwarder that will do the iterative queries to the Internet root name servers. Forwarders are used often in situations in which an organization utilizes the DNS servers of an ISP to handle all name-resolution traffic. Another common situation occurs when Active Directory’s DNS servers handle all internal AD DNS resolution but forward outbound DNS requests to another DNS environment within an organization, such as a legacy Unix BIND server.
In conditional forwarding, queries that are made to a specific domain or set of domains are sent to a specifically defined forwarder DNS server. This type of scenario is normally used to define routes that internal domain resolution traffic will follow. For example, if an organization controls the companyabc.com domain namespace and the companyxyz.com namespace, it may want queries between domains to be resolved on local DNS servers, as opposed to being sent out to the Internet just to be sent back again so that they are resolved internally.
Forward-only servers are never meant to do iterative queries, but rather to forward all requests that cannot be answered locally to a forwarder or set of forwarders. If those forwarders do not respond, a failure message is generated.
If you plan to use forwarders in a Windows Server 2003 DNS environment, you can establish them by following these steps:
Open the DNS MMC snap-in (Start, Administrative Tools, DNS).
Right-click the server name and choose Properties.
Select the Forwarders tab.
In the DNS Domain box, determine whether conditional forwarders will be established. If so, add them by clicking the New button.
Add the IP address of the forwarders into the Selected Domain’s Forwarder IP Address List box, as shown in Figure 9.17.
If this server will be configured only to forward, and to otherwise fail if forwarding does not work, check the Do Not Use Recursion for This Domain box.
Click OK to save the changes.
In environments with a significant investment in WINS lookups, the WINS database can be used in conjunction with DNS to provide for DNS name resolution. If a DNS query has exhausted all DNS methods of resolving a name, a WINS server can be queried to provide for resolution. This method creates several WINS RRs in DNS that are established to support this approach.
To enable WINS to assist with DNS lookups, follow these steps:
Windows Server 2003’s implementation of Active Directory expands upon the advanced feature set that Windows 2000 DNS introduced. Several key functional improvements were added, but the overall design and functionality changes have not been significant enough to change any Windows 2000 design decisions that were previously made regarding DNS. The following sections describe the functionality introduced in Windows 2000 DNS that has been carried over to Windows Server 2003 DNS and helps to distinguish it from other DNS implementations.
The most dramatic change in Windows 2000’s DNS implementation was the concept of directory-integrated DNS zones, known as AD-integrated zones. These zones were stored in Active Directory, as opposed to in a text file as in standard DNS. When the Active Directory was replicated, the DNS zone was replicated as well. This also allowed for secure updates, using Kerberos authentication, as well as the concept of multimaster DNS, in which no one server is the master server and all DNS servers contain a writable copy of the zone.
Windows Server 2003 utilizes AD-integrated zones, but with one major change to the design. Instead of storing the zone information directly in the naming contexts of Active Directory, it is stored in the application partition to reduce replication overhead. You can find more information on this concept in the following sections.
As previously mentioned, dynamic updates, using Dynamic DNS (DDNS), allow clients to automatically register and unregister their own host records as they are connected to the network. This concept was a new feature with Windows 2000 DNS and is carried over to Windows Server 2003.
Introduced in Windows 2000 and supported in Windows Server 2003, Unicode support of extended character sets enables DNS to store records written in Unicode, or essentially multiple character sets from many different languages. This functionality essentially allows the DNS server to utilize and perform lookups on records that are written with nonstandard characters, such as underscores, foreign letters, and so on.
Note
Although Microsoft DNS supports Unicode characters, it is best practice that you make any DNS implementation compliant with the standard DNS character set so that you can support zone transfers to and from non-Unicode–compliant DNS implementations such as Unix BIND servers. This includes a–z, A–Z, 0–9, and the hyphen (-) character.
In addition to the changes in Windows 2000 DNS, the Windows Server 2003 improvements help to further establish DNS as a reliable, robust name-resolution strategy for Microsoft and non-Microsoft environments. An overall knowledge of the increased functionality and the structural changes will help you to further understand the capabilities of DNS in Windows Server 2003.
Perhaps the most significant change in Windows Server 2003’s DNS, Active Directory–integrated zones are now stored in the application partition of the AD. For every domain in a forest, a separate application partition is created and is used to store all records that exist in each AD-integrated zone. Because the application partition is not included as part of the global catalog, DNS entries are no longer included as part of global catalog replication.
Previously, in Windows 2000, all AD-integrated zones were stored as global catalog objects and replicated to all global catalog servers in an entire forest. Many times, this information was not applicable across the entire forest, and unnecessary replication traffic was created. Subsequently, the application partition concept was enacted, and replication loads are now reduced, while important zone information is delegated to areas of the network where they are needed.
The Configure a DNS Server Wizard, as demonstrated in “Installing DNS Using the Configure Your Server Wizard” section, allows for the automatic creation of a DNS zone through a step-by-step wizard. This feature greatly eases the process of creating a zone, especially for Active Directory. The wizard can be invoked by right-clicking on the server name in the DNS MMC and choosing Configure a DNS Server.
Windows 2000 previously had a well-documented issue that was known as the “island” problem, which was manifested by a DNS server that pointed to itself as a DNS server. If the IP address of that server changed, the DNS server updated its own entry in DNS, but then other DNS servers within the domain were unable to successfully retrieve updates from the original server because they were requesting from the old IP address. This effectively left the original DNS server in an “island” by itself, hence the term.
Windows Server 2003 DNS first changes its host records on a sufficient number of other authoritative servers within DNS so that the IP changes made will be successfully replicated, thus eliminating this “island” problem. As a result, it is no longer necessary to point a root DNS server to another DNS server for updates, as was previously recommended as a method of resolving this issue.
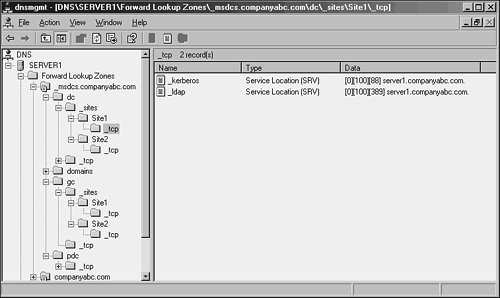
In Active Directory, all client logons and lookups are directed to local domain controllers and global catalog servers through references to the SRV records in DNS. These SRV records were stored in a subdomain to an Active Directory domain that was known as the _msdcs subdomain.
In Windows Server 2003, _msdcs has been relocated to become a separate zone in DNS, as shown in Figure 9.18. This zone, stored in the application partition, is replicated to every domain controller that is a DNS server. This listing of SRV records was moved mainly to satisfy the requirements of remote sites. In Windows 2000, these remote sites had to replicate the entire DNS database locally to access the _msdcs records, which led to increased replication time and reduced responsiveness. If you delegate the SRV records to their own zone, only this specific zone can be designated for replication to remote site DNS servers, saving replication throughput and increasing the response time for clients.

DNS is inseparable from Active Directory. In fact, the two are often confused for one another because of the similarities in their logical structures.
Active Directory uses a hierarchical X.500-based structure that was designed to map into the DNS hierarchy, hence the similarities. In addition, Active Directory utilizes DNS for all internal lookups, from client logins to global catalog lookups. Subsequently, strong consideration into how DNS integrates with Active Directory is required for those considering deploying or upgrading AD.
As any Windows 2000 administrator can attest, problems with DNS can spell disaster for an Active Directory environment. Because all servers and clients are constantly performing lookups on one another, a break in name-resolution service can severely affect Active Directory activity.
For this and other reasons, installing a redundant DNS infrastructure in any Active Directory implementation is strongly recommended. Even smaller environments should consider duplication of the primary DNS zone, and nearly as much emphasis as is put into protecting the global catalog AD index should be put into protecting DNS.
Security considerations for the DNS database should not be taken for granted. Secure updates to AD-integrated zones are highly recommended, and keeping DHCP servers off a domain controller can also help to secure DNS. (See previous sections of this chapter for more details on this concept.) In addition, limiting administrative access to DNS will help to mitigate problems with unauthorized “monkeying around” with DNS.
Active Directory was specifically written to be able to co-exist and, in fact, utilize a non-Microsoft DNS implementation as long as that implementation supports active updates and SRV records. For example, AD will function in all versions of Unix BIND 8.1.2 or higher. With this point in mind, however, it is still recommended that an organization with a significant investment in Microsoft technologies consider hosting Active Directory DNS on Windows Server 2003 systems because functionality enhancements provide for the best fit in these situations.
For environments that use older versions of DNS or are not able (or willing) to host Active Directory clients directly in their databases, Active Directory DNS can simply be delegated to a separate zone in which it can be authoritative. The Windows Server 2003 systems can simply set up forwarders to the foreign DNS implementations to provide for resolution of resources in the original zone.
Certain situations in Active Directory require the use of secondary zones to handle specific name resolution. For example, in peer-root domain models, where two separate trees form different namespaces within the same forest, secondaries of each DNS root were required in Windows 2000 to maintain proper forest-wide synchronization.
Because each tree in a peer-root model is composed of independent domains that may not have security privileges in the other domains, a mechanism will need to be in place to allow for lookups to occur between the two trees. The creation of secondary zones in each DNS environment will provide a solution to this scenario, as illustrated in Figure 9.19. Windows Server 2003 now has the option of replicating these separate trees to all DNS servers in the forest, reducing the need for secondaries. Replicating secondary zones outside of a forest is still sometimes necessary, however.

All Active Directory clients use DNS for any type of domain-based lookups. Logins, for example, require lookups into the Active Directory for specific SRV records that indicate the location of domain controllers and global catalog servers. Windows Server 2003, as previously mentioned, divides the location of the SRV records into a separate zone, which is replicated to all domain controllers that have DNS installed on them.
Subdomains for each site are created in this zone; they indicate which resource is available in those specific sites. In a nutshell, if an SRV record in the specific site subdomain is incorrect, or another server from a different site is listed, all clients in that site are forced to authenticate in other sites. This concept is important because a common problem is that when Active Directory sites are created before they are populated with servers, an SRV record from the hub location is added to that site subdomain in DNS. When a new server is added to those sites, their SRV records join the other SRV records that were placed there when the site was created. These records are not automatically deleted, and they consequently direct clients to servers across slow WAN links, often making login times very slow.
In addition to the site containers, the root of these containers contains a list of all domain controllers in a specific domain, as shown in Figure 9.20. These lists are used for name resolution when a particular site server does not respond. If a site domain controller is down, clients randomly choose a domain controller in this site. It is therefore important to make sure that the only entries in this location are servers in fast-connected hub sites. Proper grooming of these SRV records and placement of servers into their proper site subdomains will do wonders for client login times.
Much has been written about the complexity of DNS, and even more confusion and misconceptions have been written about it. In truth, however, DNS structure is logical, so you can easily troubleshoot it, if you use the proper tools and techniques. A good grasp of these tools and their functionality is a must for proper name-resolution troubleshooting with DNS.
As any good administrator will know, the Event Viewer is the first place to look when troubleshooting. Windows Server 2003 makes it even more straightforward to use because DNS Events compiled from the Event Viewer are immediately accessible from the DNS MMC console. Parsing this set of logs can help you troubleshoot DNS replication issues, query problems, and other issues.
For more advanced Event Log diagnosis, you can turn on Debug Logging on a per-server basis. It is recommended that this functionality be turned on only as required, however, as log files can fill up fast. To enable Debug Logging, follow these steps:
Performance Monitor is a built-in, often-overlooked utility that allows for a great deal of insight into issues in a network. In regard to DNS, many critical DNS counters can be monitored relating to queries, zone transfers, memory utilization, and other important factors.
Windows 2000 and higher clients have a built-in client cache for name resolution that caches all information retrieved from name servers. When requesting lookups, the client resolver parses this cache first, before contacting the name server. Items remain in this cache until the TTL expires, the machine is rebooted, or the cache is flushed. In cases where erroneous information has been entered into the client cache, it can be flushed by typing ipconfig /flushdns at the command prompt.
By default, all clients have a file named HOSTS that provides for a simple line-by-line resolution of names to IP addresses. This file is normally located in \%systemroot% system32driversetc. Problems can occur when these manual entries conflict with DNS, and it is therefore wise to ensure that there are not conflicts with this HOSTS file and the DNS database when troubleshooting.
The NSLOOKUP command-line utility is perhaps the most useful tool for DNS client troubleshooting. Its functionality is basic, but the information obtained can do wonders for helping to understand DNS problems. NSLOOKUP, in its most basic operation, contacts the default DNS server of a client and attempts to resolve a name that is inputted. For example, to test a lookup on www.companyabc.com, type nslookup www.companyabc.com at the command prompt. Different query types can be also input into NSLOOKUP. For example, you can create simple queries to view the MX and SOA records associated with a specific domain by following these steps, which are illustrated in Figure 9.21.

Open a command-prompt instance by choosing Start, All Programs, Accessories, Command Prompt.
Type
nslookupand press Enter.Type
set query=mxand press Enter.Type
<domainname>and press Enter.Type
set query=soaand press Enter.Type
<domainname>and press Enter.
NSLOOKUP’s functionality is not limited to these simple lookups. Performing an nslookup /? lists the many functions it is capable of. NSLOOKUP is a tool of choice for many name-resolution problems and is a must in any troubleshooter’s arsenal.
Another important tool for DNS resolution problems is the IPCONFIG utility, the same utility used for common TCP/IP issues. There are several key functions that IPCONFIG offers in regard to DNS. These functions can be invoked from the command prompt with the right flag, detailed as follows:
ipconfig /flushdns—. If you experience problems with the client-side cache, the cache itself can be “flushed” through the invocation of theflushdnsflag. This removes all previously cached queries that a client may be storing and is particularly useful if a server name has just changed IP addresses and particular clients have trouble connecting to it.ipconfig /registerdns—. Theregisterdnsflag forces the client to dynamically reregister itself in DNS, if the particular zone supports dynamic updates.ipconfig /displaydns—. An interesting but not well-known flag isdisplaydns. This flag displays the contents of the client-side cache and is useful for troubleshooting specific issues with individual records.
Note
These three flags, as well as a few others, are available only in Windows 2000 or higher clients. Previous clients such as NT 4.0 were limited to more basic functionality with IPCONFIG, and other clients such as Win9x clients used a different utility known as WINIPCFG. As with any utility, more advanced functionality can be unearthed by invoking the utility with a ? flag (ipconfig /?).
The TRACERT utility is a valuable resource that gives you an idea of the path that a DNS query takes when being sent over a network. By directing TRACERT at www.microsoft.com, for example, you can get an idea of how many routers and DNS servers the packet is crossing. The way that TRACERT works is simple, but actually quite interesting. A DNS query that has a TTL of 1 is sent out. Because all routers are supposed to drop the TTL by 1 on each packet that they process, this means that the first router will refuse to forward the packet and send that refusal back to the originator. The originating machine then increments the TTL by 1 and resends the packet. This time the packet will make it past the first router and get refused by the second. This process continues until the destination is met, as illustrated in Figure 9.22. Needless to say, using this command-line utility is a simple yet effective way of viewing the path that a DNS query takes as it crosses the Internet.

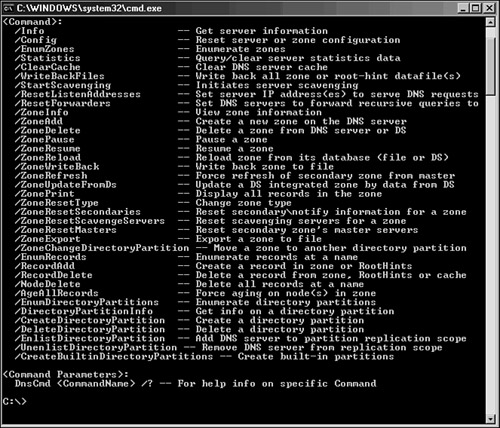
The DNSCMD utility is essentially a command-line version of the MMC DNS console. Installed as part of the Windows Server 2003 Support tools, this utility allows administrators to create zones, modify records, and perform other vital administrative functions. To install the support tools, run the support tools setup from the Windows Server 2003 CD (located in the support ools directory). You can view the full functionality of this utility by typing DNSCMD /? at the command line, as illustrated in Figure 9.23.
DNS has proven itself over time to be a robust, dependable, and extremely scalable solution to name resolution. Windows Server 2003 takes DNS to the next level and builds on the enhancements introduced with Windows 2000 DNS. Whether using DNS for a full-fledged Active Directory implementation or simply setting up an Internet DNS presence, Windows Server 2003’s DNS builds on a successful, road-tested base to provide for a functional, reliable enterprise name-resolution strategy.
Use Windows 2000/2003 DNS whenever possible to support Active Directory. If you must use a non-Windows DNS to host the AD Zone, ensure that it supports SRV records, such as with BIND version 8.1.2 or higher.
Establish a caching-only server in small branch office situations to alleviate large amounts of client query traffic across the network and to eliminate the need to replicate entire DNS zones to remote locations.
Configure DHCP to dynamically update DNS information for down-level clients if dynamic records are necessary.
Identify the sources of dynamically updated information to prevent problems with reliability.
Configure a DNS server to point to itself for DNS queries rather than to another DNS server.
Make any DNS implementation compliant with the standard DNS character set so that you can support zone transfers to and from non-Unicode–compliant DNS implementations such as Unix BIND servers. This includes a–z, A–Z, 0–9, and the hyphen (-) character.
Turn on Debug Logging on a per-server basis for more advanced DNS Event Log diagnosis only when required, and turn off this functionality when it’s no longer necessary.