
Working with the Dopesheet
So you have a rigged character that you want to animate. Awesome! Change your screen layout to the Animation layout (Ctrl+←![]() Ctrl+←). After that, the first thing that you're probably going to want to do is change the primary 3D View to solid viewport shading (Z), change the Translate manipulator to the Rotate manipulator, and set it to Normal orientation (Alt+spacebar
Ctrl+←). After that, the first thing that you're probably going to want to do is change the primary 3D View to solid viewport shading (Z), change the Translate manipulator to the Rotate manipulator, and set it to Normal orientation (Alt+spacebar![]() Normal). You should switch to Normal orientation because when you're animating with an armature, most of the time, you're animating bone rotations. By setting the Rotation manipulator to the Normal coordinate space, you can have quick, controlled transformation of bone rotations without having the 3D manipulator get in your way too much.
Normal). You should switch to Normal orientation because when you're animating with an armature, most of the time, you're animating bone rotations. By setting the Rotation manipulator to the Normal coordinate space, you can have quick, controlled transformation of bone rotations without having the 3D manipulator get in your way too much.
The next thing you need to pay attention to is the Dopesheet. As nice as seeing the Graph Editor may be, seeing all the f-curves for each object and each bone in your scene can quickly get overwhelming. The Timeline shows keys for multiple objects in a simplified way, but you don't have a good way to see which key belongs to which object, and the Timeline provides no tools for actually editing these keyframes. You need a different editor — one that gives you a big picture of the keyframes for multiple objects and bones in your animation. And, perhaps more important, this editor allows you to edit the timing of bones, objects, and properties individually. The Dopesheet, (Shift+F12), shown in Figure 12-1, fills those needs.
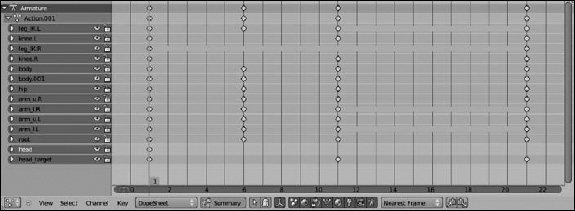
 In traditional animation, the dope sheet was the entire animation planned out, frame by frame on paper, prior to a single pencil line being drawn by the animator. In computer animation, it's taken on a slightly different meaning and purpose, but the core notion of being able to see your entire animation all at once is still there. When you have elements in your scene animated, the Dopesheet shows a channel for each keyed bone, object, and property.
When it comes to editing the overall timing of a character's performance, the Dopesheet is really the tool for the job.
![]() Like selecting in other parts of Blender, you can select individual keyframes by right-clicking the diamond-shaped keyframe indicator. You can select multiple keyframes in a variety of ways. You can use the familiar Shift+right-click or Border Select (B) functions. However, another way to select keyframes is incredibly helpful. If you have a Dopesheet open and a few keyframes set, right-click any keyframe to select it. Now, with that key selected, press K. This action selects any other key in the armature that's on the same frame as your selected key. This selection method is called a column key selection, and it's also available in the Graph Editor. You can get similar functionality with the time cursor. If you place your time cursor on a column of keys and press Ctrl+K, that column of keys is selected, rather than the column with your original selected keys.
Like selecting in other parts of Blender, you can select individual keyframes by right-clicking the diamond-shaped keyframe indicator. You can select multiple keyframes in a variety of ways. You can use the familiar Shift+right-click or Border Select (B) functions. However, another way to select keyframes is incredibly helpful. If you have a Dopesheet open and a few keyframes set, right-click any keyframe to select it. Now, with that key selected, press K. This action selects any other key in the armature that's on the same frame as your selected key. This selection method is called a column key selection, and it's also available in the Graph Editor. You can get similar functionality with the time cursor. If you place your time cursor on a column of keys and press Ctrl+K, that column of keys is selected, rather than the column with your original selected keys.
 Initially, you may not think that column key selection is all that useful. However, if you think about the process used for animating — especially cartoon-style animation — it starts making more sense. The workflow for animation usually goes from one pose to the next. At each pose that you key, multiple bones are all keyed at the same time, forming a column in the Dopesheet. In fact, unless you're doing some kind of frantic, shaky animations, it's a pretty good practice to make sure that you have nice columns in your Dopesheet. Uneven columns tend to indicate that your timing may be off on a specific part of the rig. Of course, this suggestion is a guideline more than a hard-and-fast rule.
After they're selected, you can manipulate keyframes with grabbing (G) and scaling (S). When performing these actions, there's something you should pay attention to. First of all, when you scale selected keyframes, the scale is relative to the position of the time cursor in the Dopesheet. So if you want to increase the length of your animation by stretching out the keyframes, put your time cursor at frame 1 before scaling. If you place your time cursor in the middle or at the end, the keys at the beginning of your animation are arranged so that they take place before your animation starts — typically what you don't want, so be careful.
By default, the Dopesheet has Nearest Frame snapping enabled. So when grabbing (G) or scaling (S), your keys snap to the frame to which they are closest. If you disable snapping from the snaps drop-down menu in the Dopesheet's header by changing it to No Auto-Snap, Blender stops this behavior and allows you to place keys between frames. However, you normally don't want this behavior. If you do have keys located in between frames, you can quickly fix that with the Snap Keys feature. Select the keys you want to fix in the Dopesheet and press Shift+S.
You have four options in this menu:
- Current Frame: This option snaps selected keys to the location of the time cursor in the Dopesheet.
- Nearest Frame: Choosing this option takes the selected keys and shifts them to the even frame number that's closest to them.
- Nearest Second: Like the Nearest Frame operation, but this option snaps the selected keys to the nearest frame that's at the start of a second in time.
- Nearest Marker: Blender's Dopesheet allows you to place reminders on the timeline referred to as markers. You can add a new marker at the location of the timeline cursor by pressing M in the Dopesheet with your mouse cursor near the bottom of the graph area. If you have one or more of these markers on your timeline, choosing this option snaps selected keyframes to the marker that's nearest to it.
Generally, though, it's best practice to use Blender's auto-snap feature that's enabled by default. You can change the auto-snap method by left-clicking the drop-down menu on the far right of the Dopesheet's header. This menu has almost all the same options as the preceding list. The only difference is the Time Step option, which snap keys to one-frame increments from their initial locations rather than to exact frames.