
The web frontend is an acceptable tool for making configuration changes to a Zabbix server, unless you have to make lots of modifications, which are not made easier in the frontend with methods such as mass update. One simple method is exporting configuration to an XML file, making some changes, and importing it back in.
XML import/export is very often used to share templates—you can find a large number of those on https://zabbix.org and http://share.zabbix.com.
Let's look at how a simple roundtrip would work.
In the frontend, open Configuration | Templates and select Custom Templates in the Group dropdown. Mark the checkbox next to C_Template_Email and click on the Export button at the bottom. Your browser will offer to save a file called zbx_export_templates.xml—save it somewhere on your local machine.
Now, with the file in hand, we can modify the configuration. This method gives us free rein on host and host-attached information, so modifications are limited only by Zabbix's functionality and our imagination. At this time, the following entities are available for XML export and import:
- Hosts
- Templates
- Host groups
- Network maps
- Map images (icons and backgrounds)
- Screens
- Value maps
Out of these, host groups and images are only exported indirectly. For hosts, all of their properties and sub-entities are exported and imported, except the web scenarios (this functionality might be available in Zabbix 3.2). Host groups are exported together with hosts or templates, and when exporting a map, the images used in it are exported in the same file. It is possible to import both a single type of entity and any number and combination of them in the same XML file.
Open the saved XML export in your favorite editor. In this file, you'll see all the data that this host has, and the file will start like this:
<?xml version="1.0" encoding="UTF-8"?>
<zabbix_export>
    <version>3.0</version>
    <date>2015-11-29T05:08:14Z</date>
    <groups>
        <group>
            <name>Custom templates</name>
        </group>
    </groups>
    <templates>
        <template>
            <template>C_Template_Email</template>
In this case, each template is contained in a <template> block, which in turn has blocks for all the things attached to that template. The format is simple, and most things should be obvious simply from taking a glance at the XML and maybe sometimes by comparing values in XML with values in the frontend configuration section. An exception might be the values available for each field. Those can often be gleaned from the API documentation, which we will cover in a moment.
While we look at the exported template, we can see the same information that an exported host would have, including template linkage—that's what the second nested <templates> block denotes.
While manually making a single change to an exported file can be handy, it's the large changes that expose the benefit of this approach best. As the most simple approach to creating an XML file, we can use shell scripts.
For example, if we had to add a lot of similar items, we could script an XML file with them all and import them in one go. The easiest approach would be to create some items in the frontend, export that host, and write a quick script that loops over these item definitions and creates the remaining items. The same can be done for triggers and custom graphs as well. Again, it's best to create all data for a single element, export it, and examine it to find out how it should be put back together.
Tip
Unless individual entities are to be modifiable, consider using a custom LLD rule, as covered in Chapter 12, Automating Configuration.
Other larger-scale problems that can be solved by an XML roundtrip are:
- Adding lots of devices: If you are given a large list of switches with IP addresses, adding them all through the interface is a monstrous task. With XML, it becomes a very easy and quick one instead. To do that, simply create a single host, linked against the previously created template or several ones, and then export it to get some sort of a template. In this export, you'll basically have to change a couple of values only—notably, the connection details in the
<interfaces>element. Then, just proceed to create a loop that creates new<host>entries with the corresponding IP and hostname data. Note that it is enough to only specify host information in this file—all items, triggers, graphs, and other entities will be attached based on the information that is contained in the template or templates specified in the<templates>block. - Creating many graphs with lots of arbitrary items: Sometimes, it might be required to create not only one graph per port, but also graphs grouping items from several devices and other arbitrary collections. Export an example host and script graph items in a loop—these are located in the
<graph_elements>block.
For our first XML export/import, we won't do large-scale scripting. Instead, let's make a simple modification. In the saved zbx_export_templates.xml file, find the item block with the key net.tcp.service[smtp]. An item block starts with an <item> tag and ends with an </item> tag. Copy this item block and insert it below the existing block, and then change the item name to POP3 server status and key to net.tcp.service[pop3].
Save this as a new file. Now on to the actual import process. Back in the frontend, in the Configuration | Templates section, click on Import in the upper right-hand corner. In this form, click on the Choose next to the Import file field and choose the saved file. Feel free to explore the Rules section, although the defaults will do for us. The only type of entities we are interested in are missing items, and the respective checkbox in the CREATE NEW column next to Items is already marked.
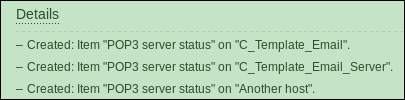
Click on Import to proceed. This should complete successfully, so click on Details in the upper-left corner. While all other records will be about updating, there should be two entries about an item being created. These will be the only ones that make any changes, as all the updates do nothing—the data in the XML file is the same as in the database. As we are adding this item for a template, it also gets added to all other hosts and templates that are linked against this one:
Let's verify that this item was added with the key we used in the XML file. Navigate to Configuration | Hosts, make sure Linux servers is selected in the Group dropdown, and click on the Items link next to the Another host entry. Our new item should be visible in the item list, showing that it has been correctly added to the linked host. Remember that we only added it to the upstream template in our import process:
One of the possible problems to solve using XML importing is creating a larger number of hosts. We could use a hackish script like this to generate a Zabbix host XML out of a CSV file:
#!/bin/bash

split="%"
agent_port=10050
useip=1

[[ -s "$1" ]] || {
        echo "Usage: pass an input CSV file as the first parameter
File should contain data in the following format: hostname,dns,ip,hostgroup,linked_template,agent_port
agent_port is optional
For groups and templates multiple entries are separated with %
First line is ignored (assuming a header)"
        exit 1
}

echo "<?xml version="1.0" encoding="UTF-8"?>
<zabbix_export>
    <version>3.0</version>
    <date>$(date "+%Y-%m-%dT%H:%M:%SZ")</date>
    <hosts>"
while read line; do
        hostname=$(echo $line | cut -d, -f1)
        dns=$(echo $line | cut -d, -f2)
        ip=$(echo $line | cut -d, -f3)
        group=$(echo $line | cut -d, -f4)
        template=$(echo $line | cut -d, -f5)
        port=$(echo $line | cut -d, -f6)

        hostname1=${hostname%"}
        dns1=${dns%"}
        ip1=${ip%"}
        group1=${group%"}
        template1=${template%"}
        port1=${port%"}

        hostgroups=$(echo $group1 | tr "$split" "
")
        templates=$(echo $template1 | tr "$split" "
")

        echo "        <host>
            <host>$(echo ${hostname1#"})</host>
            <name>$(echo ${hostname1#"})</name>
            <status>0</status>
            <description/>
            <proxy/>
            <ipmi_authtype>-1</ipmi_authtype>
            <ipmi_privilege>2</ipmi_privilege>
            <ipmi_username/>
            <ipmi_password/>
            <tls_connect>1</tls_connect>
            <tls_accept>1</tls_accept>
            <tls_issuer/>
            <tls_subject/>
            <tls_psk_identity/>
            <tls_psk/>
            <interfaces>
                <interface>
                    <default>1</default>
                    <type>1</type>
                    <useip>$useip</useip>
                    <ip>${ip1#"}</ip>
                    <dns>${dns1#"}</dns>
                    <port>${port1:-$agent_port}</port>
                    <bulk>1</bulk>
                    <interface_ref>if1</interface_ref>
                </interface>
            </interfaces>"
        echo "            <groups>"
        while read hostgroup; do
                echo "                <group>
                    <name>${hostgroup#"}</name>
                </group>"
        done < <(echo "$hostgroups")
        echo "            </groups>
            <templates>"
        while read hosttemplate; do
                echo "                <template>
                    <name>${hosttemplate#"}</name>
                </template>"
        done < <(echo "$templates")
        echo "            </templates>"
        echo "        </host>"
done < <(tail -n +2 $1)

echo "    </hosts>
</zabbix_export>"
Save this script as csv_to_zabbix_xml.sh and make it executable:
$ chmod 755 csv_to_zabbix_xml.sh
This script takes a CSV file as the input, ignores the first line, and uses all other lines as host entries. We must specify the hostname, DNS, IP, and agent port. Additionally, for each host, we may specify multiple host groups and templates the host should be linked to by delimiting multiple entries with a percent sign. The useip parameter defaults to 1; setting it to 0 will use DNS instead. Notice how we are generating all kind of fields we are not interested in at this time—all the IPMI and TLS fields, setting the bulk parameter for the agent interface. Unfortunately, Zabbix XML exports are unnecessarily verbose, and it expects the same verbosity back. For a larger number of hosts, this will significantly increase the size of the XML file.
To use this file, let's create a simple CSV file called test.csv:
"Host name","Host DNS","Host IP","Host groups","Templates","port"
"test-xml-import","dns.name","1.2.3.4","Linux servers%Zabbix servers","Template ICMP Ping"
We used a header line here, as the first line is always excluded—a single line in a file would not do anything at all. Now, let's run our script:
$ ./csv_to_zabbix_xml.sh test.csv > zabbix_generated_hosts.xml
In the frontend, navigate to Configuration | Hosts, click on Import in the upper-right corner, choose the zabbix_generated_hosts.xml file in the Import file field, and click on Import. The import should be successful—verify that back in Configuration | Hosts. As this host is not very useful right now, feel free to delete it.
When configuring network maps, we had a chance to upload our own icons. It is highly inefficient to upload a lot of images one by one. One could script the process using a utility such as curl, but that requires a new connection to the frontend for every image and could break if the Zabbix interface is changed in future versions. Images are supported in XML import, though, and we may also have a file with just the images. We could write our own script for this, but there is already a script shipped with Zabbix—look for the png_to_xml.sh script in the misc/images directory. This script accepts two parameters: the directory where the images are found and the output filename. For example, if we had images in a directory called map_icons, we would run the script as follows:
./png_to_xml.sh map_icons zabbix_images.xml
To import the images, we would go to any page that has the Import button, such as Configuration | Maps, click the Import button, and mark the checkboxes next to the Images row. Only super admins may import images. Images are exported and imported in base64 format, so there is no binary data in the XML file. An example of an exported image is this:
<encodedImage>iVBORw0KGgoAAAANSUhEUgAAADAAAAAwCAYAAABXAvmHAAAABmJLR0QA/wD/AP+gvaeTAAAM70lEQVR42u2ZeXBV133HP+cub9NDSGIR
...
</encodedImage>
This output is significantly cut—the real base64 value would take a few pages here.