
With some knowledge on how to extract historical and trend data from tables, we might as well continue looking at other interesting, and relatively simple, things that we can find and perhaps even change directly in the database.
We saw how managing users was an easy task using the frontend. But what if you have forgotten the password? What if some remote installation of Zabbix is administered by local staff, and the only Zabbix super admin has left for a month-long trip without a phone and nobody else knows the password? If you have access to the database, you can try to solve such problems. Let's find out what exactly Zabbix stores about users and how. In the MySQL console, execute this:
mysql> select * from users limit 2;
This way, we are listing all data for two users at the most:

That's a lot of fields. We'd better find out what each of them means:
As we can see, many of the fields are options that are accessible from the user profile or properties page, although some of these are not directly available. We mentioned password resetting before; let's look at a simple method to do that. If passwords are stored as MD5 hashes, we must obtain those first. A common method is the command line utility md5sum. Passing some string to it will output the desired result, so we can try executing this:
$ echo "somepassword" | md5sum
531cee37d369e8db7b054040e7a943d3  -
The MD5 hash is printed, along with a minus sign, which denotes standard input. If we had run md5sum on a file, the filename would have been printed there instead.
Now, the problem is that if we try to use this string as a password hash, it will fail. In this case, the hash is calculated on the passed string, including the newline at the end. For the correct version, we have to pass the -n flag to echo, which suppresses the trailing newline:
$ echo -n "somepassword" | md5sum
9c42a1346e333a770904b2a2b37fa7d3  -
Notice the huge difference in the resulting string. Great, now we only have to reset the password.
The following statement changes the Zabbix administrative user password. Do not perform this on a production system, except in an emergency situation:
mysql> update users set passwd='9c42a1346e333a770904b2a2b37fa7d3' where userid=1;
Query OK, 1 row affected (0.01 sec)
Rows matched: 1  Changed: 1  Warnings: 0
From here on, you should be able to log in to the Zabbix frontend as Admin/somepassword—try it out. Feel free to change the password back after that.
There's actually an easier method available. MySQL has a built-in function for calculating MD5 hashes, so all this trickery could be replaced with a simpler approach:
mysql> update users set passwd=MD5('somepassword') where alias='Admin';
We also mentioned making some user a Zabbix super admin. This change is fairly simple—all we have to do is change a single number:
mysql> update users set type=3 where alias='wannabe_admin';
And that's it, the user wannabe_admin will become a Zabbix super admin.
While once the monitoring data has been gathered you usually won't have a need to change it, there might be some rare cases when that might be required. Back in Chapter 3, Monitoring with Zabbix Agents and Basic Protocols, we created items for network traffic monitoring, and we gathered data in bytes, but in network management, usually bits per second are used instead. While it would often be possible for you to simply reconfigure the items and clear the old data, what if you need to preserve already gathered values? Directly editing the database might be the only solution.
Before doing that, you would have to modify the item in question. If data is coming in bytes but we want bits, what do we do? Right, we configure the multiplier for that item and set the multiplier to be 8. Additionally, change units to b (bits) while performing the change.
When performing the change to the item, take a quick look at a clock.
While this will deal with all future incoming values, it will leave us with inconsistent data before that moment. As we do not want to delete it, we must find some way to fix it. Our problem is twofold:
- We have incorrect data in the database
- We have both incorrect and correct data in the database (old and new values)
This means that we can't simply convert all values, as that would break the new, correct ones.
Figuring out the moment when correct information started flowing in can be most easily done by looking at the frontend. Navigate to Monitoring | Latest data, click on History for that item, and then select Values or 500 latest values. Look around the time you changed the item multiplier plus a minute or so, and check for a notable change in the scale. While it might be hard to pinpoint the exact interval between two checks (network traffic can easily fluctuate over eight times in value between two checks), there should be a pretty constant increase in values. Look at the times to the left of the values and choose a moment between the first good value and the last bad value.
But as we now know, all time-related information in the Zabbix database is stored as Unix timestamps. For that, the GNU date command can help again. Execute on the Zabbix server the following, by replacing the exact time with what you deduced from the latest values:
$ date -d "2016-03-13 13:13:13" "+%s"
That will output the Unix timestamp of that moment, which in the case of this example would be 1457867593.
Beware of the difference in time zones, though—values, displayed in the frontend, usually will have the local time zone applied. Check that the value for the timestamp you obtained matches the value in the database for that same timestamp. There is actually an easier and safer way to obtain the value timestamp. While still looking at the value history for the item in the frontend, click the As plain text button in the upper-right corner:
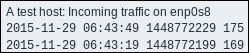
Notice how the third column is exactly what we wanted: the Unix timestamp. In this case, we don't have to worry about the time zone, either.
Now that we know the exact time that limits the change, we must also know which item we must modify for it. Wait, but we do know that already, don't we? Almost. What we need is the item ID to make changes to the database. The easiest way to find that out is by opening the item properties in the configuration section and copying the ID from the URL, like we did before.
By now, we should have two cryptic-looking values:
- The time in Unix timestamp format
- The item ID
What do we have to do now? Multiply by eight all the values for the item ID before that timestamp. With the data we have, it is actually quite simple—in the MySQL console, we would have to execute this:
mysql> update history_uint set value=value*8 where itemid=<our ID> and clock<'<our timestamp>';
We are updating history_uint, because even though the data for the network traffic is a decimal number because of the Store as item option, we dropped the decimal part by storing the data as an integer. See Chapter 3, Monitoring with Zabbix Agents and Basic Protocols, to remind yourself why we did so. This single query should be enough to convert all the old data to bits.