While Windows Phone 7 shares the "Windows" name with other Microsoft products, it does not share the same interface. For example, it does not feature the familiar Start menu or a mouse-centric approach. Instead, the Windows Phone 7 interface has been designed from the ground up to be easy to use, quick, and responsive. This section shows off the interface and talks about how to navigate through the parts of your phone that you will be using frequently.
Turning on your Windows Phone 7 device shows a Lock screen with the date, time, and other information. Use your finger to slide the screen up and reveal the Start screen.

Note
All Windows Phone 7 devices have a Windows, Search, and Back button on the front of the phone, along with a power button and camera button on the sides. The exact placement, however, is up to the phone manufacturer. To locate these buttons on your specific Windows Phone 7 device, consult your user's manual.
The Start screen consists of a variety of live tiles. Each live tile shows information regarding that application on the phone. For example, the Calendar live tile shows your next appointment. The Messaging and Inbox tiles show how many unread messages you have. You can have a virtually unlimited amount of tiles that you can customize by putting them in whatever order or location you'd like. Pressing and holding any tile for a few seconds will highlight it, allowing you to move it around.
Programs that do not have a tile on the Start screen can be accessed by pressing the Arrow icon in the upper-right corner. Pressing the Arrow icon will show the applications list. This list shows all of the applications installed on your phone, allowing you to access any of them. You can also press and hold any icon to bring up a menu that will allow you to pin the app to the Start screen.

You will see a variety of types of screens in the applications you use on your phone. For example, the following screen displays a Pivot view, which is used by many applications to show your configuration options. Pivot views consist of lists with a number of options that are grouped under headings. You can access the following Pivot view by pressing the Settings icon on the applications list.

Within any screen, you may also come across listboxes and checkboxes, as shown in the preceding screenshot. These options behave similarly to how they behave on your computer — however, instead of dropping down a list of options, the listbox (when clicked) displays a list of options to choose from. Checkboxes toggle on or off the setting described in the text next to them.

Another control frequently found in Windows Phone 7 is the slider. A slider control lets you toggle an option on or off. In the example that follows, the Wi-Fi radio has been toggled to On. Pressing the slider again would set the Wi-Fi radio to Off.

Finally, another type of screen you're likely to encounter in Windows Phone 7 is a Panorama view. Like a Pivot view, a Panorama view shows a number of items with a movable background. The example that follows shows the Pictures Hub. The outline of the device represents one page that would be shown in the Panorama view; the user can swipe her finger from side-to-side to bring up the previous or next page.

Using a Windows Phone 7 device is pretty simple. Table QS-1 lists a few finger gestures you will find helpful as you navigate your device's screens.

With the gestures and the interface descriptions listed in Table QS-1, you're now ready to start using your phone. The "Condensed Steps" section that follows will get you up-and-running with common tasks - or you can head over to the chapters in Part 3 to start learning about your device in depth!
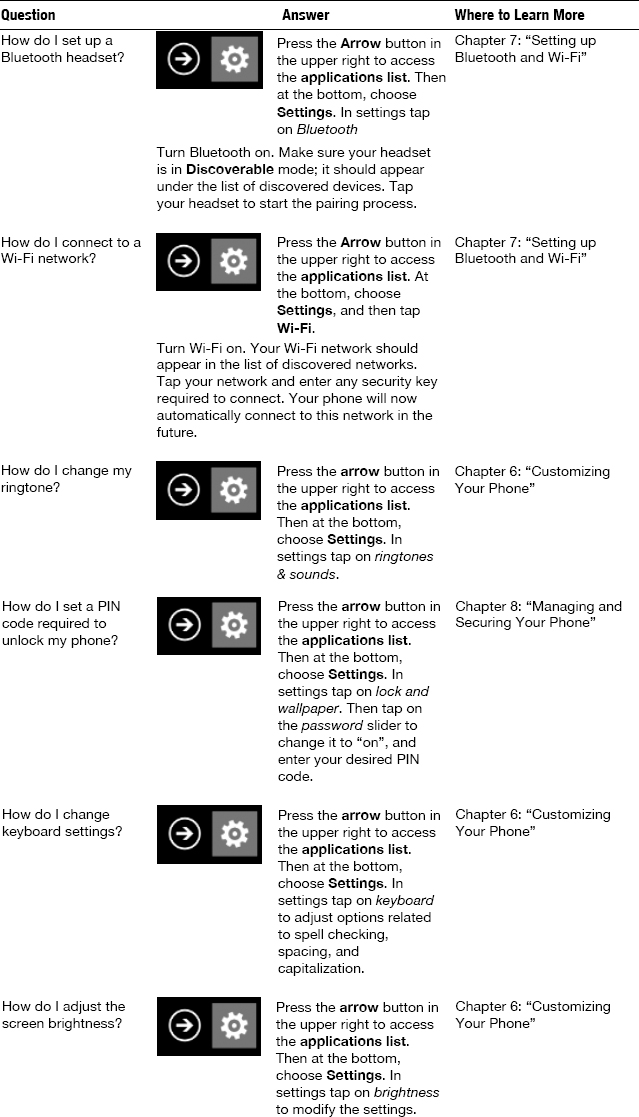
The bulk of this book (Part 3) contains chapters on pretty much anything you'd want to do with your Windows Phone 7 device. As a new Windows Phone user, however, you might have a very specific query (e.g., "How do I set up my Bluetooth headset?") that you simply want me to answer by pointing you in the right direction. This section will do precisely that, using a question-and-answer format. It lists common questions and provides short answers; it also indicates where in Part 3 you can get more information if you need it.
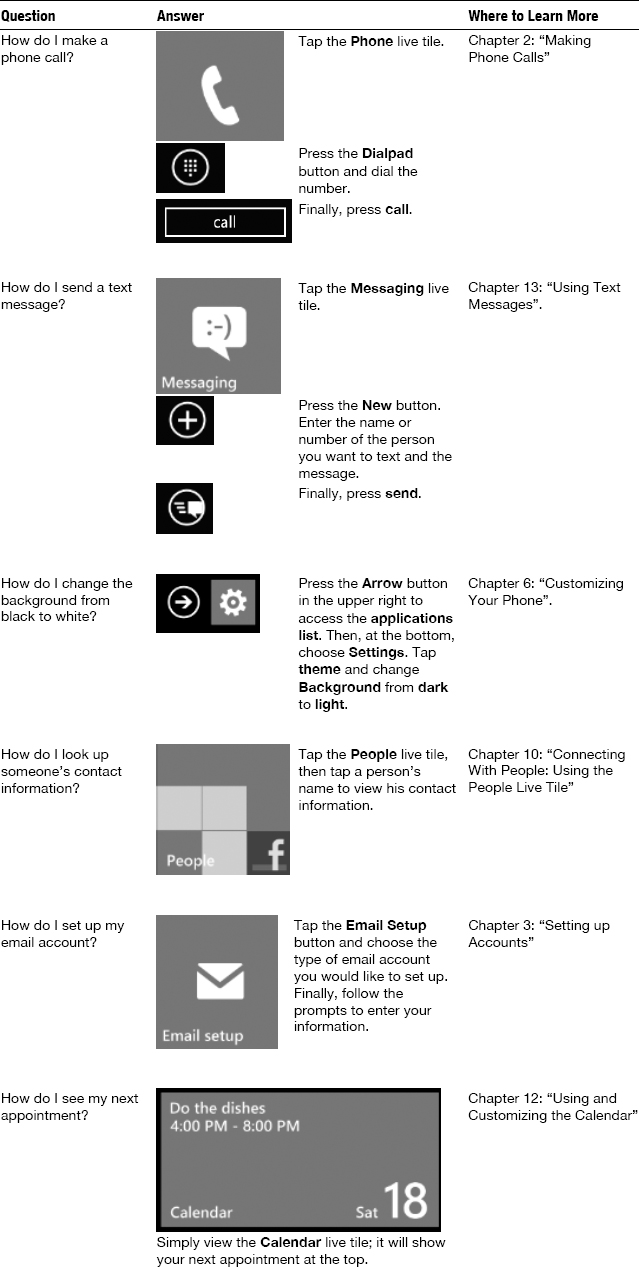
Table QS-3 lists features and functions that you'd expect a smartphone to be capable of; it also explains how to accomplish these tasks on your Windows Phone 7 device.