Often one of the primary uses of our desktop and laptop systems is one we shy away from on a phone: viewing webpages. It is true that transitioning from the large, luxurious monitor we may have at our desk to a smaller, handheld device comes with limitations. However, the latest generation of mobile web browsers (such as Internet Explorer in Windows Phone 7) makes the experience of browsing something to be enjoyed, not feared!
The most basic task is simply to start the browser and head over to a favorite web page. The steps that follow will get you surfing quickly!
Note
Some websites have mobile versions of their pages. This means that the content you see on a smartphone, such as your Windows Phone 7 device, will look substantially different from what you would see on your desktop computer. In some cases, these mobile pages can be disabled—look for a link toward the bottom of the page that reads "Full Site" or "Exit Mobile Version." In other cases, you'll need to change your preferences to view the full site, something we'll explain how to do later in this chapter.
To get started, turn on your device and unlock it. You should be at the Start screen. If not, press the Windows key to return to it. Follow these steps to browse the Web.
Tap the Internet Explorer icon (see Figure 14-1).
The browser will open, showing a screen similar to the one shown in Figure 14-2. We'll discuss what each option does over the next few pages.
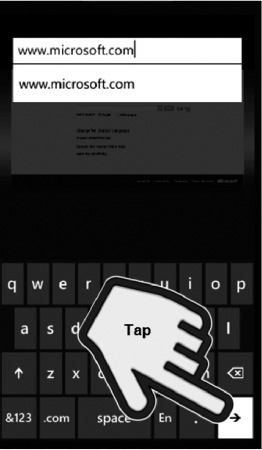
Tap the Address Bar and the on-screen keyboard will appear. Use it to enter a website address. Once you've entered the address, tap the White Arrow button in the lower right (see Figure 14-3), and the browser will go to that page.
To zoom in on any portion of the page, double-tap it. Double-tapping again will zoom out. You can also press-and-drag the screen to view portions of the page not shown while zoomed in, as well as pinch-and-stretch any portion of the screen to zoom in or out gradually. Pinching-and-stretching works just as it sounds—you place two fingers (usually your thumb and forefinger) on the screen and slowly move them together (pinch) or apart (stretch) to change the zoom. You may also find it easier to view a page by rotating your device into Landscape mode, rather than holding it vertically (Portrait mode).
Tip
As you type the address of a website, your Windows Phone 7 device will suggest commonly visited sites to you, allowing you to quickly tap the address of a site to go to it. This list will also show you the addresses of pages you've recently visited, again saving you the time of typing in a complete address!
Yourphone will keep a record of your recent site visits, as well as your favorite sites. This is similar to how your desktop browser behaves. The following steps walk you through how to use and manage your favorite sites and history:
To view your list of favorite websites, tap the Favorites button at the bottom of Internet Explorer's screen (see Figure 14-4).
You can tell the browser to go to any of the pages in the Favorites list by tapping its name.
You can also edit an entry or delete it altogether. Tap and hold the entry until the Edit and Delete options appear (see Figure 14-5). Pressing the Edit button will let you change the name and URL (address) of the entry.
To show your history of recently viewed pages, press the screen and swipe to the left to show the History list (see Figure 14-6). Alternatively, you can tap the partial word "history," and the screen will roll over to display your recently viewed pages.
You can delete your browsing history by tapping the Delete button

Browsing web pages on a computer changed radically when the first browsers to support tabs were introduced. You probably remember using a browser (or perhaps you're still forced to) that doesn't support tabs, spawning several dozen browser windows over the course of a busy work day. Tabs allow you to keep multiple pages open at a time in a single browser instance, which makes switching from page to page a breeze. The following steps walk you through opening multiple tabs and working with them:
From Internet Explorer 's screen (see Figure 14-2), tap the Tabs button.
A screen similar to the one shown in Figure 14-8 will appear, showing your current page in the upper left. Tap the New button to open a new tab.
A new tab will open, showing a gray background and asking you to enter the web address of the site you'd like to open (see Figure 14-9). You'll notice the Tabs button now shows the number of open tabs: two! To browse to a new site, you can either enter the address or select an entry from your Favorites or History. Let's head over to my personal blog, so we can see how it looks on my smartphone!
Now that we've seen my rather boring blog, we decide we probably don't want to keep that tab open! To close a tab, tap the Tab button to bring up the Open tabs screen and tap the Close button

While browsing a page, you can access different options to work with the page you are currently viewing. To get to these options, press the Ellipsis button, as shown in Figure 14-2. Doing so will bring up the following list of options (see Figure 14-11):
The forward option will be available if you recently used the Back button to return to a previous page. It will take you forward to the page you were previously on.
The find on page option will let you search for text on the page you're currently viewing. This is a great tool when you're looking for a specific piece of information!
The pin to start option will let you take your most used pages and put them straight on your Start screen. This is perfect for pages you use frequently, such as traffic or weather information, train schedules, or news websites!
The settings option lets you configure Internet Explorer to behave in certain ways. We'll discuss the available choices in the settings option in more detail in the next section.
Internet Explorer can be configured to behave in certain ways. While you probably will not need to change the default settings (Figure 14-2), the following list describes each choice and why you may want to change it:
Allow cookies on my phone—Despite the tasty sounding nature of this option, cookies to a web browser are seldom as exciting as they are to humans. A cookie is a small piece of information, usually in text form, that a website saves on your computer. This may be your username for the website or your preferences. As mentioned, previously, many mobile versions of websites will store your viewing preferences in a cookie. Other websites won't work well (or even at all) without cookies. However, if you're concerned that a website may be storing information on your phone that you'd rather it didn't (or you notice a website acting strangely on second and subsequent visits), you may want to disable cookies by unchecking this box.
Let Bing suggest sites as I type—Bing is Microsoft's search engine (or, as Microsoft brands it, a decision engine—whatever that is). You may recall I mentioned earlier that, when typing in a web address, Internet Explorer may suggest addresses similar to the one you're typing. normally, this saves you time because it lets you tap directly on the address and browse to the site more quickly; however if you don't like Bing's suggestions, go ahead and uncheck this box.
Website Preference—When Internet Explorer browses to a page, it identifies itself as either a mobile browser or a desktop browser. Selecting Mobile version tells Internet Explorer to identify itself as a smartphone, while selecting Desktop Version tells Internet Explorer to identify itself as a normal desktop web browser. The site may respond differently depending on this setting. For example, it might show a smaller or optimized version of the site if Mobile version is selected, but show a complex version of the site (that may take more time to load) if Desktop version is selected. In some cases, you may want to force Internet Explorer to identify itself as its desktop version; however, in most cases, Mobile Version is probably the best choice.
delete history—We discussed deleting your browsing history previously when we talked about using and managing your list of favorite websites and your browsing history. This button does the same thing as the one we discussed before, but it provides a bit more detail on what exactly it deletes or clears. One thing it does not delete is your list of favorite websites—those will remain after deleting your history!
Privacy Statement—Many people are concerned with how the information they put into a phone will be used, or how a search engine may use the information it collects on their search patterns. This link will take you to Microsoft's official privacy statement, giving you more information on these matters.
As you can see, Internet Explorer on Windows Phone 7 is a powerful web browser that's also easy to use, which makes finding and navigating to your favorite sites quick and easy!


