Since its introduction, Microsoft Excel has grown in both ability and complexity. Today it sports a feature-rich environment for creating everything from to-do lists to multi-sheet ledgers to thousand-line data summaries. On your Windows Phone 7 device, you can use Microsoft Office Excel Mobile to view, create, and edit files that you can then share with colleagues or open on your desktop computer.
Let's begin by firing up Excel Mobile and creating a new file. Follow these steps to do so:
Turn on your phone and unlock it.
Depending on your phone model, you may find Microsoft Office Mobile on the Start screen, or you may have to press the Arrow icon in the upper right to show the applications list. Find the entry for Office and tap it (see Figure 19-1).
A screen similar to that shown in Figure 19-2 will appear, showing Microsoft Office Mobile OneNote. Press the screen, hold, and swipe to your left to bring up the Documents screen.
Once the Documents screen displays, tap new document (see Figure 19-3) and choose Excel Workbook.
At this point, you will see a blank spreadsheet that displays rows and columns (see Figure 19-4).


You probably won't be creating any thousand-line spreadsheets on your phone, but you can use Excel Mobile to create useful and dynamic spreadsheets wherever you are. In the steps that follow, you'll learn how to enter data into cells, use formulas, and format a cell:
Follow the steps outlined in the earlier "Starting Excel and Creating a New File" section to create a new file.
Next, you want to make a list of items. You can pick anything you like to categorize, of course. But for the purposes of this example, we'll assume you have a number of sport coats and lapel pins, and you want to know how many unique pairs you can make with them. Begin by listing the items in Excel Mobile (see Figure 19-5).
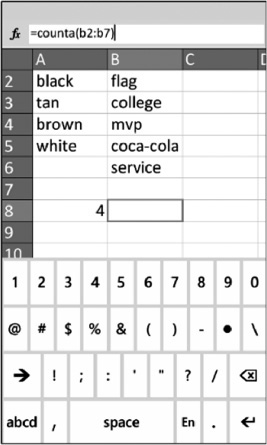
To calculate the number of combinations, you need to know how many items are in each list. You can use the Sum function to accomplish this. Begin by tapping cell A8 and entering this formula:
=counta(a2:a7).In cell B8, you enter a similar formula:
=counta(b2:b7)(see Figure 19-6).Now you just need to calculate the number of pairs. Becauseyou can pair each coat with each pin, you can simply multiply the number of coats by the number of pins. This is an easy calculation that you can put in cell C8. Next, put the word "combinations" in C9, so you know what you are calculating!
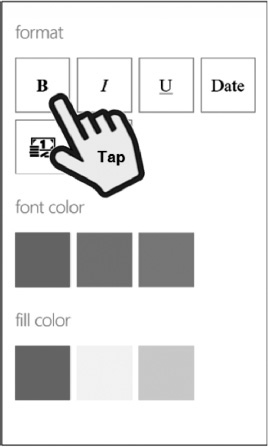
Finally, it might be helpful to format cell C8 so that it stands out better. Tap that cell, tap the Ellipsis button, and then choose format cell. Click the Bold button to apply bold-face styling to the selected cell (see Figure 19-7). At this point, you have a bolded total, but you could use the same method to format other cells.

Sometimes you need to find a particular piece of information in a spreadsheet. Sometimes you might need to find just one cell, in which case you could use the Find button (see Figure 19-4). Other times, however, you might need to see multiple pieces of data in an easy-to-understand format, where the information is filtered and sorted to your liking. The following example walksyou through how to filter and sort data.
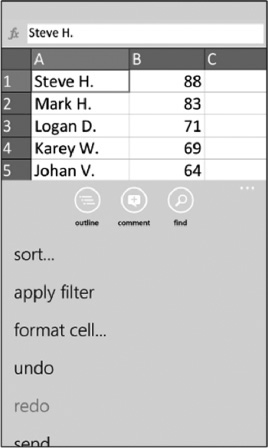
Assume that you have loaded an Excel spreadsheet that displays the names of children in a class and the scores they recently earned on the final exam (see Figure 19-8). You can manipulate this data in several ways:

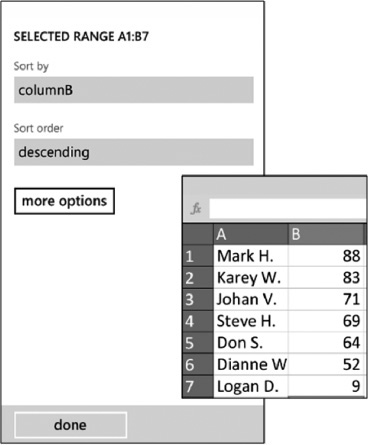
Sorting—None of these students performed extremely well on the final. Nonetheless, you might want to sort the spreadsheet, so you can see who performed best at a glance. To do this, tap the Ellipsis button and choose sort... In the box that appears, sort by ColumnB in descending order. Pressing the More Options button at this juncture will let you choose secondary sort options (e.g., sorting students with the same score by name) and allow you to exclude the header row (which you don't have in this case, so there's no need to exclude it here!). After you perform the sort, you're ready to review the results.Figure 19-9 shows both the sorting options and the resulting sorted rows.
Filtering—Assume that this class requires a score of 70 or higher to pass. Thus, you need to filter out anyone who got anything less. Tap the Ellipsis button and choose Apply Filter. The screen now changes to show small drop-down Arrow icons on the first cell in each column (see Figure 19-10). You can tap those Arrow icons to see the sorting options. Excel Mobile will let you filter discrete values, such as top 10, bottom 10, or all. Unfortunately, this version doesn't let you create a filter on an arbitrary number. Thus, if you need such a filter, you must create it in the desktop version of Excel. To make the filter's drop-down Arrow icons go away, tap the Ellipsis button again and choose remove filter.
Hiding Columns/Rows—Perhaps you don't want to see the names of each student. In that case, you can easily hide the entire column by double-tapping the column header (A) and then pressing and holding your finger on the screen to show the column options (see Figure 19-11). From here, you can tap Hide to hide the column or use one of the other options described in Figure 19-11.
Formatting Entire Rows/Columns—Selecting an entire column or row by double-tapping the header (as in the preceding example), also displays the options to sort the row and change the formatting for all of the selected cells (see Figure 19-11).


Many of the options available in Word Mobile are also present in Excel Mobile. What follows is a quick summary of the options common to both applications. Please see the previous chapter for specific information on each feature. Unless otherwise specified, you can access each of the following options using the Ellipsis button from within Excel Mobile (see Figure 19-12):
Commenting—Pressing this option lets you enter comments for each cell, similar to how you can associate comments with words or sentences in Word Mobile. These comments will then be visible to people who view the workbook. You press the Comment button to enter your comments (see Figure 19-4).
Undo—Pressing this option rolls back your most recent change to the spreadsheet.
Redo—Pressing this option cancels your previous Undo, restoring your change.
Send...—Pressing this option sends your work via email to your colleagues or friends.
Save—Pressing this option saves the current document.
Save as...—Pressing this option allows you to save the document under a new name.