In November 2006, Microsoft launched Zune, a portable music and video player that provided a unique and fun way to listen to and watch media on the go. Along with the physical Zune devices, Microsoft also released the Zune software. This software enabled users to manage their media and connect with others, a feature Microsoft called Zune Social. Zune Social allows you to see what your friends are listening to, helping you to discover new music you might like.
While developing Windows Phone 7, Microsoft realized that the Zune software could serve as a logical way to manage music, movies, and pictures on your phone. So, it included a version of the Zune software on your Windows Phone 7 device that largely mimics the behavior of the aforementioned Zune devices. In this chapter, you'll learn how to listen to music and videos on your phone, as well as how to connect your phone to your computer and synchronize it with the Zune software.
To get started, you'll need to download and install the Zune software. These steps will walk you through that process:
On your computer, go to
www.zune.netand click Get the Zune software (see Figure 23-1).On the next page, you're given two options. First, you can create a new Zune account and download the software. Second, you can simply download the software without creating an account (see Figure 23-2). You may wish to create an account, so that you can use the social and music discovery features of Zune once you install the software. However, if you've already created a Zune account, you can simply download the software to your computer.
Tip
Zune accounts are free; however, you may wish to sign up for a Zune Pass, which lets you pay a flat fee each month for access to all of the music in the Zune online store on a subscription basis. Additionally, you receive ten songs per month that you may download and keep, even if you cancel your Zune Pass later. If you're a heavy music listener and like discovering new albums and artists, this might be a good deal for you to look into!
Once you set up an account (or choose your operating system and click Download), the Zune software will begin downloading. To make sure you get the correct version, click the Start button on your computer, then right-click computer and choose properties. This screen will tell you what version of Windows you are running and whether it is 64-bit. The file is around 100 MB, so it may take awhile to download on slower connections. Once it downloads, double-click it to start the installation process.
Note
While Windows Phone 7 is designed to work best with the Zune software on a Windows PC, Mac users can use the Windows Phone 7 Connector for Mac to synchronize their phones, too. At the time of writing, the tool is still in Beta and doesn't have a full homepage—however, you can download it by using your favorite search engine and searching for "Windows Phone 7 Connector for Mac."
Follow the steps in the installation wizard to install the Zune software. The installation process is fairly straightforward, so all you should need to do is click Next a few times, and the software will be installed.
Once the software has been installed, you can double-click the Zune icon on your desktop to start it.


The Zune software is designed to be easy to navigate. It organizes your music by artist, album, and song. It can also manage videos, pictures, and podcasts. The following steps walk you through using some of the software's features:
On your computer, double-click the Zune icon on your desktop to start the software. After a few moments, the Splash screen shown in Figure 23-3 will appear.
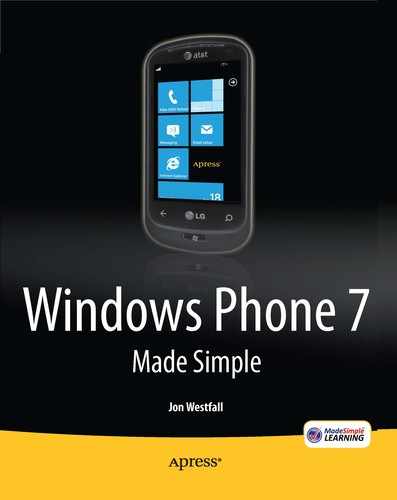
The first time the software starts, it may take a few moments longer to load than is normally the case. This is because Zune begins by cataloging your music, videos, and pictures. Once the software starts, a screen similar to the one shown in Figure 23-4 will appear. I'll discuss each part of this screen, starting in the upper left and rotating clockwise.
Look in the upper left of this screen (see Figure 23-5). Clicking Collection highlights Music by default (Figure 23-5 details what each button does in this grouping). Click each item in the upper part of the bar to explore the quickplay, marketplace, and social options.
In the upper right (see Figure 23-6), you'll find options to configure the software's Settings and access help. You'll also see your Zune profile picture and a Search box. The Search box will not only search your music and videos, but will also help you find items in the Marketplace.
In the bottom right and center (see Figure 23-7), you'll see the current track you're playing, its progress, and a familiar set of buttons to control playback. Clicking the Repeat button will repeat the current playlist; clicking the Shuffle button will randomly play items in the list; clicking the Previous, Play, and Next buttons will let you control the track's playback; and clicking the now playing button will show the playlist with the album art in the background. The last option is perfect for displaying the music currently playing on a computer in a group setting, such as when at a party.
Finally, look in the lower-left corner of the screen (see Figure 23-8). You'll find icons representing your Zune device (whether it's an actual Zune player or your Windows Phone 7 device); a Disc button that represents a burn list, which is a list of music you wish to burn to a CD; and a Playlist icon, which you can use to drag-and-drop items onto a playlist from any screen.
The best way to learn about the Zune software is by playing with the different options and ways to view music, videos, and more. Once you're comfortable with the software, get ready to hook up your Windows Phone 7 device to your computer.


Listening to music on your computer is fine when you're at home. However, when you're on the go, it isn't really convenient to have your music on a computer—you want it near you on a device made for playing music, such as your Windows Phone 7 device.
Note
If you have a previous version of the Zune software installed, you'll still need to update it to the most recent version before you can synchronize your phone with your computer. You can get the most recent version of the software at http://zune.net.
Follow these steps to connect your phone to the Zune software and leverage its ability to sync your music, videos, pictures, and podcasts:
On your PC, open the Zune software by clicking the Zune icon on the desktop.
Use the included micro-USB cord that came with your phone to plug your phone in to a free USB port on your computer.
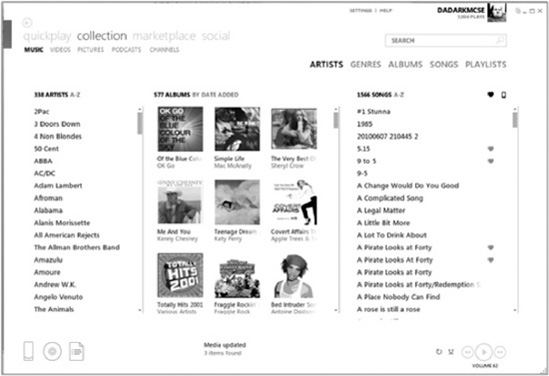
When your computer sees the device, it should display a message similar to the one shown in Figure 23-9 as it installs the proper device drivers for your phone.
Once the installation is complete, a message similar to the one shown in Figure 23-10 will appear. At this point, the Zune software should begin detecting your phone and start the setup process.
If you've set up a password lock on your phone, a screen similar to the one shown in Figure 23-11 will appear, asking you to unlock your phone. Take your phone, slide up the Lock screen image, and enter your password.
Once the phone is unlocked, the Zune software will begin the setup procedure, showing a screen similar to the one shown in Figure 23-12. Click Next to continue.
Give your phone a meaningful name—such as "My Awesome Phone"—when you see the screen shown in Figure 23-13.
Next, your phone will go online and determine whether any system updates for your phone are available. We'll discuss updating your phone in more detail in Chapter 26: "Updating Your Phone"; however, if an update is available, you'll be able to walk through the process of updating your phone at this time. Once the update check is complete (see Figure 23-14), the setup process is done.
Once the setup process is complete, you'll see a Summary screen similar to the one shown in Figure 23-15. At this point, Zune will begin downloading any pictures you've taken on your device to your computer.
Once your photos are downloaded, you will be able to see them under the Just added to collection heading, as shown in Figure 23-16.
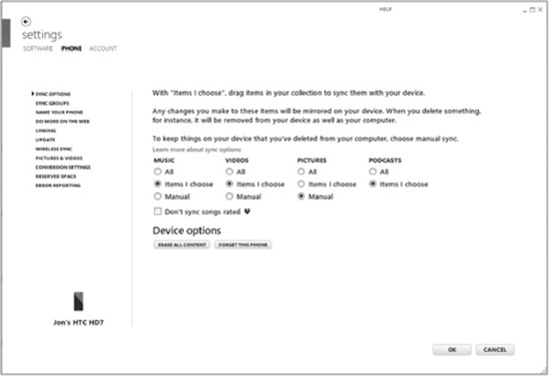
Clicking the View Sync Options button shown in Figure 23-16 (beneath the Last Sync time) will bring up the Sync Options screen (see Figure 23-17). Clicking All or Manually under each media type (Music, Videos, Pictures, or Podcasts) tells Zune either to automatically upload all of a given content type—or none. The middle section, Items I choose, allows you to create sync groups for that media type, which you'll learn more about in the next section. Once you select your Synchronization settings and click OK, Zune will begin uploading content to your phone.
As the phone synchronizes, you'll see a screen similar to the one shown in Figure 23-18. Once the synchronization gets to 100%, your media is transferred, and you can begin using it on your phone.


Some of us have awesomely large music collections, or we rip all of our DVDs so that we can watch them wherever we are. This poses a problem because even the phones out today with the largest storage capacities might not be able to hold all our media files. Fortunately, the Sync Groups feature in the Zune software lets you configure exactly what you want synchronized to your Windows Phone 7 device:
In the Zune software, click the Settings button in the upper right.
Click Phone in the upper left of the screen (see Figure 23-19).
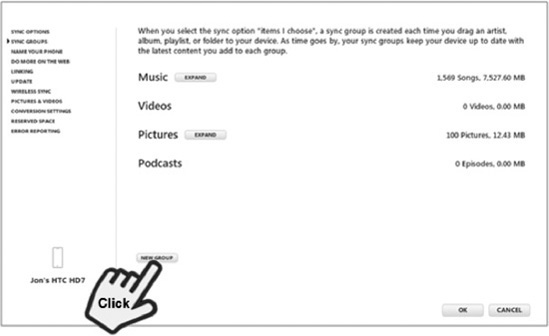
Click Sync Groups in the list of menu options to see a screen similar to the one shown in Figure 23-20. Click New Group.
The New Group box will appear (see Figure 23-21). Customize this box so it contains whatever content you'd like. The setup I've shown will synchronize photos taken within the last 30 days to my phone. Remember that any content not set to Items I choose on the Sync Options page (see Figure 23-17) won't show up in the Source drop down box shown in Figure 23-21. This is because it's all or nothing for items in a sync group when it comes to syncing automatically.
Click OK to enter the new group. The next time you synchronize, Zune will add the items to your phone.
Note
When you specify recently added, the Zune software uses the date it added the photo to its library, not the time the photo was taken according to any information in the file (i.e., the EXIF information). This means that, when you first install the Zune software, the Recently added options won't be very useful until you've spent two to three months using the software because everything will be listed as Recently added.


Once your device is loaded up with your music and videos, follow these steps to fire up Zune and listen to or view that media:
Turn on and unlock your phone.
Tap the Music + Videos live tile on your Start screen (see Figure 23-22).
A screen similar to the one shown in Figure 23-23 will appear. From here, you can tap music to listen to the music you've uploaded, tap videos to watch videos, tap podcasts to view podcasts, and tap radio to listen to the FM radio included in your phone. You can also press and swipe to the right to see new items (see Figure 23-24).
In addition to listening to music you upload, you can also listen to music through the Zune Marketplace with your Zune Pass. (See Chapter 25: "Exploring the Marketplace" for more details on the Marketplace and streaming music.)
To use the FM radio, you must first plug in headphones or you will receive an error (see Figure 23-25). As the error indicates, the headphones are required because your phone uses your headphones as an FM antenna.
You can see the radio controls in Figure 23-26. These controls allow you to add your favorite frequencies and scan for stations by swiping your fingers left or right along the Frequency dial icon.


Tip
The Windows Phone 7 radio tuner is RDS capable; if supported on your device, it will show information about the song and station you are listening to, so that you can download the song later in the Marketplace if you'd like!
Your Windows Phone 7 device is much more than a phone that can keep your life together. It can also rock in the sense that it can serve as your MP3 player, video player, any other media device you need. There are two great ways to learn about these options. First, you can follow the steps described in this chapter to explore everything described. Second, you can explore the various combinations of options available on your own to see where they lead you. The information provided in this chapter should give you a firm grasp of your phone's media interfaces and what they makepossible, enabling you to set out on your own musical adventure.