Our Windows Phone 7 devices represent only a small subset of all the information we keep, yet this is usually the most important subset we have—it holds all of our friends' contact information; our email; our favorite music; our photos; and for dedicated gamers, even our Xbox avatar! It's important, therefore, that we be able to manage our phones and keep the information safe. In this chapter, we'll discuss securing our phones with a password, managing our phones with Windows Live, and remotely disabling or wiping data from our phones in case they get lost!
Note
Many of the features we will discuss in this chapter require you to have added at least one Windows Live account to your phone (see Chapter 3: "Setting up Accounts" for more information on adding a Windows Live account). If you choose not to add a Windows Live account, the only features discussed in this chapter that you'll be able to use are the tips for setting the lock screen password and time-out interval.
Your lock screen can be customized to have your own special wallpaper and require a four-digit password to be entered in order to use the phone. Follow these steps to configure your lock screen:
Turn on and unlock your phone.
Tap the Arrow icon in the upper right of the screen to bring up the list of applications. At the bottom of the list, tap settings (see Figure 8-1).
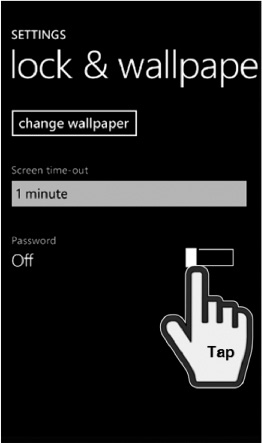
Tap lock & wallpaper (see Figure 8-2).
To change the wallpaper on the lock screen, tap the change wallpaper button (see Figure 8-3). This will bring up the standard picture chooser, letting you select an image from your camera roll or from any other photos you have access to on your device.
In this example, you will need to choose an image as your wallpaper (see Figure 8-4).
After you select an image as your wallpaper (see Figure 8-5), your phone lets you crop the picture if you so desire. In the example shown, the picture is nicely cropped already, so you could just hit the crop button at the bottom without making any changes (see Figure 8-6).
The phone now takes you back to the lock & wallpaper options (see Figure 8-2). From here, you can now set the screen time-out interval. This option controls how long the phone's screen will remain turned on after you stop using it. This is helpful in case you forget to turn your phone off; however, in some cases you may want to set the time-out interval higher or disable it altogether (especially if you're reading documents). Figure 8-7 shows your options; simply select whichever option works best for you.
Note
If you decide to enable a password, the never option will be removed from the list of time-out options.
To set a four-digit password, tap the On/Off slider (see Figure 8-8).
In the box that appears (see Figure 8-9), set a four-digit password that's easy for you to remember, but hard for others to guess. Ideally, you want to set a number that would take five or more tries for someone to guess. This excludes passwords like "1234" or "1111" and so on. When you're satisfied with your choice, press done.
Note
If you forget your password, you're given five tries to enter it. After that, your phone begins to delay how often you can try unlocking it, first by one minute, then two, then four, and so forth, doubling the interval between each successive wrong entry. This way, someone who obtains your phone can't easily try all 10,000 possible combinations in a short amount of time to "get in." Be careful, though—these delays remain even if you turn off and remove the battery from your phone!
You've now set your password, and your phone will prompt you for it each time you turn it on and unlock it.


All of us, at one time or another, misplace something. For some of us, it's not a big deal (maybe it was just a pen!); for others, it may be a big problem (e.g., keys, wallets, phones, or nuclear launch codes). Thankfully, your Windows Phone 7 device give you a suite of tools that will help you find a lost phone. We'll begin by discussing how to configure those options on your phone, and then move onto showing you how to use them through your computer. Follow these steps to do so:
Turn on and unlock your phone.
Tap the Arrow icon in the upper right of the screen to bring up the list of applications. At the bottom of the list, tap settings (see Figure 8-1).
Tap find my phone(see Figure 8-10).
The find my phone settings will appear (see Figure 8-11). While the basic features described on this screen (e.g., map, ring, lock, or erase) will work without the boxes on this screen being checked, they'll tend to work faster if you decide to go ahead and check both boxes. The first box, Save my location periodically for better mapping, periodically saves your phone's location to a central server. Consequently, if you're looking for your phone, you can find the general area it is in faster. The second box, Get results faster (may use more battery), controls whether the phone should periodically send additional information to Windows Live servers that would aid in finding your phone. It will use a bit more battery power than if you leave this option turned off. However, if you charge frequently and/or are a bit forgetful and/or live in a high crime area, this option might be worth turning on!
Once you're done setting these options on your phone, you can turn it off and set it aside for a few moments. Meanwhile, we'll explore how to use the Windows Live phone website to find your phone.
Begin by opening a web browser on your computer and going to
http://windowsphone.live.com.On the signin screen (see Figure 8-12), enter your Windows Live ID and password.
You'll then be taken to the Windows Phone site, which will show information specific to your phone, including photos you've taken and uploaded, your contacts, your OneNote notebooks, and more. You can explore this website later—for now, we'll just discuss the options listed under FIND MY PHONE(see Figure 8-13).
You're given four options to help you find your phone: Map It, which shows you the approximate location of the phone; Ring It, which makes it ring loudly so you can find it; Lock It, which enables you to prevent access to the phone in case you haven't set a password; and Erase It, which lets you wipe all your personal data if the phone has been stolen. We'll walk through each of these options in the steps that follow.
Clicking Map It will first display an approximate location based on where your phone last reported its location (see Figure 8-14).
If the Map It feature doesn't help you much, then you might try the Ring It feature. When you activate this feature, your phone will ring with a distinctive ring tone (you can preview this ring tone on your PC, so you know what it will sound like) at the phone's loudest setting. Once you see a confirmation that the ring request has been sent (see Figure 8-15), you can begin listening. Normally, it takes between 10-20 seconds for the ringing to start; it will stop once you find the device and press the power button.
If the Ring It feature doesn't help you find your phone, then alas, it might not be physically nearby. At this point, you can use the Lock It feature to cause the phone to display a special message, perhaps asking some kind person to send you your phone or otherwise contact you (see Figure 8-16 for an example of what you might say). You can also have the phone ring at the same time by checking the Ring your phone box, as shown in Figure 8-16; this alerts any nearby person to its presence.
If all else fails—and you're pretty sure your device has been stolen or lost for good—then you'll probably want to wipe your phone. This will remove all of your personal data, returning your phone to the way it was when you removed it from the box. To begin this process, click Wipe It.
A dialog box will appear, requiring that you confirm that you want to send the wipe signal (see Figure 8-17). Once you send the signal, the phone will lock, and the wipe process will begin.
Once wiped, the FIND MY PHONE section of the Windows Phone website will show a message similar to the one shown in Figure 8-18. This message will persist until you get the phone back and reconfigure your Windows Live account on it.


Warning
If you send a Wipe It request to your phone and then find it, you will be unable to stop the wipe, even if you unlock your phone before it begins!
Note
If your phone is wiped, any data on it is deleted permenantly. Many things, however, such as uploaded SkyDrive photos and email, are not lost as they are stored on the internet. However if you do not synchronize photos to your computer using the Zune software, and do not synchronize to SkyDrive, these will be lost. Therefore, you may want to make sure important information on your phone is either synchronized to the Internet, or periodically backed up in some way manually (e.g., by emailing files to yourself, using the Zune software, etc...)