
Windows Phone 7 provides a clean and easy way to see your entire list of upcoming appointments. It also provides just the right amount of detail you need, depending on whether you're rushing to an appointment (e.g., where is it?) or setting up a complex reoccurring appointment (e.g., every fourth day of the month). In this chapter, we'll walk through the steps of accessing and customizing the Calendar app, as well as adding, editing, and removing appointments.
Getting into the Calendar and changing the view is as easy following these simple steps:
Turn on your phone and unlock it.
Press the Calendar live tile. It is one of the few double-column tiles on the Start screen, and it shows the date and your next appointment (see Figure 12-1).
A screen similar to that shown in Figure 12-2 will appear, showing your appointments for today.
By default, the Calendar displays appointments in a grid format, showing empty spaces throughout the day. If you want to see all of your appointments listed without any space between them (perhaps you have an extremely busy schedule or appointments that overlap, with no space anyway!), tap Agenda to switch to Agenda view (see Figure 12-3).
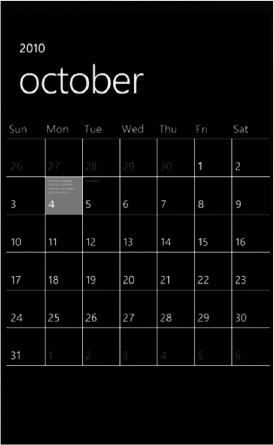
Sometimes you need to see a view of the month (or multiple months ahead), and you want to get a quick idea of how busy you'll be. Tapping the Month button switches to this view (see Figure 12-4). You can flick your finger up or down to scroll to future or past months. The days with appointments will show small lines of text to indicate how many appointments you have that day—the more lines, the fuller your schedule is! (Don't ruin your eyes by trying to read the lines, though—they're just meant to show there is an entry, not to list each one!). This view is a great way to scope out your schedule weeks or months ahead, such as when planning trips or vacations. You can also tap a given date to view the schedule for that day. To return to the Day or Agenda view, hit the Back button.
If you have multiple accounts set up on your phone, you'll see multiple calendars. You may want to customize the color assigned to each calendar (for example, to separate your calendar from your spouse's or kids' calendars) or turn off calendars entirely. To do this, press the Ellipsis key and click Calendars.
A screen similar to the one shown in Figure 12-5 will appear. For each calendar, you can press the Off/On switch to hide or show its entries. You can also tap the Color icon to change colors for each calendar, allowing you to customize your view as needed.


Adding a calendar appointment is easy to do. You can do so either by filling out the minimum amount of information or by customizing multiple options:
Access your Calendar by tapping the Calendar live tile from the Start screen.
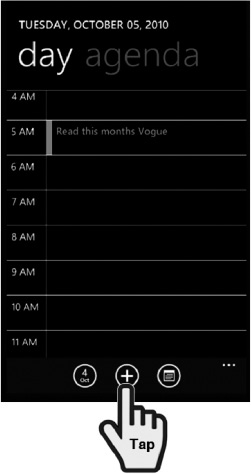
Tap the Add button (see Figure 12-6).
A screen similar to the one shown in Figure 12-7 will appear. Enter the text description of the appointment in the Subject box and the location of the appointment in the Location box.
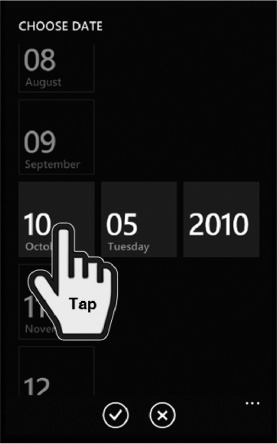
To adjust the date and time, tap the date, and then tap the month, day, or year to adjust. A list of choices will appear at the top and bottom of the element you're changing, and you can scroll through with your finger to the correct month, day, or year (see Figure 12-8).
If you need to add more details, tap the more details button. The next section will discuss each of these options.

Windows Phone 7 allows you to set a number of appointment details that work closely with Microsoft Outlook on the desktop and, if applicable, your corporation's Exchange mail server. Clicking the more details button while adding or editing an appointment brings up a number of options (see Figure 12-9):

Reminder—This option allows you to set up a reminder for the appointment. Options range from no reminder (None) to a week in advance, with more options closer to the appointment (e.g., 5 minutes or 15 minutes) than farther away (e.g., 18 hours, 1 day, or 1 week). These reminders not only show on your phone, but also show up on your computer if you synchronize your phone and calendar to an Exchange server or Windows Live.
Occurs—This option, shown in Figure 12-10, can be used for appointments that reoccur at some point in the future. Your Calendar will then show each appointment in the upcoming months. You can specify a number of options from your phone; however, to create especially complex calendaring options, you may need to use Microsoft Outlook (see Figure 12-11).
Status—This option lets you set whether the appointment should be shown as Busy, Free, Tentative, or Out of the Office on your calendar. This is useful when your phone is synchronized to a Microsoft Exchange server because it allows your colleagues to see whether you are free or busy during a given time period, but without forcing you to show the details of your appointment (e.g., they can see one block of time is "busy" while others are open).
Attendees—Clicking Attendees lets you select required and optional attendees to invite to your appointment, provided you already have them in your People tile's contact list (see Figure 12-12). Once you save your appointment, appointment requests will be emailed to all of your attendees. This tells them the date and time of the appointment, as well as any pertinent information you've added. They can then click a button to accept, reject, or tentatively accept your appointment request, and you can check the status of these requests using Microsoft Outlook.
Private—If you share your calendar through a Microsoft Exchange server or other shared calendar service, you can check this box to make the details of an appointment visible only to you, not to others who have permission to view your calendar.
Notes—You can use this section to create any notes you may need to reference about the appointment. In the past, I've filled in this field by simply dropping an email message in Microsoft Outlook onto the Calendar button. This creates a new appointment, putting the text of the email into the Notes box. From here, you can use your phone to read the email before meeting with the person to bring yourself up to speed!


Tip
Adding a person's telephone number in the Notes section of an appointment can be a great time saver. Windows Phone 7 will recognize the phone number and allow you to dial it by tapping it. This is perfect for on-the-go situations or even conference calls with nasty long codes you must enter: the number and code go nicely in notes, ready for use!
Editing(changing) or deleting (removing) a calendar appointment should be a fairly simple affair—and it is in Windows Phone 7:
Access your calendar by tapping the Calendar live tile from the Start screen.
Tap the appointment you wish to edit (see Figure 12-13); this brings up the Appointment Details screen.
A screen similar to the one shown in Figure 12-14 will appear. To edit the appointment, tap the Edit button. To remove the appointment, tap the Delete button.

As you can see, managing your Calendar with Windows Phone 7 is simple and easy. The phone provides information when you need it (by displaying the next appointment right on the Start screen's Calendar live tile), and it also allows you to drill down into the appointment's details, even allowing you to invite others to an appointment right from your phone. You can also manage multiple calendars, and customize the appearance of each; this helps you distinguish between your appointments easily!