14.7 CheckBoxes and RadioButtons
C# has two types of state buttons that can be in the on/off or true/false states—CheckBox-es and RadioButtons. Like class Button, classes CheckBox and RadioButton are derived from class ButtonBase.
14.7.1 CheckBoxes
A CheckBox is a small square that either is blank or contains a check mark. When the user clicks a CheckBox to select it, a check mark appears in the box. If the user clicks the CheckBox again to deselect it, the check mark is removed. You also can configure a CheckBox to toggle between three states (checked, unchecked and indeterminate) by setting its Three-State property to true. Any number of CheckBoxes can be selected at a time. A list of common CheckBox properties and a common event appears in Fig. 14.25.
Fig. 14.25 CheckBox properties and an event.
CheckBox properties and events |
Description |
|---|---|
| Common Properties | |
Appearance |
By default, this property is set to Normal, and the CheckBox displays as a traditional checkbox. If it’s set to Button, the CheckBox displays as a Button that looks pressed when the CheckBox is checked. |
Checked |
Indicates whether the CheckBox is checked (contains a check mark) or unchecked (blank). This property returns a bool value. The default is false (unchecked). |
CheckState |
Indicates whether the CheckBox is checked or unchecked with a value from the CheckState enumeration (Checked, Unchecked or Indeterminate). Indeterminate is used when it’s unclear whether the state should be Checked or Unchecked. When CheckState is set to Indeterminate, the CheckBox is usually shaded. |
Text |
Specifies the text displayed to the right of the CheckBox. |
ThreeState |
When this property is true, the CheckBox has three states—checked, unchecked and indeterminate. By default, this property is false and the CheckBox has only two states—checked and unchecked. When true, Checked returns true for both the checked and indeterminate states. |
| Common Event | |
CheckedChanged |
Generated any time the Checked or CheckState property changes. This is a CheckBox’s default event. When a user double clicks the CheckBox control in design view, an empty event handler for this event is generated. |
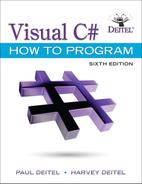
The program in Fig. 14.26 allows the user to select CheckBoxes to change a Label’s font style. The event handler for one CheckBox applies bold and the event handler for the other applies italic. If both CheckBoxes are selected, the font style is set to bold and italic. Initially, neither CheckBox is checked.

Fig. 14.26 Using CheckBoxes to toggle italic and bold styles.
Alternate View
  1    // Fig. 14.26: CheckBoxTestForm.cs
  2    // Using CheckBoxes to toggle italic and bold styles.
  3    using System;
  4    using System.Drawing;
  5    using System.Windows.Forms;
  6
  7    namespace CheckBoxTest
  8    {
  9       // Form contains CheckBoxes to allow the user to modify sample text
 10       public partial class CheckBoxTestForm : Form
 11       {
 12          // default constructor
 13          public CheckBoxTestForm()
 14          {
 15             InitializeComponent();
 16          }
 17
 18          // toggle the font style between bold and
 19          // not bold based on the current setting
 20          private void boldCheckBox_CheckedChanged(object sender, EventArgs e)
 21          {
 22             outputLabel.Font = new Font(outputLabel.Font,
 23                outputLabel.Font.Style ^ FontStyle.Bold);
 24          }
 25
 26          // toggle the font style between italic and
 27          // not italic based on the current setting
 28          private void italicCheckBox_CheckedChanged(
 29             object sender, EventArgs e)
 30          {
 31             outputLabel.Font = new Font(outputLabel.Font,
 32                outputLabel.Font.Style ^ FontStyle.Italic);
 33          }
 34      }
 35    }
The boldCheckBox has its Text property set to Bold. The italicCheckBox has its Text property set to Italic. The Text property of outputLabel is set to Watch the font style change. After creating the controls, we define their event handlers. Double clicking the CheckBoxes at design time creates empty CheckedChanged event handlers.
To change a Label’s font style, set its Font property to a new Font object (lines 22– 23 and 31–32). Class Font is in the System.Drawing namespace. The Font constructor used here takes a Font and new style as arguments. The argument outputLabel.Font uses outputLabel’s original font name and size. The style is specified with a member of the FontStyle enumeration, which contains Regular, Bold, Italic, Strikeout and Underline. (The Strikeout style displays text with a line through it.) A Font object’s Style property is read-only, so it can be set only when the Font object is created.
14.7.2 Combining Font Styles with Bitwise Operators
Styles can be combined via bitwise operators—operators that perform manipulation on bits of information. Recall from Chapter 1 that all data is represented in the computer as combinations of 0s and 1s. Each 0 or 1 represents a bit. The FontStyle (namespace System.Drawing) is represented as a set of bits that are selected in a way that allows us to combine different FontStyle elements to create compound styles, using bitwise operators. These styles are not mutually exclusive, so we can combine different styles and remove them without affecting the combination of previous FontStyle elements.
We can combine the various font styles, using either the logical OR (|) operator or the logical exclusive OR (^) operator (also called XOR). When the logical OR operator is applied to two bits, if at least one bit of the two has the value 1, then the result is 1. Combining styles using the logical OR operator works as follows. Assume that FontStyle.Bold is represented by bits 01 and that FontStyle.Italic is represented by bits 10. When we use the logical OR (|) to combine the styles, we obtain the bits 11.
                       01     =     Bold
                       10     =     Italic
                       --
                       11     =     Bold and Italic
The logical OR operator helps create style combinations. However, what happens if we want to undo a style combination, as we did in Fig. 14.26?
The logical exclusive OR operator enables us to combine styles and to undo existing style settings. When logical exclusive OR is applied to two bits, if both bits have the same value, then the result is 0. If both bits are different, then the result is 1.
Combining styles using logical exclusive OR works as follows. Assume, again, that FontStyle.Bold is represented by bits 01 and that FontStyle.Italic is represented by bits 10. When we use logical exclusive OR (^) on both styles, we obtain the bits 11.
                       01     =     Bold
                       10     =     Italic
                       --
                       11     =     Bold and Italic
Now, suppose that we’d like to remove the FontStyle.Bold style from the previous combination of FontStyle.Bold and FontStyle.Italic. The easiest way to do so is to reapply the logical exclusive OR (^) operator to the compound style and FontStyle.Bold.
                       11      =     Bold and Italic
                       01      =     Bold
                       --
                       10      =     Italic
This is a simple example. The advantages of using bitwise operators to combine FontStyle values become more evident when we consider that there are five FontStyle values (Bold, Italic, Regular, Strikeout and Underline), resulting in 16 FontStyle combinations. Using bitwise operators to combine font styles greatly reduces the amount of code required to check all possible font combinations.
In Fig. 14.26, we need to set the FontStyle so that the text appears in bold if it was not bold originally, and vice versa. Line 23 uses the bitwise logical exclusive OR operator to do this. If outputLabel.Font.Style is bold, then the resulting style is not bold. If the text is originally italic, the resulting style is bold and italic, rather than just bold. The same applies for FontStyle.Italic in line 32.
If we didn’t use bitwise operators to compound FontStyle elements, we’d have to test for the current style and change it accordingly. In boldCheckBox_CheckedChanged, we could test for the regular style and make it bold, test for the bold style and make it regular, test for the italic style and make it bold italic and test for the italic bold style and make it italic. This is cumbersome because, for every new style we add, we double the number of combinations. Adding a CheckBox for underline would require testing eight additional styles. Adding a CheckBox for strikeout would require testing 16 additional styles.
14.7.3 RadioButtons
Radio buttons (defined with class RadioButton) are similar to CheckBoxes in that they also have two states—selected and not selected (also called deselected). However, RadioButtons normally appear as a group, in which only one RadioButton can be selected at a time. Selecting one RadioButton in the group forces all the others to be deselected. Therefore, RadioButtons are used to represent a set of mutually exclusive options (i.e., a set in which multiple options cannot be selected at the same time).
 Look-and-Feel Observation 14.4
Use RadioButtons when the user should choose only one option in a group. Use Check-Boxes when the user should be able to choose multiple options in a group.
All RadioButtons added in a container are in the same group. To divide RadioButtons into several groups, they must be added to separate containers, such as GroupBoxes or Panels. RadioButton’s common properties and a common event are listed in Fig. 14.27.
Fig. 14.27 RadioButton properties and an event.
RadioButton properties and an event |
Description |
|---|---|
| Common Properties | |
Checked |
Indicates whether the RadioButton is checked. |
Text |
Specifies the RadioButton’s text. |
| Common Event | |
CheckedChanged |
Generated every time the RadioButton is checked or unchecked. When you double click a RadioButton control in design view, an empty event handler for this event is generated. |
 Software Engineering Observation 14.1
Forms, GroupBoxes, and Panels can act as logical groups for RadioButtons. The RadioButtons within each group are mutually exclusive to each other, but not to RadioButtons in different logical groups.
The program in Fig. 14.28 uses RadioButtons to enable users to select options for a MessageBox. After selecting the desired attributes, the user presses the Display Button to display the MessageBox. A Label in the lower-left corner shows the result of the MessageBox (i.e., which Button the user clicked—Yes, No, Cancel, etc.).


Fig. 14.28 Using RadioButtons to set message-window options.
Alternate View
  1    // Fig. 14.28: RadioButtonsTestForm.cs
  2    // Using RadioButtons to set message window options.
  3    using System;
  4    using System.Windows.Forms;
  5
  6    namespace RadioButtonsTest
  7    {
  8       // Form contains several RadioButtons--user chooses one
  9       // from each group to create a custom MessageBox
 10       public partial class RadioButtonsTestForm : Form
 11       {
 12          // create variables that store the user's choice of options
 13          private MessageBoxIcon IconType { get; set; }
 14          private MessageBoxButtons ButtonType { get; set; }
 15
 16          // default constructor
 17          public RadioButtonsTestForm()
 18          {
 19             InitializeComponent();
 20          }
 21
 22          // change Buttons based on option chosen by sender
 23          private void buttonType_CheckedChanged(object sender, EventArgs e)
 24          {
 25             if (sender == okRadioButton) // display OK Button
 26             {
 27                 ButtonType = MessageBoxButtons.OK;
 28              }
 29              // display OK and Cancel Buttons
 30              else if (sender == okCancelRadioButton)
 31              {
 32                 ButtonType = MessageBoxButtons.OKCancel;
 33              }
 34              // display Abort, Retry and Ignore Buttons
 35              else if (sender == abortRetryIgnoreRadioButton)
 36              {
 37                 ButtonType = MessageBoxButtons.AbortRetryIgnore;
 38              }
 39              // display Yes, No and Cancel Buttons
 40              else if (sender == yesNoCancelRadioButton)
 41              {
 42                 ButtonType = MessageBoxButtons.YesNoCancel;
 43              }
 44              // display Yes and No Buttons
 45              else if (sender == yesNoRadioButton)
 46              {
 47                 ButtonType = MessageBoxButtons.YesNo;
 48              }
 49              // only one option left--display Retry and Cancel Buttons
 50              else
 51              {
 52                 ButtonType = MessageBoxButtons.RetryCancel;
 53              }
 54          }
 55
 56          // change Icon based on option chosen by sender
 57          private void iconType_CheckedChanged(object sender, EventArgs e)
 58          {
 59             if (sender == asteriskRadioButton) // display asterisk Icon
 60             {
 61                IconType = MessageBoxIcon.Asterisk;
 62             }
 63             // display error Icon
 64             else if (sender == errorRadioButton)
 65             {
 66                IconType = MessageBoxIcon.Error;
 67             }
 68             // display exclamation point Icon
 69             else if (sender == exclamationRadioButton)
 70             {
 71                IconType = MessageBoxIcon.Exclamation;
 72             }
 73             // display hand Icon
 74             else if (sender == handRadioButton)
 75             {
 76                IconType = MessageBoxIcon.Hand;
 77             }
 78              // display information Icon
 79              else if (sender == informationRadioButton)
 80              {
 81                 IconType = MessageBoxIcon.Information;
 82              }
 83              // display question mark Icon
 84              else if (sender == questionRadioButton)
 85              {
 86                 IconType = MessageBoxIcon.Question;
 87              }
 88              // display stop Icon
 89              else if (sender == stopRadioButton)
 90              {
 91                 IconType = MessageBoxIcon.Stop;
 92              }
 93              // only one option left--display warning Icon
 94              else
 95              {
 96                 IconType = MessageBoxIcon.Warning;
 97              }
 98          }
 99
 100         // display MessageBox and Button user pressed
 101         private void displayButton_Click(object sender, EventArgs e)
 102         {
 103            // display MessageBox and store
 104            // the value of the Button that was pressed
 105            DialogResult result = MessageBox.Show(
 106               "This is your Custom MessageBox.", "Custon MessageBox",
 107               ButtonType, IconType);
 108
 109            // check to see which Button was pressed in the MessageBox
 110            // change text displayed accordingly
 111            switch (result)
 112            {
 113               case DialogResult.OK:
 114                  displayLabel.Text = "OK was pressed.";
 115                  break;
 116               case DialogResult.Cancel:
 117                  displayLabel.Text = "Cancel was pressed.";
 118                  break;
 119               case DialogResult.Abort:
 120                  displayLabel.Text = "Abort was pressed.";
 121                  break;
 122               case DialogResult.Retry:
 123                  displayLabel.Text = "Retry was pressed.";
 124                  break;
 125               case DialogResult.Ignore:
 126                  displayLabel.Text = "Ignore was pressed.";
 127                  break;
 128               case DialogResult.Yes:
 129                  displayLabel.Text = "Yes was pressed.";
 130                  break;
 131               case DialogResult.No:
 132                  displayLabel.Text = "No was pressed.";
 133                  break;
 134            }
 135        }
 136     }
 137 }

We store the user’s choices in properties IconType and ButtonType (declared in lines 13–14). IconType is of type MessageBoxIcon, and can have values Asterisk, Error, Exclamation, Hand, Information, None, Question, Stop and Warning. The sample output shows only Error, Exclamation, Information and Question icons.
ButtonType is of type MessageBoxButtons, and can have values AbortRetryIgnore, OK, OKCancel, RetryCancel, YesNo and YesNoCancel. The name indicates the options that are presented to the user in the MessageBox. The sample output windows show Message-Boxes for all of the MessageBoxButtons enumeration values.
We created separate GroupBoxes—Button Type and Icon—containing RadioButtons for the corresponding enumeration options. Only one RadioButton can be selected from each GroupBox. When a user clicks the Display Button, a customized MessageBox is displayed. A Label (displayLabel) shows which Button the user pressed in the MessageBox.
The RadioButtons’ event handler responds to each RadioButton’s CheckedChanged event. When a RadioButton in the Button Type GroupBox is selected, the event handler (lines 23–54)—which we set for all RadioButtons in that group—sets the ButtonType. Similarly, a RadioButton in the Icon GroupBox is selected, the event handler (lines 57–98)—which we set for all RadioButtons in that group—sets the IconType.
The Click event handler for displayButton (lines 101–135) creates a MessageBox (lines 105–107). The MessageBox options are specified with the values stored in IconType and ButtonType. When the user clicks one of the MessageBox’s buttons, the result of the message box is returned to the app. This result is a value from the DialogResult enumeration that contains Abort, Cancel, Ignore, No, None, OK, Retry or Yes. The switch statement in lines 111–134 tests for the result and sets displayLabel.Text appropriately.