
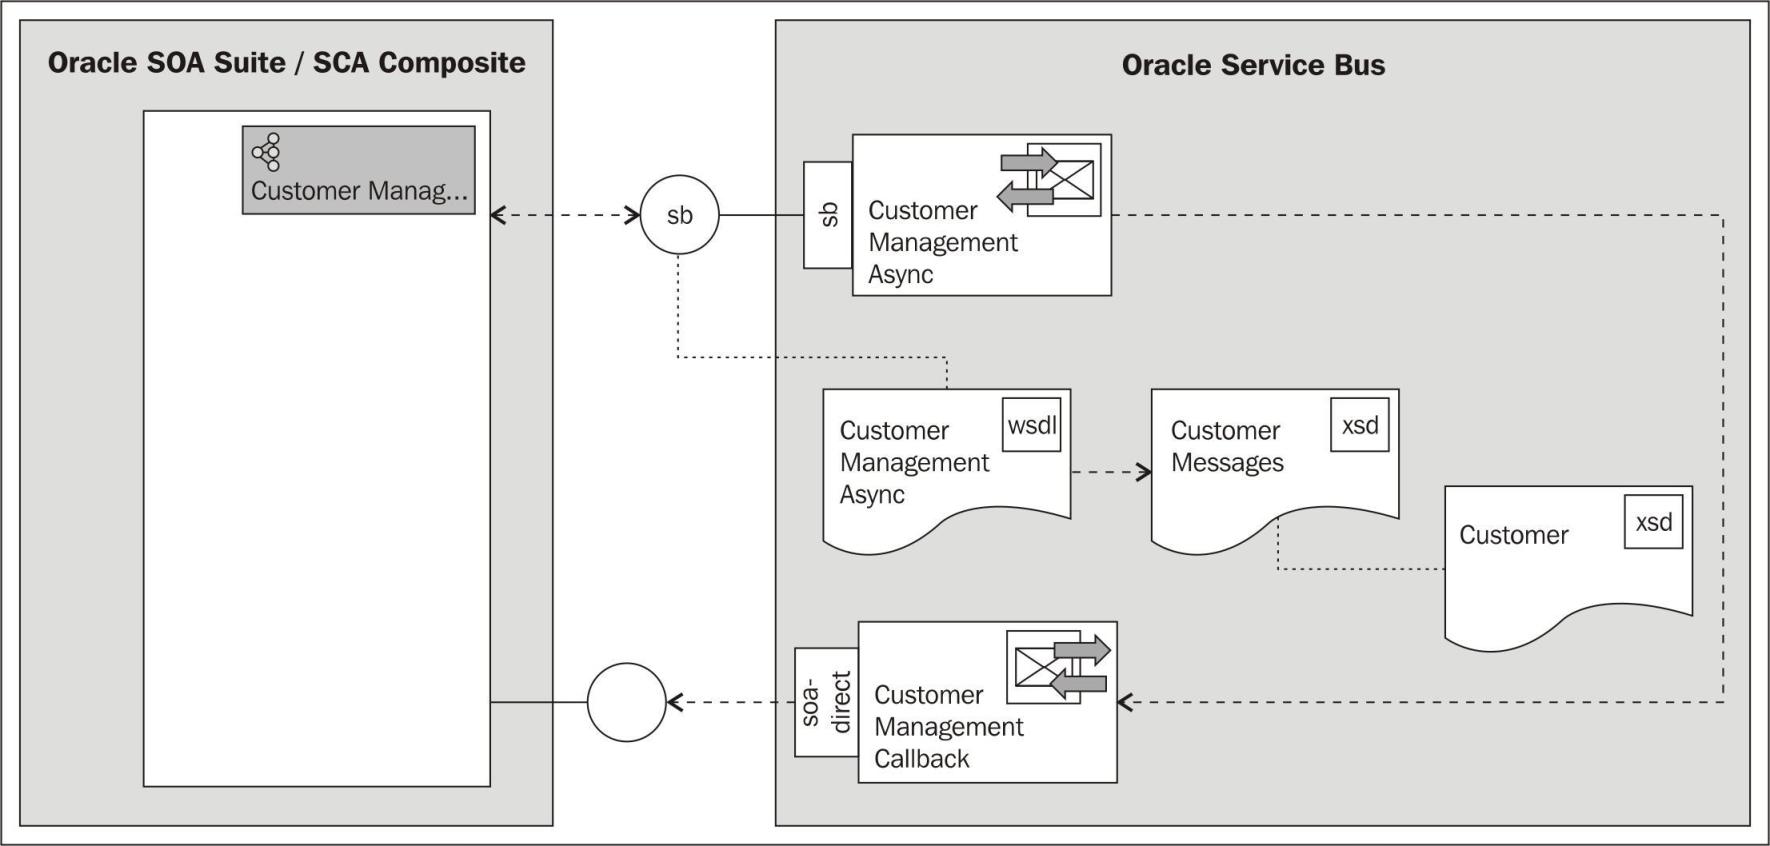
In this recipe, we will call an OSB service from a SCA Suite composite. The OSB service consists of a proxy service CustomerManagementAsync with a one-way interface accepting the call and a business service CustomerManagementCallback, which implements the callback interface for sending the response back to the SOA Suite in an asynchronous manner:
Copy the soa-suite-invoking-osb-service-async-from-sca-composite holding the JDeveloper project from chapter-8getting-readyinvoking-osb-service-async-from-sca-composite into a local workspace folder.
Import the base OSB project containing the necessary schemas and the right folder structure into Eclipse from chapter-8getting-readyinvoking-osb-service-async-from-sca-composite.
We start with the OSB side where we will create a proxy service which has a one-way interface. In the proxy service we first only add a pipeline pair, which logs the SOAP header. By that we can examine the addressing part, which we need later to dynamically callback through a business service.
InEclipse OEPE, perform the following steps:
- Open the
CustomerManagementAsync.wsdlin thewsdlfolder.The WSDL defines two port types, one for the one-way request and one for the response as a callback:

The CustomerManagementAsync port type will be implemented by the proxy service whereas the CustomerManagementAsyncCallback will be implemented by a business service. Let's start with the proxy service:
- In the
proxyfolder, create a new proxy service and name itCustomerManagementAsync. - Navigate to the General tab and select WSDL Web Service as the Service Type.
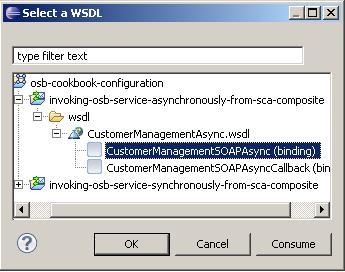
- Click on Browse and expand the
CustomerManagementAsync.wsdlin thewsdlfolder. - Select CustomerManagementSOAPAsync (binding) and click on OK:
- Confirm the Transport Configuration Change pop-up window by clicking on Yes.
- Navigate to the Transport tab and check that sb is selected as Protocol value.
- Navigate to the Message Flow tab and insert a Pipeline Pair node.
- In the Request Pipeline insert a new stage.
- Add a Log action to the stage.
- Click on the Expression link in the Properties window for the Log action.
- Drag header from the Variable Structures to the Expression field.
- Select Warning for the Severity drop-down listbox:

- Deploy the project to the OSB server.
We have now created the proxy service, which logs the content of the header to the console. We will add the invocation of the callback business service later. Let's now create the Mediator on the SOA Suite side, which will call this proxy service through a direct binding. In JDeveloper perform the following steps:
- Open the workspace in JDeveloper by selecting File | Open and navigating to the
invoking-async-from-sca-composite.jwsfile. - Click on the composite.xml located in the CustomerManagement project to open up the SCA composite view.
- Drag a Mediator component from the Service Components section of the Component Palette on the right and drop it on the Components area.
- Enter
CustomerManagementASyncinto the Name field. - Choose One-Way Interface for the Template drop-down listbox.
- Click on the magnifying glass button right to the Input field.
- In the Type Chooser window expand the CustomerMessages.xsd below the Project Schema Files node.
- Select the FindCustomer node and click on OK.
- Click on OK to create the Mediator component:

Now let's invoke the OSB proxy service from the Mediator. For that we need to add a direct binding to the composite. In JDeveloper, perform the following steps:
- On the Component Palette, drag the Direct Binding from the Service Adapters section, and drop it on the External References section of the SCA composite.
- Enter
CustomerManagementAsyncDirectinto the Name field. - Choose Reference for the Type drop-down listbox.
- Choose Oracle Service Bus for the Reference Target drop-down listbox.
- Click on the icon with the green arrow right to the WSDL URL field.
- On the SOA Resource Browser pop-up window, select Resource Palette and then expand the ApplicationServerConnection:

- Navigate to the CustomerManagmentAsync (direct) proxy service and click on OK. If the WSDL file is not available, export it from Eclipse to the file system and import it into JDeveloper from there.
- Back on the Direct Binding window, select CustomerManagementAsync for the Port Type and CustomerManagemementAsyncCallback for the Callback Port Type.
- Enable copy wsdl and its dependent artifacts into the project option and click on OK:

- Confirm the pop-up window by clicking on OK.
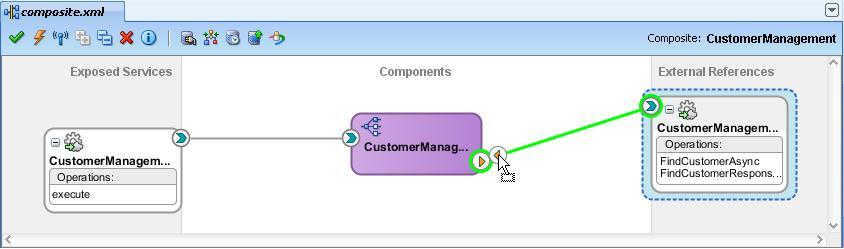
- Drag a wire from the CustomerManagementDirect external reference to the CustomerManagementSync Mediator component:
Next, we will change the Mediator component so that the request as well as the response message is passed through by the static routing rule. Perform the following steps to change the Mediator componnt:
- Double-click on the CustomerManagementAsync Mediator component.
- Click on the icon right to the Assign Value of the request.
- In the Assign Values pop-up window, click on the green plus icon.
- In the From section, select expression for the Type drop-down listbox.
- Enter
$in.request/inp1:FindCustomerinto the Expression field. - In the To section, select expression for the Type drop-down listbox.
- Enter
$out.parameters/ns2:FindCustomerinto the Expression field: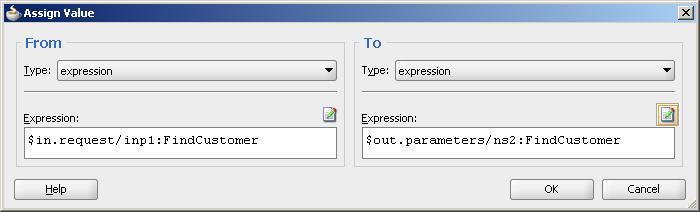
- Click on OK twice.
Now let's deploy the SCA composite to the SOA Suite server to test the request. In JDeveloper, perform the following steps:
- Right-click on the
CustomerManagement, project and select Deploy | CustomerManagement. - Select Deploy to Application Server from the list of deployment actions and click on Next.
- Enable the Overwrite any existing composites with the same revision ID check box and click on Next.
- Select the ApplicationServerConnection from the list of application servers and click on Fnish.
- Check the SOA-Log and Deployment status window for errors. The deployment was successful, if a deployment finished message is shown.
Next, let's test the CustomerManagement composite. In Enterprise Manager, perform the following steps:
- Expand the SOA node in the tree on the left, expand soa-infra node, and click on the default node.
- Click on CustomerManagement [1.0] in the list of composites and details of the composite are displayed.
- Click on the Test tab.
- The Test Web Service screen is shown, which allows us to test the SOAP Binding of the composite.
- On the Request tab, in the Input Arguments section enter
100into the ID field and click on Test Web Service in the top-right corner.
We won't see a response because it is an asynchronous process and the SOA Suite instance will wait forever for this response because we didn't implement the callback in our proxy service.
The OSB console window will show the output of the Log action with the SOAP header of the SOA Suite request:

The SOAP Header contains an addressing element with the callback URL:
<wsa:Address>t3://<soaserver>:<port>/default/CustomerManagement2!1.0*soa_fd4fbf3b-8708-4d19-acc7-ed375008370a/CustomerManagementAsyncDirect#CustomerManagementAsyncMed/CustomerManagementAsyncDirect</wsa:Address>.
For the callback URI in the business service we only need to use part of the URL: /default/CustomerManagement2!1.0 /CustomerManagementAsyncDirect#CustomerManagementAsyncMed/CustomerManagementAsyncDirect.
So we need to remove *soa_fd4fbf3b-8708-4d19-acc7-ed375008370a from the URL. This can be done using some XQuery functions in the expression of the Routing Options action.
Let's create the business service implementing the dynamic callback on the address provided by the SOAP header. In Eclipse OEPE, perform the following steps for that:
- In the
businessfolder, create a new business service and name itCustomerManagementCallback. - Navigate to the General tab and select WSDL Web Service as the Service Type.
- Click on Browse and expand the CustomerManagementAsync.wsdl in the wsdl folder.
- Select CustomerManagementSOAPAsyncCallback (binding) and clck on OK:

- Confirm the Transport Configuration Change pop-up window by clicking on Yes.
- Navigate to the Transport tab and check that soa-direct is selected as the Protocol value.
- Enter
callbackin Endpoint URI field and click on Add: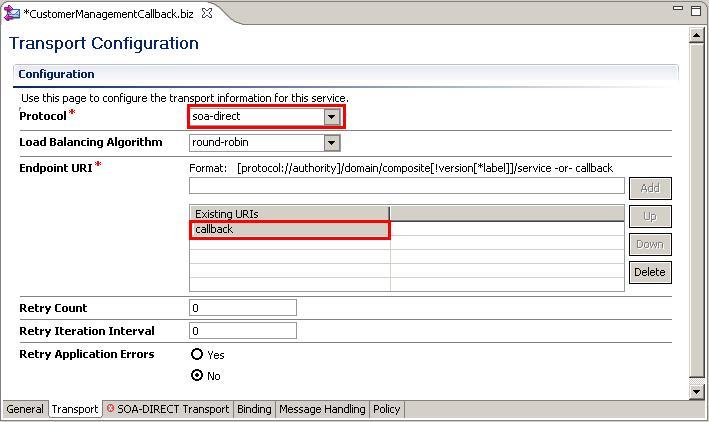
- Navigate to the SOA-DIRECT Transport tab and select Service Callback for the Role option.
We have created the business service for the callback. Now let's add the necessary actions to dynamically specify the callback address, based on the WS-Addressing header values passed in the request. In Eclipse OEPE, perform the following steps:
- Open the CustomerManagementAsync proxy service and navigate to the Message Flow tab.
- Insert a Route node after the Pipeline Pair node and name it
CallbackRoute. - Insert a Routing action into the CallbackRoute.
- Navigate to the Properties tab of the Routing action and click on Browse.
- In Select a Service Resource dialog, select CustomerManagementCallback.biz and click on OK.
- Select FindCustomerResponseAsync as the value of the Invoking drop-down listbox.
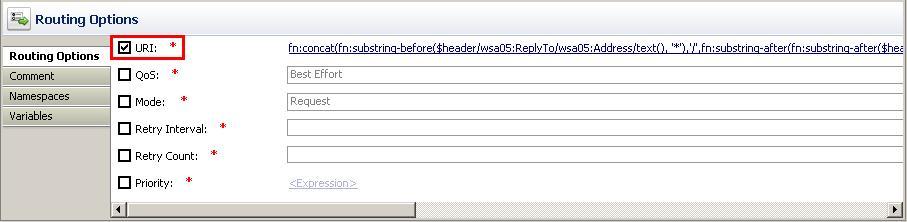
- Right-click on the Request Action of the Routing and select Insert Into | Communication | Routing Options.
- On the Properties tab of the Routing Options action enable URI.
- Click on the Expression link and add the following code in the Expression window to dynamically define and overwrite the callback URI:
- Click on OK:
- Insert a Replace action after the Routing Options action to provide a response.
- On the Properties tab of the Replace action, click on the Expression link of the Replace Properties window.
- Copy the following XML fragment into the Expression field:
<cus:FindCustomerResponse xmlns:cus="http://osb-cookbook/CustomerManagementAsync" xmlns:cus1="http://osb-cookbook/customer" xmlns:cred="http://osb-cookbook/creditcard"> <Customer> <cus1:ID>100</cus1:ID> <cus1:FirstName>Larry</cus1:FirstName> <cus1:LastName>Ellison</cus1:LastName> <cus1:EmailAddress>[email protected]</cus1:EmailAddress> <cus1:Addresses/> <cus1:BirthDate>1967-08-13</cus1:BirthDate> <cus1:Rating>A</cus1:Rating> <cus1:Gender>Male</cus1:Gender> <cus1:CreditCard> <cred:CardIssuer>visa</cred:CardIssuer> <cred:CardNumber>123</cred:CardNumber> <cred:CardholderName>Larry</cred:CardholderName> <cred:ExpirationDate>2020-01-01</cred:ExpirationDate> <cred:CardValidationCode>1233</cred:CardValidationCode> </cus1:CreditCard> </Customer> </cus:FindCustomerRespone> - Click on OK.
- Enter
bodyinto the In Variable field and select the Replace node contents option:
- Deploy the project to the OSB server.
In order to see that the callback worked and the Mediator got the callback message, let's add a file adapter and write the callback message to a file. In JDeveloper, perform th following steps:
- On the Component Palette, drag the File Adapter from the Service Adapters section and drop it on the External References section of the SCA composite.
- Click on Next.
- Enter
AsyncResponseToFileinto the Service Name field and click on Next twice. - Choose Write File for the Operation Type option and click on Next.
- Enter
c: empinto the Directory for Outgoing Files (physical path) field. - Enter
async_response_%SEQ%.xmlinto the File Naming Convention field and click on Next. - Click on the magnifying glass button right to the URL field.
- In the Type Chooser window expand the CustomerMessages.xsd inside the Project Schema Files folder, select the FindCustomerResponse element, and click on OK.
- Click on Next and Finish.
- Double-click on the Mediator to open the
CustomerManagementAsync.mplanand click on the Browse for target service operations icon next to Callback: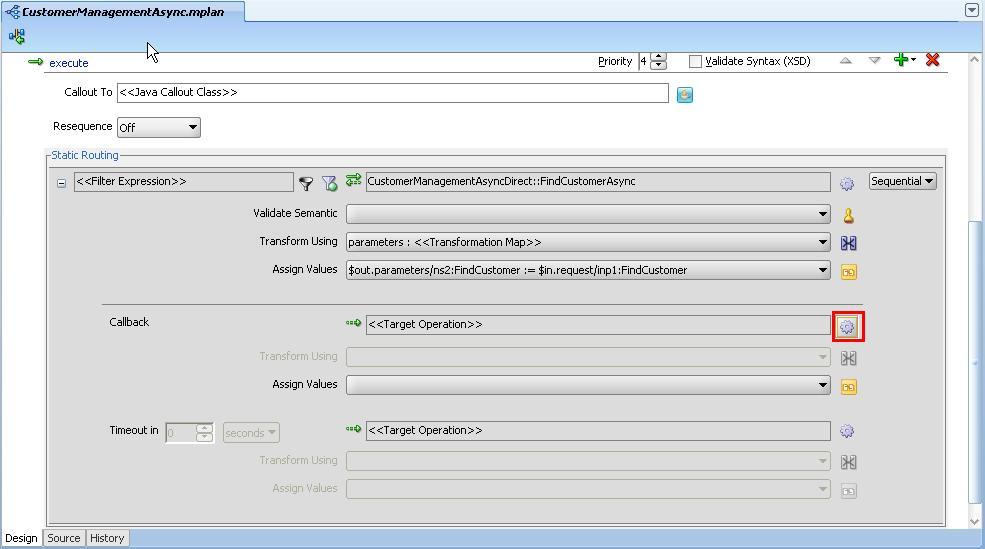
- Click on Service on the Target Type pop-up window:

- Expand the AsyncResponseToFile node, select Write, and click on OK.
- Click on the icon next to the Assign Value of the callback.
- In the Assign Value pop-up window click on the green plus icon.
- In the From section, select expression for the Type drop-down listbox.
- Enter
$in.parameters/tns:FindCustomerResponseinto the Expression field. - In the To section, select expression for the Type drop-down listbox.
- Enter
$out.body/imp1:FindCustomerResponseinto the Expression field. - Deploy the project to the SOA server.
- Retest the CustomerManagement composite in Enterprise Manager (repeat Steps 50 to 55).
- On the Response tab, click on Launch Flow Trace to see the trace of the test:
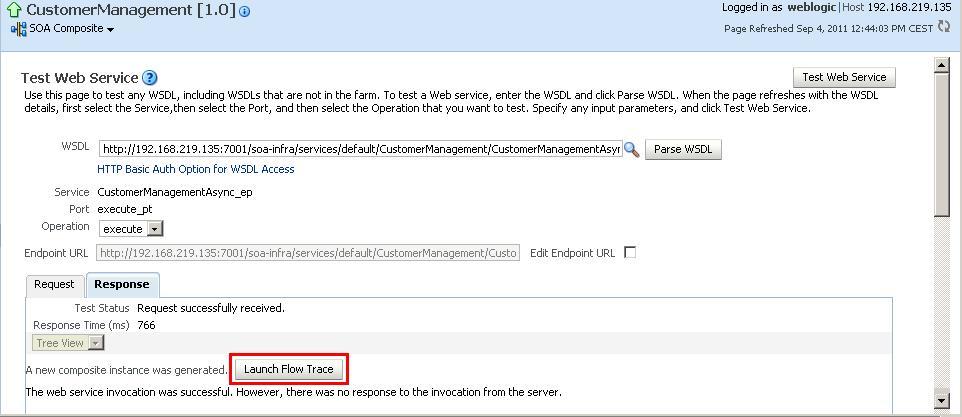
The SOA Suite composite instance flow trace is displayed and we can see that the instance got a response and then ivoked the file adapter:

A file called async_response_1.xml containing the callback message should be available at c: emp. We have successfully invoked the OSB service and returned the response asynchronously back to the Mediator through an OSB business service. To test it, we have written the callback message to a file.
This recipe demonstrated the use case, where an asynchronous SCA service component in a SCA composite invokes an OSB WSLD-based proxy service through the SB transport. To invoke this SB proxy service, the SCA service component needs to use a Direct Binding reference of target type Oracle Service Bus. Because of the asynchronous interface, the proxy service is only handling the inbound side (the request message), the callback message, when the processing on the OSB is finished, is sent by a business service through the SOA-DIRECT transport.
In the recipe, the OSB is not doing any real processing except for creating the response message. In a real case, the OSB proxy service would probably call an external service (maybe with an asynchronous interface as well) and then return the response from that external service through the business service back to the SCA component of the SOA Suite.

As the callback is sent to a different connection, OSB must be able to remember the original callback location when calling back the SCA component.
When using WS-Addressing, the callback address is sent to the request proxy service in the ReplyTo address header. Before invoking the external service, the request proxy service passes this address as a referenceParameter property inside the ReplyTo header. Following the WS-Addressing specification, the referenceParameter property is inserted in the SOAP header block of the callback from the external service.
The callback proxy service can then extract this callback address and set the callback business service URI through a Transport Options action as shown in this recipe.