
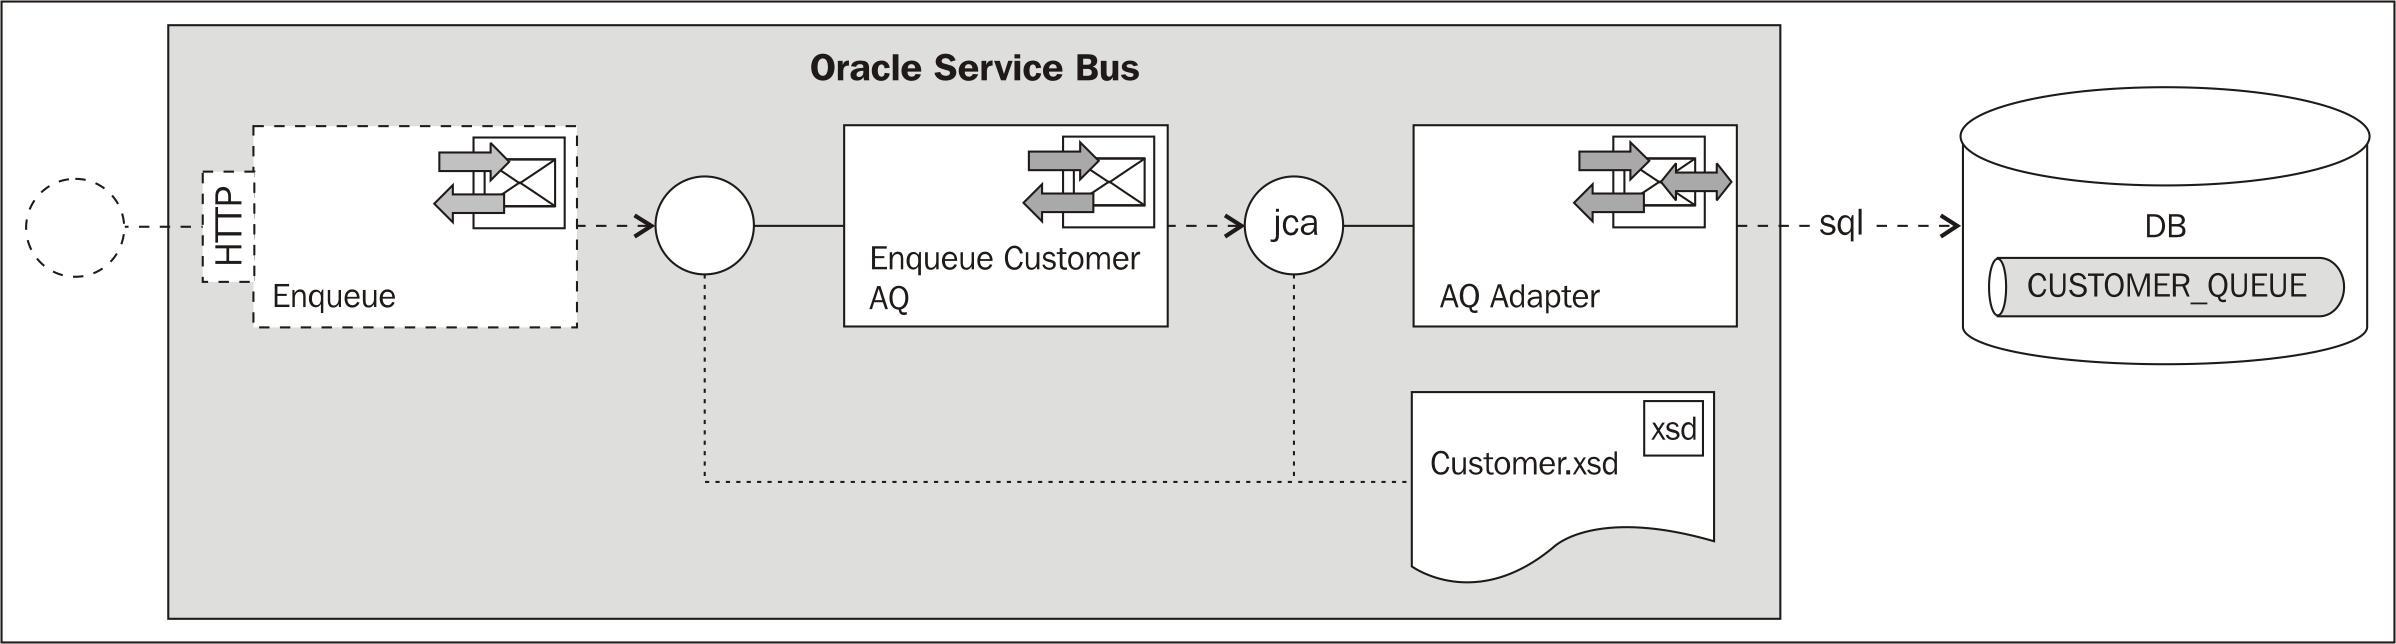
In this recipe, we will configure an outbound AQ adapter, so that it can be used to publish messages from the Oracle Service Bus to an Oracle AQ queue on the database:
The AQ database queue CUSTOMER_QUEUE, which we will use has been set up with the OSB Cookbook standard environment using the following SQL and PL/SQL code:
BEGIN
  sys.dbms_aqadm.create_queue_table(
                queue_table => 'CUSTOMER_QUEUE_T',
                queue_payload_type => 'SYS.XMLTYPE',
                storage_clause => 'PCTFREE 10 PCTUSED 40 INITRANS 1 MAXTRANS 255',
                sort_list => 'ENQ_TIME',
                compatible => '8.1.3'),
END;
/

BEGIN
  sys.dbms_aqadm.create_queue(
                queue_name => 'CUSTOMER_QUEUE',
                queue_table => 'CUSTOMER_QUEUE_T',
                queue_type => sys.dbms_aqadm.normal_queue,
                max_retries => 5,
                retry_delay => 0);
  sys.dbms_aqadm.start_queue( queue_name => 'CUSTOMER_QUEUE', enqueue => TRUE, dequeue => TRUE);

END;For this recipe, we will use the database queue CUSTOMER_QUEUE available with the OSB Cookbook standard environment. Make sure that the connection factory is set up in the database adapter configuration, as shown in the Introduction of this chapter.
You can import the OSB project containing the base setup for this recipe into Eclipse from chapter-7getting-readyusing-aq-adapter-to-enqueue-to-db.
First we create the AQ adapter, which will implement the enqueue functionality to the database. In JDeveloper perform the following steps:
- Open the file
composite.xmlof the projectEnqueueToDB. - From the Component Palette, select the SOA components if not already done.
- Drag the AQ Adapter to the External References lane and click on Next.
- Enter
EnqueueCustomerin the Service Name field and click on Next. - Select the OsbCookbookConnection from the Connection listbox.
- Check that eis/aq/OsbCookbookConnection is the value of the JNDI Name field and click on Next.
- On the Adapter Interface screen, select the Define from operation and schema (specified later) option and click on Next.
- On the Operation screen, select the Enqueue option and leave the value
Enqueuefor the Operation Name field. - Click on Next.
- On the Queue Name screen, click on Browse.
- On the Select Queue screen, select CUSTOMER_QUEUE and click on OK.
- Click on Next.
- Leave the Correlation Id empty and click on Next.
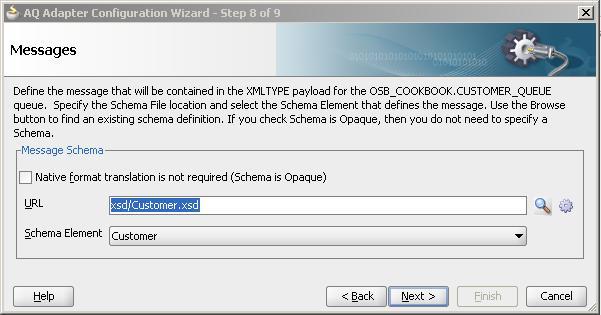
- On the Messages screen, select the Browse for schema file option.
- Choose the Customer type from the Customer.xsd and click onOK.
- Click on Next.
- Click on Finish.
- Click on the Save All to save the SOA project. The composite should look similar to the one shown in the following screenshot:
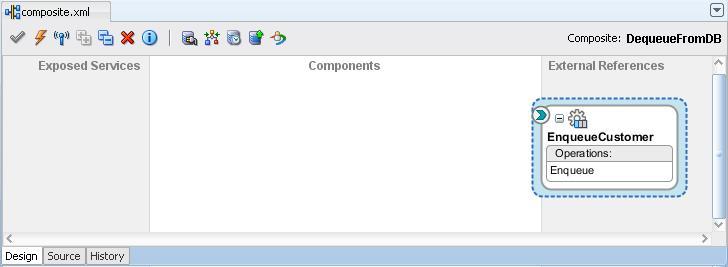
The definition of the AQ adapter for publishing messages to the
CUSTOMER_QUEUEdatabase queue is now ready. The work in JDeveloper is done and we can switch to Eclipse OEPE and perform the following steps to create a business service uing the AQ adapter: - On the OSB project hit Refresh (F5) on the adapter folder. The artifacts generated by JDeveloper in the previous steps will show up.
- Right-click on the
adapter/EnqueueCustomer_ac.jcafile and select Oracle Service Bus | Generate Service from the context menu. - Select the
businessfolder for the location of the business service. - Leave the Service Name and WSDL name as suggested by the wizard.
- Click on OK.
- Deploy the project to the OSB server.
We now have a business service that allows the Oracle Service Bus to use the AQ adapter through the JCA transport. The interface of the business service is defined by the
EnqueueCustomer_aqWSDL, which imports and uses theEnqueueCustomerWSDL generated by the AQ adapter. We could now create a proxy service, which allows us to send a Customer message over a common protocol, such as SOAP/HTTP. However, in this recipe we will just focus on testing the OSB to AQ communication.In the Service Bus Console perform the following steps:
- In the Project Explorer, navigate to the business service EnqueueCustomer_aq.
- Click on the Launch Test Console icon under Actions.
- Enter a valid customer message into the Payload field and click on Execute.
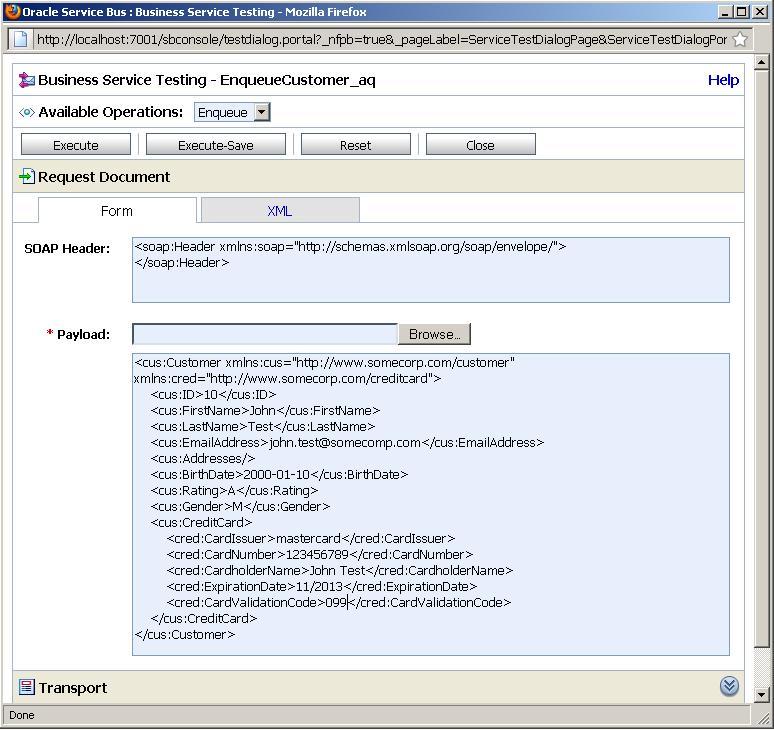
The business service publishes the message through the AQ Adapter to our queue. We can check the database if the message is located there.
- Connect to the OsbCookbookConnection within JDeveloper.
- Expand the tables and double-click on the CUSTOMER_QUEUE_T queue table.
- Click on the Data tab.
- Navigate to the
USER_DATAcolumn and click on the Edit Value button to see the complete text of the message.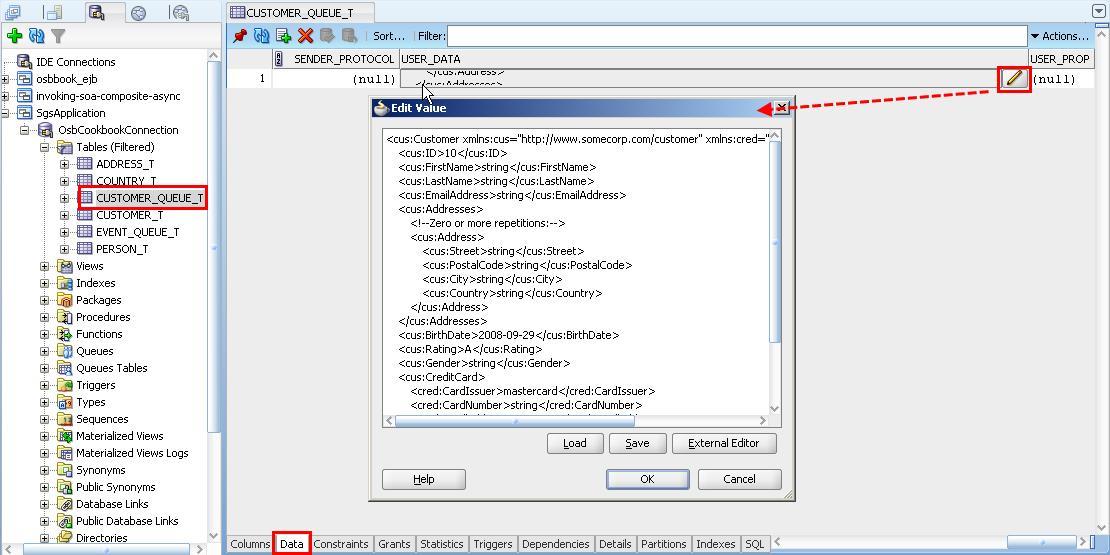
Using the AQ adapter allows us to expose Oracle AQ queues to the Oracle Service Bus.
In practice, we would invoke the business service from within a proxy service, either in a Routing or Publish action. The proxy service would then expose any other transport, for example, a WSDL Web Service, to offer the publishing a message to an AQ queue through a SOAP-based Web Service.
The queue table message has a column called CORRID that can store a correlation identifier. This is very helpful if you need to provide message tracking over multiple transactions.
The value can either be hard coded when configuring the adapter or passed dynamically when invoking the business service. When testing the business service through the test console, the value can be specified through the property in the Transport section.

To pass a correlation identifier from a proxy service, the Transport Header action should be used within a Routing or Publish action, as shown in the following screensho:
