
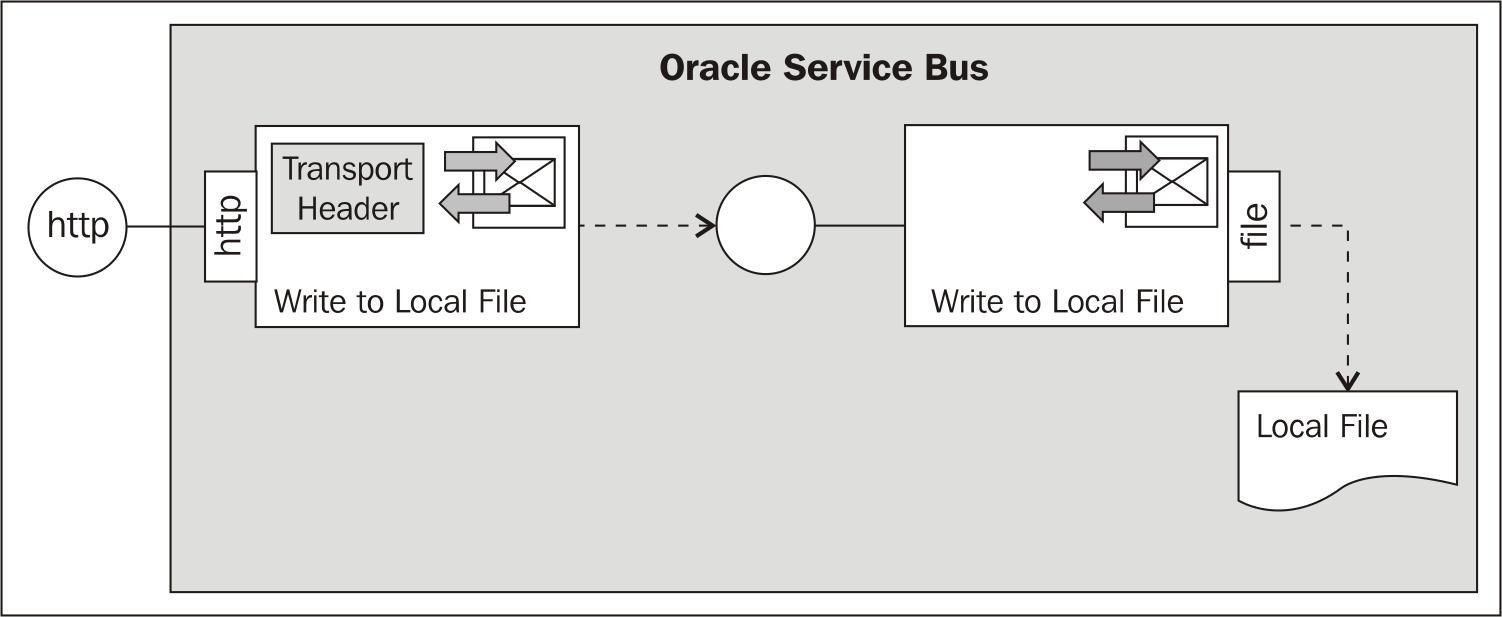
In this recipe, we will write a file to the local filesystem (local to the OSB server). We will implement a business service which uses the File Transport to do that. Additionally, we will create a proxy service and control the filename of the file being written by using a Transport Header action.
We begin with a business service writing a file to a local folder. In Eclipse OEPE, perform the following steps:
- Create a new OSB project and name it
using-file-transport-to-write-to-file. - Create a
businessfolder in that new project. - In the
businessfolder create a new business service namedWriteToLocalFile. - On the General tab select Messaging Service as the Service Type option.
- Navigate to the Messaging tab and select Text as the Request Message Type.
- Leave the Response Message Type on None.
- Navigate to the Transport tab and select file from the Protocol drop-down list.
- Enter
file:///C:/work/destinationinto the Endpoint URI field and click Add. - Navigate to the File Transport tab.
- Enter
Hellointo the Prefix field and.txtinto the Suffix field.
- Deploy the project to the OSB server.
The business service to write a file is now configured and we can test it through the test console. In the Service Bus console, perform the following steps:
- Click on Project Explorer in the menu on the left and navigate to the WriteToLocalFile business service.
- Click on the Launch Test Console icon.
- Enter
Hello world!For the content to write to the local file into the Payload field. - Click Execute.
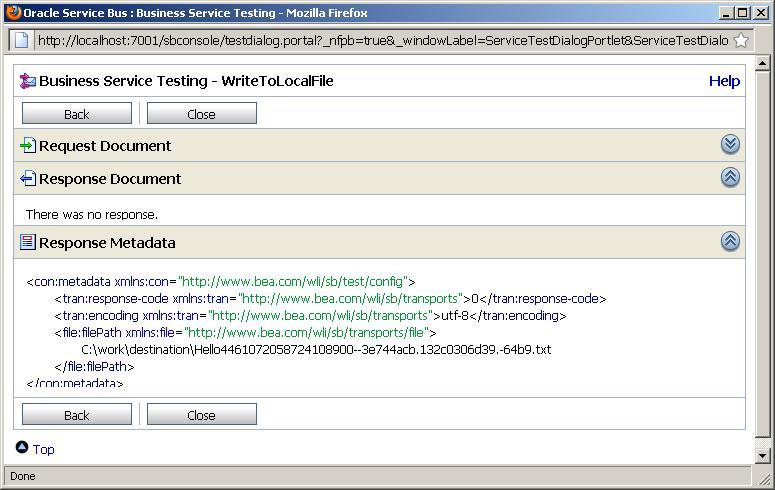
- The result of the test is presented as shown in the following screenshot. There is now response, as writing a file is always a one-way operation. But the content of the metadata returns the file path, that is, a generated name with the prefix Hello and the suffix .txt.
- Check that a file has been created at the given location.
We have a business service through which we can write to a local file. The filename is generated. We can only control the prefix and suffix being used through the configuration of the File Transport.
To specify the complete filename, a Transport Header action can be used in the Routing action of the proxy service which is invoking the business service.
Simply using a business service configured with the File Transport is enough to be able to write a file to a local folder. The Endpoint URI configured on the File Transport defines where that target local folder resides. If the folder does not yet exist, then it is created by the File Transport upon writing the first file.
The File Transport allows some control over the filename by the prefix and suffix option. However, the middle part of the filename is by default generated based on a UUID-like string. By that it's guaranteed that the filenames are always unique. If this is not the behavior we want, then we can overwrite the filename by using a Transport Header action, as shown in the next recipe Specifying a filename at runtime.
If a file already exists, a _N will be appended, where N is a number starting from 0. The string will be added before the suffix, so an original filename targetFile.txt would be extended to targetFile_0.txt, if targetFile.xml already exists in the destination folder.
In this section, we discuss how to specify the filename dynamically at runtime and how to use the FTP Transport to write a file to a remote folder through FTP.
If we want to overwrite the filename generated by the File Transport, then we have set some transport headers using a Transport Header action when invoking the business service from a proxy service.
So let's create a proxy service which invokes the business service created previously. To simplify things, we just use the Generate Service functionality to create a proxy service based on the existing business service and change the protocol to HTTP transport. In Eclipse OEPE, perform the following steps:
- Create a
proxyfolder. - Right-click on the business service WriteToLocalFile and select Oracle Service Bus | Generate Proxy Service.
- Select the
proxyfolder in the Enter or select the parent folder tree, enterWriteToLocalFileinto the File name field and click Finish. - Navigate to the Transport tab and change the Protocol to http.
- Navigate to the Message Flow tab.
- Insert a Transport Header action into the generated Request Action of the Routing node.
- On the Properties tab of the Transport Header action, click on Add Header.
- Select the Defined option and select file and fileName in the corresponding drop-downs.
- Select the Set Header to option and click on <Expression>.
- Enter
'TargetFile'(including the quotes) into the Expression field.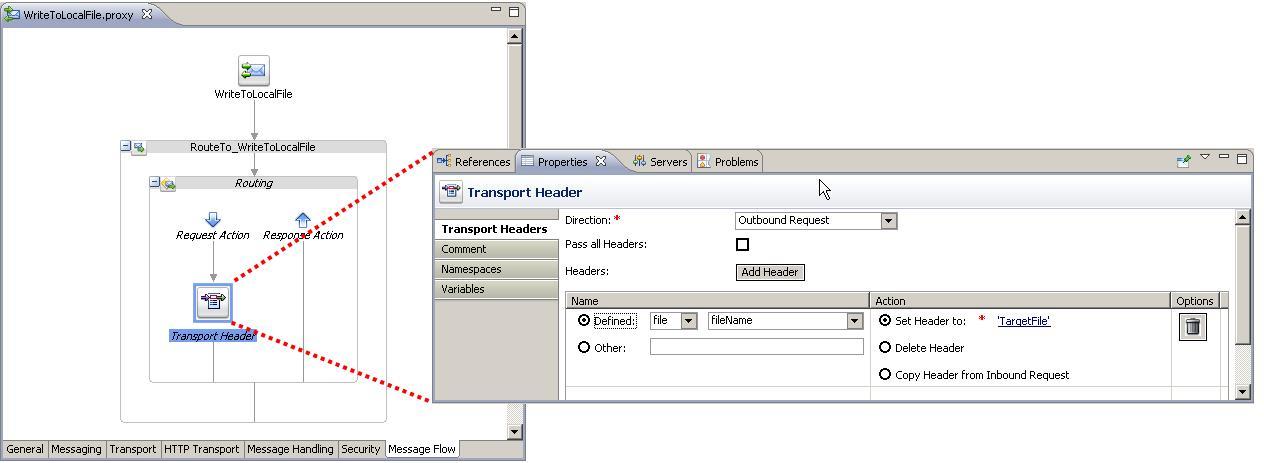
- Deploy the project to the OSB server.
We can now test the proxy service through the test console. In the Service Bus console, perform the following steps:
- Click on Project Explorer in the menu on the left and navigate to the WriteToLocalFile proxy service inside the
proxyfolder. - Click on the Launch Test Console icon.
- Enter
Hello world!For the content to write to the local file into the Payload field. - Click Execute.
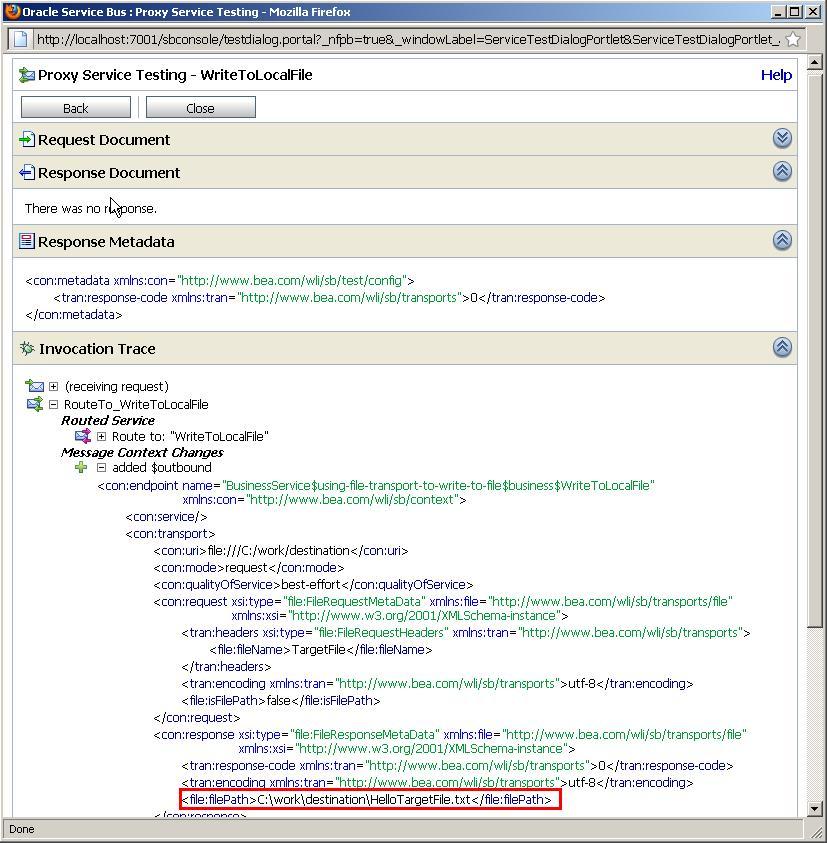
- The result of the test should be similar to that shown in the following screenshot. The outbound variable will show the value of the complete filePath used to write the file. The filename is created with the prefix Hello and the suffix .txt from the File Transport configuration and the name TargetFile from the Transport Header action.
- Check that a file has been created at the given location.
Similar to shown in the Using the File or FTP Transport to trigger a proxy service upon arrival of a new file recipe, we can replace the File Transport by a FTP Transport to write to a remote filesystem through FTP.
To write the file to an FTP server, perform the following steps in Eclipse OEPE:
- Create a Service Account artifact called
FTPUser.sain the same way as shown in the Using the File or FTP Transport to trigger a proxy service upon arrival of a new file recipe. - Create a new business service
WriteToFtpFilein thebusinessfolder. - On the General tab select Messaging Service as the Service Type option.
- Navigate to the Messaging tab and select Text as the Request Message Type.
- Leave the Response Message Type on None.
- Navigate to the Transport tab ad select ftp from the Protocol drop-down list.
- Enter
ftp://localhost/into the Endpoint URI field and click Add.
- Navigate to the FTP Transport tab.
- Select external user for the User Authentication option, click Browse and select the FTPUser Service Account artifact.
- Enter
Hellointo the Prefix for destination File Name and.txtinto the Suffix for destination File Name field. - Select ascii for the Transfer Mode option.

This business service can now be invoked from the proxy service instead and the file is written to the FTP server.