
In this recipe, we will trigger a proxy service upon arrival of a file in a certain location. We will implement both, a proxy service listening on a folder in a local filesystem as well as one listening to a remote location via FTP.

In order to make working with the FTP example as simple as possible, we first install a simple local FTP server:
- From http://coreftp.com/server/index.html, download the Core FTP Server.
- Start the installer and click through it (leave all options on default).
- Create a folder
C:workftp. - Launch the Core FTP Server executable.
- Click on Setup.
- Click on New.
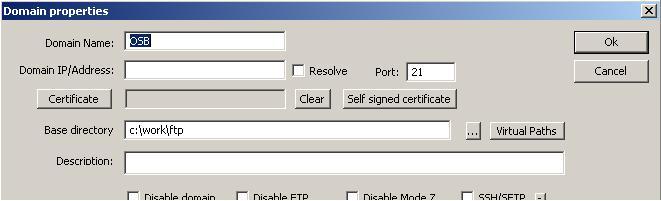
- Enter
OSBin the Domain Name field. - Enter
localhostin the Domain IP/Address field. - Enter
C:workftpin the Base directory field. - Click on OK.
- Back on the main setup window, select the newly created domain and click New on the lower half of the window, to create a user.
- Enter
osbin the User name field. - Enter
osbin the Password field.
- Click OK and then click Yes to confirm the creation of the home directory.
- Click OK in the main setup window.
- Click Start on the Core FTP Server main window.
The FTP server is started and ready to be used.
We begin with a proxy service listening on a local folder for new files. In Eclipse OEPE, perform the following steps:
- Create a new OSB project, name it
using-file-transport-to-trigger-serviceand add aproxyfolder to that new project. - In the
proxyfolder, create a new proxy service namedTriggeredByFile. - On the General tab select Messaging Service for the Service Type option.
- Navigate to the Messaging tab and select Text as the Request Message Type.
- Leave the Response Message Type on None.
- Navigate to the Transport tab select file from the Protocol drop-down list.
- Enter
file:///C:/work/landinginto the Endpoint URI field. - Navigate to the File Transport tab and enter
5into the Polling Interval field. - Select archive from the Post Read Action drop-down list.
- Enter
C:workstageinto the Stage Directory field,C:workarchiveinto the Archive Directory field andC:workerrorinto the Error Directory field.
- Navigate to the Message Flow tab, insert a Pipeline Pair and name it
FileProcessingPipelinePair. - Insert a Stage node into the Request Pipeline and name it
LogStage. - Insert a Log action into the stage.
- Enter
$inboundas the log Expression and set the Severity to Warning. - Insert a second Log action into the stage.
- Enter
$body/text()as the log Expression and set the Severity to Warning.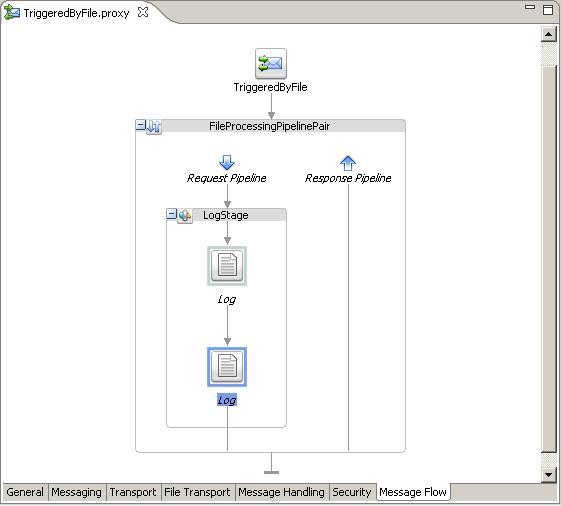
- Deploy the project to the OSB server.
Now our simple file polling service, implemented by a proxy service using the File Transport, is ready and can be tested.
Copy a text file into the folder
C:worklanding. Within five seconds, the file will disappear from that folder and two log messages, one with metadata from$inboundand one with the content of the file, are shown on the Service Bus console log window.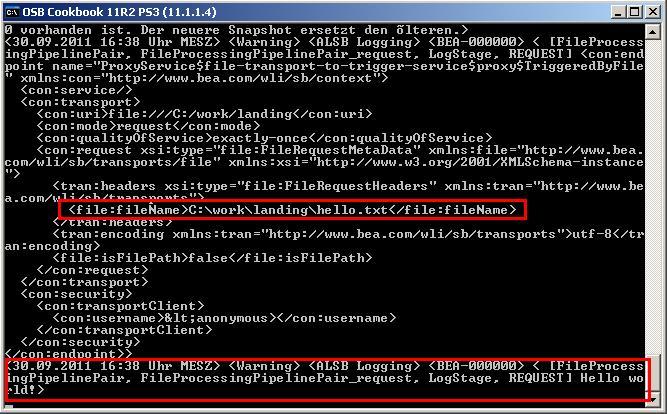
We have implemented a proxy service listening and process files arriving on a local folder. Now, let's implement a proxy service consuming files from a remote FTP location.
- In the
proxyfolder create a new proxy service namedTriggeredByFtp. - On the General tab select Messaging Service as the Service Type option.
- Navigate to the Messaging tab and select Text as the Request Message Type.
- Leave the Response Message Type on None.
- Navigate to the Transport tab and select ftp from the Protocol drop-down list.
- Enter
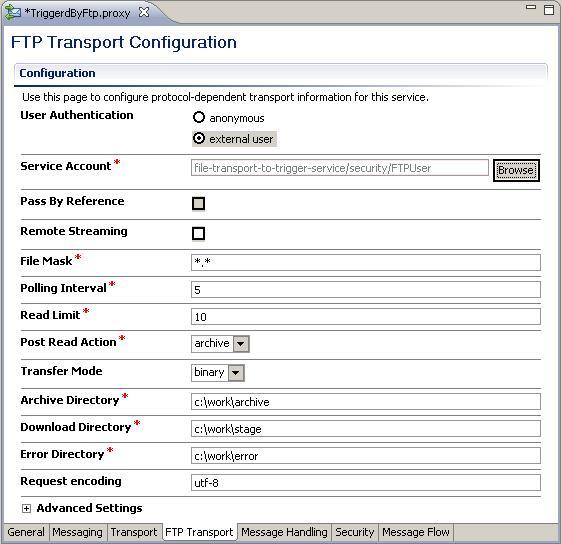
ftp://localhost/into the Endpoint URI field. - Navigate to the FTP Transport tab enter
5into the Polling Interval field. - Select archive from the Post Read Action drop-down list.
- Enter
C:workarchiveinto the Archive Directory field,C:workstageinto the Download Directory field and C:workerror into the Error Directory field.In order to access the FTP server, the proxy service needs to authenticate itself. To provide the credentials, we first need a Service Account, which can then be used on the proxy service.
- Within the file-transport-to-trigger-service project create a new folder and name it
security. - Right-click on the folder
securityand choose New | Service Account. - Enter
FTPUserinto the File name field and click Finish. - Select Static for the Resource Type option.
- Enter
osbinto the User Name field andosbinto the Password and Confirm Password fields.The Service Account is now configured and ready to be used from our proxy service.
- Reopen the TriggeredByFtp proxy service and navigate to the FTP Transport tab.
- Select external user for the User Authentication option.
- Right to the Service Account field, click Browse and select the service account created previously:
- Navigate to the Message Flow tab, insert a Pipeline Pair and name it
FileProcessingPipelinePair. - nsert a Stage to it and name it
LogStage. - Add a first Log action to the stage with
$inboundas the log Expression and set the Severity to Warning. - Add a second Log action to the stage with
$body/text()as the log Expression and set the Severity to Warning. - Redeploy the project to the OSB server.
Now our file polling service, implemented by a proxy service using the FTP Transport is ready and can be tested.
Copy a text file to the directory C:workftposb. Within five seconds the file will disappear from that folder and two log messages, one with the metadata of $inbound and one with the content of the file, are shown on the Service Bus console log window.
Both transports, the File and the FTP Transport work similarly. The main difference is the file retrieval mechanism. Of course, polling through FTP is more costly than polling on the local filesystem using the File Transport. Take that into account when defining the polling frequency.
If the transport discovers a new file in polling location, then the file is copied into the staging directory. The file remains in there until the execution of the proxy service is finished. The absolute path of the processed file is available within the message flow through the $inbound variable.
If the proxy service finishes with an uncaught error, the file is moved to the error folder. If the proxy service terminates without an error, the file is moved to the archive folder—or deleted, depending on the option chosen for Post Read Action. Files in the error and archive folders are automatically prefixed with a UUID to make the filename unique.
Proxy service execution started through either the File or FTP Transport can be transactional. A new transaction is started upon execution. Both the File and FTP Transport are one-way only; it is not possible to return a response.
In this section, we discuss the difference between the File or FTP Transport and the JCA adapters, show how to process files selectively and how to handle files with binary content.
The File and FTP transports are not as feature-rich as the corresponding File and FTP JCA adapters, known from the Oracle SOA Suite and also available for OSB.
For instance, with both the File and FTP transports, it is not possible to read a file within a message flow. A file can only be read inbound through polling, meaning that a new proxy service message flow is started. This is the behavior we have shown in this recipe.
To read a file from inside an already started and active message flow, use the File or FTP JCA adapter, as covered in the Using the File JCA adapter to read a file within the message flow recipe.
When using the File or FTP transport on a business service, then the behavior is always outbound, meaning that a file can only be written. This is covered in the recipe Using the File or FTP transport to write a file.
Furthermore, the JCA adapter also provides far richer metadata about the file being processed.
You can selectively process files inside the polling directory, by using the File Mask on the FTP Transport tab.

When working with files, we often end up with the requirement that we have to be able to handle files with binary content, such as images, movies, or other digital content.
The OSB offers no direct support for manipulating binary data inside the message flow of a proxy service. Binary data will be represented as a reference. If we change the Request Message Type on the Messaging tab of the proxy service from Text to Binary, the body will have the following content when copying a binary file into the polling folder:
<soapenv:Bodyxmlns:soapenv="http://schemas.xmlsoap.org/soap/envelope/"xmlns:con="http://www.bea.com/wli/sb/context"><con:binary-content ref="cid:6af7caf5:132a6198e59:6a40" /></soapenv:Body>
We can see that the content of the file is no longer present inside the <soapenv:Body> element, but only a reference is.
Such references to binary data can be passed as a byte array to an EJB message-driven bean or to an EJB session bean, where it can then be processed using Java.
Binary content can also be passed through the proxy service to a business service, which is using an outbound File or FTP Transport. In that case, we just pass the content of the body variable untouched to the business service.
Another option is to pass the binary content to a Java Callout action. A method accepting binary data can have the following signature.
public static void fileProcessing(byte[] inputData) {
  ...
}
When calling this method from a Java Callout action inside the message flow of a proxy service, the following XPath expression must be used to bind the inputData parameter:
$body/ctx:binary-content
Using this expression, the OSB automatically converts the reference contained in the <binary-content> element into a byte array, which can then be accessed in the Java code.