If there is a need to read the contents of a file inside a message flow of an already active proxy service, then neither the File Transport nor the FTP transport can be of any help. Reading a file with the File or FTP Transport is always only available inbound, implemented as a polling operation and starting a new message flow/proxy service upon detecting a new file.
This recipe will show how we can use the File JCA adapter to read a file at runtime, for example, to enrich data at runtime or to retrieve some configuration information. The JCA adapters are available since OSB 11g and are the same ones we know from the SOA Suite.
We will create a business service wrapping the artifacts created by the JCA adapter wizard in JDeveloper. By that the business service is just as any other business service seen so far and can be invoked from a proxy service using a Routing or Service Callout action as shown in this recipe.

The scenario shown can be helpful if you need to retrieve some configuration data or you'll have to enrich the message, and the data is already available as a file.
Import the base OSB project containing the folder structure and the nested JDeveloper project as shown in recipe Setting up OSB project to work with JCA adapters into Eclipse from chapter-6getting-ready
eading-a-file-within-a-message-flow.
First, we will use JDeveloper to create the File adapter, using the nested SOA project inside the adapter folder of the Eclipse OEPE project. In JDeveloper, perform the following steps:
- Open the
AdapterSOAProject.jprfile inside theadapterfolder of the OSB project, by selecting File | Open. - In the SOA project, double-click on the
composite.xmlfile to open the SCA composite. - To be able to create the File adapter, we need a XML Schema defining the data we will read. Copy the prepared XML Schema file from
chapter-6getting-ready eading-a-file-within-a-message-flowProperties.xsdand paste it into thexsdfolder inside the SOA project:
- On the SOA Composite view, drag a new File Adapter from the Component Palette and drop it on the External References swim lane on the right-hand side.

- Click Next.
- Enter
FileReadingServiceinto the Service Name field and click Next. - Select the Define from operation and schema (specified later) option and click Next.
- Select Synchronous Read File for the Operation Type option.
- Leave
SynchReadin the Operation Name field and click Next.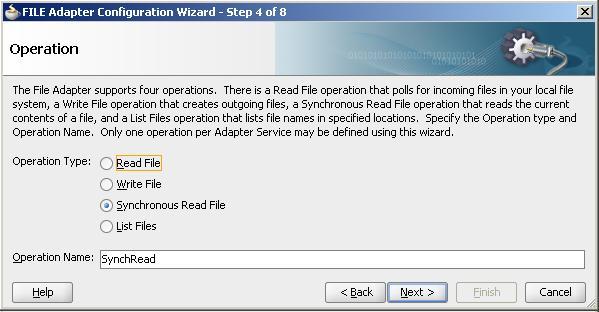
- Select Physical Path for the Directory names are specified as option.
- Enter
C:workfilesininto the Directory for Incoming Files field. - The option Delete files after successful retrieval is enabled but grayed out and cannot by changed (reason for that not known). This is probably not we want here, because we want the file to stay. We will later see the possibility to change the flag when creating/configuring the business service.
- Click Next.

- Enter
Properties.xmlinto the File Name field and click Next. - Deselect the Native format translation is not required option.
- Enter
xsd/Properties.xsdinto the URL field. - Select properties in the Schema Element drop-down listbox.
- Click Next and then click Finish.
- Save the SOA project in JDeveloper.
This is all we have to do in JDeveloper to get the necessary artifacts describing the File adapter service. We can now go back to Eclipse OEPE and generate a business service based on the JCA metadata.
In Eclipse OEPE, perform the following steps:
- Refresh the
adapterfolder inside the OSB project.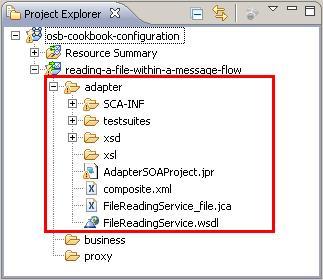
- Right-click on the
FileReadingService_file.jcafile and select Oracle Service Bus | Generate Service to generate a business service based on the JCA adapter definition. - Select the
businessfolder in the Select the location for the WSDL and Service tree. - Enter
FileReadingServiceinto the Service name and WSDL name field and click OK.The business service is generated. We could already use it like that. But we have to configure the adapter to not remove the file after reading it. In Eclipse OEPE, perform the following steps to configure the business service:
- Open the generated FileReadingService business service and navigate to the JCA Transport tab.
- Expand the Advanced Settings at the bottom of the window.
- Disable Always use configuration from JCA file and set the Delete File field value to
false.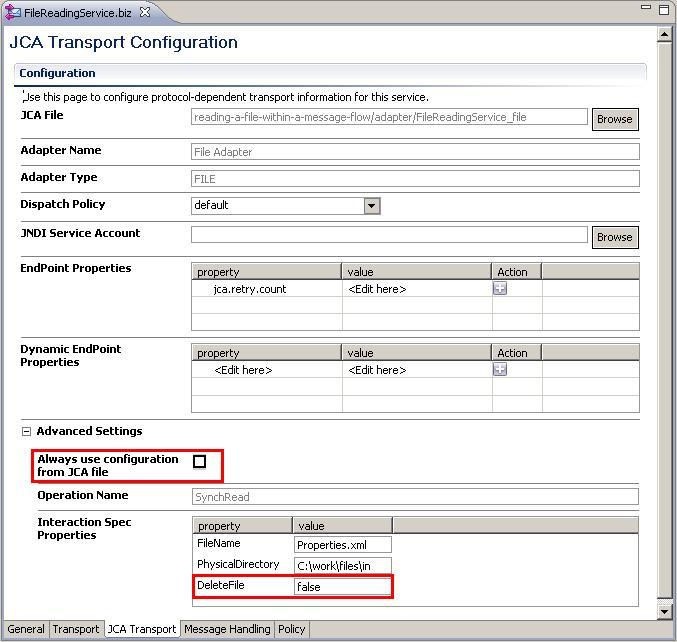
Next we will create the proxy service, which will invoke the business service generated previously, through a Service Callout action.
- Inside the
proxyfolder, create a new proxy service and name itFileReader. - Select Any XML Service for the Service Type option.
- Navigate to the Transport tab.
- Select http for the protocol drop-down listbox.
- Navigate to the Message Flow tab.
- Insert a Pipeline Pair action and name it
ReadFilePipelinePair. - Insert a Stage node into the Request Pipeline, and name it
FileReadStage. - In the FileReadStage stage, insert a Service Callout action.

- Navigate to the Properties tab of the Service Callout action, click Browse and select the FileReadingService business service.
- Select the SynchRead operation for the Invoking drop-down listbox.
- Select the Configure Payload Document option.
- Enter
fileRequestinto the Request Variable field andfileResponseinto the Response Variable field:
- Deploy the project to the OSB server.
- Copy the file
chapter-6getting-ready
eading-a-file-within-a-message-flowmiscProperties.xml
into thec: empinfilesfolder.Now we're ready to test the service. On the Service Bus console perform the following steps:
- In the Project Explorer navigate to the FileReader proxy service inside the
proxyfolder. - Click on the Launch Test Console icon and click Execute.
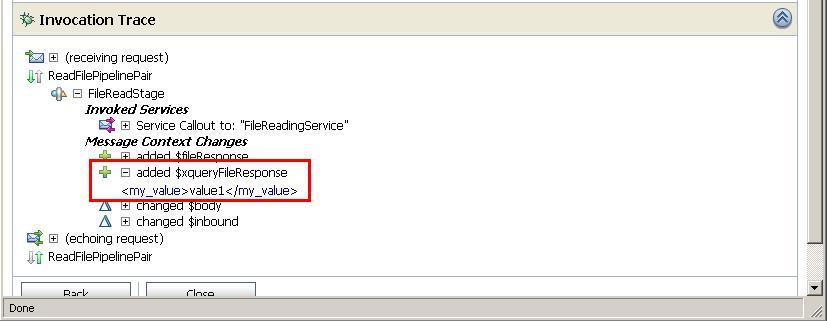
- Check the Invocation trace to see that the content of the file is available in the
fileResponsevariable.
In this recipe, we have used the File JCA adapter for reading files from the local filesystem (local to the OSB server) from within a message flow of a proxy service. With the File Transport, reading a file can only be used in a polling scenario, where a proxy service together with the File Transport constantly polls for new files to arrive and a new message flow is started for each file. So the file itself is the trigger when using the File Transport. When using the File JCA adapter, the operation on the file (write or read) is exposed as a service and being wrapped by an OSB business service it can be invoked as any other service. The JCA adapter actually creates a WSDL, which acts as the contract for the service, although behind the scenes, JCA is used as the protocol and not SOAP or HTTP.
We have used the Service Callout action to invoke the File adapter service, but we could have used a Routing action as well. Reading a file is typically only one of the (preparing) steps in a proxy flow and a Service Callout action needs to be used, as no further (request) actions can follow a Routing action in a message flow.
In this section, we show how to set file/folder names dynamically at runtime and how to read a file through an XQuery script, as an alternative to the File JCA adapter.
When going through the File adapter in JDeveloper, we have specified the file and directory name to be used for reading the file. These settings are used at runtime, if not overwritten by the invoker. To overwrite them, we can use the Transport Header action inside the Service Callout and specify some JCA-specific transport header properties.
In Eclipse OEPE, open the FileReader proxy service and perform the following steps:
- In the Request Pipeline of the Service Callout action, insert a Transport Header activity.

- On the Properties tab of the Transport Header action, click Add Header twice.
- Set the Defined drop-down list to jca and select the jca.file.FileName property with the following Set Header to expression:
data($body/configuration/location[1]/filename). - Set the Defined drop-down list for the second header again to jca and select the jca.file.Directory property with the following Set Header to expression:
data($body/configuration/location[1]/directory).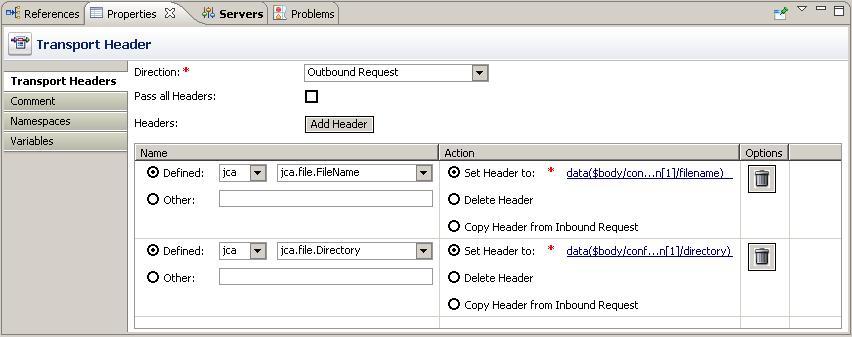
- Deploy the project to the OSB server.
- Copy the file
chapter-6getting-ready
eading-a-file-within-a-message-flowmiscOtherProperties.xml
into thec: empinfilesfolder.Now, let's test the change. In Service Bus console, perform the following steps:
- In the Project Explorer navigate to the FileReader proxy service inside the
proxyfolder. - Click on the Launch Test Console icon.
- Set the Payload field to the following value:
<configuration> <location> <directory>c:workfilesin</directory> <filename>OtherProperties.xml</filename> </location> </configuration> - Check the Invocation trace to see that the content of the file is available in the
fileResponsevariable.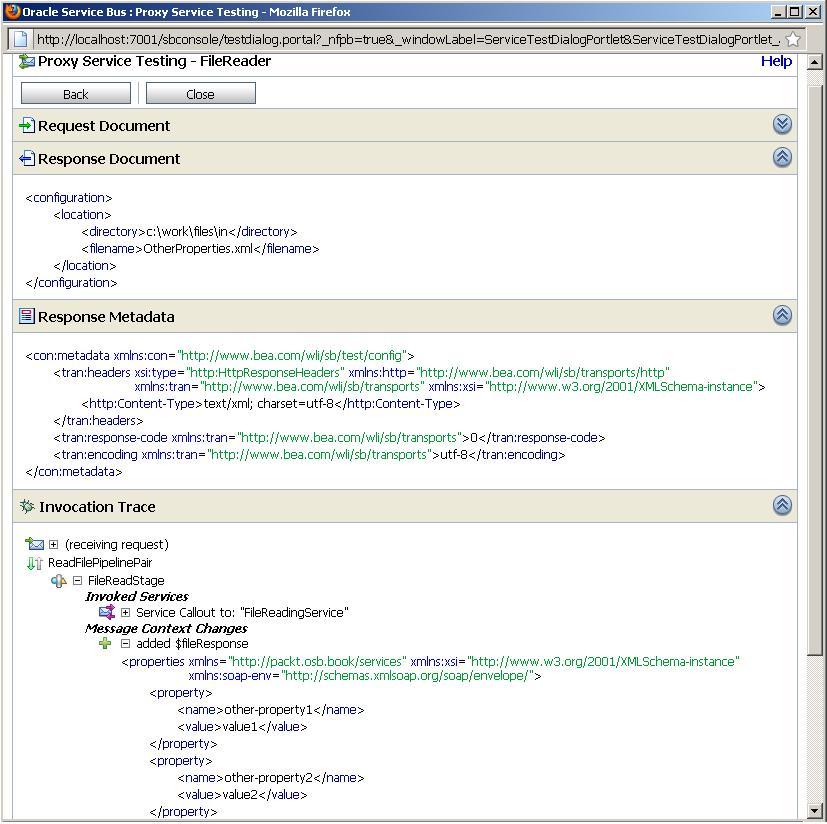
Another possibility for reading a file from the local filesystem from a proxy service is by using the XQuery doc function.
To read a file through XQuery, perform the following steps in Eclipse OEPE:
- Create a
xqueryfolder and copy the filechapter-6getting-ready eading-a-file-within-a-message-flowmiscReadFile.xqinto that folder.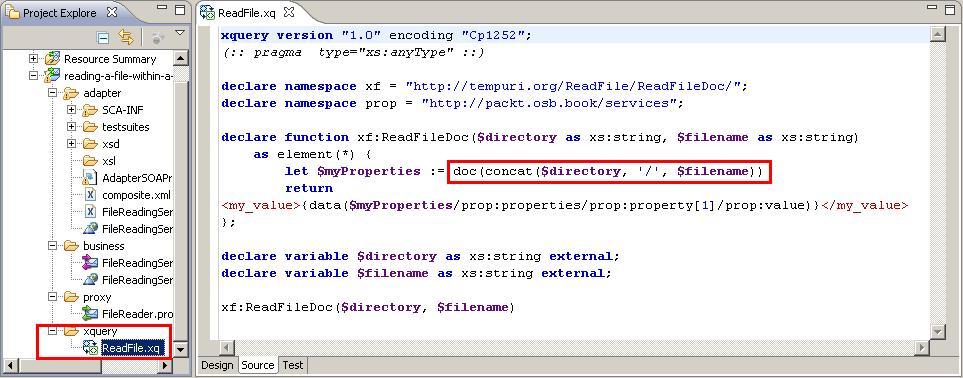
- Insert an Assign action into the FileReadStage.
- On the Properties tab of the Assign, type
xqueryFileResponseinto the Variable field. - Click on the <Expression>.
- Select the XQuery Resources tab and click Browse.
- Select the ReadFile.xq resource from the
xqueryfolder. - Enter
data($body/configuration/location[1]/directory)into the directory field. - Enter
data($body/configuration/location[1]/directory)into the filename field.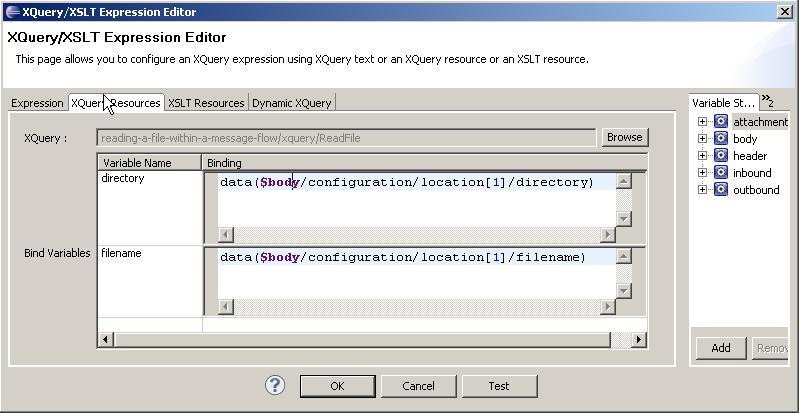
Now, let's test the change. In Service Bus console, perform the following steps:
- In the Project Explorer navigate to the FileReader proxy service inside the
proxyfolder. - Click on the Launch Test Console icon.
- Set the Payload field to the following value:
<configuration> <location> <directory>c:workfilesin</directory> <filename>OtherProperties.xml</filename> </location> </configuration> - Check the Invocation trace to see that the content of the file is available in the
xqueryFileResponsevariable.